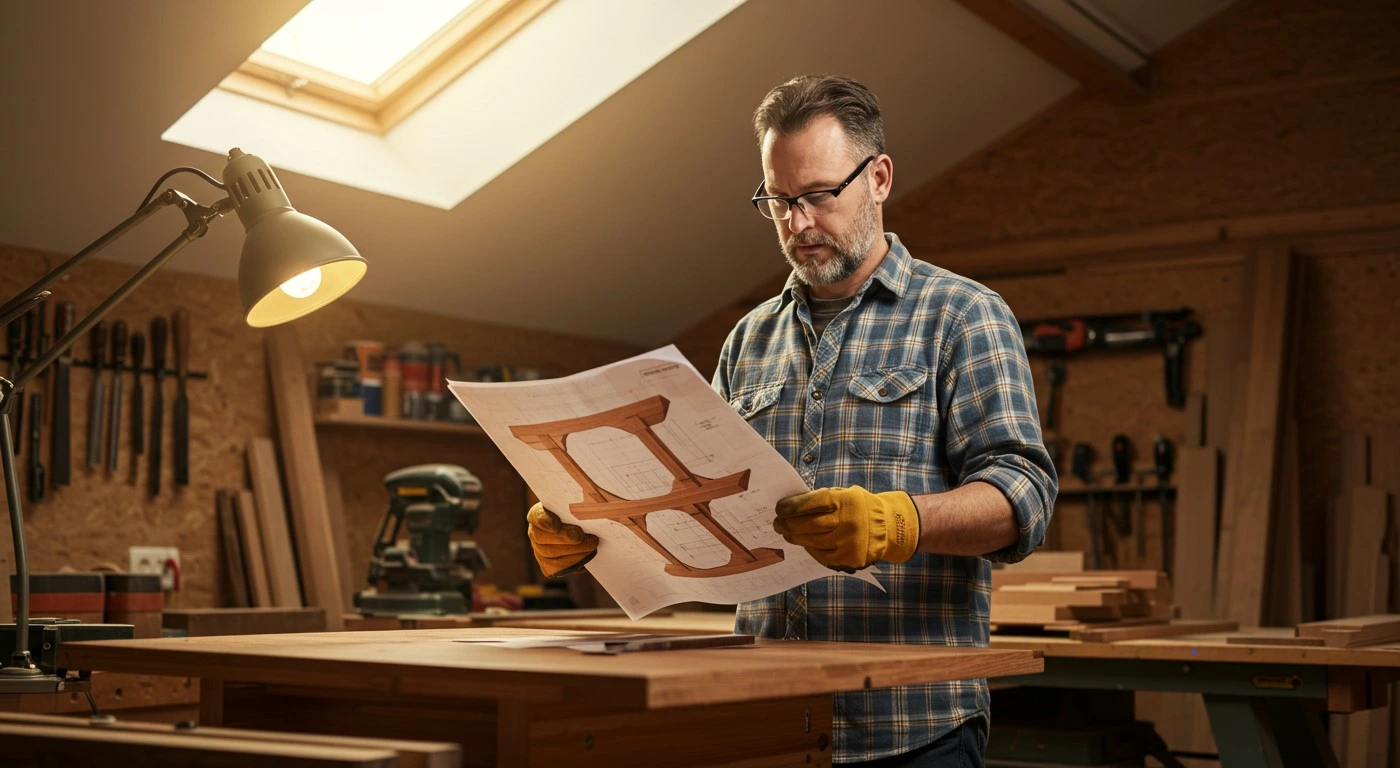
When you’re diving into woodworking, having effective woodworking table plans can make all the difference. Creating a successful woodworking project starts with a well-thought-out plan that guides you through the process. Here are some essential elements to consider that will help you create effective woodworking table plans.
1. Clear Objectives
Setting clear objectives is the first step in crafting your woodworking table plans. Ask yourself about the purpose of the table. Will it be a workbench, a dining table, or a decorative piece? Here are some considerations:
- Define the size based on usage and space available.
- Consider the style that fits your needs, whether modern, rustic, or traditional.
- Determine the load the table must support if it will bear significant weight.
2. Selecting Materials
Choosing the right materials is crucial. Different woods offer various benefits and aesthetics. Here are some popular options:
- Oak: Durable and resistant to wear, great for heavy-use tables.
- Pine: A more affordable option that is lightweight and easy to work with.
- Walnut: Offers a rich color and grain, perfect for stylish furniture.
Consider not only the visual appeal but also the properties of the wood you select.
3. Dimensions and Ratios
The dimensions of your table plans should be practical. Ensure you adhere to standard ratios that provide stability and comfort. Here are some common dimensions:
| Type of Table | Standard Height | Standard Width | Standard Length |
|---|---|---|---|
| Dining Table | 28-30 inches | 30-42 inches | 60-96 inches |
| Work Table | 30-36 inches | 24-48 inches | 48-72 inches |
4. Detailed Drawings
Once your ideas take shape, it’s time for detailed drawings. Sketching out your plans can help visualize the final product. You can use software like SketchUp or traditional graph paper to get precise measurements. Include the following in your drawings:
- Top view, side view, and front view.
- Measurements for each component.
- Joinery details, indicating how different pieces will connect.
5. Step-by-Step Instructions
Your woodworking table plans should have clear, step-by-step instructions. This ensures that anyone with basic woodworking skills can follow along. Include tips such as:
- Pre-drilling holes to avoid wood splitting.
- Using clamps for stability while assembling.
- Finishing touches like sanding and varnishing for durability.
6. Safety Measures
Safety cannot be overlooked. Ensure your plans include safety guidelines. Simple actions can protect you while working:
- Wearing safety goggles and masks when cutting or sanding.
- Checking tools and equipment for safety standards before starting.
- Ensuring your workspace is organized to prevent accidents.
7. Testing and Adjustments
Once the table is complete, it’s essential to test its stability and strength. You may need to make adjustments to ensure everything is secure and functional. Consider these points:
- Check for wobbling by placing the table on a flat surface.
- Use a level to ensure the surface is even.
- Test the weight capacity if the table is meant for heavy items.
Common Mistakes to Avoid When Designing Your Own Woodworking Table

Designing your own woodworking table can be an exciting journey. However, it can also lead to some common pitfalls that many woodworkers face. To create a functional and efficient workspace, you need to be aware of potential mistakes that could hinder your project. Here are some mistakes to avoid when designing your woodworking table.
Ignoring the Workspace Layout
One of the biggest errors is not considering the layout of your workspace. Before you start crafting your woodworking table, you should plan how it will fit into your area. Take into account the following:
- Your available space: Measure your workshop to understand how much room you can allocate.
- Accessibility: Ensure that you can reach all parts of the table easily. You don’t want to struggle to access tools and materials.
- Workflow: Position your table in a logical flow with other tools and equipment.
Neglecting the Table Size
Many woodworkers make the mistake of choosing the wrong table size. A woodworking table should be spacious enough to accommodate larger projects. However, it should also fit comfortably within your workspace. Here are some size considerations:
- Surface Area: Ensure that the top surface is ample — a bigger surface allows for more complex projects.
- Height: The height of the table must be comfortable for you. A standard height is about 30 inches, but it may vary based on your height.
Not Accounting for Stability
Stability plays a crucial role in woodworking. If your table wobbles, it can affect your precision. To achieve stability, focus on these aspects:
- Material Choice: Use solid materials like hardwood or plywood that offer durability.
- Leg Design: Incorporate wider legs or additional supports. You might also consider a torsion box construction for better stability.
Omitting Tool Storage
A woodworking table is not complete without storage options. Many designs go wrong by failing to include proper space for tools. Think about:
- Drawers: Incorporate drawers for smaller tools to keep them organized and close at hand.
- Shelves: Adding shelves can enable you to store larger equipment or materials.
Evaluate your most-used tools and ensure there is a designated spot for them in your design.
Ignoring Dust Collection
Woodworking can create a lot of dust and debris. Neglecting a dust collection system can turn your workspace into a mess. Consider the following options:
- Built-in Dust Ports: Design your table with built-in dust collection ports to connect to a vacuum system.
- Work Surface Material: Use materials that minimize dust buildup, making it easier to clean.
Overlooking Electrical Needs
In today’s woodworking, having power tools is essential. Yet many designers fail to consider their electrical needs. Here’s what you can do
- Power Outlets: Integrate outlets into your table design, so tools are easily accessible without long cords.
- Lighting: Consider where you will place your table and add adequate lighting to prevent shadows while you work.
Failing to Personalize the Design
Your woodworking table should reflect your personal style and working habits. Failing to customize can lead to a lack of motivation and efficiency. Here is how to make it unique:
Color and Finish: Choose finishes that appeal to you and match your workshop aesthetic.
Custom Features: Include jigs or clamps that cater to your specific projects or styles.
Building your woodworking table can be a rewarding experience when done correctly. Avoid these common mistakes to enhance your design and function. You can explore various woodworking table plans to guide your project at Wood Magazine or Rockler.
The Benefits of Custom Woodworking Tables for Home Workshops
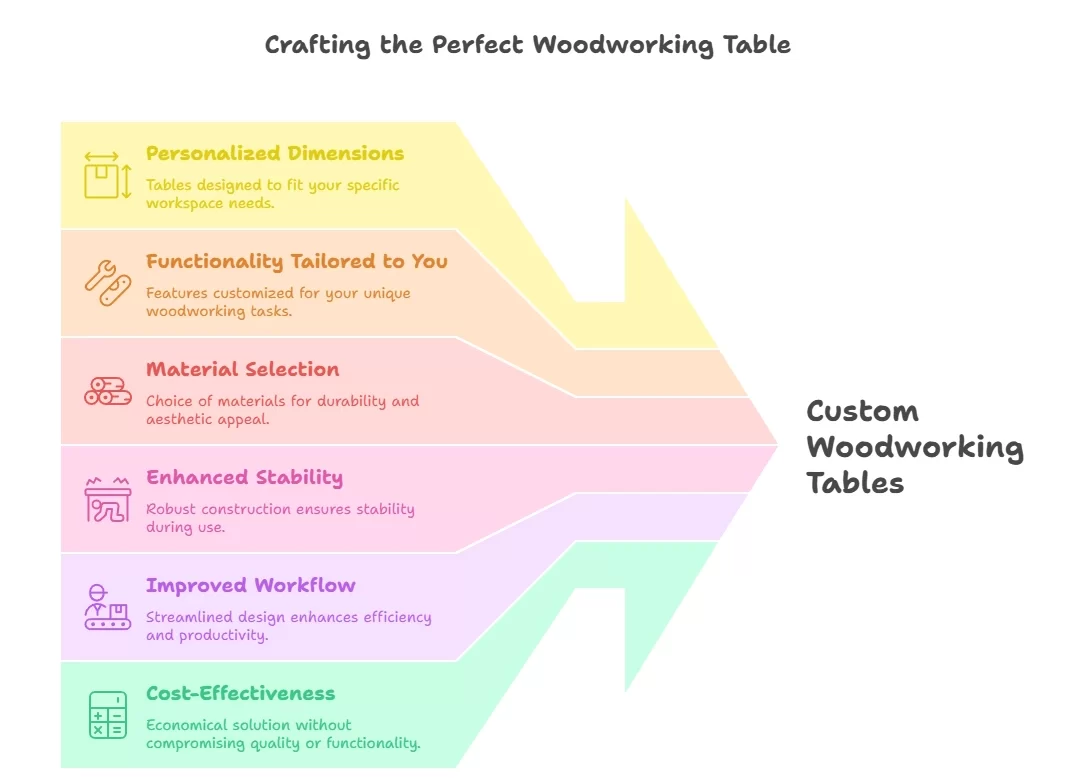
Creating a home workshop is an exciting venture, and one of the most vital components of this setup is a custom woodworking table. A woodworking table is not just a flat surface; it serves as the foundation for your projects, tools, and creativity. The benefits of having a tailored table can transform your woodworking experience, providing the functionality and comfort you need.
Personalized Dimensions
One of the standout advantages of a custom woodworking table is the ability to choose its dimensions. When you design your table, you can determine its height, width, and length based on your specific needs. This is particularly beneficial for:
- Ergonomics: A table that is tailored to your height can prevent strain during long hours of work.
- Available Space: You can optimize the dimensions based on your workshop’s layout to ensure maximum efficiency.
- Project Size: If you often work on larger projects, you can create a table that accommodates that extra space.
Functionality Tailored to You
Custom woodworking tables can be outfitted with specific features that enhance their utility. Consider incorporating:
- Built-in Storage: Drawers or cubbyholes to store tools and supplies can keep your workspace organized.
- Built-in Clamps: Features like integrated clamps can simplify holding workpieces securely.
- Power Outlets: Having built-in electrical outlets can make it easier to power tools without the clutter of extension cords.
Material Selection
When you design a table, you can choose materials that fit your style and budget. Different materials can affect the durability and aesthetics of your workspace. Common materials include:
- Hardwood: Offers durability and a beautiful finish, perfect for a classic look.
- Plywood: A cost-effective option that can be dressed up with veneer for a polished finish.
- Melamine: Provides a smooth surface that is easy to clean and maintain.
Enhanced Stability
A custom woodworking table can be designed to minimize wobble and enhance stability. Factors to consider include:
- Thickness of the Top: A thicker tabletop can resist flexing and handling pressure better.
- Leg Design: A sturdy leg design, such as a “T” or “A” frame, can improve stability when working with heavy materials.
- Weight Distribution: A well-designed table will have a center of gravity that keeps it grounded when using power tools.
Improved Workflow
Efficiency is essential in any workshop. A custom woodworking table can be designed to enhance your workflow. Here’s how:
- Workflow Zones: Design separate zones for cutting, assembly, and finishing to minimize movement.
- Proximity of Tools: Place frequently used tools within reach to reduce time spent searching for them.
- Dedicated Space for Materials: Allocate space for lumber, fasteners, and other materials close to your work surface.
Cost-Effectiveness
While it may seem that custom woodworking tables require a larger initial investment, they can be more cost-effective in the long run. Investing in a table that meets your needs reduces the risk of having to buy replacements or extra tools because your workspace isn’t suited for your projects.
Emotional and Creative Satisfaction
There’s an undeniable emotional aspect to a custom woodworking table. When you design your own workspace, it cultivates a sense of ownership and pride. This can foster a more enjoyable environment, stimulating creativity and motivation.
If you’re looking for woodworking table plans, there are several resources where you can find inspiration and detailed designs, such as Wood Magazine and Popular Woodworking. Both sites provide valuable insights, plans, and tips to guide you in creating your dream workspace.
Investing in a custom woodworking table can elevate your home workshop experience by providing you with a functional, personalized space that inspires creativity and efficiency. Don’t settle for generic when you can have a table that reflects your needs and style!
Popular Wood Types and Their Impact on Your Woodworking Projects

Choosing the right wood for your projects is crucial as it can significantly affect both the functionality and aesthetics of your work. Various wood types each possess unique characteristics that can influence the outcome of your woodworking endeavors. Understanding these woods can help you make informed choices that align with your project’s goals.
Softwoods: Versatile and Affordable
Softwoods are often seen as a go-to option for many woodworking projects due to their availability and ease of use. Here are some of the most popular softwoods:
- Pine: An economical choice with a light yellow color, it is easy to work with, making it ideal for beginners.
- Spruce: Known for its excellent sound clarity, spruce is a popular choice for musical instruments and lightweight structures.
- Cedar: With a natural resistance to decay, cedar is perfect for outdoor furniture and garden structures. Its aromatic properties add a pleasant scent to any project.
- Fir: Commonly used in framing and construction, fir provides strength and durability.
Hardwoods: Beauty and Durability
Hardwoods are prized for their dense structure and stunning appearances. They often come from deciduous trees, and here are some notable hardwoods:
- Oak: Available in red and white varieties, oak is strong, durable, and resistant to wear. Its grain pattern adds beauty, making it a popular choice for furniture.
- Maple: Known for its hardness and fine grain, maple is great for cabinets and flooring. It can be stained or left natural for a lovely finish.
- Cherry: With a rich color that deepens with age, cherry wood is favored for its beauty in cabinetry and fine furniture.
- Walnut: This dark, luxurious wood is often used in high-end furniture. Its rich color and beautiful grain make it an excellent choice for statement pieces.
Impact on Project Outcomes
The type of wood you choose can change not only the looks but also the durability and longevity of your project. Here are some aspects to consider:
| Wood Type | Suitability | Working Difficulty | Aesthetic Appeal |
|---|---|---|---|
| Pine | Beginner Projects | Easy | Moderate |
| Oak | Furniture, Flooring | Moderate | High |
| Maple | Cabinets, Toys | Moderate | High |
| Walnut | High-End Furniture | Hard | Very High |
Environmental Considerations
When selecting wood, consider its environmental impact. Sustainable sourcing becomes paramount to minimize deforestation and habitat destruction. Look for wood that is certified by organizations like the Forest Stewardship Council (FSC) or the Programme for the Endorsement of Forest Certification (PEFC).
Local vs. Exotic Woods
Local woods, like oak and pine, can offer more cost-effective options and lower environmental footprints. However, exotic woods, such as teak and mahogany, may provide striking aesthetics but come with higher prices and conservation concerns. Deciding whether to use local or exotic wood should align with your project’s budget and ethical standards.
Ultimately, the choice of wood will depend on your project’s requirements and your personal preferences. Understanding the unique characteristics of wood types can empower you to make better decisions. For more guidance on choosing the right wood for your projects, consider exploring resources at Wood Magazine or Woodworker’s Source.!
Innovative Storage Solutions for Woodworking Tables and Workspaces

For woodworking enthusiasts, having a well-organized workspace is essential for creativity and efficiency. Innovative storage solutions can make a huge difference in how you manage your tools and materials. By optimizing your workspace, you can ensure that everything is easily accessible, which ultimately enhances your productivity. Here are some clever ways to improve storage in your woodworking area.
Utilizing Vertical Space
One major area where you can gain storage is the vertical space in your workshop. Using walls effectively allows you to keep tools and supplies off the ground and within easy reach. Consider installing:
- Wall-mounted tool racks: These can hold hand tools like saws, hammers, and screwdrivers.
- Magnetic strips: Perfect for organizing metal tools, keeping them visible and easy to access.
- Pegboards: This versatile option lets you customize the layout to suit your needs.
Creative Use of Drawers and Cabinets
While many opt for large tool chests, built-in cabinets and custom drawers can provide streamlined storage solutions. Here’s what to consider:
- Deep drawers: Great for larger tools, deep drawers can store cords and small power tools safely.
- Pull-out shelves: These allow easy access to items tucked away in the back.
- Clear front bins: Using bins with clear fronts lets you quickly identify contents without rummaging through.
Mobile Storage Options
Having storage that can be moved offers incredible flexibility. You can arrange your workspace as needed. Here are some mobile storage solutions:
- Tool carts: Carts on wheels can hold frequently used tools and supplies, making it easy to transport your workspace.
- Rolling cabinets: These provide cabinet storage combined with mobility for large tools.
- Workbench with built-in storage: This combines your work surface with storage space, keeping everything organized and close at hand.
Stackable Storage Units
Stackable storage systems allow you to maximize floor space while maintaining organization. Whether you’re storing materials or tools, stacking can help create an orderly environment. Consider:
- Modular containers: These can be customized as per your needs to store various materials, from screws to larger pieces of wood.
- Stackable bins: Easy to label and access, these bins keep your workspace tidy.
Using Labels and Color Codes
Keeping everything designated helps further streamline your woodworking process. Use color-coded labels for sections, drawers, or bins based on type or size. This will help you locate tools quickly, thereby increasing efficiency. Consider these tips:
- Label bins by size and type: For example, categorize tools as ‘saws’, ‘drills’, etc.
- Use different color labels: This speeds up the identification process, allowing you to find tools faster.
Investing in Quality Tool Storage
When you invest in storage solutions, you ensure the longevity of your tools. Durable storage can prevent damage and offer protection against humidity. Some options include:
- Plastic tool boxes: Excellent for portability and protection from the elements.
- Wooden tool chests: A timeless choice that can add aesthetic value and durability.
For those seeking woodworking table plans that integrate storage features, consider visiting Wood Magazine for insightful plans and designs. You can also explore Popular Woodworking for inspiration and tutorials. These sites offer a wealth of knowledge that can help transform your workspace into an organized haven.
Remember that your ideal woodworking setup is a personal choice—what works for one person may not be ideal for another. Adjust these storage solutions to fit your specific needs and preferences. The goal is to create an inviting work environment that encourages creativity and efficiency.
Conclusion
Creating woodworking table plans that cater to your specific needs involves understanding several key elements. By focusing on functionality, aesthetics, and ergonomics, you can design a table that not only serves its purpose but also enhances your workspace. Avoiding common mistakes, like neglecting dimensions or material choices, is crucial to ensure your projects turn out as planned.
Custom woodworking tables provide numerous advantages to home workshops, from optimizing available space to fostering creativity. Choosing the right wood types can significantly affect the outcome of your projects, impacting durability and appearance. Knowing whether to use hardwood or softwood, for instance, can be the difference between a long-lasting table and one that requires constant repairs.
Moreover, innovative storage solutions can transform a cluttered workshop into an organized haven. Integrating features like drawers, shelves, and tool racks not only increases efficiency but also makes your workspace more enjoyable to use. Ultimately, a well-thought-out woodworking table plan enhances your skills and encourages more ambitious projects.
By considering the elements discussed—while steering clear of common pitfalls—you can build a woodworking table that serves not just as a work surface but as the heart of your workshop. Invest time into planning and designing your tables to reap the rewards in your woodworking journey. Happy crafting!