
Achieving a smooth, flawless finish on a woodworking project requires more than just steady hands and quality materials. Mastering various woodworking sanding techniques is crucial for preparing surfaces, removing imperfections, and enhancing the wood’s natural beauty. Whether you’re a beginner or have some experience, understanding the right sanding methods can significantly improve your results and make finishing much easier.
Choosing the Right Sandpaper Grit
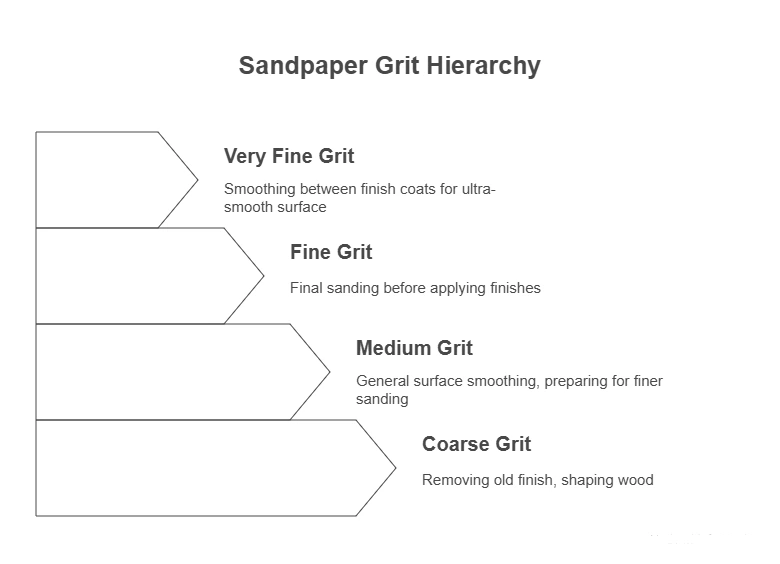
Sandpaper grit plays a major role in the sanding process. Grit size ranges from coarse to very fine, and selecting the correct grit for each step ensures a smooth finish without scratches or uneven surfaces. Here’s a quick guide:
| Grit Range | Purpose |
|---|---|
| 40-60 (Coarse) | Removing old finish, shaping wood, or sanding rough surfaces |
| 80-120 (Medium) | General surface smoothing and preparing wood for finer sanding |
| 150-180 (Fine) | Final sanding before applying finishes like stain or varnish |
| 220 and up (Very Fine) | Smoothing between coats of finish for an ultra-smooth surface |
Start with a coarser grit to remove any rough spots, then gradually progress to finer grits to refine the surface texture. Avoid skipping grits because it can leave scratches that are difficult to remove later.
Sanding Techniques for Different Wood Types
Softwoods like pine and cedar tend to absorb sanding marks more easily, so it’s essential to use gentle, even pressure when sanding. Hardwoods like oak or maple usually require a more robust approach, as they are denser and contain open grain patterns that benefit from careful sanding to avoid blotchiness when applying finishes.
Grain Direction Matters
Always sand with the grain of the wood, not against it. Sanding cross-grain can create visible scratches that remain after the finish is applied. For curved or intricate areas, use flexible sanding pads that contour to the surface or hand sand these parts with fine grit paper.
Hand Sanding vs. Power Sanding
Both hand sanding and power sanding have their places in woodworking projects, and knowing when to use each will help you achieve the best results.
Hand Sanding
- Ideal for delicate or detailed areas where power tools might cause damage
- Allows for better control over pressure and angle
- Essential for finish sanding to remove minor imperfections after power sanding
Power Sanding
- Great for quickly removing material or smoothing large surfaces
- Random orbital sanders reduce swirl marks and are user-friendly
- Use caution to prevent sanding too deeply and unevenly
Proper Sanding Practices for Smooth Finishes
To maximize the effectiveness of your sanding, follow these practical tips:
- Clean Between Grits: Wipe the surface with a tack cloth or vacuum dust to prevent grit contamination that can scratch the wood.
- Keep Sandpaper Clean: Remove dust buildup from sandpaper frequently using a sandpaper cleaning stick.
- Use a Sanding Block: When hand sanding flat surfaces, use a sanding block to maintain even pressure and avoid rounding edges.
- Apply Light Pressure: Heavy pressure can cause gouges or waves in the wood.
- Check Your Progress: Regularly run your hand over the surface to feel for smoothness and spot areas needing more attention.
Dealing with Complex Shapes and Curves
Wood pieces with ornate details or curves require special care. Flexible sanding sponges or strips work better than rigid sandpaper sheets because they conform to shapes easily. For very tight spaces, consider using small sanding sticks or folded sandpaper to reach intricate areas.
Creating a Finish-Ready Surface
Once you have completed sanding through the recommended grit progression, the wood surface should feel smooth and show no visible scratches. This stage is critical before applying any stain, paint, or varnish because the finish will amplify any imperfections left behind.
Additional Resources for Enhancing Your Sanding Skills
For more detailed information and tutorials on woodworking sanding techniques, you can visit Wood Magazine or explore expert guides at Popular Woodworking. These sites offer step-by-step advice and product recommendations to cater to all levels of woodworking enthusiasts.
Mastering woodworking sanding techniques will set the foundation for projects that look professional and last long. With patience and the right approach, sanding can transform rough lumber into fine furniture and art that you take pride in.
Choosing the Right Sandpaper Grit for Every Woodworking Project
Understanding Sandpaper Grit Numbers
When working with wood, selecting the proper sandpaper grit is critical to achieving a smooth finish and preventing damage. Sandpaper grit refers to the number of abrasive particles per square inch of sandpaper. The lower the grit number, the coarser the sandpaper. Conversely, a higher number means the sandpaper is finer and smoother. For woodworking sanding techniques, knowing which grit level to use at each stage ensures your project progresses smoothly and efficiently.
Coarse Grits: The Rough Start
Begin most woodworking projects with coarse grit sandpaper, ranging from 40 to 60 grit. This stage removes rough surfaces, old finishes, or sizable imperfections such as dents or glue residue. Coarse sandpaper cuts through wood quickly and prepares the surface for finer sanding. However, using too coarse a grit for delicate wood can cause deeper scratches, which can be difficult to remove later. It’s best to reserve coarse grits for raw or heavily damaged wood.
Medium Grits: Shaping and Smoothing
Once the rough spots are gone, move to medium grit sandpaper, typically between 80 and 120 grit. This range is perfect for shaping edges, rounding corners, and smoothing out the scratches left by the coarse grit. Medium grit sandpaper balances material removal with surface smoothing. It’s the most versatile grit for general sanding and pre-finish preparation, ensuring the wood looks even without overly scratching the surface.
Fine Grits: Achieving a Polished Surface
To prepare wood for staining, sealing, or painting, fine grit sandpaper in the range of 150 to 220 is essential. This grit removes the scratches made by medium grit sandpaper and polishes the wood’s surface, allowing finishes to adhere consistently. When sanding between coats of finish, you’ll want to use very fine grit (often 220 to 320 grit) to smooth out dust particles or bubbles without stripping the finish completely.
Extra-Fine and Ultra-Fine Grits: Final Touches
For projects requiring an ultra-smooth finish, especially with high-gloss paints or clear coats, extra-fine grits between 320 and 600 or even higher are used. These grits remove extremely fine scratches and help create a mirror-like surface. You can also use ultra-fine grit wet/dry sandpaper, which works well for meticulous sanding by hand or with sanding blocks.
Grit Selection for Different Wood Types
Softwoods like pine or cedar absorb scratches more easily, so you might want to avoid starting with very coarse grits unless the wood is heavily damaged. Starting around 80 or 100 grit can reduce the risk of deep gouges. Hardwoods like oak or maple tolerate coarser grits better, giving you more flexibility during sanding.
| Sandpaper Grit | Purpose | Wood Type Recommendation |
|---|---|---|
| 40-60 | Removing rough surfaces, old finishes, and heavy material removal | Hardwoods (only if heavily damaged); Avoid on softwoods unless necessary |
| 80-120 | Shaping, smoothing rough patches | Both softwoods and hardwoods |
| 150-220 | Preparing surface for finish, smoothing scratches | Both softwoods and hardwoods |
| 320-600+ | Ultra-smooth finishing, between coats sanding | Both, especially for fine finishing |

Additional Tips for Effective Sanding
- Always sand with the grain: Sanding against the wood grain creates scratches that can ruin the final finish.
- Progress gradually: Move through grit numbers step-by-step to avoid deeper scratches and achieve a smooth surface.
- Use sanding blocks or power sanders: This ensures even pressure and avoids gouging.
- Keep sandpaper clean: Clogged sandpaper reduces effectiveness and can damage wood.
- Test on scrap wood: Before working on your project, test the sandpaper grit on a scrap piece to see the effect.
Where to Find Quality Sandpaper
Choosing the right sandpaper brand also matters. For a reliable selection of sanding materials suited for woodworking, consider checking out Mueller Industries. They offer a wide range of grit options perfect for various woodworking needs. Additionally, Woodcraft provides expert-grade sandpaper designed specifically for woodworking projects.
Mastering Your Woodworking Sanding Techniques
By choosing the right sandpaper grit for each stage of your woodworking project, you ensure a smooth, professional finish every time. Correct grit selection saves time, reduces frustration, and helps prevent costly surface errors. Remember to adapt grit choice based on wood type, project stage, and finish requirements. This knowledge forms the foundation of excellent woodworking sanding techniques that deliver beautiful and durable results.
Hand Sanding vs. Power Sanding: Pros and Cons
Evaluating the Differences Between Hand Sanding and Power Sanding
When working on woodworking projects, choosing the right sanding method is essential for achieving a smooth, professional finish. Both hand sanding and power sanding have distinctive advantages and disadvantages that you should consider based on your project’s size, detail, and material.
Benefits of Hand Sanding
Hand sanding allows for unmatched control and precision. If your project involves intricate details, tight corners, or delicate surfaces, this method lets you work with a gentle touch to avoid damage. Here are some key advantages:
- Precision: Hand sanding enables careful attention to edges, grooves, and curves where power tools may be too aggressive.
- Surface Protection: It reduces the risk of over-sanding and unwanted removal of material, preserving the original shape of delicate pieces.
- Control: You can easily adjust pressure and direction, which is great for achieving an even finish on smaller or oddly shaped parts.
- Cost-Effective: This method requires minimal equipment—just sandpaper and a sanding block—making it budget-friendly for hobbyists and beginners.
However, hand sanding does have its challenges. It can be time-consuming and physically demanding, especially on larger surfaces. It’s less efficient for projects that require removing lots of material or smoothing extensive flat areas.
Advantages of Power Sanding
Power sanding tools, such as orbital sanders, belt sanders, and detail sanders, offer speed and efficiency unmatched by manual labor. They are particularly useful for larger woodworking projects or rough surfaces that need significant smoothing.
- Speed: Power sanders dramatically reduce the time needed to smooth surfaces, especially on large, flat panels.
- Consistency: These tools maintain uniform pressure and motion, resulting in an even sanding job across extensive areas.
- Versatility: Different types of sanders are available to suit various tasks, from aggressive material removal to fine finishing touches.
- Ergonomics: Power tools reduce the physical strain compared to the repetitive motion of hand sanding.
Despite these benefits, power sanding requires experience to avoid common pitfalls. Over-sanding, gouging, or uneven surfaces can occur if the tool is not handled properly. Additionally, power sanding often generates more dust, so using proper protective gear and dust collection systems is important.
Hand Sanding and Power Sanding: When to Use Which?
Choosing between hand sanding and power sanding often depends on the project requirements:
| Project Aspect | Hand Sanding | Power Sanding |
|---|---|---|
| Project Size | Small or detailed work | Large surfaces or whole panels |
| Surface Details | Intricate edges and curves | Flat, accessible areas |
| Finish Quality | Fine finishing and touch-ups | Initial material removal and bulk smoothing |
| Time Efficiency | More time-consuming | Faster completion |
| Physical Effort | Higher manual effort | Less physical effort |
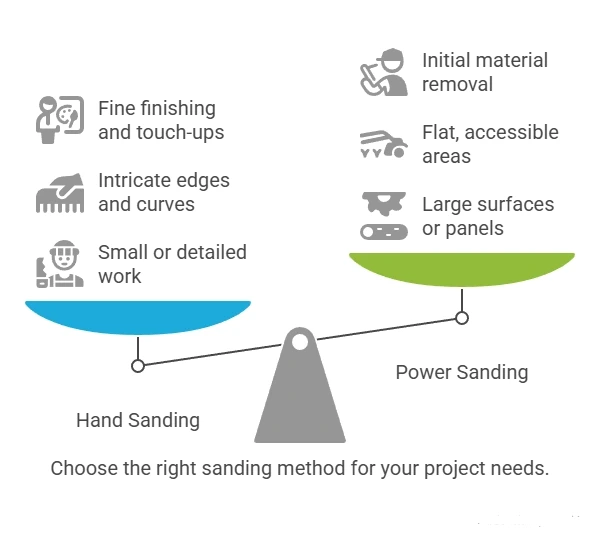
By understanding these factors, you can decide which sanding technique better suits your woodworking project. For intricate cabinetry, hand sanding might deliver the finest results, while furniture making and flooring benefit from the speed and consistency of power sanding.
Combining Both Techniques for Optimal Results
Many woodworkers find the best approach is to combine both methods. Start with power sanding to remove rough surfaces and flatten large areas, then switch to hand sanding for fine details and polishing the finish.
- Begin with coarse grit on a power sander to level the wood.
- Use medium grit to smooth the surface evenly.
- Switch to hand sanding with fine grit sandpaper for final finishing, focusing on corners, edges, and surface imperfections.
This strategy leverages the efficiency of power sanding and the precision of hand sanding, ensuring your project looks impeccable.
Additional Tips to Enhance Your Sanding Techniques
- Choose the right grit: Progress through grit sizes from coarse to fine to avoid scratches and provide an even finish.
- Keep sandpaper clean: Clogged sandpaper reduces efficiency and can damage the wood surface.
- Sand with the grain: Always move sandpaper in the direction of the wood grain to prevent scratches and marking.
- Use good lighting: Adequate lighting helps you spot rough spots or inconsistencies while sanding.
For more detailed techniques and tool recommendations, visit Wood Magazine’s guide on sanding methods. Additionally, Popular Woodworking offers valuable tutorials on perfecting your sanding skills.
Choosing the right sanding method is about balancing speed, control, and finish quality. Understanding the pros and cons of hand sanding and power sanding ensures you deliver woodworking projects that stand out for their craftsmanship and beauty.
Tips for Sanding Curves and Intricate Wood Shapes
Mastering the Art of Sanding Curves and Intricate Wood Shapes
Sanding curves and intricate wood shapes can be challenging, but with the right techniques, you can achieve a smooth, professional finish. Unlike flat surfaces, curved and detailed pieces often require more patience and careful sanding to avoid uneven spots or damage to delicate areas. Whether you’re working on a rounded chair leg, a decorative trim, or a finely carved wooden ornament, these strategies will help you perfect your woodworking project.
Choosing the Right Sandpaper and Grits
One critical factor in sanding curves is selecting the appropriate sandpaper types and grits. For delicate curves and fine details, using a very flexible and thin sandpaper is essential. This allows the paper to conform to contours and reach tight spots more easily.
- Coarse grit (60-80): Use this grit only if the piece has rough edges or requires shaping before smoothing.
- Medium grit (100-150): Ideal for smoothing minor roughness in curves and preparing wood for fine sanding.
- Fine grit (180-220): Perfect for finishing touches and ensuring a flawless surface before applying any finish or stain.
Start with coarser grits if needed but always transition gradually to finer grits to avoid deep scratches that can be difficult to remove later.
Using the Right Tools to Sand Curves Effectively
Working with curves means preferring tools that can adapt and fit into small or complex shapes. While hand sanding with sandpaper wrapped around a flexible block is a common method, sometimes specialty tools can make your job easier.
- Sanding sponges: These are flexible and conform well to curves, providing a consistent sanding pressure.
- Detail sanding tools: Electric detail sanders come with small triangular pads or narrow tips to access tight corners and intricate designs.
- Drum sanders: For intricate shapes on a lathe or where precision is key, a small drum sander attachment can be very effective.
- Hand sanding sticks: You can create or buy thin sticks covered in sandpaper to reach inside grooves and small areas.
Techniques to Avoid Damage and Achieve Even Results
When sanding curves, it’s important to avoid flattening or over-sanding certain areas. Here’s how to maintain the integrity of your design:
-
-
- Sand with the grain: Even on curves, try to follow the wood grain whenever possible, going around the shape gently to avoid scratches.
- Use light, consistent pressure: Heavy sanding can create flat spots or uneven surfaces on your curves.
- Rotate the piece: Frequently change the position of your project to ensure all angles are smoothed evenly.
- Use a flexible sanding block: Wrap your sandpaper around a foam sanding block that can conform to the shape but still allow controlled pressure.
-
Patience is key. Take your time to feel the surface and make adjustments rather than rushing through. Smooth transitions between flat and curved surfaces often require repeated sanding and checking.
How to Sand Different Curve Types
| Curve Type | Recommended Approach | Tools & Tips |
|---|---|---|
| Gentle, Large Curves | Wrap sandpaper around a soft, rounded sanding block. | Use medium to fine grits; maintain even pressure and sand with the grain. |
| Tight Curves | Use hand sanding sticks or detail sanders. | Select thin, flexible sandpaper; work slowly around the curve to avoid flattening. |
| Intricate Carvings | Use flexible sanding sponges and small sanding tools. | Light pressure, multiple finer grits, and careful rotation to reach tiny crevices. |
| Concave Areas | Use folded sandpaper or sandpaper on foam to fit the hollow space. | Avoid applying excessive pressure to prevent rounding the edges unintentionally. |
Additional Tips for Perfecting Curved Wood Surfaces
- Wet sanding: For some finishes and hardwoods, slightly dampening the sandpaper can reduce dust and help smooth the surface without clogging the paper.
- Check with touch, not just sight: Run your fingers over the surface regularly to feel for rough spots or inconsistencies.
- Use tack cloth: After each sanding step, wipe the surface to remove dust that can create a rough finish.
- Mask delicate embellishments: If your piece has delicate painted or inlaid areas, protect them with painter’s tape before sanding nearby curves.
Applying these tips can transform your approach, especially when dealing with complex shapes that demand a delicate, meticulous touch.
For a deeper dive into professional woodworking and finishing techniques, visit Wood Magazine, a great resource full of expert guides and project ideas.
Ultimately, mastering woodworking sanding techniques for curves and intricate shapes requires a balance of the right tools, patience, and careful technique. Following these guidelines will help you achieve smooth, clean surfaces that highlight the beauty of your handcrafted pieces.
Common Sanding Mistakes and How to Avoid Them in Woodworking
Understanding the Importance of Proper Sanding in Woodworking
Sanding is a crucial step in woodworking that impacts the final look and feel of your project. When done correctly, sanding can bring out the natural beauty of wood and prepare surfaces for staining or finishing. However, many woodworkers, especially beginners, make common sanding mistakes that can ruin the surface quality or waste time and materials.
Common Sanding Mistakes to Watch Out For
Avoiding these frequent errors will help you achieve a smooth and professional finish in your woodworking projects.
- Starting with Sandpaper That’s Too CoarseJumping straight into a very coarse grit sandpaper may remove material quickly, but it also leaves deep scratches that are hard to eliminate later. It’s better to start with a medium grit, like 120, for most woodworking surfaces, especially softwoods. Use coarser grits, such as 60 or 80, mainly for rough stock removal.
- Skipping Grits in the Sanding SequenceTransitioning abruptly from a coarse grit to a very fine one often leaves scratches from the coarse grit visible even after sanding. The best approach is a gradual progression through grits – for example, 80 → 120 → 180 → 220. This process smooths the wood effectively without carrying over scratches.
- Applying Excessive Pressure While SandingPushing too hard on the sandpaper can cause uneven sanding and even damage delicate wood fibers. Using light, consistent pressure lets the abrasive do its job efficiently without gouging the wood. This method also prevents premature wear of sandpaper, saving you money.
Techniques That Improve Sanding Results
Use the Right Sanding Tools
Choosing the correct tool matters. For flat surfaces, an orbital sander ensures even sanding with minimal cupping or uneven spots. Hand sanding works best for intricate shapes or edges but requires practice for smoothness. When sanding curved or detailed surfaces, fine sanding sponges or flexible pads can reach spots sandpaper can’t.
Sand with the Grain, Not Against It
Sanding with the wood grain helps preserve the natural texture and avoids unsightly scratches that run perpendicular to the grain. Always inspect your work visually in good lighting to ensure your sanding strokes follow the grain pattern.
Keep Sandpaper Clean and Replace When Needed
Clogged and worn sandpaper reduces sanding efficiency and can create uneven surfaces. Clean sandpaper regularly by tapping it gently or using a specialized abrasive cleaning stick. Replace the sheets once you notice they no longer abrade properly.
Use a Sanding Block or Pad
Wrapping sandpaper around a sanding block keeps the sandpaper flat and prevents your fingers from creating ridges or dips in the wood. This simple tool makes a huge difference in achieving even pressure and consistent results.
Additional Tips to Avoid Sanding Errors
- Inspect frequently: Stop and check your work often to catch any sanding mistakes before they become harder to fix.
- Keep the surface clean: Dust can settle into scratches and interfere with finish adhesion — wipe or blow off particles after sanding.
- Sand in a well-lit area: Proper lighting reveals imperfections early, so you can adjust your sanding technique.
Choosing the Appropriate Sandpaper Grit for Each Stage
| Grit Range | Purpose | Recommended Usage |
|---|---|---|
| 40-60 (Coarse) | Rapid material removal | Removing old finishes, leveling rough timber |
| 80-120 (Medium) | Surface smoothing | General sanding to remove marks and prepare wood for fine sanding |
| 150-180 (Fine) | Pre-finishing smoothing | Final passes on raw wood before staining or finishing |
| 220+ (Very Fine) | Surface polishing | Between coats of finish for smooth touch-ups |
Helpful Resources for Improving Woodworking Sanding Skills
To deepen your sanding technique knowledge, resources like Wood Magazine’s sanding tips offer practical advice. Additionally, The Family Handyman provides detailed step-by-step processes clarifying sanding mistakes to avoid.
Implementing smart sanding techniques not only saves you time but elevates the elegance and longevity of your woodworking projects. Paying close attention to grit selection, sanding direction, and tool choice will transform your work, delivering flawless surfaces ready for finishing. Whether a hobbyist or professional, refining your sanding skills is foundational to crafting standout wood pieces.
Conclusion
Mastering woodworking sanding techniques is key to achieving flawless, professional-quality finishes on your projects. Understanding how to select the right sandpaper grit ensures that you remove imperfections without damaging the wood surface. Whether you choose hand sanding for delicate control or power sanding for speed, knowing the benefits and limitations of each method helps you work smarter, not harder.
When working with curves and intricate shapes, adopting specialized sanding approaches prevents rounding edges or uneven surfaces, preserving the design’s integrity. Avoiding common sanding mistakes—like using too coarse grit too long or neglecting to clean dust between passes—will save you time and frustration while improving the overall look of your piece.
By applying these proven sanding strategies, you’ll enhance both the beauty and durability of your woodworking projects, making each piece a source of pride. Remember, sanding is more than just a step—it’s an art that brings your woodwork to life with smoothness and finesse.