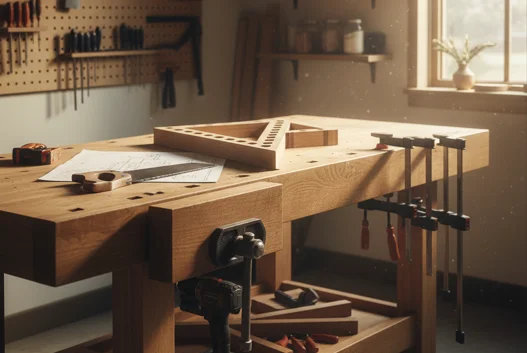
When it comes to crafting quality woodworking projects, having the right workbench is essential. A well-designed workbench serves as a reliable foundation for various tasks, so understanding effective Woodworking Plans Workbench is crucial. Here are some essential features to look for when choosing or designing a workbench for your workbench.
Sturdy Construction
The foundation of any effective workbench is its sturdiness. A solid workbench can withstand pounding, cutting, and drilling without wobbling. When looking for plans, ensure they suggest quality materials such as hardwood or plywood that offer both weight and stability. A plan should clearly identify the dimensions and type of wood required to create a robust structure.
Optimal Dimensions
The size of your workbench should suit your workspace. Effective woodworking plans will outline dimensions based on your specific needs. Here are some typical dimensions:
- Length: 60 to 72 inches
- Width: 24 to 36 inches
- Height: 30 to 40 inches
Your height will depend on your comfort level while working. A well-planned workbench allows you to work without straining your back or arms.
Flexible Design
Your woodworking projects will vary, so a flexible design is beneficial. Plans should incorporate features that allow for adjustments and modifications. Consider designs that:
- Include adjustable height options
- Feature modular components that can be added or removed
- Support various tools and clamps for different tasks
A flexible design keeps your workbench relevant and useful for years to come.
Built-In Storage Solutions
An effective workbench is not just a flat surface; it should also include storage options to keep your workspace organized. Look for plans that feature:
- Drawers for small tools and accessories
- Open shelves for larger items
- Magnetic strips or pegboards for easy access to frequently used tools
Storage solutions helps you maintain a tidy work area, enhancing efficiency and productivity.
Ease of Assembly
If you’re a beginner, complicated plans can be daunting. Choose Woodworking Plans Workbench that are straightforward and easy to follow. A comprehensive plan should provide:
- Clear step-by-step instructions
- Detailed illustrations or diagrams
- A list of necessary tools and materials
Plans that adhere to these guidelines are most likely to result in a satisfying DIY experience.
Built-in Clamps and Vises
A crucial feature of many effective workbenches is the inclusion of built-in clamps and vises. These tools are necessary for holding workpieces securely in place while you work. Look for plans that incorporate:
- Stationary vises for sturdy grip
- Sliding clamps that can be adjusted as needed
- Cutouts or recesses for convenience
Having these features can significantly reduce setup time and increase your overall productivity.
Durability and Maintenance
Consider the longevity of your workbench. Effective Woodworking Plans Workbench should suggest finishes and materials that endure wear and tear. For example:
- Finishes like polyurethane or oil can provide a protective coat.
- Hardwood tops resist denting better than softer woods.
Regular maintenance is also essential for keeping your workbench functional and visually appealing.
When seeking Woodworking Plans Workbench, several online resources can guide you through the process. Websites such as Wood Magazine, Woodworker’s Journal, and Popular Woodworking offer templates and expert tips that can help you in your woodworking journey.
Ultimately, when you equip yourself with the right principles and plans, crafting a workbench that meets your needs becomes an achievable goal. Whether you’re an experienced woodworker or just starting, having a well-designed workbench is invaluable in achieving great results.
Step-by-Step Guide to Building Your Own Workbench
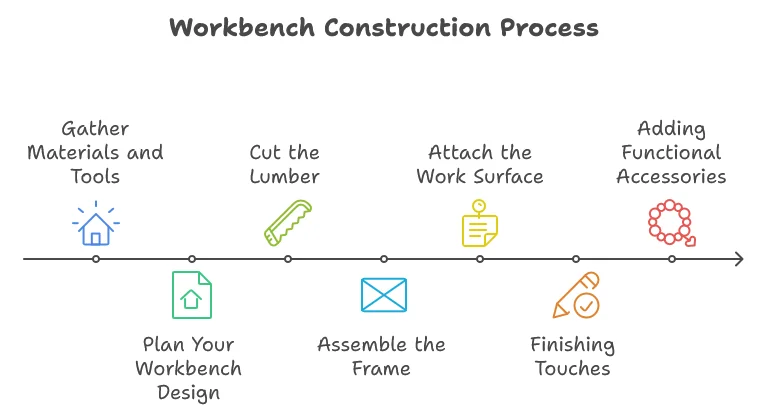
Building your own workbench can be a rewarding project that greatly enhances your woodworking experience. With the right Woodworking Plans Workbench, you can create a functional and sturdy space for your projects. Here’s a step-by-step guide to help you through the process.
Step 1: Gather Materials and Tools
Before you start, collect everything you need. Here’s a list of common materials and tools:
Materials:
- 2×4 lumber (top, legs, and supports)
- Plywood (for the work surface)
- Wood screws
- Wood glue
- Wood finish or paint (optional)
Tools:
- Drill
- Saw (circular or miter)
- Screwdriver
- Measuring tape
- Square
- Clamps
Step 2: Plan Your Workbench Design
Decide on the size and height of your workbench. A typical height ranges from 32 to 36 inches. You may want to sketch your design on paper or use software to visualize it. Simple and ample plans can be found on woodworking websites like Woodworker’s Source.
Step 3: Cut the Lumber
Using your saw, cut the wood according to your workbench plan. For a basic workbench, you will need:
| Part | Dimensions |
|---|---|
| Top | 48” x 24” |
| Legs (4 pieces) | 4” x 32” |
| Supports | Depends on your design |
Step 4: Assemble the Frame
Start by constructing the frame. Attach the legs to the top using screws and wood glue for extra stability. Make sure everything is square using your square tool. If your design includes cross-bracing for additional strength, now is the time to add it.
Step 5: Attach the Work Surface
Once the frame is ready, place the plywood on top as your work surface. Secure it firmly with wood screws. Be sure to leave the edges clear if you intend to add a vise or clamps later on.
Step 6: Finishing Touches
This is where you can personalize your workbench. Sand down rough edges to ensure safe use. You might want to apply wood finish or paint for protection or aesthetics. For more tips on finishes, visit Rockler.
Step 7: Adding Functional Accessories
Think about adding accessories like vises, clamps, or storage spaces beneath the workbench. This maximizes efficiency in your workspace. You can find helpful ideas and plans for customization on sites like Ana White.
Common Mistakes to Avoid in Workbench Woodworking Plans
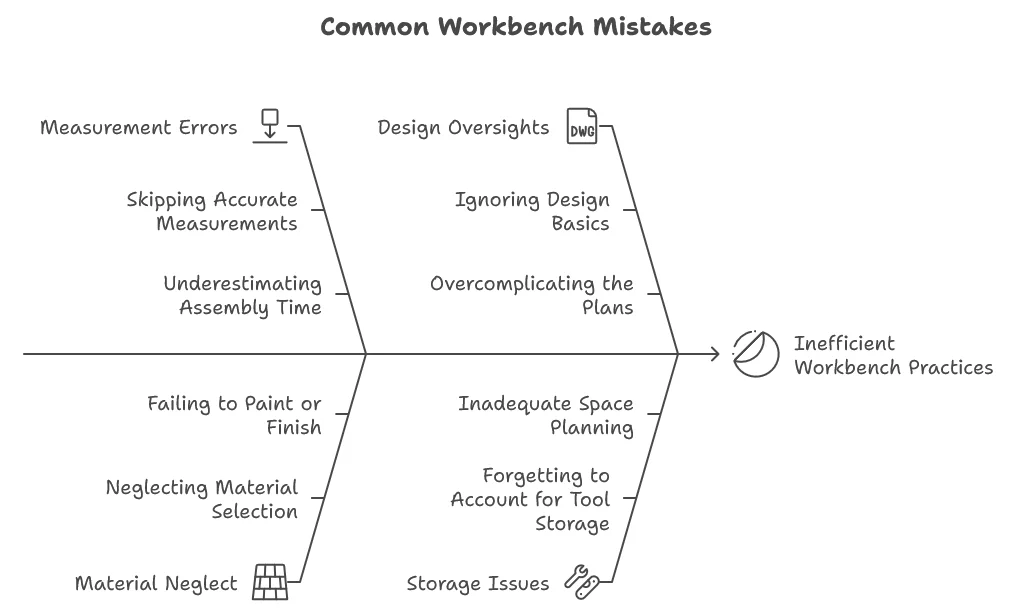
When diving into woodworking projects, particularly when building a workbench, having a solid plan can make all the difference. However, issues can arise quickly if you’re not careful. Here are some common mistakes that you should avoid while working on your Woodworking Plans Workbench.
Skipping Accurate Measurements
One of the biggest blunders you can make is to skip or rush through measurements. Failing to measure accurately can lead to parts not fitting together properly, which can ruin your entire project. Always take measurements twice and ensure that your Woodworking Plans Workbench provide specific dimensions. Here’s a quick checklist:
- Use a reliable tape measure.
- Check your angles with a framing square.
- Mark measurements clearly on your materials.
Neglecting Material Selection
Your choice of materials plays a vital role in the strength and durability of your workbench. Many eager woodworkers tend to choose lower-quality wood to save money. This could lead to a workbench that does not hold up under pressure. Keep in mind these material tips:
- Opt for sturdy woods like oak or maple.
- Understand the weight capacity you need for your plans.
- Consider the environmental conditions where you will use your workbench.
Ignoring Design Basics
Your workbench design is crucial for its functionality. Many find themselves ignoring essential design elements, leading to a less efficient workspace. Here are some design considerations:
- Height: Ensure your workbench is at a comfortable height for your work.
- Surface Area: Evaluate how much space you’ll need for tools and projects.
- Stability: A solid base will prevent wobbling during use.
Overcomplicating the Plans
It’s easy to get excited and want to add too many features to your workbench. Keeping your project simple can save time and increase your chance of success. Consider these best practices:
- Start with a basic design, then add features as needed.
- Focus on essential functionalities, like clamps and storage.
- Be honest about your skill level—don’t bite off more than you can chew.
Forgetting to Account for Tool Storage
A common oversight in Woodworking Plans Workbench is neglecting to include sufficient storage for tools. Without an organized workspace, it can be difficult to keep track of what you need. Plan for storage by:
- Integrating drawers or shelves directly into your workbench design.
- Creating a pegboard or wall-mounted storage above the bench.
- Utilizing toolboxes for portable tools that can easily be accessed when needed.
Underestimating Assembly Time
Many newcomers to Woodworking Plans Workbench misjudge the time required for assembly. Skimping on time estimates can lead to rushed work and poor quality. Here’s how to manage your time effectively:
- Break your project into stages and allocate sufficient time for each.
- Set realistic deadlines, considering your skill level and available tools.
- Build in extra time for adjustments or unexpected challenges.
Failing to Paint or Finish
Not applying a sealing coat or finish can result in wear and tear over time. A good finish not only improves the appearance but also extends the life of your bench. Remember these finishing tips:
- Choose a non-toxic finish if you work with food or children’s projects.
- Apply multiple thin coats for better results.
- Sand down between coats for a smooth surface.
With these common mistakes in mind, you can significantly enhance your woodworking experience. For more inspiration and specific Woodworking Plans Workbench, consider checking out resources like Wood Magazine and Fine Woodworking. They provide plans, tips, and expert advice that can help you build a better workbench tailored to your needs. Happy woodworking!
The Best Materials for Durable Workbench Construction
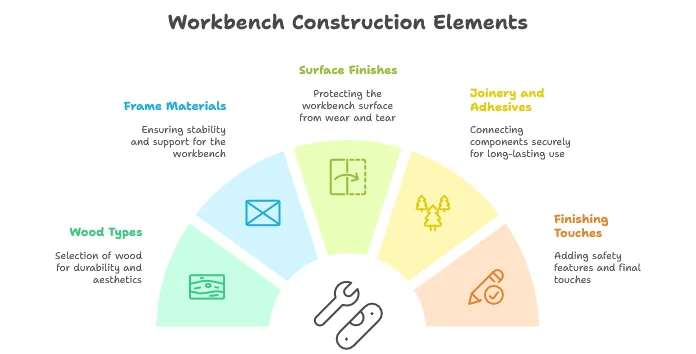
Building a durable workbench starts with choosing the right materials. Your workbench is the heart of your woodworking shop, and using high-quality materials can make all the difference between a sturdy workstation and one that falls apart after a few projects. Here’s a look at some of the best materials that ensure your workbench lasts for years to come.
Wood Types for the Workbench Top
The workbench top must be strong and resistant to wear. Here are the most popular wood types used for workbench surfaces:
- Maple: Known for its hardness and durability, maple is an excellent choice for a workbench top. It resists dents and scratches well.
- Beech: Beechwood is also very durable and has a fine grain. It’s easy to work with and provides a stable surface.
- Oak: With its robust nature and open grain, oak provides a hard workbench surface, great for heavy-duty projects.
- Plywood: If you’re looking for a budget option, laminated plywood can provide a flat, durable surface for your workbench. Just ensure to select high-quality plywood rated for strength.
Frame Materials for Stability
The frame of your workbench should support the weight of your work. Here are some recommended materials to consider:
- Softwood: Woods such as pine or fir are commonly used for the frame because they are easy to work with and affordable.
- Hardwood: If you want extra durability, use hardwood for the framework. It may cost more, but it provides better stability and longevity.
- Metal: If you’re looking for a modern touch, consider using metal for legs and support beams. Steel or aluminum frames can withstand heavy usage and offer a sleek look.
Surface Finishes for Protection
Once you’ve chosen the wood types for your top and frame, adding a finish can significantly extend the life of your workbench:
- Varnish: A tough layer of varnish seals the wood, protecting it from spills and stains while also providing a beautiful shine.
- Polyurethane: This finish offers outstanding durability against wear and is water-resistant, making it ideal for active woodworking areas.
- Oil: Applying oil periodically helps maintain the wood, nourishes it, and can create a unique patina over time.
Joinery and Adhesives
The strength of your joints is critical for a sturdy workbench. Use quality joinery techniques, and don’t skimp on adhesives:
- Dowel Joints: This technique provides a strong connection and can be easier for beginners.
- Mortise and Tenon: This ancient method is incredibly strong and ideal for frames.
- High-Quality Wood Glue: Use a strong adhesive, such as PVA glue, that creates a permanent bond and can withstand pressure.
Finishing Touches for Safety
It’s important to ensure your workbench is not only durable but safe to use. Consider adding:
- Corner Brackets: These can stabilize corners and reduce movement.
- Rubber Feet: Adding rubber feet to your workbench can prevent slipping and provide traction.
- Clamps: Integrated clamps can give you a helpful, secure grip on your projects.
When investing time and resources into your workbench, choosing the right materials is essential. Ensure your construction plans reflect sturdy components that will enhance your woodworking experience. To explore specific Woodworking Plans Workbench for constructing durable workbenches, consider visiting Wood Magazine or check out detailed guides on sites like Woodworker’s Journal. Each of these resources provides valuable insights and plans that can help you build a workbench that stands the test of time.
With the right materials and a bit of creativity, your workbench can become the perfect companion for all your woodworking projects. Whether you’re a hobbyist or a professional, investing in high-quality construction will pay off in the longevity of your workspace.
How to Customize Your Workbench Plans for Specific Projects
Working on woodworking projects can be both exciting and fulfilling, especially when you have a well-designed workbench tailored to your needs. Customizing your Woodworking Plans Workbench can significantly improve your efficiency and make your projects more enjoyable. Let’s explore various factors to consider while personalizing your workbench to suit specific projects.
First and foremost, think about the types of projects you usually undertake. Different projects have unique requirements, whether it’s cabinetry, furniture-making, or crafting smaller items like toys. This understanding is crucial as it directly influences the design and storage features of your workbench. You might want to customize your workbench plan by considering what tools you typically use. If you rely heavily on hand tools, you can create a workbench equipped with special storage solutions like drawers or tool racks. Conversely, if you favor power tools, ensure your workbench has adequate space to accommodate them without clutter.

Customization Factors to Consider:
- Size: Adjust the dimensions of your workbench to fit your workshop space. A larger workbench may be necessary for extensive projects, while a compact design can work for smaller spaces.
- Height: Customize the workbench height according to your own comfort. A height that suits your stature can prevent strain and improve productivity.
- Material: Choose materials that suit the kind of work you perform. A robust top may be ideal for heavy projects, while a softer surface could be appropriate for woodworking tasks that require precision.
- Storage: Designate sections for storing tools, materials, and jigs. Consider including pegboards, shelves, or cabinets to organize your workspace efficiently.
Next, consider incorporating specific features that enhance functionality based on your project type. For example, if you often work with large sheets of plywood, adding an outfeed table can help manage cuts better. Alternatively, if you prioritize assembly projects, an integrated clamping station will improve ease and speed. Utilizing adjustable components can further expand the versatility of your workbench.
Drawers that can be repositioned or shelves that can be raised or lowered accommodate various project needs. This adaptability will streamline your workspace and cater to differing project types. If you’re tackling detailed or intricate work, consider adding features such as a vise or dog holes.
These tools provide better control during projects, especially for detailed carvings or precise measurements. Additionally, integrating a tool chest within your workbench design can save space while keeping everything organized. Your workbench should be a hub of creativity and functionality, accommodating everything you need in one place.
Technology Integration
As technology advances, many woodworkers find that integrating some tech features can be beneficial. For instance, you could install built-in LED lighting on your workbench for improved visibility. Also, consider adding power outlets to keep your tools charged without crowding the workspace.
Customization Checklist:
- Identify project types.
- Assess your essential tools.
- Decide on the preferred size and height.
- Select the right materials for the work surface.
- Include necessary features like vises or clamps.
- Plan for efficient storage options.
- Consider integrating tech to enhance usability.
Once you have developed a rough design, it’s time to refine your Woodworking Plans Workbench. Drawing out your ideas on paper or utilizing design software can give you a clear visual of what to expect. Additionally, resources like Wood Magazine or Woodworking Network provide useful insights and inspiration for creating a solid workbench.
Remember that your workbench is a reflection of your unique woodworking style and needs. Regularly evaluate how the bench meets your requirements, and don’t hesitate to make modifications over time as your projects evolve. Each adjustment you make will contribute to an increasingly efficient and enjoyable woodworking experience.
Conclusion
Creating your own workbench can be an incredibly rewarding experience. By understanding the essential features of an effective Woodworking Plans Workbench, you can ensure your workbench meets all your needs. The step-by-step guide has provided you with a clear pathway to construct a sturdy, functional workspace. As you embark on this project, keeping in mind the common mistakes to avoid will help you save time and resources.
Choosing the right materials is crucial for durability and longevity, so don’t overlook that aspect during planning. The best woods and hardware will significantly impact the performance of your workbench. Further, customizing your workbench for specific projects will enhance your woodworking experience, allowing for versatility in your tasks.
Always remember that your workbench should not only serve its purpose but also reflect your personal style and preferences. Feel free to adapt designs and features based on your unique requirements. Engaging with your workbench project will not only boost your skills but also deepen your appreciation for woodworking as a craft. Happy building!