 ATTENTION: World's Largest Collection of 16,000 Woodworking Plans!
Stop struggling with incomplete plans that waste your time and money!
Step-by-step instructions that make woodworking super easy, even for beginners
Detailed schematics, cutting lists, and materials lists for every project
Get new plans monthly for life - no recurring fees or hidden costs
Request custom plans for your unique projects at no extra charge
Get 4 valuable bonuses including woodworking guides and business tips
GET INSTANT ACCESS NOW!
ATTENTION: World's Largest Collection of 16,000 Woodworking Plans!
Stop struggling with incomplete plans that waste your time and money!
Step-by-step instructions that make woodworking super easy, even for beginners
Detailed schematics, cutting lists, and materials lists for every project
Get new plans monthly for life - no recurring fees or hidden costs
Request custom plans for your unique projects at no extra charge
Get 4 valuable bonuses including woodworking guides and business tips
GET INSTANT ACCESS NOW!
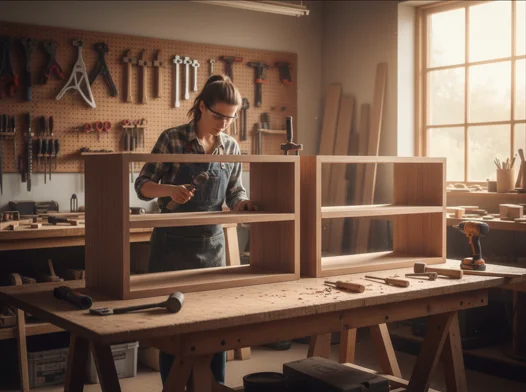
If you’re looking to add functional storage to your space, sturdy shelves are an excellent choice. Whether for a garage, living room, or kitchen, shelves for building shelves can turn your vision into reality. With the right plans, you can create beautiful and robust shelves that are perfectly tailored to your needs.
Choosing Your Woodworking Plans
When choosing woodworking plans, consider the following essentials:
- Materials: Popular options include plywood, solid wood, or MDF. Each material has its pros and cons. For example, plywood is cheaper and lighter, while solid wood is durable and offers a great look.
- Design: Decide the type of shelves you want. Floating shelves give a modern touch, while traditional shelving units can hold more weight.
- Dimensions: Measure your space carefully. Knowing the height and width allows you to build shelves that fit your area perfectly.
- Weight Capacity: Ensure your plans detail how much weight the shelves can hold. This is vital for functional purposes.
Popular Woodworking Plans for Shelves
To start building your shelves, here are some popular shelves you can consider:
| Plan Type | Description | Link |
|---|---|---|
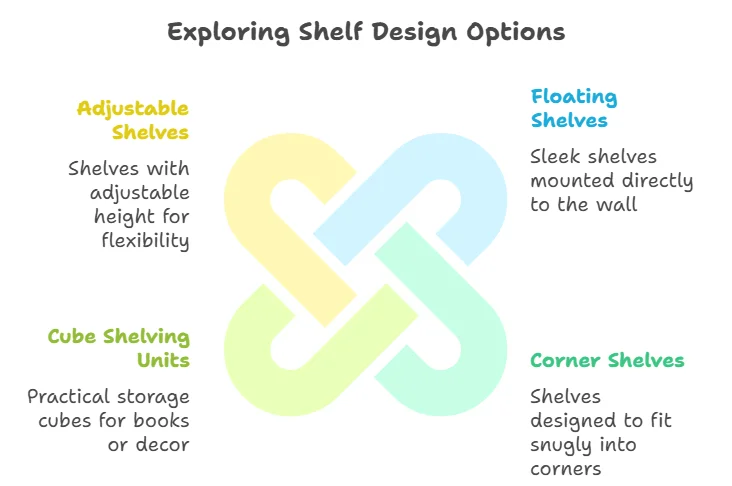
| Floating Shelves | These shelves mount directly to the wall without visible supports. They are sleek and modern. | Ana White |
| Corner Shelves | Great for maximizing space, these shelves are designed to fit snugly into corners. | Wood Magazine |
| Cube Shelving Units | This design creates practical storage cubes that can hold books or decorative items. | Rogue Engineer |
| Adjustable Shelves | These shelves can change height, allowing for flexibility in storage. | Family Handyman |
Tips for Successful Shelf Construction
Once you have selected your preferred plans, here are some tips for success:
- Tools Needed: Ensure you have the right tools on hand. Key tools include a saw, drill, level, and measuring tape.
- Follow Measurements: Accuracy is key in woodworking. Double-check measurements before cutting materials.
- Sand & Finish: After assembly, don’t forget to sand the surfaces for a smooth finish. Adding paint or wood stain can enhance the look.
Building shelves is not only optimizes space but also contributes to the overall aesthetic of your home. By applying careful attention to each step, you can achieve stunning results. This is also an excellent project for beginners looking to improve their woodworking skills. With practice, you’ll understand more about joinery and structural support, ultimately allowing for more complex projects in the future.
Furthermore, finding inspiration from various sources can help you customize your design. Websites, such as Instructables, offer countless projects that may spark your creativity. Don’t forget about safety while woodworking. Always wear safety goggles, ear protection, and follow tool safety guidelines. The joy of crafting your own sturdy shelves is well worth the effort. With the right Woodworking Plans Shelves, you can transform any room in your home, ensuring both functionality and charm.
Tips for Customizing Your Woodworking Shelf Projects
Creating custom woodworking shelves is not only a practical project but also a rewarding way to express your creativity. If you’re eager to personalize your shelving projects, there are several tips that can elevate your craftsmanship and result in stunning final pieces.
Choose the Right Materials
Your first step in customizing your shelves is selecting the right materials. The type of wood you choose significantly impacts the look and sturdiness of your shelves. Popular choices include:
- Pine: Affordable and easy to work with, suitable for beginners.
- Oak: Very durable and offers a striking appearance, perfect for more complex designs.
- Maple: A hardwood that provides a smooth finish, great for contemporary styles.
Incorporate Unique Design Elements
To make your shelves stand out, think about adding unique design elements. Here are a few ideas:
- Curved Shelves: Instead of traditional straight shelves, consider curves for a more modern look.
- Mixed Materials: Combine wood with metal brackets or glass panels for a stylish contrast.
- Shapes: Experiment with layered or asymmetrical designs to create visual intrigue.
Optimize Your Shelf Dimensions
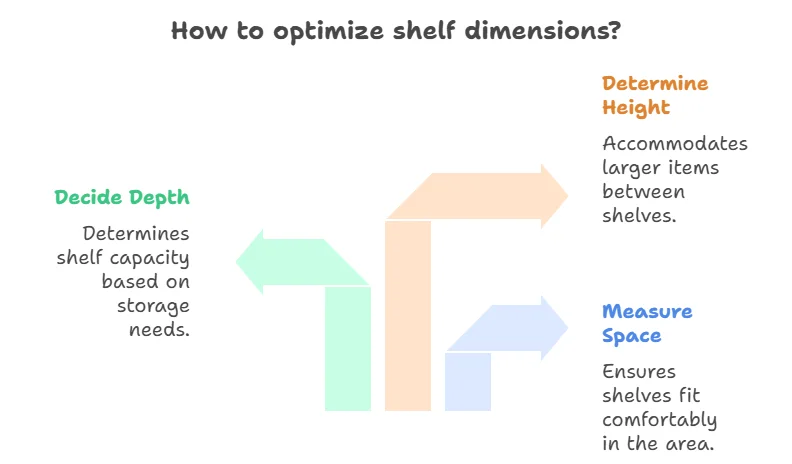
When creating shelves, ensuring the right dimensions is crucial. Proper measurements can save you time and enhance functionality. Consider the following tips:
- Measure the space where the shelves will be installed. Ensure your shelves fit comfortably within this area.
- Decide on the depth. A standard shelf is usually 12 inches deep, but you can go deeper or shallower depending on what you plan to store.
- Determine the height between shelves, especially if you’ll be placing larger items. This is typically 12 to 16 inches, but adjust it as necessary.
Finish Your Shelves with Style
The finishing touches can dramatically change the appeal of your shelves. A few finishing tips include:
- Stains: Choose a stain that enhances the wood grain while providing a rich color.
- Paint: A bold paint color can give a modern vibe and tie into your room’s decor.
- Sealers: Applying a sealant will protect your shelves from damage and help them last longer.
Plan for Functionality
Your shelves should not only be beautiful but also functional. Consider the following features:
- Adjustable Shelves: Installing adjustable shelving brackets gives you flexibility for future adjustments.
- Built-in Lighting: Adding LED lights or spotlights can enhance visibility and ambiance.
- Integrated Storage: Think about incorporating drawers or hidden compartments for additional storage.
Tools and Techniques for Customization
To execute your plans smoothly, ensure you have the right tools and techniques in place. This can include:
- Using a woodworking guide for tools suitable for beginners and experts.
- Practicing cutting techniques to ensure clean edges and accurate dimensions.
- Learning about joinery such as dovetail and box joints for a professional finish.
Find Inspiration and Resources
For additional help with your shelves, consider checking out online resources. You can gain insights and inspiration from:
- Woodworker’s Source Blog – for woodworking projects, tips, and community advice.
- Ana White – a popular site for DIY woodworking plans and designs.
- Wood Magazine – offering expert advice and techniques for woodworking enthusiasts.
By taking the time to customize your shelves, you can create elegant and functional pieces that enhance your living space. Remember to experiment, have fun, and let your creativity run wild as you build your shelves!
The Best Tools and Materials for Successful Shelf Construction
Building your own shelves can be a fulfilling and practical project that not only enhances your living space but also provides a great opportunity to hone your woodworking skills. To successfully construct sturdy and beautiful shelves, having the right tools and materials is crucial. Below is a detailed guide to help you gather the essentials you need for your shelving project.
Essential Tools for Shelf Construction
Different tools can make a significant difference in your shelf construction process. Here’s a useful list of tools you may need:
- Table Saw: Ideal for making precise cuts on large sheets of wood. This tool improves accuracy over manual saws.
- Drill and Drill Bits: A cordless drill with various bits will be necessary for making holes for screws and installation.
- Screwdriver: Either a manual or power screwdriver will help you efficiently fasten your shelf together.
- Measuring Tape: Accurate measurements are essential, so invest in a good-quality measuring tape.
- Level: Ensures your shelves are straight and evenly aligned, which is key for both aesthetics and practicality.
- Sandpaper: Use various grits to smooth out your wood to achieve a professional finish.
- Pry Bar: Useful for making adjustments and removing amounts if needed during the installation phase.
Materials for Building Shelves
Choosing the right materials can greatly affect the durability and look of your shelves. Here are some common materials to consider:
- Wood: Popular choices include plywood, hardwood, or softwood. Each offers different aesthetics and strength levels, so choose based on your project’s requirements. Plywood is great for sturdy shelves, while hardwood is favored for its beauty.
- Screws: Select wood screws that are long enough for your shelf thickness and strong enough to hold the weight you’ll place on them.
- Brackets: If you’re looking for added support, brackets can help distribute weight and add a decorative flair.
- Wood Glue: For added strength, wood glue can be used in conjunction with screws when assembling your shelves.
- Finish: Paint, stain, or varnish will protect your shelves and enhance their appearance. Consider how you want them to blend or stand out in your home environment.
Safety Equipment
When working on woodworking projects, safety should always be a priority. Here’s a quick list of safety gear to wear:
- Safety Glasses: Protect your eyes from flying debris and wood dust.
- Dust Mask: To avoid breathing in dust particles, especially when sanding.
- Hearing Protection: Earplugs or earmuffs can protect your hearing when using loud tools.
Additional Resources and Tutorials
For further guidance, including shelves and DIY shelving tips, check these excellent online resources:
- Wood Magazine: A hub for woodworking plans and articles.
- Popular Woodworking: Offers projects along with expert tips and techniques.
- Ana White: Great for beginner-friendly woodworking plans.
Cost Considerations
Here’s a breakdown of average costs for materials that you might want to budget during your project:
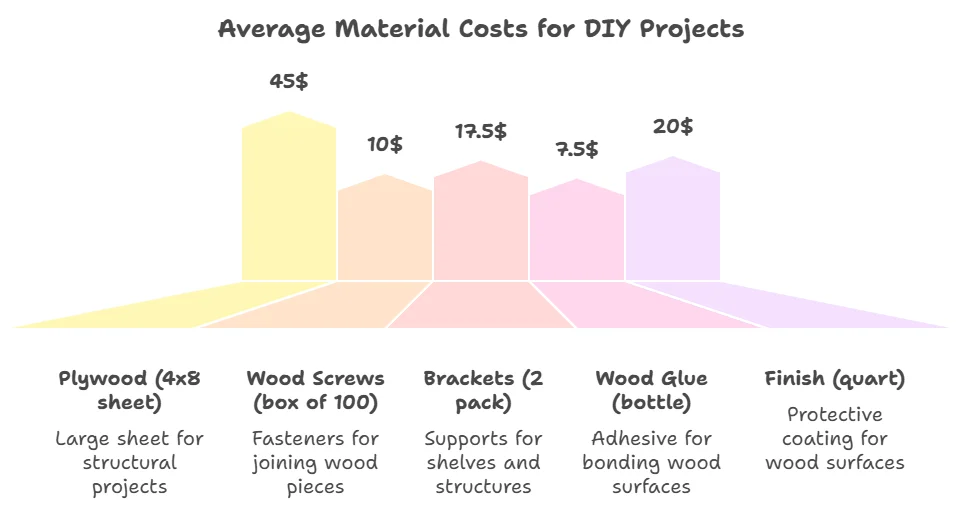
| Material | Average Cost per Unit |
|---|---|
| Plywood (4×8 sheet) | $30 – $60 |
| Wood Screws (box of 100) | $5 – $15 |
| Brackets (2 pack) | $10 – $25 |
| Wood Glue (bottle) | $5 – $10 |
| Finish (quart) | $10 – $30 |
By ensuring you have the right tools and materials, you’ll set yourself up for success in your shelf construction project. Focus on safety, accuracy, and quality finishes, and you’ll create shelves that are not only functional but also beautiful.
Creative Design Ideas for Shelving in Every Room
Innovative Ideas for Living Room Shelving
If you’re looking to spruce up your living room, consider using shelving to showcase your personality. Floating shelves can create an open feel while providing storage. You can arrange books, plants, and decorative items to craft a cozy atmosphere. Try placing these shelves at different heights to add visual interest. Additionally, think about using corner shelves to utilize those often-overlooked spaces. This can become a great spot for a small plant or a collection of framed photos. A well-placed shelf can turn an empty corner into a focal point.
Functional Kitchen Shelving Solutions
In kitchens, shelving can be both stylish and functional. Open shelves encourage organization and easy access to your dishware and cooking essentials. Consider using wooden shelves that provide warmth while pairing them with metal brackets for a modern touch. Here are some kitchen shelving ideas to consider:
- Wire rack shelves for a commercial look
- Adjustable shelves to accommodate different items
- Glass shelves for a sleek design
These options not only help you save space but can turn your kitchen into a functional work of art.
Charming Bedroom Storage Ideas
The bedroom is a sanctuary, and shelving can enhance its charm. Consider building shelves above the bed or beside it to save space. You might use these for storing books or displaying a collection of meaningful items. Instead of a traditional nightstand, you can try a stack of crates or repurposed wooden boxes. This gives a rustic touch and provides extra space for books or decorations, combining style with function.
Creative Techniques for Home Office Shelving
A well-organized home office is crucial for productivity. Floating shelves above your desk can hold essential items within reach while keeping your workspace clutter-free. You can display an inspiring art piece or add some plants to beautify the space around you. Use a pegboard as a wall-mounted shelving solution. This allows you to customize your arrangement easily and switch things up whenever you need a fresh look. For a consistent design, match your pegboard with your office furniture.
Unique Outdoor Shelving Designs
Outdoor spaces can benefit from creative shelving just as much as indoors. Use reclaimed wood to build rustic shelves that complement your garden. These can hold pots of herbs or decorative elements. For patios or balconies, consider vertical gardens. Install shelves to house a variety of plants, maximizing your limited space while adding a splash of greenery. This creates not just a shelving solution but brings life to your outdoor area.
Customized Shelving for Every Room
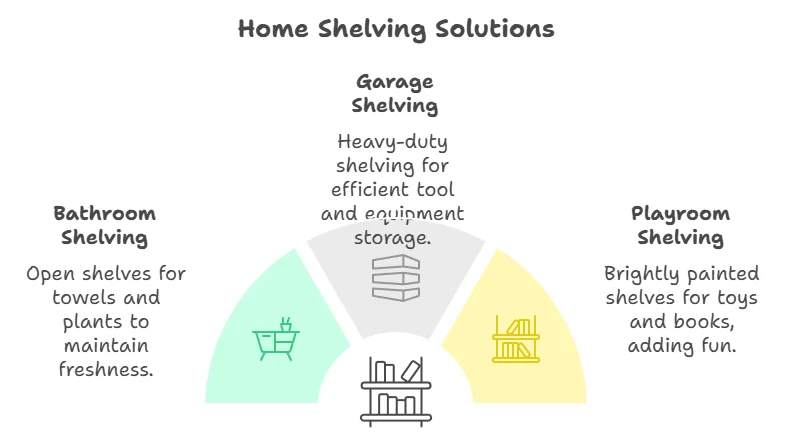
Each room has unique needs, and customized shelving can help meet them. Here are some ideas tailored for specific environments:
- Bathroom: Use open shelves for towels and plants to keep the space fresh and clean.
- Garage: Install heavy-duty shelving to store tools and equipment efficiently.
- Playroom: Brightly painted shelves can hold toys and books while bringing fun to organization.
Understanding the specific purpose of the shelving will lead to a more pleasing and functional interior.
Resources for Designing Your Shelves
If you’re looking for inspiration or guidance, several websites offer Woodworking Plans Shelves and related projects. You may find detailed plans along with tutorials on sites such as Wood Magazine and Ana White. These resources provide step-by-step instructions that can help you create the perfect shelving solution for your space. By exploring the various ideas and customization possibilities, you can create shelving that not only serves a purpose but also enhances the aesthetic of your home. Keeping your designs unique and tailored to each room can lead to a cohesive yet diverse look throughout your living space.
How to Maintain and Care for Your Wooden Shelves
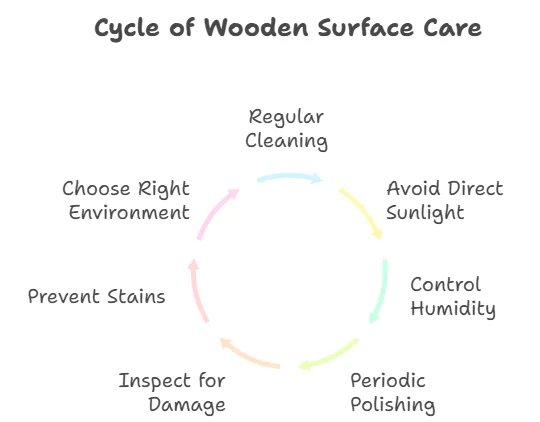
Wooden shelves bring warmth and beauty to any room. They are a wonderful addition to your home, providing visual appeal and practical storage. However, to ensure your shelves remain in excellent condition, you must take proper care of them. Here are some tips to help you maintain and care for your wooden shelves effectively.
Regular Cleaning
Keeping your wooden shelves clean is essential for their longevity. Dust and dirt can accumulate and cause scratches or dull finishes over time. Here’s how to clean them correctly:
- Use a soft, lint-free cloth or a microfiber cloth to wipe the surface.
- For more significant messes, you can dampen the cloth slightly with water. Avoid soaking the wood, as this can cause damage.
- For stubborn stains, consider using a small amount of mild soap mixed with water.
Avoid Direct Sunlight
Wood is susceptible to fading and drying out when exposed to direct sunlight. To prevent this:
- Position your shelves away from direct sunlight if possible.
- Use curtains or blinds to shield your wooden shelves from harmful UV rays.
- Consider applying UV-blocking film to windows in sunlit rooms.
Humidity Control
Wooden shelves are also sensitive to changes in humidity. Too much moisture can lead to warping, while too little can cause cracking. Here are some strategies to maintain proper humidity:
- Use a humidifier during dry months to maintain moisture in the air.
- In areas with excess humidity, a dehumidifier can help to keep levels stable.
- A hygrometer can monitor humidity levels, helping you adjust accordingly.
Periodic Polishing
Polishing wooden shelves will not only enhance their look but also protect the wood from dust and moisture. Here’s how to polish them properly:
- Select a high-quality wood polish or beeswax.
- Apply a small amount to a soft cloth.
- Work in small circular motions to cover the surface evenly. Make sure to follow the wood grain.
Inspect for Damage
Regularly check your wooden shelves for any signs of damage, such as cracks or loose joints. Early detection can prevent further issues. If you notice any problems:
- Reinforce loose shelves with brackets or screws.
- Fill minor cracks with wood filler and sand them down for a smooth finish.
- For significant damage, consider seeking professional help.
Preventing Stains
Wooden shelves can easily become stained from spills, food, or beverages. To avoid stains:
- Use coasters and placemats under items that may leak or stain.
- Clean up spills immediately with a damp cloth to avoid absorption.
- Consider applying a clear protective finish to the shelves to guard against stains.
Choosing the Right Environment
It’s essential to place your wooden shelves in the right environment. This will minimize potential issues caused by temperature and humidity fluctuations. Factors to consider include:
| Factor | Recommendation |
|---|---|
| Temperature | Avoid extreme heat and cold. Maintain a consistent temperature. |
| Humidity | Keep humidity level between 30-50% for optimal wood preservation. |
| Location | Keep away from kitchens and bathrooms where humidity and heat levels can fluctuate significantly. |
By following these simple care tips, your wooden shelves will not only look stunning but also last for many years. For more detailed advice on managing wooden furniture, visit Wood Magazine or Woodworker’s Source Blog. Proper care of your wooden shelves is a rewarding investment that enhances their beauty and utility in your living space. Keep these strategies in mind, and enjoy your beautiful wooden shelves for years to come!
Conclusion
Creating your own shelves can be a rewarding experience that enhances both the functionality and aesthetics of your home. With the essential shelves outlined, you now have a roadmap to build sturdy shelves that meet your needs. Remember, customization is key; adding your personal touch can transform a standard design into a unique piece reflecting your style.
Choosing the right tools and materials is crucial for successful construction. Ensure you invest in high-quality equipment and select the appropriate wood type to guarantee durability and longevity. Armed with this knowledge, your projects will not only stand out but also withstand the test of time. Creative design ideas will allow you to fit shelving solutions into every room of your home, from the living room to the garage.
Whether you prefer floating shelves, built-ins, or bookcases, your projects can turn any space into a functional masterpiece. After your shelves are built, regular maintenance helps keep them looking their best. Simple care techniques can protect your investment and ensure they remain a centerpiece in your home for years to come.
By following these steps, you can embark on your woodworking journey with confidence. The reward of seeing your finished shelves, perfectly suited to your space and needs, is well worth the effort. Embrace the creativity and skill that woodworking offers, and enjoy crafting beautiful shelves that truly enhance your living environment.