
Understanding the Importance of Joinery in Woodworking
When you start a woodworking project, one of the most important skills to master is understanding woodworking joinery techniques. These techniques are the foundation of building sturdy, durable wooden pieces that last for years. Joinery is the method by which two pieces of wood are joined together to form a strong and stable connection. Without strong joints, even the finest wood can fail or break under pressure.
Choosing the right joinery method depends on your project’s purpose, aesthetic preferences, and the tools or skills you have. Whether it’s furniture, cabinets, or decorative pieces, using the proper joinery technique improves the strength and appearance of your woodworking.
Common Woodworking Joinery Techniques Explained
Let’s explore some essential joinery techniques every woodworker should know. These methods vary in complexity but are all crucial for creating lasting joints.
Butt Joint
The butt joint is the simplest form of joining wood, where two pieces are simply butted together. It’s easy to create and requires minimal tools, making it popular for beginners. However, it relies heavily on mechanical fasteners like screws or nails and glue to improve strength.
Dado Joint
A dado joint involves cutting a slot or groove across the grain of one board to fit another piece snugly. This joint is commonly used for shelving and cabinetry because it provides good stability and prevents shifting over time.
Mortise and Tenon Joint
Known for its strength and durability, the mortise and tenon joint connects two pieces at a 90-degree angle. The “mortise” is a hole or cavity, while the “tenon” is a projecting piece designed to fit tightly into the mortise. This technique is favored in high-quality furniture making.
Dovetail Joint
Dovetail joints are admired for their interlocking strength and decorative appearance. Characterized by “tails” and “pins” cut into the wood, this joint resists pulling apart and is commonly used in drawers and fine cabinetry. Although it requires skill to cut accurately, it greatly enhances project value and durability.
Rabbet Joint
The rabbet joint features a recess cut along the edge or end of a board, allowing another piece to fit flush against it. This joint adds more surface area for glue, creating a stronger connection often found in box construction.
Choosing the Right Joinery Technique for Your Project
Not every woodworking joint is suited for all types of work. It’s essential to evaluate the stresses your project will face and how much strength is needed. Sometimes a simple butt joint reinforced with glue is enough for decorative items. For furniture or load-bearing projects, mortise and tenon or dovetail joints are preferred for their superior stability.
Here’s a quick guide to help you select a joinery technique based on project needs:
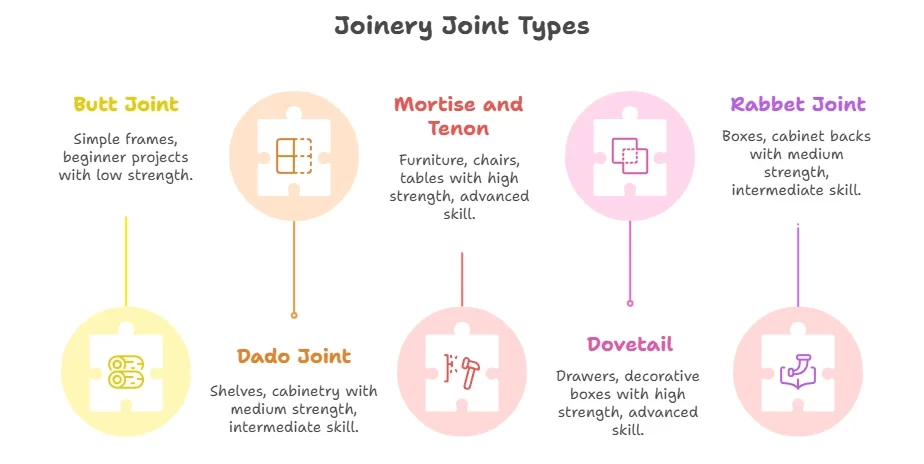
| Joinery Technique | Best For | Strength | Skill Level |
|---|---|---|---|
| Butt Joint | Simple frames, beginner projects | Low | Beginner |
| Dado Joint | Shelves, cabinetry | Medium | Intermediate |
| Mortise and Tenon | Furniture, chairs, tables | High | Advanced |
| Dovetail | Drawers, decorative boxes | High | Advanced |
| Rabbet Joint | Boxes, cabinet backs | Medium | Intermediate |
Tips for Perfecting Your Wood Joinery Skills
Mastering woodworking joinery takes practice and patience. To achieve the best results, consider the following tips:
- Use Sharp Tools: Dull blades and chisels cause tear-out and sloppy joints.
- Measure Precisely: Accurate measurements ensure tight fits and strong bonds.
- Dry Fit Before Gluing: Always assemble parts without glue to check alignment.
- Apply the Right Glue: Use wood glue designed for joinery to withstand stresses.
- Clamp Securely: Clamping holds pieces steady while glue dries for a solid bond.
Expanding Your Joinery Knowledge
If you want to dig deeper into advanced woodworking joinery techniques, specialized resources can help. Websites like Wood Magazine offer detailed tutorials and expert advice. You might also explore Popular Woodworking for project ideas and step-by-step guides that highlight various joinery methods.
Learning different joinery techniques is essential to elevate your woodworking projects from functional to exceptional. Take your time experimenting with each joint, and soon you’ll build pieces that combine beauty and enduring strength.
Comparing Traditional and Modern Joinery Methods in Woodworking
Understanding the Basics of Woodworking Joinery Techniques
Woodworking joinery techniques are at the heart of crafting durable and beautiful wooden structures. These methods connect pieces of wood in ways that enhance strength, functionality, and aesthetics. Over time, craftsmen have developed diverse approaches, categorized generally as traditional and modern joinery techniques. Each approach has its unique characteristics, benefits, and applications, shaping how projects evolve from simple furniture to intricate architectural details.
Traditional Joinery Methods: Craftsmanship and Timeless Strength
Traditional joinery methods have been refined over centuries, relying on precise handwork and time-tested designs. These techniques often require specialized tools and skilled craftsmanship. Some common traditional joint types include:
- Mortise and Tenon: A classic method where a projecting tenon fits snugly into a matching mortise hole, creating a strong, interlocking joint.
- Dovetail Joints: Recognizable by their interlocking fan-shaped pins and tails, dovetails are widely used in drawer boxes and cabinetry for their mechanical strength and aesthetic appeal.
- Finger Joints: Also known as box joints, these involve interlocking rectangular “fingers” cut into the ends of two boards for solid end-to-end connections.
- Lap Joints: Created by overlapping two pieces of wood and fastening them together, often used where visible thickening of the wood is acceptable.
Traditional joinery does not heavily rely on adhesives or metal fasteners, emphasizing natural wood-to-wood contact, which ages gracefully and allows easy repairs. These methods often produce joints that can withstand tension and pressure over decades, making them ideal for heirloom furniture.
Modern Joinery Methods: Efficiency Meets Innovation
With advances in technology, woodworking has embraced modern joinery methods that streamline construction, often supported by power tools and machine precision. These techniques emphasize quick assembly, repeatability, and consistent performance, especially useful in mass production or DIY projects. Popular modern joinery techniques include:
- Biscuit Joints: Small, oval-shaped wooden pieces (“biscuits”) are inserted into slots cut by a biscuit joiner, aligning and strengthening glued joints.
- Pocket Hole Joinery: Angled holes drilled to create hidden screw joints, allowing rapid assembly with minimal clamping.
- Domino Joinery: Using a power tool to cut precise mortises for pre-made loose tenons (“dominoes”), combining speed and strength.
- Dowel Joinery: Wooden dowels inserted into aligned, drilled holes to reinforce and align joints.
Modern joinery often incorporates adhesives and fasteners that enhance holding power and simplify complicated assembly steps. These methods are generally easier to master for beginners and can significantly reduce build times while maintaining durability.
Comparing Strength and Durability
| Joinery Method | Strength | Durability | Typical Application |
|---|---|---|---|
| Mortise and Tenon (Traditional) | Very High | Excellent, long-lasting | Doors, frames, chairs |
| Dovetail (Traditional) | Very High | Excellent, resists pulling apart | Drawers, cabinetry |
| Biscuit Joints (Modern) | Moderate to High | Good when glued properly | Panel assembly, furniture |
| Pocket Hole (Modern) | Moderate | Good, but relies on screws | Quick furniture assembly |

While traditional joints often outperform modern joints in sheer mechanical strength, modern joinery can match performance when combined with quality adhesives and fasteners. The choice depends on the requirements of the project, from desired appearance to load-bearing needs.
Considerations When Choosing Between Traditional and Modern Techniques
Your decision on which joinery method to use will depend on several factors:
- Skill Level: Traditional methods demand time, patience, and hand-tool proficiency, whereas modern joints are more accessible to beginners.
- Project Type: Furniture requiring heirloom quality or historical accuracy benefits from traditional joints. In contrast, modern techniques suit rapid prototyping or commercial manufacturing.
- Tools Available: Modern joinery often requires specialized power tools, while traditional joints can be made with hand tools.
- Aesthetics: Exposed, intricate joinery can become a design focal point, favoring traditional options. Conversely, modern methods tend to be hidden for sleek looks.
- Time and Budget: Modern joinery can save time and sometimes material costs, suitable for fast turnaround projects.
Enhancing Woodworking Skills Through Both Methods
For woodworking enthusiasts, mastering both traditional and modern joinery techniques expands creative possibilities. Learning traditional methods deepens understanding of wood behavior and craftsmanship. Using modern joinery allows faster iteration and practical applications in today’s woodworking landscape.
To explore a wide range of woodworking joinery methods, you can visit Wood Magazine’s joints guide. For hands-on tutorials and tool recommendations, Rockler Woodworking and Hardware offers great resources for both novices and experts.
Ultimately, blending traditional artistry with modern efficiency can help you build woodworking projects that are strong, beautiful, and crafted with confidence.
Tools and Materials Needed for Mastering Wood Joinery
Mastering Wood Joinery
Mastering woodworking joinery requires not only skill but also the right tools and materials to ensure precision and durability in your projects. Whether you’re a beginner or an experienced woodworker, having a well-rounded toolkit and understanding the best materials to use will significantly enhance your ability to create strong, beautiful joints.
Essential Tools for Wood Joinery
To begin, there are several fundamental tools every woodworker should have to tackle various joinery techniques effectively:
- Chisels: Sharp chisels are critical for cleaning out joints, shaping wood, and ensuring tight fits. A quality set typically includes several sizes for versatility.
- Saws: Different saws serve different joinery needs. A dovetail saw is perfect for fine cuts in joinery, while a tenon saw is ideal for crosscuts in mortise and tenon joints.
- Marking Tools: Precise marking tools such as marking gauges, awls, and pencils help define cuts and measurements accurately.
- Clamps: Clamps hold pieces together while glue dries or when fitting joints, helping maintain alignment and pressure.
- Mallets: Wooden or rubber mallets allow for gentle tapping of pieces without damaging the wood.
- Squares and Measuring Tools: A combination square or try square ensures your joints are precise and angles are correct.
- Router: For more advanced joinery techniques like dadoes, rabbets, or mortises, a router creates clean and consistent cuts.
- Drill and Bits: For dowel joints or preparing holes for screws, a quality drill with appropriate bits is necessary.
Materials for Creating Strong and Durable Joints
The choice of material plays an equally vital role in woodworking joinery. The right type of wood and adhesives can transform a simple joint into a long-lasting structure.
Wood Types
Hardwoods and softwoods behave differently in joinery:
| Wood Type | Characteristics | Best Use in Joinery |
|---|---|---|
| Oak | Strong, dense, great wear resistance | Ideal for mortise and tenon, dovetail joints |
| Maple | Hard and smooth, fine grain | Suitable for precise joints like finger joints |
| Pine | Softwood, easy to work with, inexpensive | Good for beginner projects and simple joints |
| Cherry | Moderately hard, smooth texture, beautiful finish | Great for visible joints in furniture |

Adhesives and Fasteners
While traditional joinery aims for strong mechanical joints, adhesives and fasteners often play a supportive role:
- Wood Glue: A high-quality PVA wood glue is a staple in almost every woodworking project. It strengthens joints by bonding fibers together for added durability.
- Epoxy Resin: For joints subjected to heavy loads or outdoor conditions, epoxy offers water resistance and exceptional strength.
- Dowels, Screws, and Nails: These fasteners are useful in reinforcing joints, especially where glue alone might not suffice. Dowels are especially helpful in aligning pieces for seamless joinery.
Measurement and Precision: Tools for Accuracy
Joinery is all about precision. Even a small misalignment can weaken the joint or create an unsightly gap.
Marking and Measuring Instruments:
- Marking Gauge: This ensures consistent groove or mortise width and depth.
- Calipers: Useful for measuring thickness and ensuring uniformity between joint components.
- Precision Square: This tool helps in maintaining perfectly square corners, essential for box joints and miters.
Safety Equipment and Workspace Setup
Handling woodworking tools demands proper safety precautions. Equip your workspace with:
- Safety Glasses: Protect your eyes from flying splinters and dust.
- Hearing Protection: Power tools can be loud; earplugs or earmuffs safeguard hearing.
- Dust Masks or Respirators: Prevent inhaling sawdust, which can be harmful over time.
- Proper Workbench: A sturdy workbench provides a stable surface for marking, cutting, and clamping joints.
Additional Resources for Learning and Purchasing
If you’re serious about refining your woodworking joinery skills, exploring further resources and acquiring quality tools from trusted sources is key. Websites like Rockler Woodworking and Hardware offer a wide range of specialized tools for joinery, including precision chisels and marking gauges. For instructional content, Wood Magazine provides expert articles and videos aimed at all skill levels.
Additionally, online communities such as Woodworking Talk provide forums where you can ask questions and get advice on tool selection and techniques from seasoned woodworkers.
Choosing the Right Tools and Materials Tips
- Start Simple: Focus on acquiring basics like a good set of chisels, a reliable saw, and clamps before investing in power tools.
- Quality Over Quantity: Investing in fewer high-quality tools often pays off in longevity and precision.
- Match Wood to Project: Use hardwoods for structural or visible joints and softwoods for practice
Troubleshooting Common Challenges in Woodworking Joinery
Understanding the Root Causes of Joinery Problems
When you first start working with woodworking joinery techniques, you might encounter some common challenges that can affect the strength, appearance, and durability of your projects. Identifying the root cause is the key to fixing these issues efficiently. Issues like gaps between joints, weak bonds, or misaligned pieces often arise due to measurement inaccuracies, improper tool usage, or the wrong choice of joinery for the project at hand.
For instance, a misaligned dovetail joint can occur if your cutting angles are off even by a fraction of a degree. Similarly, a weak mortise and tenon joint can result from loose fits or insufficient glue coverage. Taking the time to measure properly, select compatible wood pieces, and apply appropriate woodworking joinery techniques will save you headaches in the long run.
Strategies to Fix Common Joinery Challenges
Here are targeted tips to troubleshoot and improve your woodworking joinery results:
- Inaccurate Cuts: Use sharp, calibrated tools and double-check measurements before making cuts. A table saw with a reliable fence or a quality dovetail jig can improve precision significantly.
- Gaps in Joints: Plan for tight-fitting joints. If gaps appear, carefully sanding joints or using wood filler designed for joints can help. Avoid forcing pieces together if they don’t fit snugly.
- Glue Failure: Choose the right type of wood glue for your material—PVA glue works well for most hardwoods, while polyurethane glue can handle moisture-prone environments. Ensure surfaces are clean and dry before glue application.
- Weak Mechanical Strength: Reinforce joints like dowel or biscuit joints with additional fasteners or splines when necessary. Consider alternative woodworking joinery techniques such as box joints or finger joints when strength is critical.
How Wood Species and Grain Affect Joint Quality
Not all woods behave the same. Hardwood species like maple and oak are dense and durable but can split easily if not handled with care during joinery. Softer woods like pine are easier to work with but may compress under pressure, leading to loose joints over time.
Grain direction plays a crucial role in joinery success. Always align joints so that the grain direction of mating pieces complements each other, which helps reduce stress and prevents warping. Learning about these subtle details can elevate your woodworking skills considerably.
Common Woodworking Joinery Techniques and Their Troubleshooting Tips
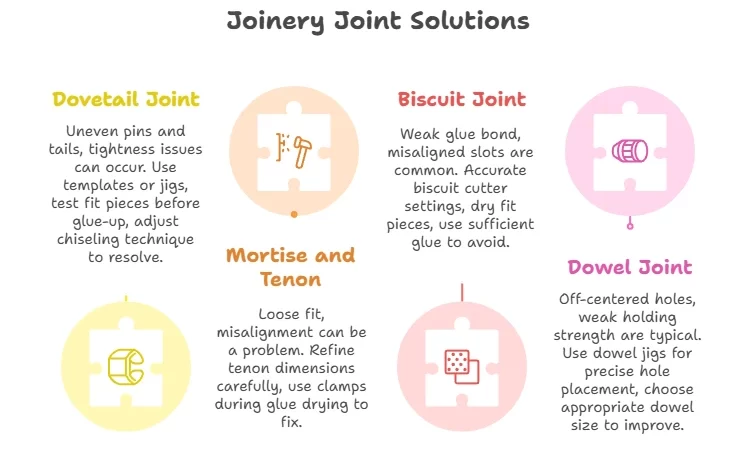
| Joinery Type | Common Issues | Practical Solutions |
|---|---|---|
| Dovetail Joint | Uneven pins and tails, tightness issues | Use templates or jigs, test fit pieces before glue-up, adjust chiseling technique |
| Mortise and Tenon | Loose fit, misalignment | Refine tenon dimensions carefully, use clamps during glue drying |
| Biscuit Joint | Weak glue bond, misaligned slots | Accurate biscuit cutter settings, dry fit pieces, use sufficient glue |
| Dowel Joint | Off-centered holes, weak holding strength | Use dowel jigs for precise hole placement, choose appropriate dowel size |
Maintaining Tools and Workspace for Better Joinery
One factor that often gets overlooked is tool maintenance. Dull blades or poorly calibrated equipment frequently cause poor joinery outcomes. Regularly sharpening blades, cleaning saws, and checking your measuring tools’ accuracy will greatly enhance your woodworking results.
Additionally, keeping your workspace clean and free of sawdust helps you maintain precision. Dust particles can interrupt glue bonds and interfere with clamping pressure, causing joints to weaken. A tidy environment supports better focus and accuracy in each step.
Learning Resources to Improve Your Wood Joinery Skills
For ongoing improvement, accessing reputable woodworking resources is essential. Websites like Wood Magazine offer great tutorials and expert advice on advanced joinery techniques. Similarly, Popular Woodworking provides hands-on tips and troubleshooting guides to help you master various joints.
Forums such as Woodworking Talk also foster community support where you can ask questions and get personalized advice from experienced woodworkers.
Practice and Patience: Keys to Mastering Joinery
No matter how carefully you plan, occasional mistakes in woodworking joinery are inevitable—especially when learning new techniques. Approach each error as a learning opportunity. With regular practice and patient adjustments, you’ll build confidence and create joints that are tight, strong, and lasting.
Remember, joinery success comes from a blend of precise craftsmanship, well-maintained tools, and understanding wood properties. By applying careful troubleshooting and learning from resources, you can overcome common challenges and elevate your woodworking projects to a professional standard.
Creative Applications of Joinery Techniques in Custom Woodwork Designs
Exploring the Art of Woodworking Joinery Techniques
When it comes to crafting custom woodwork designs, the strength and beauty of the pieces largely depend on the joinery techniques used. These methods not only hold wood parts together but also serve as a creative element that defines the style and durability of furniture, cabinetry, and artful wood installations.
Woodworking joinery techniques have evolved into both functional and decorative forms that allow artisans to express creativity while maintaining structural integrity. Whether traditional or modern, these joinery methods open up a world of possibilities in custom wood designs.
Popular Joinery Techniques and Their Creative Uses
Here are some widely used woodworking joinery techniques and ways to creatively apply them in custom projects:
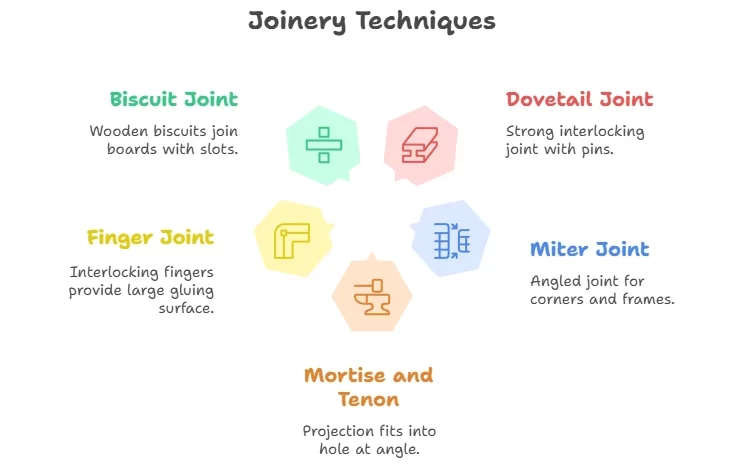
| Joinery Technique | Description | Creative Applications |
|---|---|---|
| Dovetail Joint | A strong interlocking joint with wedge-shaped pins and tails. | Often used in drawers and boxes, dovetail joints can be highlighted by contrasting wood colors to enhance the visual appeal. |
| Miter Joint | Joining two pieces at an angle, usually 45 degrees, to form a corner. | Perfect for creating seamless frames or boxes with concealed joints, and can be reinforced with splines or biscuits for extra strength. |
| Mortise and Tenon | A tenon (projection) fits into a mortise (hole) to join two pieces at a 90-degree angle. | This classic joint adds strength to tables and chairs and can be left visible to showcase craftsmanship. |
| Finger Joint | Interlocking fingers cut into two pieces that provide a large gluing surface. | Used in box making, it is excellent for long edges and can be creatively combined with patterns for decorative panels. |
| Biscuit Joint | Oval-shaped wooden “biscuits” join two boards, aligned with slots cut by a biscuit joiner. | Ideal for tabletops or furniture frames, biscuits add alignment and strength with minimal visible joinery. |
Innovative Techniques for Adding Artistic Expression
Creative woodworkers often blend traditional joinery with modern ideas to transform joinery into a design feature rather than hidden support. Here are some innovative approaches to integrate joinery into custom woodworking designs:
- Contrasting Wood Choices: Using different wood species with varying colors and grains allows the joinery to stand out as part of the design. For example, pairing dark walnut pins against light maple tails in a dovetail joint makes a striking visual pattern.
- Exposed Joinery: Instead of covering joints with fillers or veneers, leaving them visible celebrates the craftsmanship. Exposed mortise and tenon joints with decorative wedges or keys add an artisanal touch.
- Inlay and Marquetry with Joinery: Embedding decorative inlay around or within joinery areas can amplify the aesthetic appeal. This requires precision but results in distinctive custom pieces.
- Mixed Joinery Systems: Combining different joinery techniques within the same project can create unique structural and visual effects. For instance, using dovetail drawers within a frame assembled by mortise and tenon joints.
- 3D Sculptural Joinery: Complex interlocking joints, such as puzzle or lattice joints, make the woodwork design sculptural, engaging viewers with their intricacy.
Practical Tips for Mastering Creative Joinery
To successfully incorporate creative joinery techniques into your custom woodwork, consider the following practical guidelines:
- Understand Wood Movement: Wood expands and contracts with humidity changes. Choose joinery that allows movement or plan for it to avoid cracks or warping.
- Precision Matters: The success of joinery lies in accuracy. Use sharp tools and reliable measuring devices to get exact fits.
- Test on Scrap Wood: Before making cuts on your project wood, practice joinery on scraps to perfect your technique.
- Use Quality Adhesives: A strong glue is crucial for joinery durability; choose timber-specific woodworking glues.
- Finish Before Assembly: In some cases, finishing individual pieces before assembly helps reach inside joints and achieves a cleaner look.
Discover more about joinery and custom woodworking by visiting the Wood Magazine Joinery Guide, which offers detailed tutorials and inspiration for woodworkers at all skill levels.
For advanced techniques and tool recommendations, explore Fine Woodworking, a valuable resource filled with expert advice and project plans.
Conclusion
Mastering woodworking joinery techniques opens the door to creating projects that are not only strong but also visually stunning. By exploring essential joinery methods, you build a solid foundation for crafting durable wood pieces that stand the test of time. Understanding the differences between traditional and modern joinery allows you to choose the best approach for your specific project, blending classic strength with innovative designs.
Equipping yourself with the right tools and quality materials is crucial for achieving precise joints and smooth finishes. When challenges arise, knowing how to troubleshoot common issues like misaligned joints or weak connections ensures that your project stays on track without frustration. Beyond just functionality, joinery offers a creative playground where custom woodwork designs come to life. Whether you’re building furniture, cabinetry, or decorative items, applying these techniques creatively elevates your craftsmanship and adds unique character to your work.
By combining knowledge, skill, and creativity in woodworking joinery, you can transform simple pieces of wood into lasting creations. Each joint tells a story of care and expertise, reflecting your commitment to quality and craftsmanship. Embrace the art of joinery, and watch your woodworking projects become stronger, more beautiful, and truly your own.