
Setting up an effective Woodworking Dust Collection Setup DIY Tutorial system is crucial for maintaining a safe and clean workshop environment. When you’re working with wood, dust particles can pose health hazards and create a mess. Building a DIY dust collection setup can significantly improve your workspace’s air quality and cleanliness. Let’s explore the essential components you need to create your own efficient system.
Understand Your Dust Collection Needs
First, assess the scale of your woodworking projects. This will guide your dust collection setup’s size and complexity. Think about the tools you use and how much dust they produce. Common tools that generate fine dust include:
- Table saws
- Band saws
- Miter saws
- Planers
- Routers
Understanding your specific dust production will help you choose the right components for your system.
Essential Components for Your DIY System
Your DIY dust collection setup will rely on several key components to function effectively. Here’s what you need:
| Component | Description |
|---|---|
| Dust Collector | The heart of your system, it gathers dust from various tools and collects it in a bag or canister. |
| Hoses | Flexible hoses connect your tools to the dust collector, allowing for efficient dust transfer. |
| Connectors and Adapters | These ensure a tight fit between hoses and tools, preventing leaks and maximizing efficiency. |
| Filters | Filtering systems capture fine dust particles, keeping your workshop air clean. Choose a HEPA filter for the best results. |
| Dust Collection Bags/Containers | These collect the dust and debris. Make sure they’re compatible with your dust collector. |
Choosing the Right Dust Collector
The dust collector you choose can make or break your DIY setup. There are two main types:
- Single-stage Collectors: These are generally less expensive and suitable for smaller workshops. They work well for tools that don’t produce a high volume of fine dust.
- Two-stage Collectors: These systems use a cyclone to separate larger particles from fine dust, resulting in more efficient collection and less filter clogging.
Think about your workshop’s layout and choose a dust collector that fits well within your space.
Setting Up the Hoses and Connectors
Once you’ve selected your dust collector, it’s time to think about the hoses and connectors. You want to ensure that your setup is as streamlined as possible:
- Measure the distance between your tools and the collector to determine the hose length needed.
- Use smooth, rigid ducts where possible to improve airflow. Flexible hoses work too but can restrict airflow more than ducting.
- Using larger hose diameters will help maintain a strong airflow, especially for stationary equipment.
Placement and Airflow Considerations
Placement is key to maximizing the efficiency of your dust collection. Here are a few tips:
- Position your dust collector centrally to minimize hose length.
- Avoid sharp bends in hoses, as they can hinder airflow. Keep them as straight as possible.
- Consider ceiling-mounted or wall-mounted options for larger collectors to save floor space.
Ensure that your system has good airflow. This ensures that dust travels efficiently and reduces the chances of clogging.
Maintenance of Your Dust Collection System
Regular maintenance will keep your dust collection system running smoothly:
- Check and replace filters when necessary.
- Clean hoses and ducts periodically to prevent dust buildup.
- Inspect connectors for leaks and replace any damaged parts.
Building your Woodworking Dust Collection Setup DIY Tutorial can greatly enhance your working environment while keeping your health in check. For more in-depth guides, consider visiting websites like Wood Magazine and Woodworker’s Journal. With the right components and a solid plan, you’ll be able to enjoy your woodworking projects without the hassle of dust!
Benefits of Effective Dust Collection in Your Woodworking Space

Creating a clean and efficient woodworking environment is essential for both safety and productivity. One of the major components to achieve this is an effective dust collection system. Not only does it help you maintain a tidy workspace, but there are numerous benefits to implementing such a system in your woodworking shop.
It enhances your health
First and foremost, effective dust collection significantly enhances your health. Wood dust can be harmful when inhaled, potentially leading to respiratory problems over time. By investing in a reliable dust collection setup, you reduce the risk of inhaling fine particles. This is incredibly important for those who spend hours in their workshops, as budget-friendly masks or respirators may not provide the necessary protection against the smallest dust particles.
Contributes to safety
Additionally, keeping your workspace clean contributes to safety. Wood dust can create a fire hazard when it accumulates near heat sources or electrical equipment. An efficient dust collection system minimizes the presence of this flammable material, making your workspace much safer. This is crucial not just for you but also for anyone else who might enter your shop.
Improved visibility
Another key benefit is improved visibility. When dust settles on your tools and surfaces, it becomes harder to see your work. With an effective dust collection system, you will notice that your workspace stays clear, allowing you to focus better on your projects without distractions. You’ll find that clean surfaces enhance detail work and help maintain precision.
It saves money
Furthermore, an efficient dust collection setup saves money in the long run. When dust collects on your machinery, it can lead to wear and tear. This results in costly repairs or replacements over time. By keeping your tools clean, you extend their lifespan, leading to a greater return on your investment in woodworking equipment.
Choosing the Right Dust Collection System
When considering the best dust collection setup for your space, there are various options available. Here are a few systems to consider:
- Shop Vacs: Portable and usually more affordable, these are perfect for smaller shops or DIY enthusiasts.
- Bag Dust Collectors: A step up, these systems are typically used in larger woodworking shops. They offer greater collection capacities.
- Cyclone Dust Collectors: These advanced systems separate heavier dust before it reaches the filter, offering superior performance and efficiency.
Each type has pros and cons. Think about your workshop’s size, the volume of work you do, and how much you are willing to invest. Many woodworking forums like Wood Magazine and Woodworking Network provide insights and experiences from fellow woodworkers that can help you make an informed decision.
Implementing Your Dust Collection System
Once you’ve chosen the right system, installation becomes the next critical step. Here’s a simple guide to ensure you get it right:
- Select the Right Location: Position your dust collector close to your most used power tools to minimize the length of ducting.
- Proper Ducting: Use smooth pipes that are appropriately sized according to your system’s requirements. Too many bends or a narrow pipe can hinder performance.
- Connect Your Tools: Make sure each tool has a dedicated connection. Using blast gates can help you control the airflow.
- Regular Maintenance: Ensure you clean your filters and empty the dust bag regularly to maintain optimal performance.
Regularly check for leaks in your ducting and connections to keep dust collection efficient. Engage with communities like Forestry Forum to share tips on maintenance and troubleshooting.
The benefits of effective dust collection in your woodworking space cannot be overlooked. From health and safety improvements to enhanced productivity and cost savings, investing in a good dust collection setup is essential for any woodworking enthusiast. Take the time to research, invest wisely, and soon you’ll enjoy a cleaner and safer workspace.
Common Mistakes to Avoid When Setting Up Dust Collection
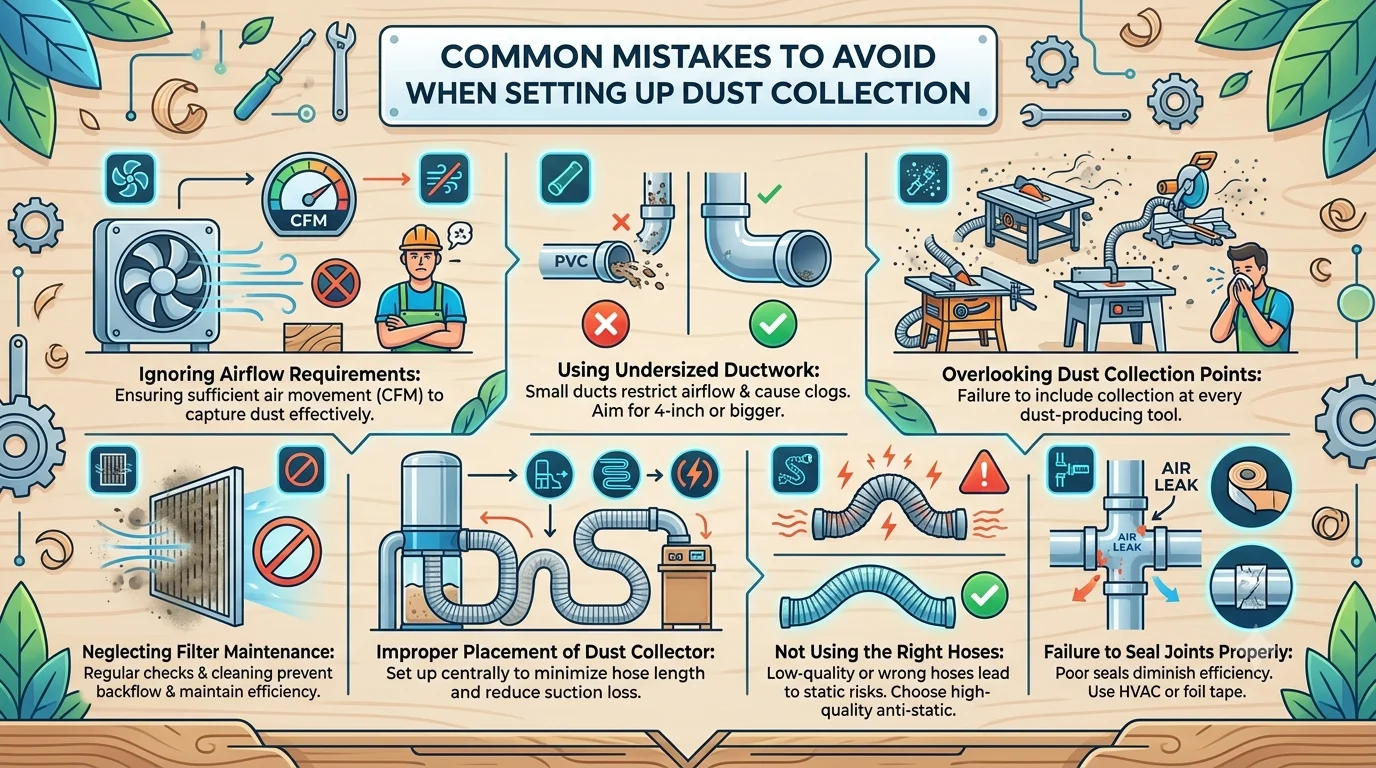
Setting up a woodworking dust collection system is a crucial step for anyone serious about woodworking. However, many enthusiasts make common mistakes that can affect performance and safety. By avoiding these pitfalls, you can ensure your dust collection setup works efficiently, keeping your workshop clean and your lungs healthy.
Ignoring Airflow Requirements
One of the biggest mistakes is not considering airflow requirements. Your dust collection system relies heavily on the proper airflow to capture dust effectively. Each dust collector has a specific cubic feet per minute (CFM) rating, which indicates how much air it can move. Make sure the ducts and hoses you use do not restrict airflow. A system with plenty of bends or narrow sections can hinder performance. For optimal functioning, aim to keep duct runs as straight and smooth as possible.
Using Undersized Ductwork
Another error is selecting ductwork that is too small. When you use small ducts, you risk reducing airflow and creating clogs. To avoid this, follow these guidelines:
- For up to 600 CFM, use at least 4-inch ducts.
- For 600 to 1,200 CFM, consider 5 to 6-inch ducts.
- For larger systems, 7-inch ducts or bigger may be necessary.
Choosing the right size duct can save you long-term headaches. For more in-depth information, check Wood Magazine.
Overlooking Dust Collection Points
When setting up your system, it’s important to think about where the dust will be generated. Forgetting to include collection points at every dust-producing tool will lead to inefficiencies. Make sure to have the following tools connected to your dust collection system:
- Table saw
- Band saw
- Router table
- Jointers and planers
- Sanders
By ensuring every tool is covered, you’ll capture more dust and maintain a cleaner environment.
Neglecting Filter Maintenance
Filters play a critical role in how effectively your dust collection system works. A common mistake is neglecting regular maintenance. Clogged filters can reduce airflow and lead to dust blowing back into your workspace. Make it a routine to check and clean your filters regularly, and replace them as needed to keep your system running smoothly.
Improper Placement of Dust Collector
The placement of your dust collector can greatly affect its efficiency. Placing it too far from your tools can result in losses in suction power and dust emission. Ideally, set up your collector as centrally located as possible. Use longer hoses for those tools that are further away, but remember that every additional foot can reduce suction.
Not Using the Right Hoses
Your choice of hose also matters. Using low-quality or the wrong type of hose can lead to static electricity buildup, which poses safety risks. Always opt for high-quality, anti-static hoses, particularly in larger setups. For detailed reviews on choices, consider sites like Woodworker’s Source.
Failure to Seal Joints Properly
Many people overlook how important sealing joints can be. Air leaks at the joints can significantly diminish your dust collection efficiency. Always ensure joints are tightly sealed using appropriate materials like foil tape or HVAC tape. This simple step can enhance the performance of your entire system.
| Mistake | Consequence | Solution |
|---|---|---|
| Ignoring airflow requirements | Reduced dust collection efficiency | Consider CFM rating |
| Using undersized ductwork | Clogs and poor airflow | Select the right hose size |
| Overlooking dust collection points | Poor capture of dust | Install points at all machinery |
| Neglecting filter maintenance | Clogged filters, backflow of dust | Regular checks and replacements |
| Improper placement of dust collector | Loss of suction | Position centrally with shorter runs |
By recognizing and rectifying these common mistakes, you can create a more effective Woodworking Dust Collection Setup DIY Tutorial. It’s not just about collecting waste; it’s about maintaining a safe and healthy workspace. For additional insights, you can refer to Popular Woodworking.
DIY Dust Collection Techniques: Exploring Affordable Options
Dust collection is crucial for any woodworking enthusiast. Effective dust control not only keeps your workspace clean but also protects your health. If you’re looking for affordable and DIY dust collection techniques, you’re in the right place. This guide will explore various efficient options to help maintain a cleaner and safer environment in your workshop.
Understanding the Basics of Dust Collection
Before jumping into DIY techniques, it’s essential to understand what woodworking dust collection involves. In woodworking, dust and debris can accumulate quickly. This can lead to health issues such as respiratory problems and create a dangerous environment due to fire hazards. A good dust collection system captures wood chips, shavings, and fine dust particles from your tools, ensuring a healthier workspace.
Common DIY Dust Collection Techniques
Creating your own dust collection system doesn’t have to break the bank. Here are some practical and affordable options:
- Shop Vacuum Setup: Use a standard shop vacuum as your main dust collector. Attach the proper hoses to your power tools to effectively capture dust at the source. This method is simple, efficient, and incredibly budget-friendly.
- Homemade Cyclone Separator: Construct a cyclone separator using a trash can and some PVC piping. This system pre-separates larger particles from the fine dust before they reach the vacuum, extending its life and effectiveness.
- Networked Collection System: Connect multiple tool dust ports using ducting to create a centralized system. This requires some planning but significantly enhances efficiency. Use smooth PVC or metal ducting for optimal airflow.
Materials You Will Need
For your DIY dust collection setup, gather the following materials:
| Item | Purpose |
|---|---|
| Shop Vacuum/Blower | Main dust collection unit |
| PVC Pipe | Connect tools to the vacuum |
| Trash Can | Cyclone separator component |
| Duct Tape | Ensure airtight connections |
| Hoses | Flexible connections between tools and vacuum |

Step-by-Step Setup Guide
To set up an effective DIY dust collection system, follow these steps:
- Evaluate Your Workshop: Identify where most dust is generated and assess which tools need dust collection.
- Choose Your Main Unit: Decide if you’ll use a shop vacuum or build a cyclone separator. For a shop vacuum, ensure it has a good filtration system.
- Plan Your Ducting: Map out connections between your tools and the vacuum unit. Measure accurately to reduce airflow loss.
- Install Hoses and Connectors: Use flexible hoses to connect various tools to your vacuum. Ensure all connections are secure to minimize leaks.
- Test Your System: Turn on your vacuum and check for air leaks. Adjust connections as needed for optimal performance.
Maintenance Tips for Keeping Your Dust Collection System Efficient
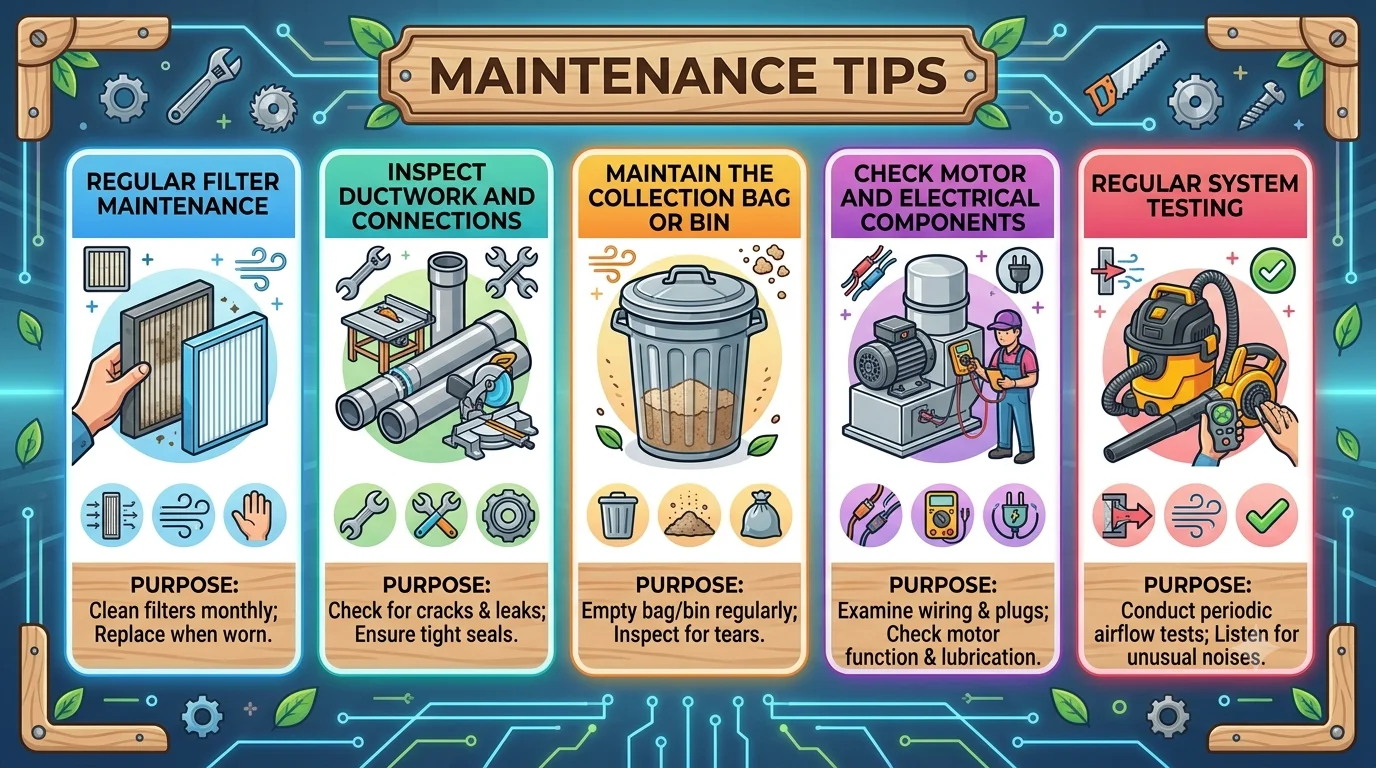
Dust collection systems play a crucial role in maintaining a clean and safe woodworking environment. Ensuring your dust collection system operates efficiently is essential not only for system performance but also for your health and productivity. Here are some maintenance tips to keep your dust collection system running smoothly.
Regular Filter Maintenance
The filters in your dust collection system work hard to capture fine particles. Clogged filters can impede airflow, leading to decreased efficiency. To maintain optimal performance, remember to:
- Check filters regularly for dust build-up.
- Clean filters according to the manufacturer’s instructions.
- Replace filters when they show signs of wear or are no longer effective.
Most manufacturers recommend cleaning filters once a month, but your schedule might vary depending on usage. For more information on filter maintenance, visit Wood Magazine.
Inspect Ductwork and Connections
Over time, dust can accumulate in the ductwork, and connections may become loose. Performing regular inspections can help ensure that your system operates efficiently. Here are some steps to follow:
- Check for leaks or cracks in the ductwork.
- Ensure that connections between hoses and ducting are tight.
- Consider adding blast gates to direct airflow without overloading the system.
Keep in mind that smooth, straight duct runs will help improve airflow. If you’re looking to upgrade your ductwork, check out Woodworkers Guild of America for a variety of options.
Maintain the Collection Bag or Bin
The collection bag or bin is a key component of your dust collection system. Keeping it clean will ensure it can hold as much debris as possible without clogging. Here’s how to manage your collection area:
- Empty the bag or bin regularly, depending on your workload.
- Inspect the bag for tears or wear; replace it if necessary.
- Ensure that the attachment point to the system is secure to prevent dust from escaping back into the workshop.
Consider using a larger capacity bag to reduce how often you need to empty it. For tips on choosing the right collection bag, you can refer to Woodcraft.
Check Motor and Electrical Components
The motor is another critical element of your dust collection system. A well-maintained motor can provide many years of service. Follow these tips to keep it in good condition:
- Check all wiring for signs of wear or damage.
- Ensure the motor is securely mounted to avoid vibration and noise.
- Lubricate bearings as recommended by the manufacturer to keep the motor running smoothly.
If you’re experiencing power issues, it might be beneficial to consult an electrician or a professional. For more detailed advice on motor maintenance, explore resources at Wood Magazine.
Regular System Testing
Conduct a regular test of your dust collection system. Here’s how you can perform checks:
- Turn on the dust collector and listen for any unusual noises.
- Check for proper suction at various tools to ensure efficiency.
- Measure airflow with an anemometer to verify performance levels.
By regularly testing your setup, you can quickly identify issues before they escalate. For more insights, consider visiting The Wood Whisperer.
By incorporating these maintenance tips into your routine, you can maximize the efficiency of your dust collection system. A well-maintained system not only provides better air quality but also enhances your woodworking experience. Remember, regular maintenance is key to keeping your workshop safe and your tools in top condition.
Conclusion
Creating an effective Woodworking Dust Collection Setup DIY Tutorial is crucial for maintaining a safe and efficient workspace. By understanding the essential components of a DIY dust collection system, you can customize a solution that meets your specific needs. Not only does a proper dust collection system enhance your woodworking experience, but it also significantly reduces health risks by minimizing airborne dust particles, leading to a cleaner environment.
When embarking on your DIY journey, be mindful of common mistakes that can undermine your efforts. Poor placement or inadequate sizing of ducts can lead to ineffective dust capture. Instead, focus on smart installation techniques and affordable options that keep your costs down while maximizing performance. Exploring creative solutions, such as using repurposed materials, can further enhance your system without breaking the bank.
Regular maintenance is key to ensuring that your dust collection system operates at peak efficiency. Simple practices like cleaning filters, checking for leaks, and emptying collection bags can prolong the life of your equipment and improve overall performance.
By investing the time and effort into setting up and maintaining your Woodworking Dust Collection Setup DIY Tutorial, you not only enhance your craft but also safeguard your health. With these strategies and tips, you’re well on your way to creating a clean, safe, and enjoyable woodworking environment that fosters creativity and quality craftsmanship for years to come. Remember, a little planning today goes a long way in perfecting your workshop for tomorrow’s projects. Happy woodworking!