
Why Choosing the Right Woodworking Bed Plans Matters
Building your own bed is a rewarding project that combines creativity with practical skills. When you’re just starting in woodworking, selecting well-designed and easy-to-follow woodworking bed plans is crucial. These plans guide every cut, joint, and finish, helping you avoid common mistakes and enjoy the process. For beginners, the best plans offer clear instructions, simple tools requirements, and materials that are easy to handle.
Not only do these guides save time and reduce waste, but they also help you craft a sturdy, beautiful bed that can last for years. Whether you’re after a minimalist platform bed, a rustic farmhouse style, or a classic frame, the right plan makes all the difference in your success and satisfaction.
Key Features of Beginner-Friendly Woodworking Bed Plans
- Clear Instructions: Step-by-step guides with diagrams or pictures that explain each part of the build in simple language.
- Accessible Tools and Materials: Plans that use common tools like saws, drills, and sanders, and readily available wood types such as pine or plywood.
- Simple Joinery Techniques: Easy-to-master joints such as butt joints, pocket holes, or dowels instead of complex dovetails or mortise and tenon joins.
- Flexible Size Options: Adjustable dimensions to fit different mattress sizes—from twin to king—help beginners customize their projects.
- Minimal Finishing Steps: Designs that don’t require advanced finishing skills, allowing beginners to focus on building strength and form.
Popular Types of Woodworking Bed Plans Suitable for Beginners
When looking for bed plans to start your woodworking journey, these styles are both manageable and stylish:
Platform Beds
The platform bed features a simple, low-to-the-ground design that eliminates the need for box springs. It usually consists of a flat wooden surface supported by legs or a frame. Because of its straightforward construction, platform bed plans rarely involve complicated joinery. Beginners enjoy building these because they provide enormous flexibility and require fewer materials.
Box Spring Frame Beds
This type of bed involves building a frame that supports a box spring beneath the mattress. The plans focus on creating a rectangular outer frame, commonly using butt joints reinforced with screws or brackets. These plans are straightforward and perfect for a first woodworking project.
Storage Beds
For those wanting extra functionality, beginner-friendly storage bed plans include built-in drawers or shelves beneath the bed frame. While these plans can be a little more complex, many come with simplified assembly instructions, making them accessible for motivated beginners looking to add a useful feature to their bedroom.
Essential Materials and Tools for Your Bed Project
When starting with woodworking bed plans, using the right materials and tools makes the project less intimidating and more enjoyable.
| Materials | Reasons to Choose |
|---|---|
| Pine Wood | Affordable, lightweight, and easy to work with |
| Plywood | Stable and available in large sheets for flat surfaces |
| Wood Screws | Strong fastening without complicated joinery |
| Wood Glue | Reinforces joints for extra durability |
| Sandpaper | Prepares surfaces for a smooth finish |
Basic tools include an electric drill, circular saw or hand saw, measuring tape, clamps, and a screwdriver. Many plans suggest using pocket hole jigs to create precise joints quickly.
Where to Find Reliable Woodworking Bed Plans for Beginners
Searching for plans online can sometimes be overwhelming with so many options available. To ensure your success, look for plans that experts have tested and come with detailed instructions, cut lists, and tool guides.
You may want to explore websites such as Ana White and Family Handyman, which offer free or affordable woodworking bed plans suited for beginners. These sites also provide helpful tutorials and community forums where you can ask questions and share progress.
Tips to Keep in Mind When Building Your Bed
- Measure Twice, Cut Once: Always double-check your measurements before making any cuts to avoid wasting materials.
- Start Small: If this is your first woodworking project, choose simpler designs and work your way up to more complex bed frames.
- Follow Safety Procedures: Use protective gear, keep your work area clean, and handle tools carefully to prevent accidents.
- Test Fit Pieces: Before final assembly, dry fit your pieces to ensure everything aligns properly.
- Take Your Time With Finishing: Sand thoroughly and apply finish evenly to enhance the durability and appearance of your bed.
Benefits of Building Your Own Bed Using Woodworking Plans
Creating a bed from woodworking plans offers several advantages beyond cost savings. It allows you to customize dimensions and style to perfectly match your space and taste. You develop new skills and gain confidence in your craftsmanship, which can spur more advanced woodworking projects. Plus, the pride and satisfaction of sleeping in a bed you built yourself is hard to beat.
Whether you want a simple bed frame or a piece with elegant design, quality woodworking bed plans provide the roadmap to turn your vision into reality.
Choosing the Right Materials for Your Woodworking Bed Project
When diving into woodworking bed plans, one of the most important decisions you’ll face is selecting the right materials for your project. The choice of wood and accompanying elements can greatly affect the durability, aesthetic appeal, and overall success of your handmade bed. Understanding the properties of different woods and materials will help you create a bed frame that not only looks great but lasts for years.
Choosing the Best Type of Wood
Your first step is identifying the wood that fits your style, budget, and woodworking skills. Woods come in two main categories: hardwoods and softwoods.
Hardwoods for Strong and Durable Beds
Hardwoods are denser and generally more durable. This makes them an excellent choice for bed frames that need to withstand daily use and weight.
- Oak: A classic choice, oak is strong and has a beautiful grain that can be highlighted with clear finishes.
- Maple: Known for its smooth texture and resistance to wear, maple is ideal for a sleek modern look.
- Cherry: Adds warmth with its reddish-brown tones and ages beautifully over time.
- Walnut: A premium choice offering dark, rich color and excellent stability.
Softwoods for Budget-Friendly Projects
Softwoods are easier to work with and often cost less. They are perfect if you are a beginner or prefer a rustic aesthetic.
- Pine: Widely available and affordable; pine is easy to cut and shape but can dent more easily.
- Cedar: Naturally resistant to insects and decay, cedar adds a pleasant aroma and rich color.
- Fir: Sturdy and straight-grained, making it a good option for structural parts of the bed.
Considering Engineered Wood Options
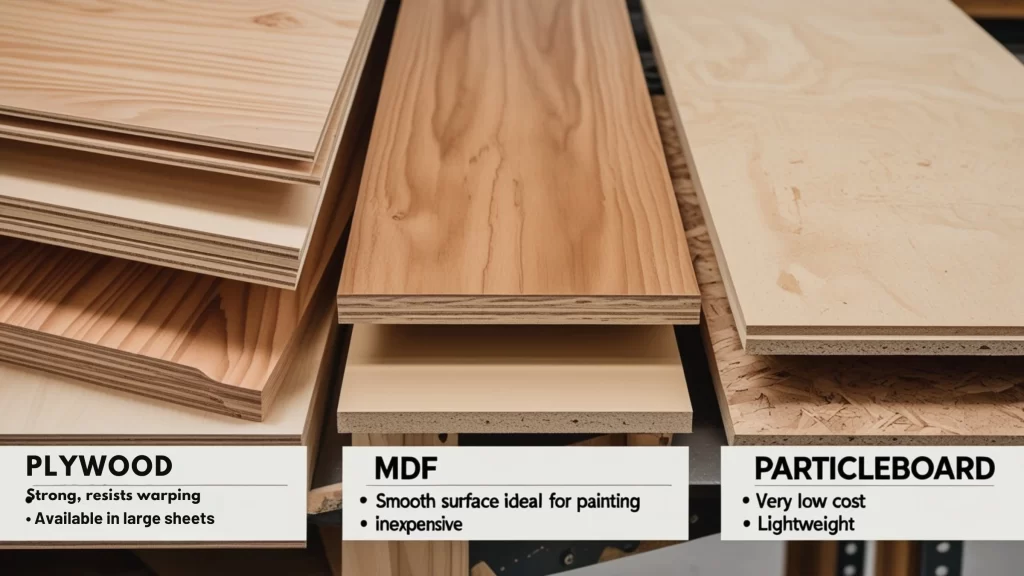
Besides solid wood, engineered woods like plywood and MDF are popular in woodworking bed plans due to their affordability and stability.
| Material | Advantages | Considerations |
|---|---|---|
| Plywood | Strong, resists warping, available in large sheets | Edges need finishing; surface can be less attractive without veneer |
| MDF (Medium Density Fiberboard) | Smooth surface ideal for painting, inexpensive | Not as strong as plywood, susceptible to water damage |
| Particleboard | Very low cost, lightweight | Weak, less durable, prone to swelling with moisture |
Choosing Finishes and Hardware
Wood is just one part of the puzzle—the finish and hardware you select play a significant role in the bed’s final look and durability.
Finishes to Protect and Beautify
A protective finish safeguards your bed from scratches, spills, and moisture. Consider these options:
- Oil-based finishes: These penetrate the wood, enhancing natural grain and providing long-lasting protection.
- Polyurethane: Available in satin, gloss, or matte, this synthetic finish forms a hard shell on the surface.
- Wax or lacquer: Offers a smooth feel and good aesthetic, though may require more upkeep.
Hardware Selection
Strong and reliable hardware ensures your bed is sturdy. Choose bolts, screws, and brackets that provide good support. Steel hardware with rust-resistance coating is often the best choice.
Where to Find Reliable Woodworking Bed Plans and Materials
If you’re just starting out or looking for expertly crafted plans, Wood Magazine offers an extensive collection of free, detailed woodworking bed plans designed for various skill levels and styles. For sourcing materials, Rockler Woodworking and Hardware is a trusted retailer that stocks quality hardwoods, softwoods, engineered plywood, and finishing supplies to fit your project needs.
Tips for Working with Your Chosen Materials
Once you’ve picked your materials, keep these practical tips in mind:
- Acclimate the wood: Let your lumber sit in your workshop for several days to adjust to the room’s humidity and temperature. This prevents warping and cracking later.
- Pre-cut and label: Organize your materials by cutting according to your plans and labeling each piece to avoid confusion during assembly.
- Test finishes: Always apply your finish choice on a scrap piece to see how it interacts with the wood.
Building a bed from scratch is a rewarding challenge, and choosing the right materials sets you on the path to success. By selecting appropriate wood and finishing materials, and carefully sourcing quality hardware, you’ll create a stunning and sturdy bed frame tailored to your style and needs.
Step-by-Step Guide to Building a Wooden Bed Frame
Gathering Materials and Tools for Your Woodworking Bed Plans
Before you start building your wooden bed frame, it’s essential to gather all necessary materials and tools. This preparation phase saves time and ensures a smoother building process. Common materials include quality hardwood or softwood lumber, wood screws, wood glue, sandpaper, wood finish or paint, and mattress support slats. Essential tools are a saw (circular or miter), electric drill, screwdriver, measuring tape, carpenter’s square, clamps, and safety gear such as goggles and gloves.
For detailed material recommendations and to find local suppliers, websites like Wood Magazine offer valuable resources and product reviews tailored to woodworking enthusiasts.
Planning and Measuring Your Bed Frame
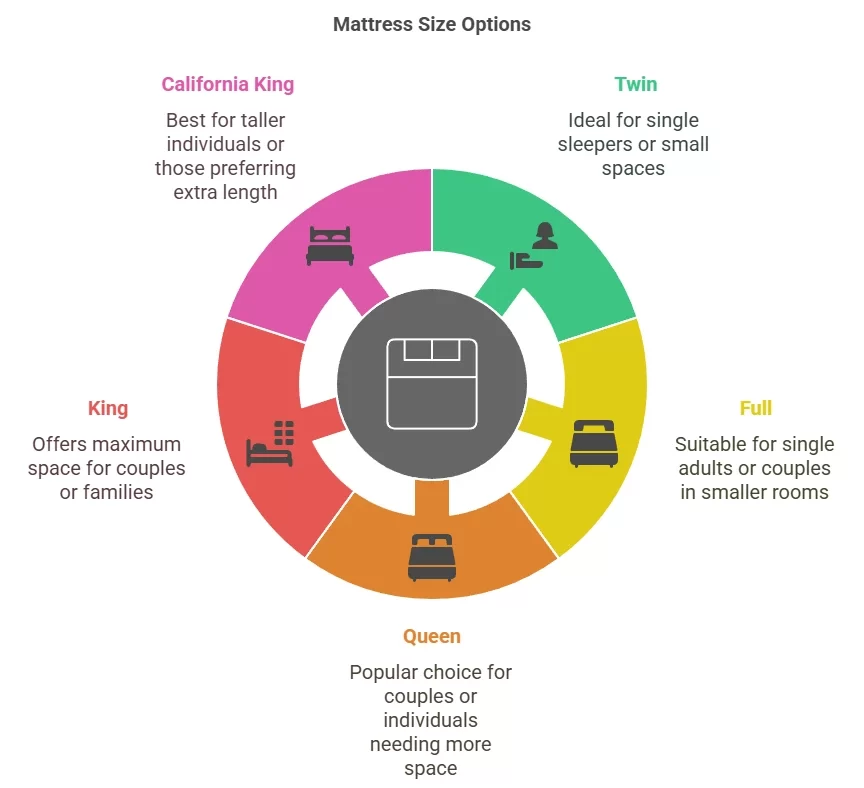
Accurate planning and measurement are vital steps in any woodworking project, especially a bed frame. Determine the mattress size you will be accommodating: Twin, Full, Queen, King, or California King. Then, decide if you want additional features such as built-in storage drawers or headboards. Including extra design elements affects both your material needs and the complexity of your build.
Start by sketching your design on paper or using a digital tool for woodworking plans. Your sketch should include dimensions for all major components including the side rails, headboard, footboard, support slats, and legs.
| Standard Mattress Sizes and Corresponding Frame Dimensions | |||
|---|---|---|---|
| Mattress Size | Width (inches) | Length (inches) | Recommended Frame Size (inches) |
| Twin | 38 | 75 | 41 x 79 |
| Full | 54 | 75 | 57 x 79 |
| Queen | 60 | 80 | 63 x 84 |
| King | 76 | 80 | 79 x 84 |
| California King | 72 | 84 | 75 x 88 |
Cutting Wood and Assembling the Frame
Using your measurements and woodworking bed plans, cut the wood precisely for each component. Straight, clean cuts are critical, so take your time and use clamps to secure wood when cutting. Sand the edges to remove splinters and create a smooth finish, increasing safety and aesthetic appeal.
Start assembling by joining the headboard and footboard with side rails using wood screws and wood glue for added strength. Use a carpenter’s square to keep angles at 90 degrees, ensuring the frame is square and sturdy. Don’t forget to pre-drill holes to avoid splitting the wood. Add reinforcement blocks at each corner if your design requires extra sturdiness.
Installing Support Slats and Legs
The mattress requires adequate support to prolong its life and ensure comfort. Lay down slats evenly spaced across the bed frame. You can screw slats directly onto support beams or use a metal bed slat holder for easier replacement and adjustment. Space between slats should be around 2 to 3 inches for proper ventilation.
Attach the bed legs, ensuring they are level to prevent wobble. Wooden legs can be crafted from the same lumber used for the frame, or you may purchase pre-made legs for convenience. Check that each leg supports the mattress weight adequately.
Sanding, Finishing, and Safety Tips
Sanding the entire frame thoroughly removes rough spots and prepares the surface for finishing. Apply a wood finish, stain, or paint based on your preference. Wood finishes protect the bed from moisture and general wear, extending the life of the frame and enhancing its natural beauty. Choose low-VOC or eco-friendly finishes to maintain air quality indoors.
When working on woodworking bed plans, always wear safety glasses and a dust mask during sanding and cutting. Maintain a clean, organized workspace and read tool manuals before use. Secure all components tightly during assembly to prevent any movement or instability once the bed is in use.
Additional Resources and Inspiration
For more detailed woodworking bed plans, free templates, and step-by-step video tutorials, visit well-known craft and woodworking websites such as This Old House or Family Handyman. These sites offer community tips, alternative styles, and troubleshooting advice to help you tailor your project perfectly.
Building your own wooden bed frame is a gratifying project that combines creativity, craftsmanship, and practical use. With proper planning and attention to detail, your personalized bed frame will provide comfort and style for years to come.
Customizing Your Woodworking Bed Plans for Style and Functionality
Choosing the Right Woodworking Bed Plans for Your Space
When diving into woodworking bed plans, you want to make sure the design fits both your room’s size and your personal style. Customizing these plans allows you to create a bed that is not only visually appealing but also highly functional. Starting with a basic design, you can adjust dimensions, materials, and features to suit your needs.
First, measure your bedroom carefully. This step is crucial because it informs the size of the bed frame you will build. Standard sizes might not always fit perfectly, so tweaking the length, width, or height can make a major difference. For example, if you have a small room, consider building a platform bed with storage underneath to save space.
Materials Matter: Selecting Wood Types and Finishes
Your choice of wood will affect both the look and longevity of your bed. Common woods for bed projects include pine, oak, maple, and walnut. Each offers unique grain patterns and strength levels. Pine is affordable and easy to work with but less durable than hardwoods like oak or walnut.
Beyond the type of wood, the finish you pick impacts style and protection. You might prefer a natural look with a clear varnish or stain to highlight the wood’s grain. Alternatively, painting your DIY bed frame can add a pop of color or match your room’s theme. Consider finishes that protect against scratches and moisture to ensure your bed lasts for years.
Creative Functional Upgrades to Enhance Your Woodworking Bed
Customizing woodworking bed plans isn’t just about appearance; it’s also about adding functionality. Here are some ideas you could incorporate:
- Built-in Storage: Add drawers or shelves under the bed to keep linens, clothes, or books neatly tucked away. This is perfect for rooms with limited closet space.
- Headboard Features: Customize the headboard with integrated lighting, charging stations for devices, or even cushioned panels for extra comfort.
- Adjustable Frame: Create a modular frame that can easily be disassembled or resized if you move or want to rearrange your space.
- Raised Bed Design: A lofted design offers additional storage or living space underneath, ideal for small bedrooms or studio apartments.
Each of these features can be tailored through woodworking bed plans to suit your lifestyle and maximize the bedroom’s usability.
Your Personal Style with Design Choices
Your bed is often the centerpiece of your bedroom, so it’s essential to incorporate your own style into the project. Woodworking bed plans typically provide clear dimensions and joinery methods, but the aesthetic choices are yours to control.
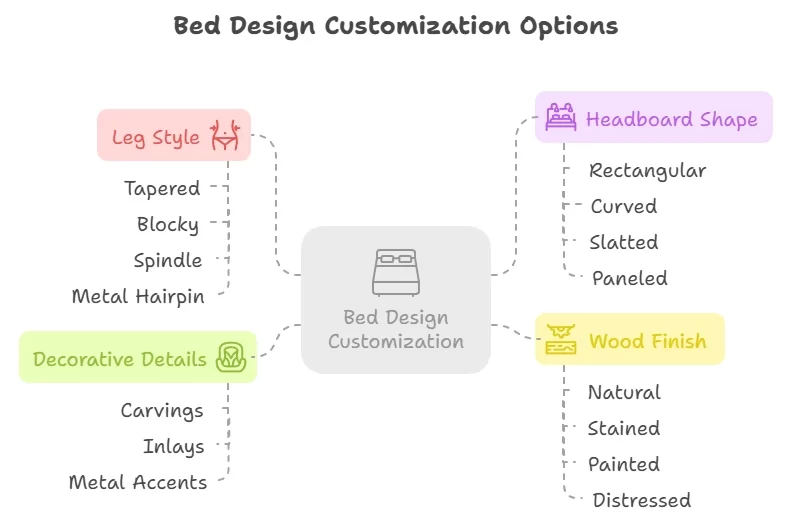
Consider these ways to add a personal touch:
| Design Element | Customization Options | Effect on Style |
|---|---|---|
| Leg Style | Tapered, blocky, spindle, or metal hairpin legs | Changes the visual lightness or heaviness of the bed |
| Headboard Shape | Rectangular, curved, slatted, or paneled | Sets the tone from modern to rustic to classic |
| Wood Finish | Natural, stained, painted, distressed | Influences warmth, color scheme, and ambiance |
| Decorative Details | Carvings, inlays, metal accents | Adds personality and craftsmanship appeal |
By mixing and matching these elements, you can create a unique bed frame that reflects your tastes perfectly.
Tips for Adapting Woodworking Bed Plans Safely and Effectively
When making changes to any woodworking bed plans, keep these vital tips in mind:
- Check structural integrity: If you resize components or add features, make sure the frame remains stable and supports weight safely.
- Use quality joinery techniques: Proper joints like mortise and tenon, dowels, or pocket screws improve durability over simple nails or screws alone.
- Test dimension adjustments: Build small test pieces or mock-ups to verify dimensions and fit before cutting all your wood.
- Plan your tools and workspace: Confirm you have the right saws, clamps, drills, and a clean workspace to avoid mistakes or injury.
Following these strategies will ensure your customized woodworking bed is as safe and comfortable as it is beautiful.
Finding Reliable Woodworking Bed Plans Online
A good set of woodworking bed plans is the foundation of a successful project. Trusted resources often provide detailed drawings, material lists, and step-by-step instructions. Many websites specialize in free or paid plans designed for every skill level.
For high-quality plans, consider visiting places like Ana White or Wood Magazine. These sites offer a vast collection of woodworking projects, including beds with customizable options. Browsing multiple plans can inspire ideas for your own modifications, ensuring your final build aligns perfectly with your style and needs.
By starting with solid woodworking bed plans and thoughtfully customizing helps you create a bed frame that combines beauty, functionality, and personal flair. This approach not only enhances your room’s design but provides a satisfying woodworking experience from start to finish.
Essential Tools Every Woodworker Needs for Bed Construction Methods
Building a wooden bed from scratch is a rewarding project that combines creativity, precision, and craftsmanship. To successfully execute woodworking bed plans, having the right tools at your disposal is essential. These tools not only help improve efficiency but also ensure your bed frame is safe, sturdy, and aesthetically pleasing.
Fundamental Measuring and Marking Tools
Before cutting or joining any wood pieces, accuracy in measurement and marking is crucial. Precision at this stage prevents costly errors later in construction.
- Tape Measure: A reliable 25-foot tape measure is a must-have for measuring planks, slats, and overall dimensions of your bed frame.
- Combination Square: Helps in drawing accurate right angles, marking wood, and checking the squareness of joints.
- Marking Gauge: Ideal for laying out mortise and tenon joints common in bed construction.
- Pencil and Marking Knife: Use sharp pencils or marking knives for fine, visible lines that won’t blur during cutting.
Cutting Tools for Precision and Versatility
Cutting wooden pieces to the exact size is a foundational step for building any bed. The type of cuts you’ll need — straight, angled, or curved — requires specific tools.
- Table Saw: This tool allows for straight, long rip cuts and crosscuts. Fine adjustments can be made for perfect sizing of rails, legs, and support slats.
- Miter Saw: Essential for making precise angled cuts, especially for box joints or decorative frames in headboards and footboards.
- Jigsaw: Perfect for cutting curves, rounded edges, or intricate shapes that add character to your bed design.
- Handsaw: A good quality handsaw is handy for quick on-the-spot cuts or finishing cuts that require manual control.
Joinery and Assembly Tools to Ensure Strong Bonds
Effective joinery methods are key to durable bed frames. Selecting the right fastening tools and techniques will help produce a bed that will last for years.
- Power Drill and Driver: Drills are essential for pre-drilling holes, which prevent wood splitting. Drivers speed up the process of driving screws for strong mechanical joints.
- Clamps: Various clamps like bar clamps, C-clamps, and corner clamps hold pieces together firmly during gluing and fastening.
- Wood Glue: Serving as a primary bonding agent, good quality wood glue works well with clamps to secure joints.
- Doweling Jigs or Pocket Hole Jigs: These specialized tools simplify creating strong wood-to-wood joints without complicated mortising.
Sanding and Finishing Tools for a Polished Look
After assembly, smooth edges and flawless surfaces not only improve the appearance but also increase safety by removing splinters and rough spots.
- Orbital Sander: Speeds up sanding large surfaces like mattress supports and side rails with even, swirl-free finishes.
- Sanding Blocks: Useful for sanding detailed or curved areas where power sanders may not reach.
- Files and Rasps: Perfect for shaping edges and smoothing cutouts in headboards or footboards.
Essential Safety Gear
Woodworking involves power tools and sharp equipment, making safety gear non-negotiable for protecting yourself during bed building.
- Safety Glasses: Shield your eyes from sawdust, wood chips, and splinters.
- Hearing Protection: Power tools can be loud, so earplugs or earmuffs help preserve hearing health.
- Dust Mask or Respirator: Protect your lungs from fine sawdust particles.
- Work Gloves: Provide grip and protect your hands from splinters and accidental cuts.
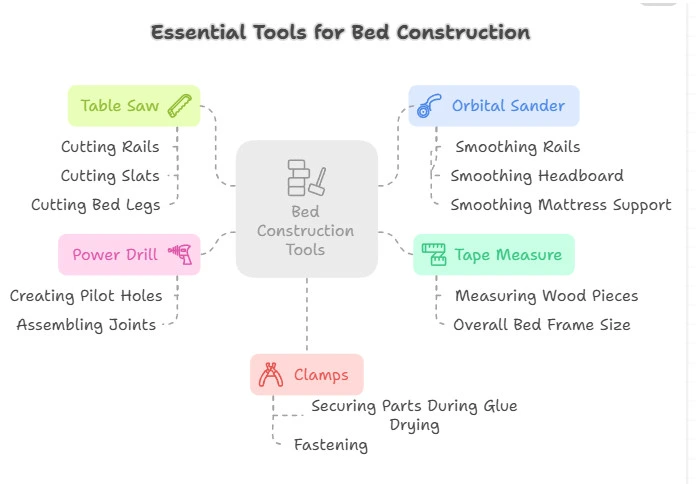
Table: Key Tools and Their Primary Functions
| Tool | Primary Function | Recommended Use for Bed Construction |
|---|---|---|
| Tape Measure | Accurate measurement | Measuring wood pieces and overall bed frame size |
| Table Saw | Long straight cuts | Cutting rails, slats, and bed legs |
| Power Drill | Drilling and screw driving | Creating pilot holes and assembling joints |
| Orbital Sander | Sanding surfaces | Smoothing rails, headboard, and mattress support |
| Clamps | Holding pieces together | Securing parts during glue drying and fastening |
Planning ahead and ensuring you have these essential tools helps make your woodworking bed plans more achievable. As you gain experience and narrow in on your bed design style, investing in some specialized tools can further elevate your craftsmanship.
For detailed woodworking bed plans and additional tips on tool usage, Wood Magazine’s bed plans section offers a great resource with step-by-step instructions. Family Handyman also provides practical videos and guides for beginners and advanced woodworkers, making your bed building project easier and more enjoyable.
Conclusion
Creating your own wooden bed is a rewarding project that combines creativity, craftsmanship, and practicality. By exploring woodworking bed plans designed for beginners, you can find clear, manageable designs that help you build confidence while crafting a beautiful piece of furniture. Selecting the right materials is just as important; choosing quality wood suited to your style and budget ensures durability and enhances the overall look of your bed.
Following a detailed, step-by-step guide makes the construction process less intimidating, guiding you through each stage from measuring to assembly. Customizing your woodworking bed plans lets you add personal touches, whether it’s adjusting dimensions to fit your space or incorporating unique features for added function and style. And remember, having the essential tools on hand—from saws and drills to clamps and measuring devices—makes the building process smoother and more enjoyable.
With careful planning, the right materials, and a bit of patience, you’ll be proud to sleep on a bed you’ve built yourself. This hands-on experience adds warmth and character to any bedroom, turning a simple woodworking project into a lasting, cherished piece of home comfort.