
Why the Mortise and Tenon Joint Is Considered Hard
Crafting a mortise and tenon joint is not an easy task. Here are a few reasons why it is often deemed the hardest joint in carpentry.:
- Precision is Key: Both the mortise and tenon must be cut to exact dimensions for a secure fit. Even slight deviations can weaken the joint.
- Tool Skills Required: Mastering the tools used for cutting these joints—like chisels, mallets, and saws—takes time and practice. Carpenter beginners often find this challenging.
- Time-Consuming: This joint often requires more time than simpler joints because of the detailed fitting and finishing involved.
- Increased Complexity: Advanced variations like the haunched mortise and tenon introduce additional challenges, requiring further skill and understanding.
Common Techniques for Creating a Mortise and Tenon Joint
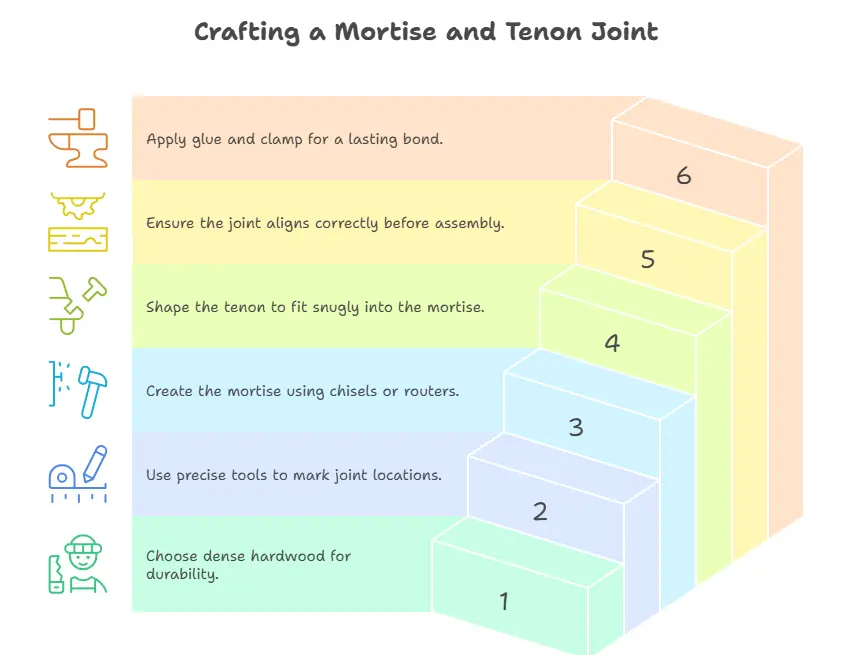
To successfully create a mortise and tenon joint, follow these techniques:
- Select Your Materials: Choose a dense hardwood, such as oak or maple, which will stand the test of time.
- Measure Accurately: Use reliable measuring tools to mark the locations for both the mortise and the tenon.
- Cut the Mortise: Create the mortise first. This is typically done using a chisel and mallet, or a router for refined edges. Ensure it’s deep enough for a firm hold.
- Cut the Tenon: Next, cut the tenon on the end of the corresponding wood piece. The tenon should fit snugly into the mortise without being too loose or too tight.
- Test the Fit: Always test the joint before final assembly to ensure everything aligns correctly. Make adjustments as necessary.
- Glue and Assemble: Once satisfied with the fit, apply wood glue for a lasting bond, and clamp the pieces together until the glue dries.
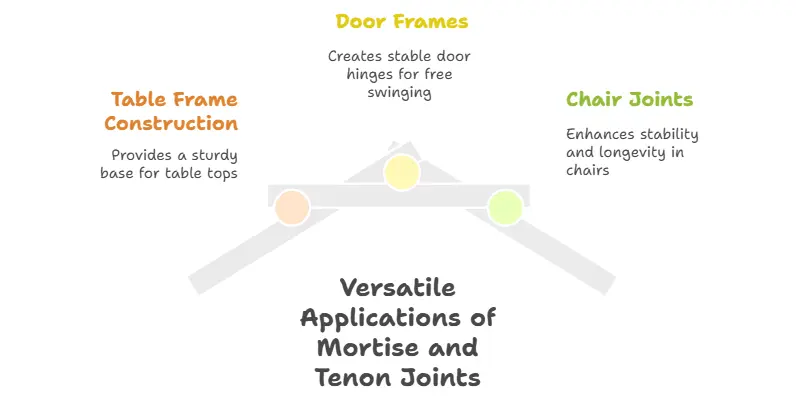
Applications of Mortise and Tenon Joints
These joints are versatile and are used across a variety of carpentry projects. Common applications include:
| Application | Description |
|---|---|
| Table Frame Construction | Provides a sturdy base for table tops, ensuring durability and resistance to warping. |
| Door Frames | Used to create stable door hinges, allowing doors to swing freely and remain securely in place. |
| Chair Joints | Enhances stability and longevity, supporting the weight and usage over time. |
Despite its complexity, mastering the mortise and tenon joint opens up a world of router possibilities in woodworking. By practicing and refining your skills over time, you can transform your carpentry projects into lasting treasures. If you want more detailed guides on specific woodworking techniques, check websites like Wood Magazine or Popular Woodworking. Embracing the challenge of perfecting this sophisticated joint can greatly enhance your carpentry skills and elevate your woodworking projects.
Essential Tools for Mastering Complex Joinery
Mastering complex joinery in carpentry requires not only skill but also the right set of tools. The tools you choose can significantly affect the quality of your work, from precision cuts to perfect joints. Here, we delve into the essential tools you’ll need to tackle intricate joinery techniques effectively.
Measuring and Marking Tools
Accurate measurements and markings are the foundations of any successful project. Here are some pivotal tools you should always have:
- Tape Measure: Ideal for quick and easy measurements.
- Square: Used for ensuring corners are 90 degrees, which is crucial for joints.
- Marking Gauge: Helps you mark lines parallel to the edge of a piece of wood with precision.
- Pencil: A fine-tip marking pencil helps create clear lines that are easy to see but can be easily erased.
Cutting Tools
Cutting tools are crucial for crafting the pieces that will be joined together. Here’s a list of essential cutting tools:
- Table Saw: Great for making precise cuts and can handle large pieces of wood.
- Hand Saw: A versatile tool for smaller projects, allowing for neat, controlled cuts.
- Chisels: Essential for cleaning up joints and removing material where needed.
- Band Saw: Useful for cutting curves and angles that are often necessary in intricate designs.
Joining Tools
To achieve strong and lasting joints, specific tools designed for joinery are indispensable:
- Doweling Jigs: Helps align dowels perfectly for tight fittings.
- Pocket Hole Jigs: Great for creating strong, hidden joints.
- Mortise Chisel: Ideal for cutting mortises used in mortise-and-tenon joints.
- Biscuits and Biscuit Joiner: This tool allows you to create strong biscuit joints for aligned pieces.
Clamping Tools
Clamps play a vital role in keeping your workpieces stable while you join them. Here are a few types to consider:
- Pipe Clamps: Versatile for various sizes and great for large projects.
- Bar Clamps: Excellent for quick adjustments and holding pieces tightly together.
- Corner Clamps: Useful for ensuring square corners in intricate settings.
Finishing Tools
Finishing touches are just as important as initial construction. For this, consider the following tools:
- Sanders: Orbital sanders, belt sanders, and hand sanders can smooth out the surfaces of your joints.
- Saws for Trim Work: Fine saws are needed for precise cutting of trim details after joinery is complete.
- Router: This tool is vital for creating decorative edges and dovetail joints.
Safety Equipment
Never overlook safety while working with these tools. Consider investing in:
- Safety Glasses: Essential to protect your eyes from dust and debris.
- Ear Protection: Use earmuffs or plugs when working with power tools to prevent hearing loss.
- Dust Masks: Protect your lungs from wood dust, especially when sanding.
Choosing the right tools is essential for mastering complex joinery in carpentry. Each tool serves a specific purpose and enhances your ability to create intricate, lasting structures. For additional tips on tool usage and maintenance, visit Fine Woodworking and Popular Woodworking. In your journey towards proficient joinery, remember that practice makes perfect. Use your tools effectively, pay attention to detail, and you’ll soon master the art of complex joinery!
Tips for Perfecting Your Woodworking Joints
Woodworking is an art that combines skill, creativity, and precision. One of the fundamental aspects of woodworking is mastering joints, as they connect different parts of your projects. Perfecting your woodworking joints is essential for both functionality and aesthetics. Here are some essential tips that can help you improve your joinery skills.
Choose the Right Joint for the Job
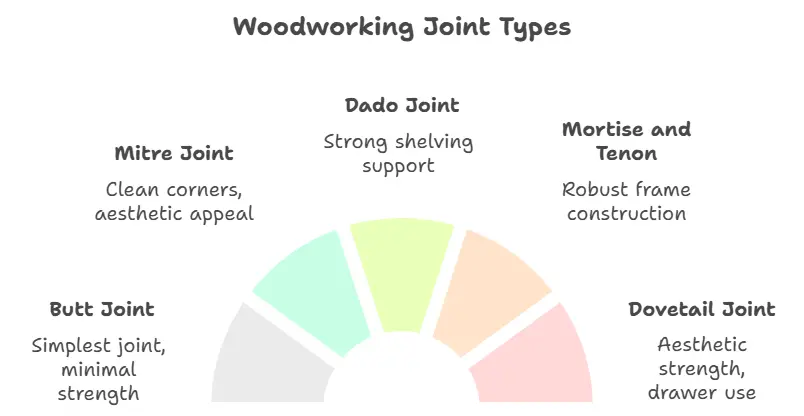
Not all woodworking joints are created equal. The first step in perfecting your joints is to choose the right type for your project:
- Butt Joint: Simple to make but provides minimal strength.
- Mitre Joint: Perfect for corner applications, providing a clean look.
- Dado Joint: Great for shelving, providing a strong fit.
- Mortise and Tenon: One of the strongest joints, ideal for frame constructions.
- Dovetail Joint: Known for its aesthetic appeal and strength, commonly used in drawers.
Invest in Quality Tools
The tools you use play a significant role in the quality of your joints. Invest in high-quality saws, chisels, and clamps. Sharp tools make cleaner cuts, ensuring that your joints fit together seamlessly. Here’s a quick list of must-have tools:
- Chisels
- Saws (crosscut and rip saws)
- Clamps
- Squares
- Sanding blocks
Measure Twice, Cut Once
One of the oldest sayings in woodworking holds true: always measure twice before cutting. Accurate measurements reduce the chance of errors, leading to better-fitting joints. Use a quality tape measure and a square to ensure your cuts are precise.
Practice Different Joint Techniques
Like any skill, practice is key to improvement. Spend time practicing different joint techniques. Each joint has its nuances, and feeling comfortable with them will help you in larger projects. Consider taking a woodworking class or watching tutorial videos online to enhance your skills.
Dry Fit First
Before applying glue, always perform a dry fit. This allows you to test the fit of your joints without the mess of adhesives. Dry fitting helps ensure everything aligns correctly, making adjustments easier before sealing the deal.
Choose the Right Adhesive
Glues vary in strength and drying times, so it’s essential to select the right one for your project. For general woodworking, PVA (polyvinyl acetate) glue works well. If you require more durability or are working with outdoor projects, consider waterproof options like Titebond III. Remember, even the strongest glue won’t compensate for poor technique, so always focus on the joint quality first.
Use Clamping Techniques Wisely
Clamping is crucial for ensuring a solid joint. When clamping, follow these techniques:
- Even Pressure: Ensure clamps are applied evenly to avoid misalignment.
- Use Sticks: Place clamps on wood pads or sticks to distribute pressure and prevent denting the wood.
- Timing: Allow sufficient time for glue to dry before removing clamps to achieve optimal strength.
Sand and Finish
After your joints are securely glued and clamped, sand the areas where they meet. This improves the overall look and feel of your project, ensuring smooth edges and surfaces. Remember that patience is vital, so take your time while sanding to get the best finish.
Keep Learning and Experimenting
Woodworking is an ever-evolving craft. Stay updated with new techniques and tools by reading books, joining forums, or following reputable woodworking sites such as Popular Woodworking and Wood Magazine. Engaging with the woodworking community will allow you to share experiences and receive helpful feedback. Perfecting your woodworking joints takes time, practice, and dedication. By following these tips, you’ll enhance not only your joinery skills but also the overall quality of your woodworking projects. Whether you are a seasoned woodworker or a beginner, these best practices will set you on the path to successful woodworking.
The Importance of Joint Strength in Furniture Building
When constructing furniture, the strength of joints made during assembly plays a crucial role in determining durability and functionality. The right joints ensure that pieces stay together under everyday use, which is essential for both aesthetics and structural integrity. Understanding the importance of joint strength can make all the difference in your carpentry projects. In carpentry, a variety of joints can be employed, each serving a different purpose and providing a unique level of strength. The most common types include:
- Mortise and Tenon
- Dovetail
- Finger Joint
- Butt Joint
- Lap Joint
- Dowels
Among these, the mortise and tenon joint stands out as one of the strongest. This joint is created by inserting a ‘tenon’ from one piece of wood into a ‘mortise’ cut into another. The resulting joint can withstand significant force, making it ideal for structural applications such as table legs or chair frames. On the other hand, dovetail joints are often celebrated for their beauty and strength. Commonly found in drawers and boxes, these joints resist pulling forces effectively, providing durability alongside an appealing aesthetic.
While they require more skill to create, the investment in time and effort yields robust results. Joint strength isn’t just about the type of joint; it’s also influenced by the materials used and the glue or fastening methods applied. High-quality adhesives can enhance the overall durability of a joint. For example, wood glue specifically designed for carpentry can fill gaps and create a bond that is often stronger than the wood itself. Here are some factors that contribute to joint strength:
| Factor | Description |
|---|---|
| Joint Type | The choice of joint plays a vital role. Stronger joints tend to be more complex but offer greater durability. |
| Material Quality | Using high-quality wood can impact joint strength. Thicker or denser woods typically produce stronger joints. |
| Adhesive | The type of adhesive used can either enhance or weaken a joint. It’s essential to choose the right glue for the material. |
| Construction Skill | The skill of the carpenter is critical; precise cuts and fitting will lead to stronger joints. |
| Environmental Factors | Humidity and temperature changes can weaken joints over time, so considering these factors is essential in furniture design. |

While many carpenters focus on appearance, emphasizing joint strength ensures longevity in furniture design. You wouldn’t want a beautiful piece that fails under pressure. When building furniture, remember that well-constructed joints prevent sagging, ensure alignment, and keep pieces intact over time. The location of the joint also affects its strength. For example, joints that bear weight must be particularly robust to withstand stress. In contrast, decorative joints may prioritize aesthetics over strength.
As a result, it’s essential to match the joint type to its purpose in the overall design. To better understand these principles, consider this: a dining table must support the weight of dishes, people, and other items, making the choice of joint critically important. Mortise and tenon joints, combined with strong materials and quality glue, offer the best solution for these high-stress applications.
For those seeking more information on joint strength and furniture building, consider exploring the following resources: Wood Magazine, Fine Woodworking, Woodworkers Source. The emphasis on joint strength cannot be overstated in furniture building. It influences not only the beauty of a piece but also its functionality and durability. By understanding the various types of joints and their applications, you can enhance the quality of your furniture projects significantly.
Comparing Traditional and Modern Joinery Methods
Carpentry is an ancient craft, steeped in tradition and skill. Over the years, joinery has evolved from time-honored techniques to modern methods. Each approach carries its pros and cons, offering different levels of precision, durability, and aesthetic appeal. Let’s dive into the details of both traditional and modern joinery methods to better understand their differences and applications.
Traditional Joinery Methods
For centuries, traditional joinery methods have been used by skilled craftsmen worldwide. These techniques are often honed through years of practice and passed down through generations.
- Dovetail Joint: Known for its strength and resistance to being pulled apart, the dovetail joint is a hallmark of quality in furniture making.
- Mortise and Tenon: This technique involves cutting a hole (mortise) into one piece of wood and a matching tongue (tenon) on another, fitting them together tightly.
- Half-Lap Joint: Achieved by removing half the thickness of each piece of wood, this joint is simple yet effective for frame construction.
- Scarf Joint: This joint is used to join two lengths of wood together, often at an angle, making it useful for extended beams.
One major advantage of traditional methods is their ability to create strong, durable joints without the need for metal fasteners. Craftsmen often employ elaborate methods of shaping wood to fit snugly together, which adds to the overall aesthetic appeal. Moreover, these techniques allow for repairs to be made without needing replacement parts, maintaining the longevity of the piece.
Modern Joinery Methods
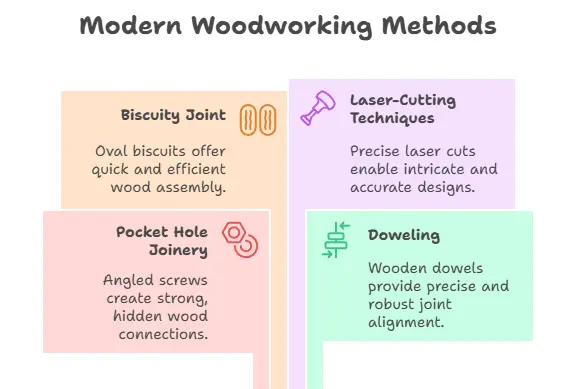
Modern joinery techniques utilize advancements in technology and materials, making them more accessible for woodworking enthusiasts and professionals alike. Common modern methods include:
- Pocket Hole Joinery: This method involves drilling an angled hole into one board to accept a screw that attaches it to another board.
- Doweling: Wooden dowels are inserted into aligned holes in two pieces of wood, securing them together effectively.
- Biscuity Joint: This method employs oval-shaped wooden biscuits that fit into slots cut into both pieces of wood, offering a quick assembly method.
- Laser-Cutting Techniques: Uses laser technology to create precise cuts, making intricate designs feasible with minimal error.
One significant advantage of modern joinery is efficiency. Tools like pocket hole jigs and biscuit joiners allow for quick and straightforward assembly, making them ideal for mass production. Furthermore, the use of adhesives in modern methods enhances the bond’s strength, often exceeding that of any traditional joint.
Comparing Durability and Aesthetics
Durability is a vital aspect when comparing traditional and modern joinery. Traditional methods tend to create joints that can withstand movement and stress over time, particularly in high-quality craftsmanship. However, some modern joinery methods, when executed correctly, can achieve similar strength due to improved adhesives and techniques. Aesthetically, traditional joinery often holds an appeal that many modern methods cannot replicate. The craftsmanship and detail involved in traditional joints, such as dovetails, offer unique visual interest that speaks to the history and skill of carpentry. In contrast, modern techniques tend to focus less on aesthetic appeal and more on function and speed, potentially sacrificing character for efficiency.
Cost and Accessibility
The cost of joinery methods can vary widely. Traditional joinery often requires a skilled artisan who can execute each joint correctly, leading to higher labor costs. Conversely, modern methods often use machine-driven processes, presenting a more cost-effective option for mass production projects. Additionally, modern tools are more accessible to amateurs, making woodworking a hobby that many can pursue.
Choosing the Right Method
Ultimately, the choice between traditional and modern joinery methods depends on the project’s unique needs. If you seek authenticity and craftsmanship, traditional joinery provides timeless quality. However, if you require speed and cost-effectiveness, modern methods might be the best fit. For more detailed guides on joinery techniques, you can visit Wood Magazine or refer to Popular Woodworking for various resources. Each of these platforms contains a wealth of information to help you decide which method aligns best with your carpentry goals. Regardless of which method you choose, understanding both traditional and modern joinery will enhance your woodworking skills and appreciation for this cherished craft.
Conclusion
Understanding the hardest joint in carpentry requires a blend of skill, technique, and the right tools. Whether you are exploring intricate joinery such as the dovetail or mortise-and-tenon joints, mastering these methods opens up a world of possibilities in furniture design and construction. Each method has its own strengths and weaknesses, and knowing which to use in different situations is key to achieving optimal durability and aesthetic appeal.
Having the essential tools at your disposal can elevate your joinery work. From chisels and mallets to dedicated router jigs, each tool plays a significant role. Investing in quality equipment not only simplifies the process but also dramatically improves the precision of your cuts, enabling you to create strong, long-lasting joints. Perfecting your woodworking joints involves patience and practice. Don’t hesitate to experiment with different techniques until you find what works best for your style.
Utilizing proper alignment and glue application will enhance joint integrity, ensuring your furniture withstands the test of time. The comparison between traditional and modern joinery methods highlights the evolution of woodworking. While traditional techniques bring a sense of craftsmanship and nostalgia, modern advancements offer efficiency and accuracy. Understanding both allows you to integrate the best of both worlds, adapting your approach to meet the needs of specific projects.
Ultimately, the hardest joint in carpentry is not just a technical challenge; it reflects your growth as a craftsman. With dedication, the right knowledge, and tools, you can tackle any joint with confidence, impressing others with the quality and longevity of your work. Embrace the journey of refining your skills, as it is in mastering these joints that true artistry in woodworking is found.