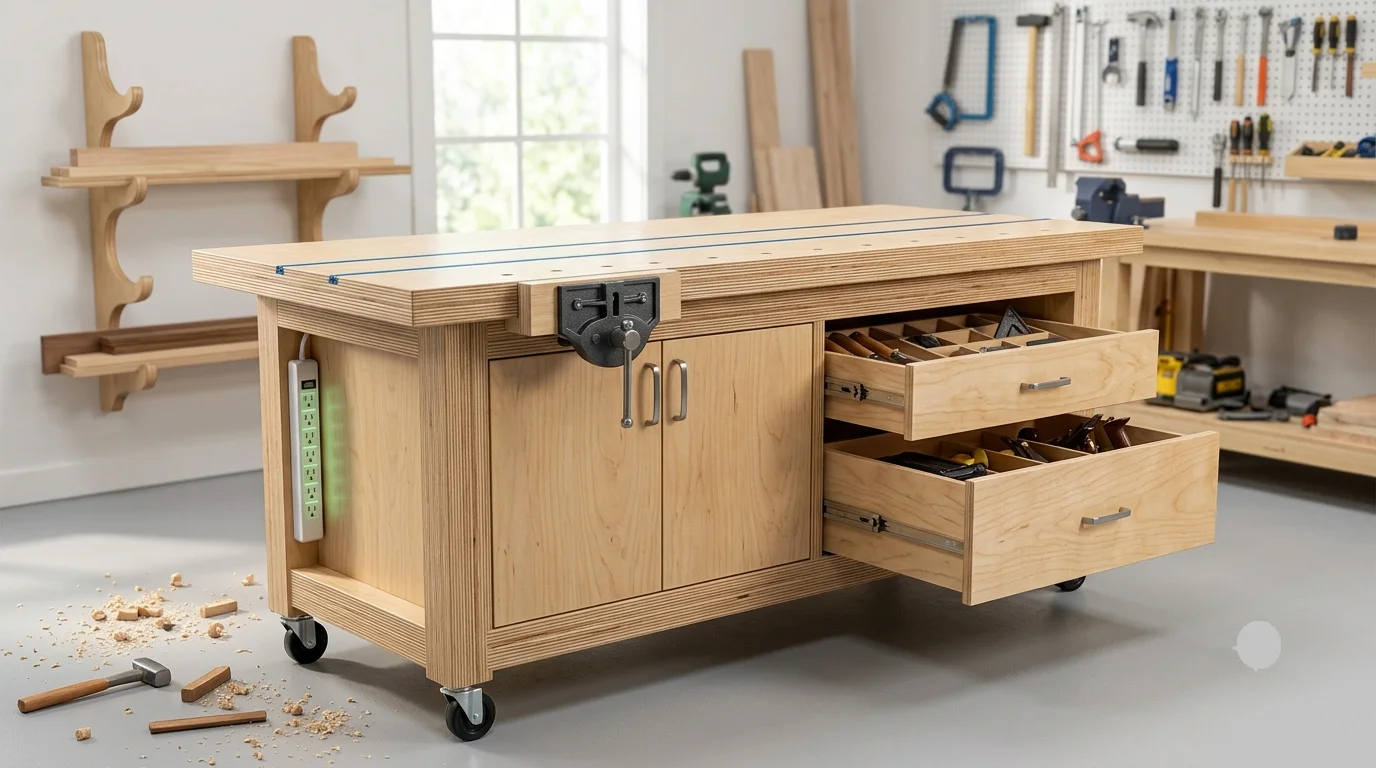
When you’re setting up a small woodworking shop, space efficiency is vital. Using plywood creatively can maximize your workspace and enhance functionality. Here are some innovative layout ideas that leverage plywood in your woodworking shop.
Utilize Plywood for Storage Solutions
Plywood is a fantastic material for building storage units. Here are a few ideas:
- Wall-mounted Shelves: Consider installing wall-mounted plywood shelves. These can hold tools and materials off the ground, giving you more floor space to work.
- Tool Cabinets: Build a plywood cabinet tailored for your specific tools. This keeps them organized and easily accessible.
- Vertical Storage: Use plywood sheets to create vertical storage spaces for long pieces of wood. You can design a simple frame that holds the plywood upright, ensuring you can easily grab what you need.
Create a Multi-functional Workbench
Your workbench is the heart of your woodworking shop. Using plywood, you can craft a multi-functional workbench that meets different needs:
- Built-in Tool Storage: Incorporate storage drawers beneath the work surface to hold smaller tools and supplies.
- Drop-down Extensions: Add drop-down wings made from plywood to increase the workspace as needed for larger projects.
- Surface Options: Consider a plywood top laminated with a durable surface to withstand heavy use while allowing for easy cleanup.
Design an Efficient Layout
When arranging your shop, consider a layout that encourages workflow:
- Zone Setup: Divide your shop into functional zones: cutting, assembly, and finishing. This organization minimizes movement between tasks.
- Walking Space: Ensure you have at least three feet of walking space around each zone for safety and convenience.
- Plywood Partitions: Use plywood to create closed-off areas for particular processes, such as painting or sanding, to reduce dust spread.
Make Use of Plywood Panels for Wall Space
Plywood panels can turn your wall space into storage and organization points:
- Tool Organization: Attach hooks and pegboards to plywood panels for easy access to essential tools.
- Color Coding: Paint or mark areas on plywood for different tool or material types. This visual cue helps keep your work organized.
- Inspiration Board: Use a section of plywood as a wall-mounted inspiration board to pin up plans or ideas for future projects.
Incorporate Plywood for Custom Fixtures
Creating custom fixtures enables you to work more efficiently:
- Clamp Storage: Design a plywood clamp rack that keeps your clamps organized and in easy reach.
- Sawhorse Plans: Create sawhorses from plywood that are lightweight yet sturdy, perfect for a variety of tasks.
- Dust Collection System: Use plywood to build a custom dust collection system that suits your shop layout, helping to keep your workspace clean.
Switch to Mobile Workstations
Mobility is essential in a small workspace:
- Rolling Carts: Build plywood rolling carts for tools, materials, or even your workbench. This flexibility allows you to rearrange your shop as needed.
- Fold-up Tables: Consider designing fold-up workstations that can be stowed away when not in use to maximize space.
Maximizing Space Efficiency in a Compact Workshop
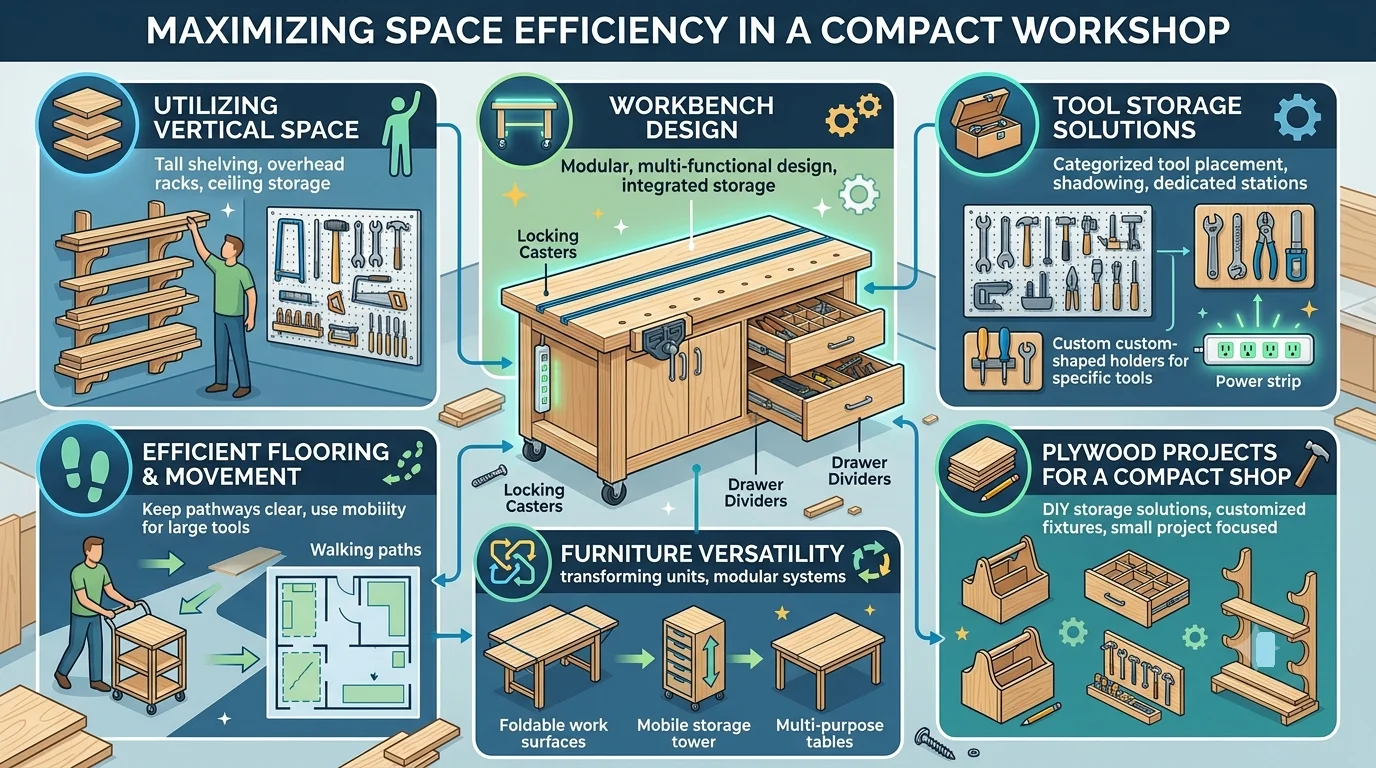
When it comes to setting up a small woodworking shop, space efficiency is key. A well-planned layout can make your workshop not only functional but also enjoyable to work in. By using plywood smartly, you can create a modular and organized environment for your projects. Here are a few practical ideas to maximize space in your compact woodworking shop while utilizing plywood effectively.
Utilizing Vertical Space
One of the best ways to maximize space is by thinking vertically. Plywood can play a vital role in building shelving and storage solutions that take advantage of wall space. Consider these ideas:
- Wall-Mounted Shelves: Create adjustable shelves from plywood that can hold tools, paints, and other supplies. Position them at eye level for easy access.
- Plywood Pegboards: Use a plywood pegboard to hang tools. This not only saves space but also keeps your tools organized in plain sight.
- Overhead Racks: For larger pieces like lumber or sheets of plywood, consider overhead storage. Build sturdy racks from plywood and mount them to the ceiling.
Workbench Design
Your workbench is often the heart of the workshop. A well-designed bench that incorporates storage can save a lot of space. Here are some features to consider:
- Built-in Drawers: Construct drawers from plywood beneath your workbench. This can be an excellent place to store smaller tools and materials.
- Foldable Workbench: If space is extremely limited, a foldable workbench can provide you with the workspace you need when it’s time to work and fold away when you’re done.
- Rolling Workbench: A mobile workbench can be easily moved around the shop. Add wheels to your plywood bench for flexibility.
Tool Storage Solutions
Keeping your tools organized is crucial in a small woodworking shop. Effective storage can prevent clutter and improve workflow. Here are some tool storage solutions:
- Drawer Dividers: Use plywood dividers in your drawers to separate different tools. This helps you quickly find what you need.
- Under-Bench Tool Storage: Create plywood cabinets that fit under your workbench. This allows you to store frequently used tools within easy reach.
- Sliding Tool Racks: Build sliding racks from plywood that contain your power tools. This will make the most out of limited drawer space.
Efficient Flooring and Movement
Moving around your workshop efficiently is crucial in a compact space. Here are some tips for optimizing the layout:
- Clear Pathways: Ensure that there are at least 3 feet of clear space around your workbench and major tools.
- Accessible Zones: Designate specific areas for cutting, assembly, and finishing. This will lead to a more structured workspace.
Furniture Versatility
In a small woodworking shop, versatility is paramount. Consider using multi-purpose furniture made from plywood:
- Multi-functional Tables: Build tables that can serve as both work surfaces and storage.
- Rotating Tables: Use rotating setups for tools that can pivot, saving space without sacrificing functionality.
Plywood Projects for a Compact Shop
Creating projects from plywood can not only improve your shop’s efficiency but also help you practice your woodworking skills. Some project ideas include:
- Plywood tool cabinets
- Modular work surfaces
- Sturdy shelving units
Essential Tools and Equipment for Your Small Woodworking Shop
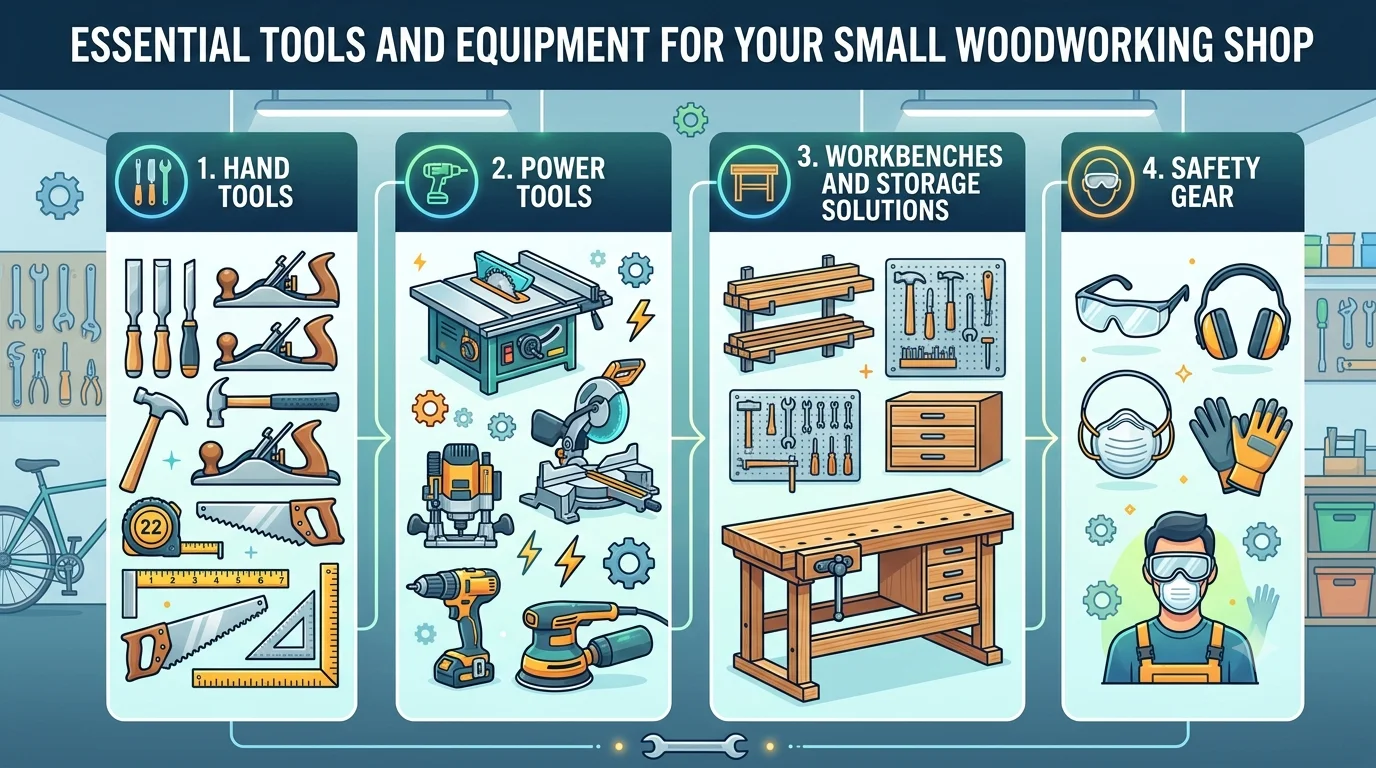
Setting up a small woodworking shop can be an exciting venture, but having the right tools and equipment is crucial for your success. Whether you are an experienced woodworker or just getting started, investing in essential tools will help you achieve great results. Here’s a guide on some key tools you should consider for your woodworking space.
Hand Tools
Every woodworking shop needs a solid selection of hand tools. These tools provide versatility and precision, allowing you to complete intricate tasks that require a human touch. Here are some essential hand tools to include:
- Saws: Having a variety of saws is vital. Consider a miter saw for crosscuts and a table saw for ripping wide boards.
- Chisels: A good set of chisels helps with carving and joint fittings.
- Planes: Hand planes are great for smoothing surfaces and adjusting the thickness of wood.
- Measuring Tools: Accurate measurements are key in woodworking. A tape measure, square, and calipers should be in your toolbox.
Power Tools
Power tools can significantly reduce the time and effort required to complete woodworking projects. Here’s a list of must-have power tools for your shop:
- Table Saw: This is often considered the heart of many woodworking shops. A table saw allows for precise cuts and is essential for making straight and angled cuts.
- Portable Router: This tool is perfect for hollowing out areas of wood and creating decorative edges.
- Drill: A high-quality drill will be invaluable for creating holes and driving screws. A cordless drill offers portability and ease of use.
- Band Saw: Ideal for cutting curves and intricate shapes, a band saw adds creativity to your woodworking projects.
Workbenches and Storage Solutions
A proper workbench is the centerpiece of your woodworking shop. Here are a few tips for setting up your bench:
- Height: Make sure the workbench is at a comfortable height, typically around waist level.
- Stability: A solidly built bench will provide stability while you work.
Additionally, having effective storage solutions can keep your workspace organized and efficient. Consider the following:
- Tool Cabinets: Use cabinets to store your hand tools and power tools safely.
- Wall-mounted Shelves: These can keep frequently used items within easy reach while maximizing floor space.
- Magnetic Tool Holders: These help you access tools quickly without cluttering your workspace.
Safety Gear
Safety must always be a priority in your woodworking shop. Investing in appropriate gear is essential to protect yourself while working. Here’s a list of safety equipment you should have:
- Eye Protection: Always wear safety glasses or goggles to protect your eyes from wood dust and flying debris.
- Ear Protection: Use earplugs or earmuffs to guard against hearing loss from loud power tools.
- Dust Masks: Wearing a dust mask reduces inhalation of harmful particles.
- Gloves: Protective gloves can prevent cuts and splinters when handling wood.
By equipping your small woodworking shop with the right tools and safety gear, you create an optimal environment for crafting beautiful pieces of furniture or art. Investing in quality tools pays off in the long run, ensuring accuracy and durability in your projects.
Creating a Functional and Aesthetic Workspace with Plywood
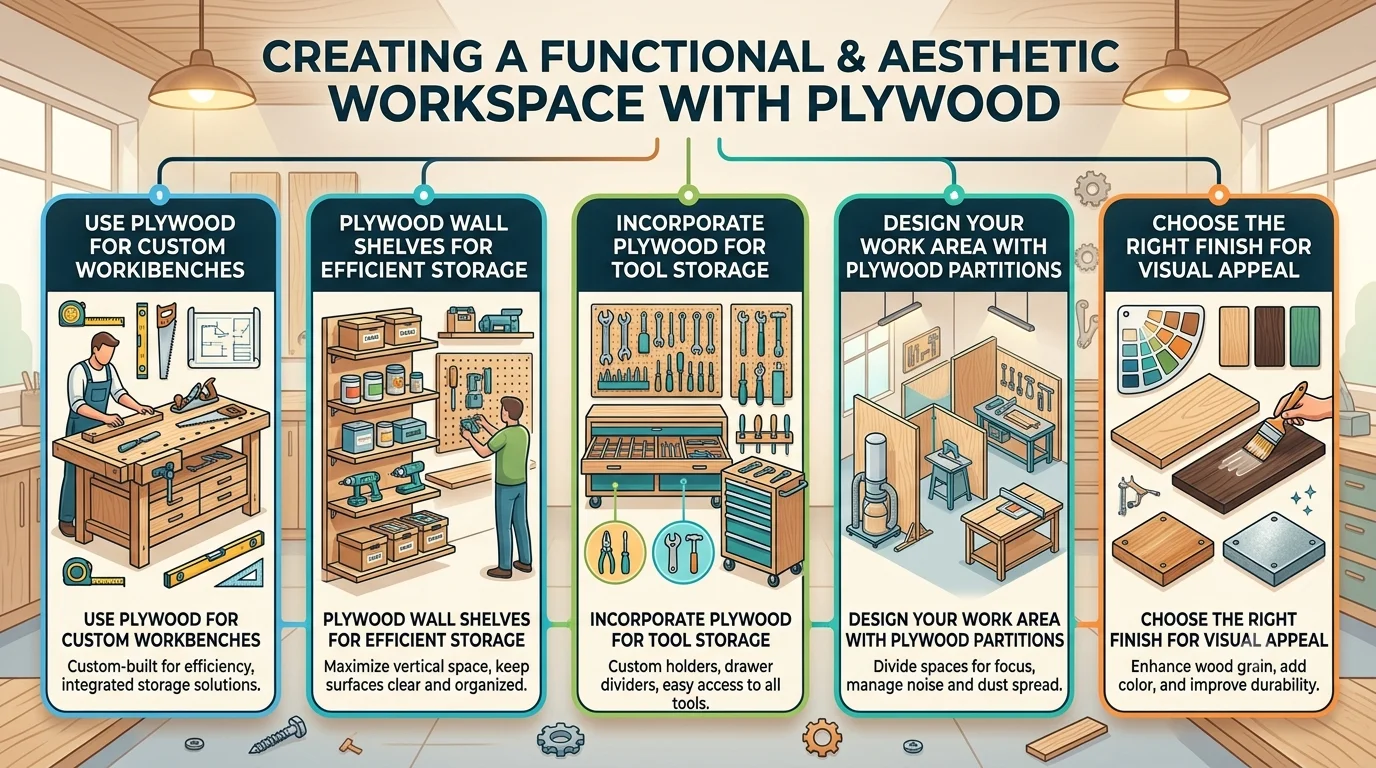
When designing a workspace using plywood, functionality and aesthetics go hand in hand. Plywood is not just a building material; its versatility and attractive finish make it a favorite among woodworkers and DIY enthusiasts. By thoughtfully planning your workspace, you can create an environment that inspires creativity while remaining practical and efficient.
One of the primary advantages of plywood is its strength relative to weight. You can use it for everything from shelving to workbenches, ensuring your space remains organized and usable. Below are some ideas for creating a functional and aesthetic workspace with plywood.
Use Plywood for Custom Workbenches
Custom workbenches made from plywood give you the dimensions you need for your workspace. Consider the following:
- Height: Make sure the bench is adjustable to accommodate different tasks, whether detailed handwork or larger projects.
- Storage: Design the bench with built-in storage or even drawers beneath the surface to keep tools at hand but out of sight.
- Sturdy Base: Utilize plywood for legs and supports to ensure your work surface can handle heavy materials and tools.
Plywood Wall Shelves for Efficient Storage
Maximizing vertical space is crucial in a small workspace. Plywood wall shelves can be stylish and functional, allowing you to display tools and materials while keeping the floor clear.
- Floating Shelves: Create floating shelves with plywood that give off a modern vibe, making room for both practical storage and decorative items.
- Brackets and Supports: Simple brackets can provide strong support, ensuring you can store heavier items without worry.
- Color and Stain: A good stain can highlight the wood grain, adding depth and color to your workspace.
Incorporate Plywood for Tool Storage
Effective tool storage is essential in any woodworking shop. Here are some effective ideas:
- Tool Organizers: Build a wall-mounted organizer with slots and compartments specifically sized for your tools.
- Tool Chests: Fabricate a wooden tool chest using plywood, allowing you to centralize your tools and transport them easily.
- Magnetic Strips: Attach magnetic strips to a plywood backdrop for easy access to metal tools.
Design Your Work Area with Plywood Partitions
If your shop is large enough or you share the space with others, partitions can help designate different work areas. Consider using:
- Plywood Panels: Sturdy enough to withstand minor wear and give each area a clear identity.
- Tempered Edges: Ensure that all edges are sanded and finished properly to avoid splinters.
Choose the Right Finish for Visual Appeal
The finish of your plywood can vastly change its overall look. People often overlook this aspect, but it’s vital for aesthetics:
- Varnish: A simple coat of varnish can enhance the natural grain and protect against moisture.
- Paint: Painting different sections can help create a lively environment and categorize the workspace.
- Staining: Opt for stains that match or contrast with your existing décor for an appealing look.
Another effective way to plan your workspace is through proper layout planning. Consider elements like flow and accessibility, which can improve efficiency:
| Element | Tip |
|---|---|
| Work Triangle | Ensure your main tools (saw, sander, and drill) are within a triangle layout for efficiency. |
| Lighting | Use LED strips under shelving or task lights above your workbench for optimal visibility. |
Ultimately, creating a functional and aesthetic workspace with plywood revolves around your unique needs and preferences. Whether you are a hobbyist or a professional, making a space that works for you fosters productivity and creativity. For more insights and designs, explore resources such as Wood Magazine and Popular Woodworking.
By considering these strategies and utilizing plywood, you can build the woodshop of your dreams that is not only practical but also pleasing to the eye.
Tips for Organizing and Storing Materials in a Small Workshop
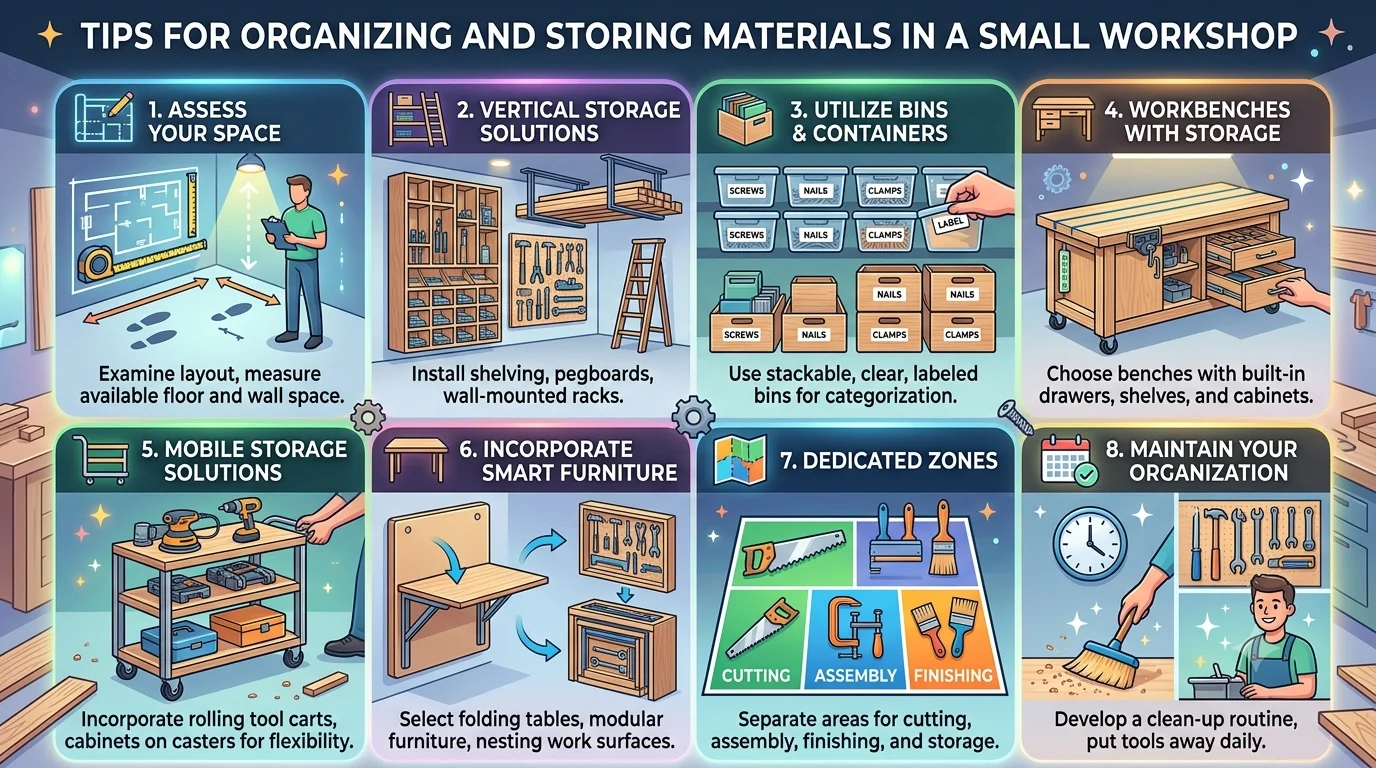
Organizing your materials in a small workshop can make all the difference in your productivity and creativity. When your workspace feels cluttered or chaotic, it can be challenging to focus. Here are some practical tips to help you optimize your small workshop for better organization and storage.
Assess Your Space
Before diving into organization, take a good look at your small workshop. Note what materials you use most often and the space available for storage. Consider the following:
- Dimensions of your workshop
- Location of windows and doors
- Your workflow – where you typically do your work
Understanding your space is crucial for creating an efficient layout.
Vertical Storage Solutions
When space is limited, think vertically! Wall-mounted storage can free up valuable floor space. Here are some ideas:
- Wall Shelves: Install sturdy shelves to store bins, tools, and materials.
- Pegboards: Use pegboards to hang tools and small supplies. They are versatile and allow for easy access.
- Magnetic Strips: Attach magnetic strips to store metal tools like saws and wrenches, keeping them off your work surfaces.
Utilize Bins and Containers
Invest in a variety of bins and containers to keep your materials organized. Clear bins allow you to easily see the contents, reducing the time spent searching for items. Consider using:
- Storage Bins: Stackable bins can maximize vertical space.
- Drawer Organizers: Create categories for screws, nails, and other small parts.
- Labeling: Labeling your containers helps quickly locate what you need.
Workbenches with Storage
Your workbench can serve double duty as a storage solution. Look for workbenches that come with drawers or built-in shelving. If you’re up for a DIY project, you can customize your own workbench with storage compartments tailored to your materials. This can not only enhance workflow but also keep your workspace tidy.
Mobile Storage Solutions
Mobility is a key factor in a small workshop. Using carts or rolling storage can make it easy to shift your materials closer to where you’re working. Here are some options:
- Rolling Carts: Perfect for storing frequently-used tools and materials. You can easily move them around.
- Toolboxes on Wheels: Great for organizing smaller tools that you need on hand.
Incorporate Smart Furniture
Consider furniture that serves multiple purposes. For example, foldable tables can save space when not in use. Ottomans with storage can provide seating and space for hidden materials. Look for:
- Foldable Tables: When not in use, these can be easily stowed away.
- Storage Ottomans: Serve as both a comfy seat and a storage solution for smaller items.
Dedicated Zones
Establishing dedicated zones for different tasks can also help in keeping your workshop organized. You might create areas for:
- Cutting and Assembly: Keep your cutting tools and materials together.
- Finishing: A separate area for painting or staining can reduce mess in your main workspace.
Maintain Your Organization
Maintaining your organized space is crucial. Regularly review your setup and make adjustments as needed. Set aside time each month to declutter and reorganize. Consistency will help you keep your small workshop efficient and enjoyable to work in.
For more ideas and inspiration, consider visiting Wood Magazine or Popular Woodworking. These sites offer a wealth of resources for woodworkers and those interested in workshop organization.
If you’re looking for more detailed information or resources related to woodworking tools and techniques, check out these websites:
Stay dedicated to your woodworking craft! With these essential tools, your small shop will be well-equipped to bring your ideas to life.
Conclusion
Designing a small woodworking shop using plywood offers countless benefits that can elevate your crafting experience. By embracing innovative layout ideas, you can create an efficient space that accommodates essential tools and equipment while maximizing every inch of your workshop. Consider the roles of modular workstations and movable storage units, as these can transform your small area into a flexible, functional environment that inspires creativity.
Effective organization is vital. Utilizing plywood for shelves, cabinetry, and tool racks can help you keep your materials accessible yet tidy. This not only enhances your workflow but also contributes to a visually appealing work environment. By focusing on both functionality and aesthetics, you can cultivate a space that reflects your personality and passion for woodworking.
Making the most of a compact workspace means thinking outside the box. Strategic arrangement of tools and materials will significantly impact your productivity. Whether you choose to install pegboards for easy tool access or incorporate hidden compartments for storage, every decision counts in creating an ideal layout.
With thoughtful planning and creativity, your small woodworking shop can be an efficient, organized, and beautiful haven. The impact of a well-designed workspace on your woodworking projects cannot be overstated—it’s the foundation upon which your creativity flourishes. Each woodworking venture becomes a delightful experience when your shop is tailored to your needs, with plywood as your versatile companion in this rewarding journey. Embrace these ideas and watch your small woodworking shop turn into a masterpiece of both design and functionality.