
The Types of Sanding Belts Available
Sanding belts come in various types to suit different materials and applications. Understanding these can help you make an informed choice:
- Aluminum Oxide: Ideal for wood and metal, this is the most common type. It balances performance and cost, making it suitable for general-purpose sanding.
- Silicon Carbide: These belts are sharper and typically used for harder materials like glass and plastics. They are great for finer finishes.
- Zirconia: Known for their durability, zirconia belts work well for heavy grinding and are perfect for sanding wood and metal surfaces.
- Ceramic: Ceramic sanding belts are designed for aggressive sanding and are best for heavy-duty tasks, especially on metal.
Grit Size: Picking the Right Texture
The grit size of your sanding belt determines how aggressive the sanding will be. Here’s a quick guide:
| Grit Size | Use |
|---|---|
| Coarse (24-60) | Removing material quickly, shaping, or leveling surfaces. |
| Medium (80-120) | General sanding, preparing surfaces for finishing. |
| Fine (150-320) | Sanding between coats of finish and achieving a smooth surface. |
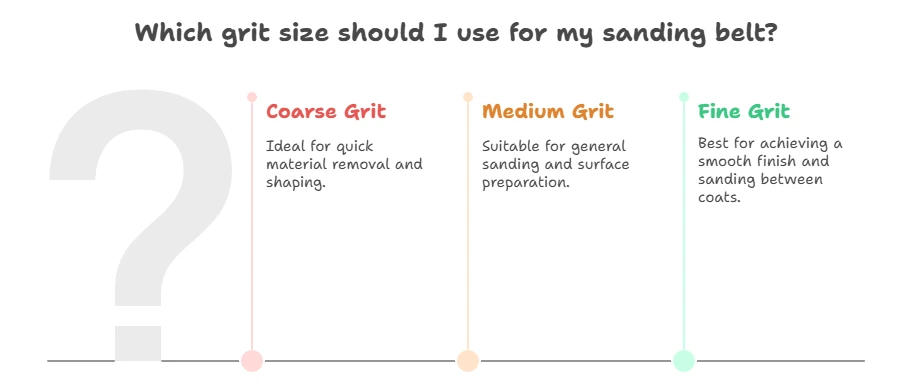
Choosing the correct grit allows you to tailor your sanding process to the specific phase of your project, ensuring you achieve optimal results.
Consider the Belt Size and Machine Compatibility
Not all sanding belts fit every machine. Before purchasing, confirm the size of the belt matches your sander’s specifications. Common sizes include:
- 1 inch x 30 inches
- 2 inches x 72 inches
- 4 inches x 36 inches
Incompatible sizes can lead to inefficiency and can even damage your sander. Remember, taking the time to measure can save you much hassle in the long run.
Durability vs. Cost
While it might be tempting to choose the cheapest sanding belt, a balance between cost and durability is important. Higher-quality belts often last longer and perform better, ultimately saving you time and money. When assessing options, consider factors such as:
- Construction quality: Higher-quality materials like ceramic and zirconia typically outlast common aluminum oxide belts.
- Brand reputation: Research different brands to find one that has a high rate of customer satisfaction.
Investing in better-quality sanding belts can lead to a smoother finish and better project outcomes.
Choosing for Specific Projects
The nature of your project will dictate your sanding belt choice. Here’s how to decide:
- Woodworking: Aluminum oxide belts are your best friend. They provide durability and a smooth finish.
- Metalworking: Opt for zirconia or ceramic belts to handle tough materials.
- Fine Finishing: For getting a sleek finish, favor finer grits, ideally silicon carbide.
By aligning your sanding belt choice with the project’s demands, you enhance both efficiency and output quality.
For purchasing options and more detailed advice, consider visiting empireabresives.com for a wide selection of sanding belts tailored to every project requirement.
Choosing the right sanding belt is about considering materials, grit size, durability, and project type. Making informed selections can lead to enhanced efficiency and superior finishes, which ultimately makes your work more satisfying and professional-looking.
How to Properly Maintain Your Sanding Belt for Longevity
When you invest in a sanding belt, you’re making a commitment to ensuring your projects are smooth and professional. However, just like any tool in your workshop, proper maintenance is key to maximizing its lifespan and efficiency. Here’s how you can take care of your sanding belt to get the most out of it.
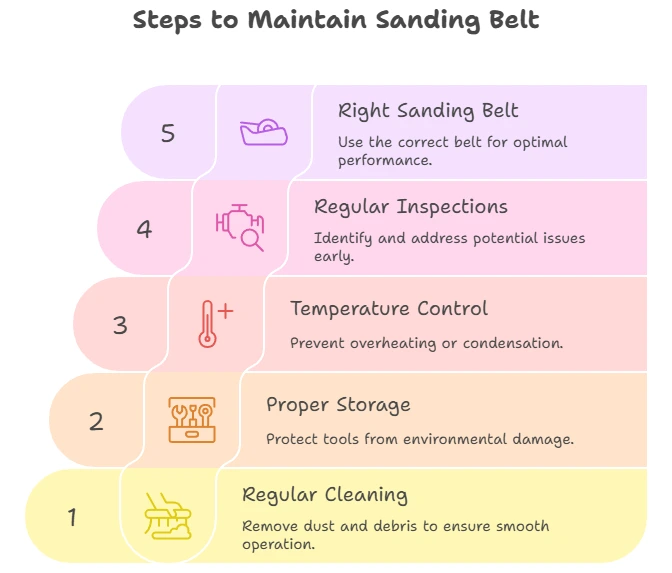
Regular Cleaning
Keeping your sanding belt clean is essential. Dust and debris can accumulate on the surface, hindering performance. Here are steps to follow:
- Use a Rubber Cleaning Block: Gently rub a rubber cleaning block against the belt surface while the sander is running to remove built-up dust.
- Inspect for Clogs: Periodically examine the belt. If you see clogged areas, take the time to clean them off. You can use a soft brush or compressed air.
- Avoid Water: Never wash your sanding belt with water, as moisture can ruin it and cause premature wearing.
Proper Storage
When you’re not using your sanding belt, store it correctly to prevent damage:
- Keep it Dry: Store your sanding belt in a dry place where humidity is low to prevent mold and wear.
- Avoid Direct Sunlight: Sunlight can degrade the adhesive on the belt, causing it to break down faster.
- Store Flat: Place your belt flat and avoid folding or creasing it, which can affect performance.
Temperature Control
Extreme temperatures can lead to unwanted changes in the sanding belt. To ensure your belt remains in good shape, consider the following:
- Avoid Hot Areas: Don’t store your sanding belt near heaters or ovens, as heat can weaken the material.
- Cool, Stable Environment: If possible, keep your belts in a climate-controlled area to maintain their flexibility and strength.
Regular Inspections
Just as you would with any tool, regular inspections are crucial for maintaining your sanding belt:
- Check for Wear: Look for signs of wear or damage regularly. If you spot frayed edges or worn-down sections, it’s time to replace the belt.
- Tension and Alignment: Ensure the belt is properly tensioned and aligned in your sander. A misaligned belt can wear unevenly and reduce its life.
Use the Right Sanding Belt
Choosing the right sanding belt for your specific tasks will minimize wear and improve efficiency:
- Know Your Material: Ensure you’re using a belt that matches the material you’re working with, as each material requires different grit and type.
- Grit Selection: Use finer grits for finishing and coarser grits for material removal. This can enhance efficiency and reduce strain on your sanding belt.
How to Spot Signs of a Worn Sanding Belt
Being aware of the signs of deterioration can help you replace your sanding belt before it affects your work:
- Heavy Dust Build-up: If cleaning does not resolve performance issues, the belt may be worn out.
- Sparking: If you notice sparks flying when in use, this indicates the belt is not cutting effectively and should be replaced.
Helpful Resources
For more information on sanding belts and their maintenance, check out these helpful resources:
By following these maintenance tips, you’ll ensure your sanding belt lasts longer and performs at its best. Remember, taking a little time for upkeep today can save you bigger headaches in the future!
Different Types of Sanding Belts and Their Specific Uses
Sanding belts are essential tools in many woodworking and metalworking applications. Understanding the different types and their specific uses can significantly enhance your efficiency and effectiveness. Here’s a look at the various kinds of sanding belts available and where each excels.
1. Aluminum Oxide Sanding Belts
Aluminum oxide sanding belts are popular for their versatility. They work well on both wood and metal surfaces, making them a reliable choice for various projects. These belts are known for their durability and are available in various grits, allowing for both aggressive sanding and fine finishing.
Uses:
- Woodworking: Ideal for removing material and preparing surfaces for finishing.
- Metalworking: Effective on steel and aluminum for deburring and shaping.
2. Zirconia Sanding Belts
Zirconia sanding belts are designed for heavier applications. They are more durable than aluminum oxide belts, making them perfect for sanding on metals. They also feature a self-sharpening property, which means they stay effective for longer periods before needing replacement.
Uses:
- Heavy metal grinding: Excellent for denser metals and materials.
- Finishing welds: Great for smoothing out rough edges and seams.
3. Ceramic Sanding Belts
Ceramic sanding belts are the heavyweights of sanding materials. They are known for their longevity and aggressive cutting abilities. Made from high-quality ceramic grain, these belts are often used in manufacturing and heavy industrial applications.
Uses:
- Production environments: Ideal for high-volume manufacturing where durability is paramount.
- Metal fabrication: Suitable for tough materials like stainless steel and titanium.
4. Silicone Carbide Sanding Belts
Silicone carbide sanding belts are typically used for finishing and polishing tasks. They are sharper than aluminum oxide and are excellent for sanding harder materials such as glass and ceramics. These belts have a unique ability to provide a smooth finish, making them suitable for high-quality projects.
Uses:
- Finishing edges: Perfect for creating a fine finish on delicate materials.
- Polishing: Ideal for glass surfaces and other non-metal items.
5. Specialty Sanding Belts
There are many specialized sanding belts designed for particular tasks. These can include belts specifically made for wood, metal, or even automotive applications. Each belt type is engineered to maximize performance in its designated area.
Uses:
- Wood: Belts for sanding hard and soft woods, often with a unique grain pattern.
- Automotive: Belts designed for sanding car body panels and finishing work.
Choosing the Right Sanding Belt
When selecting a sanding belt, consider the material you are working with and the finish you desire. High-grit belts are excellent for finishing touches, while low-grit belts are for material removal. Think about the type of sanding machine you’re using, as it might dictate the size and type of belt you need.
It’s also essential to consider the belt size. Common sizes include:
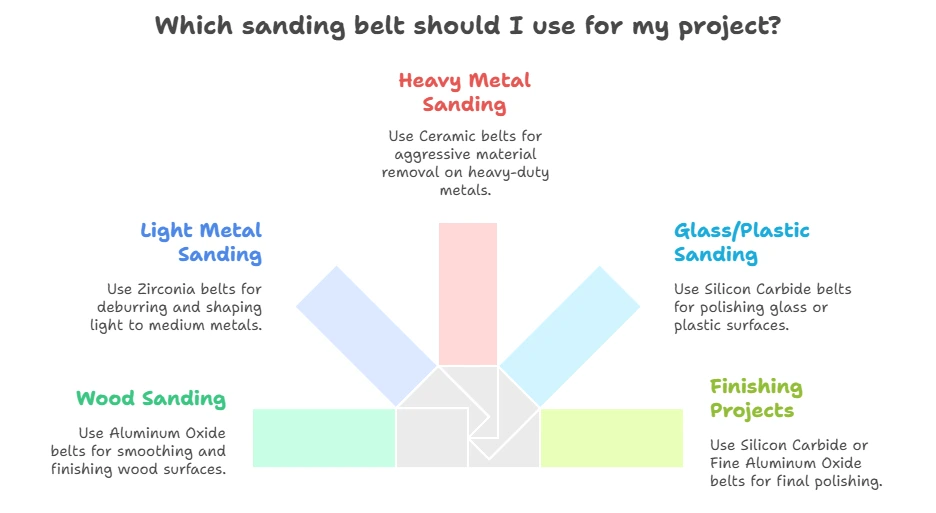
| Material | Recommended Sanding Belt | Ideal Grit Range | Use Case |
|---|---|---|---|
| Wood (general) | Aluminum Oxide | 80–150 | Smoothing and finishing wood surfaces |
| Metal (light to medium) | Zirconia | 36–100 | Deburring, shaping, and removing rust |
| Metal (heavy-duty) | Ceramic | 24–80 | Grinding and aggressive material removal |
| Glass or Plastic | Silicon Carbide | 150–320 | Polishing and delicate surface work |
| Finishing Projects | Silicon Carbide or Fine Aluminum Oxide | 180–320 | Between coats of finish, final polishing |
For more detailed specifications and options, you can explore resources like Abrasive Resource and Sanding Belts.
These can guide you in selecting the correct type and size of sanding belt for your specific needs.
By understanding the different types of sanding belts, you can choose the right one for your project, enhancing your craftsmanship and yielding better results. Whether you are a professional or just a DIY enthusiast, using the optimal belt will make a noticeable difference in your work quality.
—
Common Mistakes to Avoid When Using a Sanding Belt
Using a sanding belt can be a highly effective way to smooth out surfaces or remove material quickly. However, many users make common mistakes that can lead to subpar results or even accidents. Here are key mistakes to avoid when you’re working with a sanding belt.
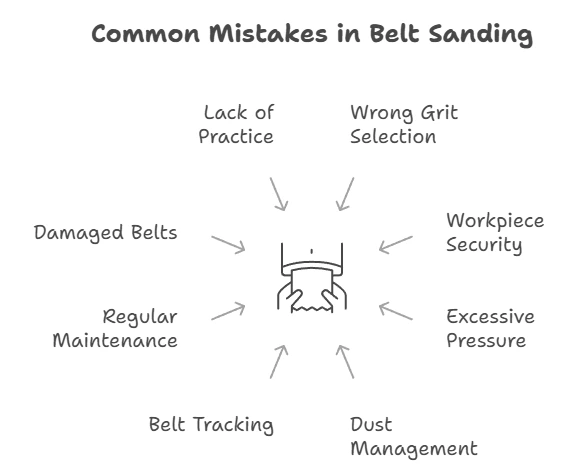
Choosing the Wrong Grit
One of the most frequent errors is selecting the incorrect grit for your sanding project. Sanding belts come in various grits ranging from coarse to fine. If you choose a grit that is too coarse for your project, you may gouge the wood or damage the surface. Conversely, if the grit is too fine, the sanding might take too long and may not yield the desired results.
- Coarse Grit (40-60): Best for aggressive material removal or shaping.
- Medium Grit (80-120): Ideal for smoothing surfaces after coarse sanding.
- Fine Grit (150-220): Excellent for finishing touches and achieving a smooth final surface.
Not Securing Your Workpiece
Failing to secure the workpiece is another common pitfall. When sanding, you need to ensure that the material is firmly held in place. Loose pieces can move unexpectedly, causing injuries or poor sanding results. Use clamps or a bench vise to stabilize the workpiece you’re working on to ensure safety and precision.
Using Excessive Pressure
Applying too much pressure when using a sanding belt is a mistake many beginners make. It might seem logical to push harder for quicker results, but this can lead to premature belt wear and uneven sanding. Instead, let the sanding belt do the work. Apply even, moderate pressure for consistent results.
Neglecting Dust Management
Another essential aspect is managing dust effectively. Wood dust can be harmful if inhaled, and it may also obscure your vision while working. Always wear a dust mask or respirator and consider using a dust extraction system with your sander. This not only keeps you safe but also helps in keeping the workspace clean.
Ignoring the Belt Tracking
Another mistake is not paying attention to how the sanding belt is tracking. If it is not aligned properly, it can cause uneven sanding and could potentially damage the machine or the belt. Regularly check the alignment and make adjustments as needed. Most sanders will have a tracking adjustment knob to help with this.
Overlooking Regular Maintenance
Just like any other tool, sanding belts and sanders require routine maintenance. Avoid the mistake of ignoring the upkeep of your tool. Clean the sanding belt from dust and debris after use. Regularly inspect the belt for wear and replace it when it starts to wear out to ensure peak performance.
Using Damaged Belts
Using a damaged sanding belt can result in poor performance and even accidents. Always inspect your sanding belt before using it. Look for frays, tears, or worn spots. A worn-out sanding belt can lead to uneven sanding and may put additional strain on the sanding machine.
Not Practicing
Don’t make the mistake of thinking you can jump right in without practice. Like any skill, using a sanding belt effectively takes time to learn. Consider practicing on scrap material to get a feel for the tool and technique before starting on your actual project.
Helpful Resources
For additional information and expert advice on sanding belts, you may find the following resources useful:
By avoiding these common mistakes, you can use sanding belts more effectively and safely. Not only will your projects turn out better, but you’ll also save time and materials in the long run. Remember, practice makes perfect, so don’t hesitate to take your time and improve your skills. Happy sanding!
Tips for Maximizing Efficiency with Sanding Belts in Woodworking
Sanding belts are essential tools for woodworkers who aim for precision and efficiency in their projects. With the right practices, you can maximize the performance of your sanding belts and improve both the quality of your work and your workflow. Here are some practical tips to help you make the most out of your sanding belts.
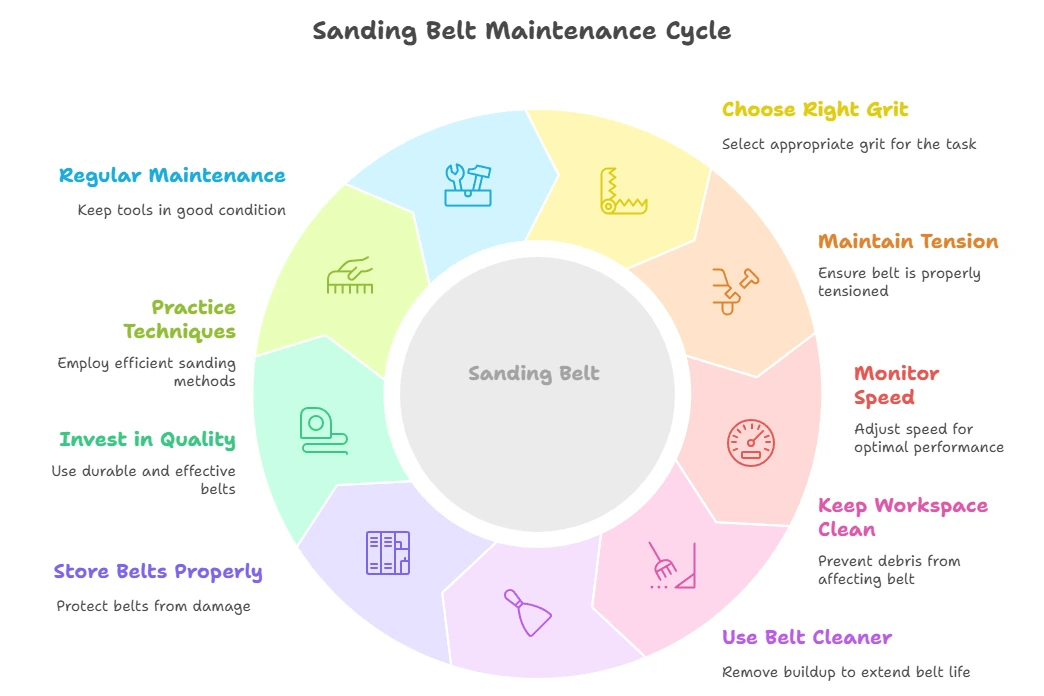
Choose the Right Grit
Understanding grit size is crucial when selecting sanding belts. The grit refers to the size of the abrasive particles on the belt. Here’s a quick guide:
- Coarse Grit (40-80): Ideal for heavy material removal and shaping.
- Medium Grit (100-150): Best for smoothing surfaces and removing imperfections.
- Fine Grit (180-220): Perfect for finishing touches and achieving a polished look.
Choosing the correct grit size for your project will ensure that you are not overdoing or under-prepping the surface.
Maintain Proper Tension
Proper tension is vital in ensuring that the sanding belt performs efficiently. If the belt is too loose, it may slip, affecting the finish of your work. Conversely, too much tension can lead to premature wear. Adjust the tension according to the manufacturer’s recommendations for optimal performance.
Monitor the Speed Settings
Different materials require various speeds to achieve the best results. Adjust the speed of your sander based on the type of wood you are working with:
- Softwoods: Use a higher speed to avoid burning the surface.
- Hardwoods: Lower speeds may be necessary to prevent dust from clogging the grit.
By tailoring your speed settings, you can enhance the effectiveness of your sanding process.
Keep Your Workspace Clean
Dust and debris can impact the efficiency of your sanding belt. Regularly cleaning your workspace helps maintain a clear area, allowing for smoother operation. Additionally, keeping the surfaces you’re working on free from sawdust can prevent it from interfering with the sanding process.
Use a Belt Cleaner
Cleaning your sanding belt regularly extends its lifespan and maintains performance. A belt cleaner is a simple tool that removes debris and prevents clogging. Use it periodically, especially if you notice a decrease in the belt’s effectiveness.
Store Belts Properly
Long-term storage can cause your sanding belts to lose their shape and effectiveness. Keep your belts in a cool, dry place away from direct sunlight. A storage solution such as a dedicated belt rack can help maintain their condition, keeping them ready for work when you need them.
Invest in Quality Products
Choosing high-quality sanding belts can make a significant difference in their performance and longevity. While cheaper options may seem appealing, they often wear out quickly and can negatively impact your work. Look for sanding belts from reputable manufacturers that provide durability and efficiency.
Practice Efficient Techniques
Use the right technique to enhance your efficiency. Here are some tips to follow:
- Use even pressure: Apply consistent pressure across the surface for an even finish.
- Keep moving: Avoid holding the sander in one spot for too long to prevent gouges or burns.
- Work with the grain: Sanding in the direction of the wood grain prevents scratches and gives a smoother finish.
Regular Maintenance of Your Tools
In addition to caring for your sanding belts, regular maintenance of your sanding equipment ensures the best results. Check the sanding machine for wear, make sure the belts are aligned correctly, and lubricate moving parts as necessary.
Explore Resources for Further Learning
If you want to delve deeper into handling sanding belts and woodworking techniques, consider visiting websites like Woodworkers Source or Popular Woodworking. These platforms offer valuable articles and tips tailored for woodworkers.
By implementing these strategies, you can significantly enhance the efficiency of your sanding belts in woodworking projects. Whether you’re a beginner or a seasoned professional, remembering to focus on grit choice, maintenance, and overall technique will lead to better craftsmanship and more satisfying results.