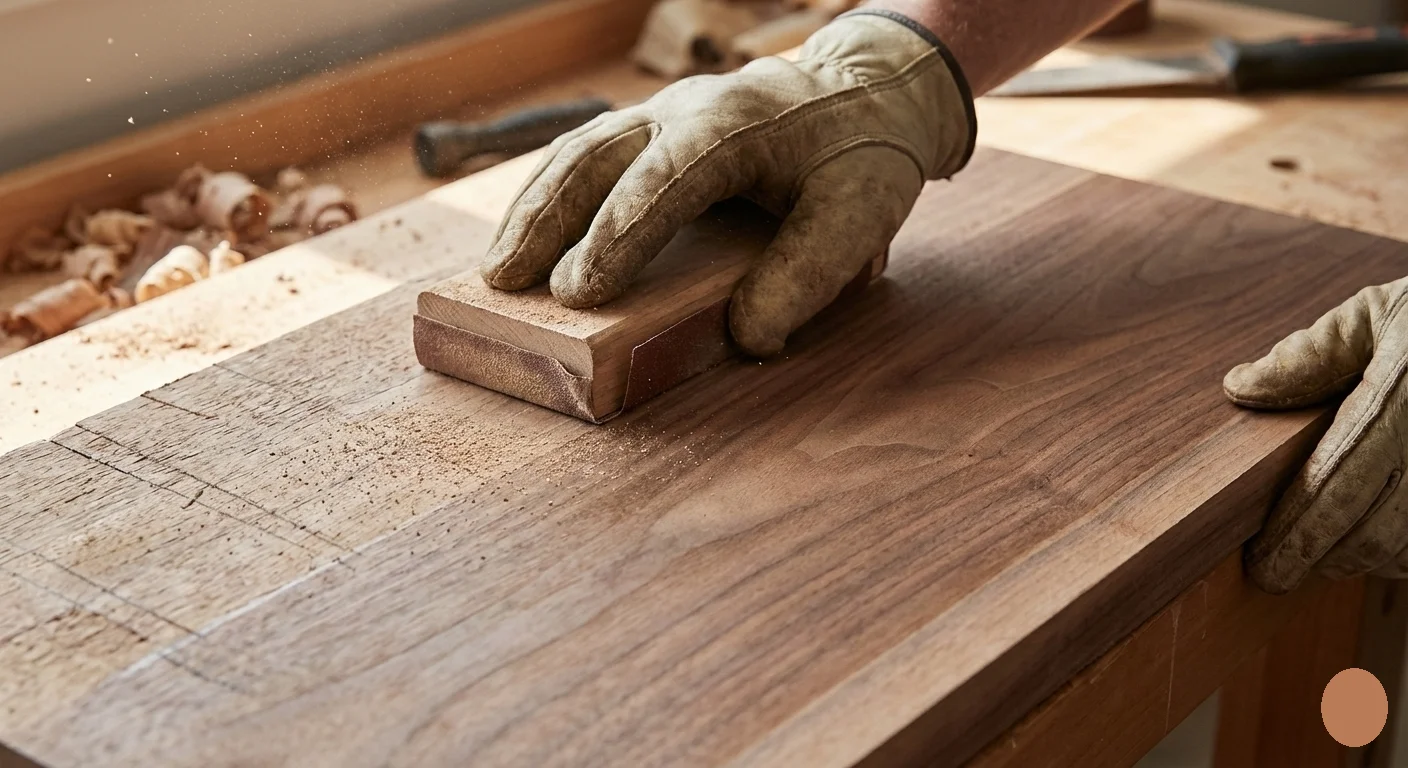
Sanding wood properly is an essential skill for anyone working with wood, whether you’re a DIY enthusiast or a professional. The right sanding techniques can transform your projects, making surfaces smooth and ready for finishes. Follow these steps to learn How To Sand Wood Properly effectively.
Understanding the Tools and Materials
Before you start sanding, gather the necessary tools and materials. Here’s a list to help you:
- Sanding blocks or electric sanders
- Sandpaper in various grits (coarse, medium, fine)
- Dust mask and safety goggles
- Vacuum or tack cloth to remove dust
- Wood filler (if needed)
Choosing the Right Sandpaper
Using the right sandpaper is crucial for achieving smooth surfaces. Here’s a simple guide on sandpaper grits:
| Grit | Usage |
|---|---|
| 40-60 | Removing old finishes or shaping wood |
| 80-120 | Preparing surfaces for finishing |
| 180-220 | Smoothing surfaces before applying final finish |
Step-by-Step Sanding Process
Step 1: Prepare the Wood Surface
Ensure the wood is clean and free of debris. If you’re working with a previously finished piece, you must strip old paint or varnish. Use coarse sandpaper (40-60 grit) to remove the finish, working with the grain of the wood. This prevents deep scratches.
Step 2: Get Sanding
Start with medium grit sandpaper (80-120) to smoothen the surface. If you’re using a sanding block, make sure to apply even pressure. For electric sanders, let the tool do the work without forcing it. This will help avoid gouges and uneven surfaces.
Step 3: Sand with Finer Grits
Once the surface feels smooth with medium grit, switch to fine grit (180-220). Sand lightly, especially around edges. This step is important because it’ll prepare the wood for any finish you plan to apply.
Step 4: Clean the Surface
After sanding, it’s crucial to remove all dust particles. Use a vacuum or a tack cloth to ensure the wood is free of debris. This will help the finish adhere better and result in a more polished look.
Step 5: Fill in Any Imperfections
If you notice any holes or imperfections in the wood, apply wood filler. Once it dries, sand it smooth, following the same grit progression as before.
Step 6: Final Touches
After completing all sanding, wipe down the surface one final time with a damp cloth. This will remove any remaining dust, allowing your finish to shine. If you prefer, you can also lightly sand between coats of paint or finish for an ultra-smooth result.
Safety Precautions
While sanding wood, never forget safety. Always wear a dust mask to avoid inhaling dust and goggles to protect your eyes. Working in a well-ventilated area helps minimize dust accumulation and ensures a safer environment.
Where to Find Additional Resources
For more detailed guides and expert tips on woodworking, check out the following resources:
Sanding wood properly is an achievable task when you follow the right techniques. With practice, you’ll master the art of sanding and enhance the quality of your woodworking projects.
Choosing the Right Sandpaper for Different Wood Types
When you’re working with wood, the right sandpaper can make all the difference. Different wood types have unique characteristics, and selecting the appropriate sandpaper for each can significantly affect the finish and overall quality of your project. Learning How To Sand Wood Properly involves understanding grit levels, materials, and the specific properties of the wood you are working with.
The Importance of Grit Levels
Sandpaper comes in various grit levels that indicate the coarseness of the paper. The higher the grit number, the finer the sandpaper is. Here’s a quick guide to help you select the right grit:
- Coarse Grit (40-60): Ideal for heavy material removal and shaping rough wood.
- Medium Grit (80-120): Suitable for smoothing surfaces and preparing wood for finishing.
- Fine Grit (150-220): Used for final finishing work before applying any sealants or finishes.
- Very Fine Grit (240+): Perfect for polishing surfaces or sanding between coats of finish.
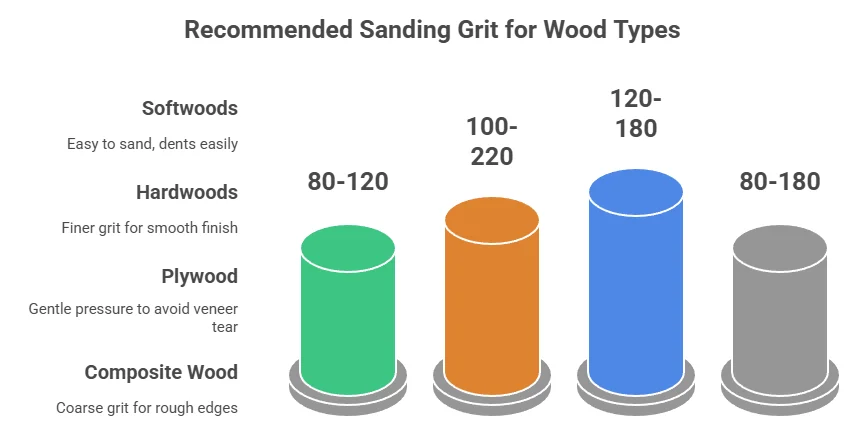
Sanding Different Wood Types
| Wood Type | Recommended Grit | Comments |
|---|---|---|
| Softwoods (like Pine, Cedar) | 80-120 | Softwoods are easier to sand, but be cautious as they can dent easily. |
| Hardwoods (like Oak, Maple) | 100-220 | Requires finer grit for achieving a smooth finish; avoid aggressive sanding. |
| Plywood | 120-180 | Sanding too aggressively can tear the veneer; use gentler pressure. |
| Composite Wood (like MDF, Particleboard) | 80-180 | Good to start with coarse grit before moving to finer options to eliminate rough edges. |
Selecting Sandpaper Materials
Beyond grit levels, the materials that make up the sandpaper also matter. Here’s a breakdown of popular types:
- Aluminum Oxide: Versatile and durable, ideal for general-purpose sanding. Works well on all wood types.
- Silicon Carbide: Best for wet sanding and finishes; this material can tackle softwoods and hardwoods alike.
- Ceramic: Longer-lasting but typically used for heavy-duty applications, suitable for rougher woods.
Tips for Sanding
Once you select the right sandpaper, remember these tips for effective sanding:
- Always sand in the direction of the wood grain to avoid scratches.
- Change sandpaper frequently to maintain efficiency and prevent clogging.
- Use sandpaper blocks or machines for large surfaces to ensure even pressure.
- Consider using a vacuum or a dust collector to limit dust during the process.
To gain deeper insights into sanding techniques, consider visiting Wood Magazine or Woodworkers Source. These resources provide valuable information and tips that can enhance your woodworking skills.
Common Mistakes to Avoid When Sanding Wood
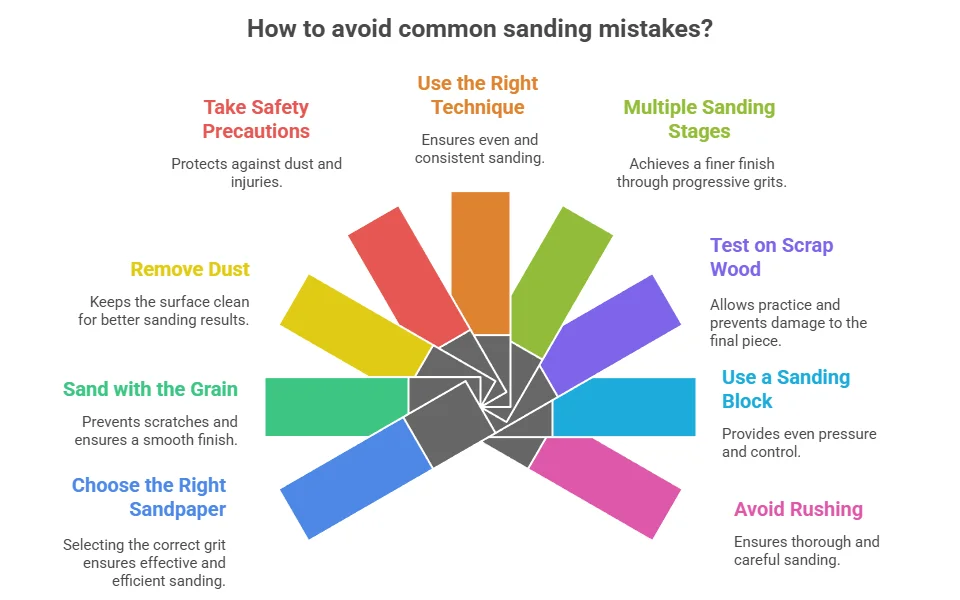
Sanding wood is a crucial step in any woodworking project. However, it’s easy to make mistakes that can ruin your hard work. Here are some common pitfalls to avoid when learning How To Sand Wood Properly to ensure a smooth finish and a successful project.
Choosing the Wrong Sandpaper
The type of sandpaper you choose can greatly affect the outcome of your project. Using sandpaper that’s too coarse can leave scratches, while overly fine grit can take too long and may not effectively remove imperfections.
| Grit Size | Use |
|---|---|
| Coarse (40-60) | Initial sanding for heavy material removal |
| Medium (80-120) | General sanding and leveling |
| Fine (150-220) | Sanding between finishes and for final touches |
Neglecting to Sand with the Grain
When sanding wood, always remember to sand with the grain. Sanding against the grain can create scratches and a rough finish that are hard to fix. Always visualize the wood grain and move your sandpaper in the same direction.
Skipping the Dust Removal Stage
After sanding, dust can accumulate and interfere with your finish application. Failing to clean off dust can result in a rough surface and an uneven finish. Make it a habit to:
- Wipe down the surface with a damp cloth or tack cloth.
- Use a vacuum with a brush attachment to capture more dust.
- Ensure the area is well-ventilated to reduce dust buildup in the first place.
Overlooking Safety Precautions
Sanding can create a lot of dust and debris, which can be harmful if inhaled. Always wear a dust mask and goggles to protect your eyes and lungs. Additionally, ensure you are working in a well-ventilated space.
Not Using the Right Technique
Improper sanding technique can lead to uneven surfaces. Here’s how to achieve the best results:
- Start with coarse sandpaper to remove significant imperfections.
- Progressively move to finer grits for smoothness.
- Apply even pressure, but don’t over-sand in one spot.
- Always keep the sandpaper flat against the surface, avoiding edges that can cause gouges.
Ignoring the Need for Multiple Sanding Stages
Many believe that a single pass with sandpaper is sufficient. In reality, proper sanding involves multiple stages. Each grit should do its job until you reach the finest grit. Skipping grits can leave more visible scratches and deficiencies.
Not Testing on Scrap Wood
Before you begin sanding a main piece, it’s wise to test your techniques and grit choices on a scrap piece of wood. This will help you gauge how your selected sandpaper will affect the finish and whether your technique is on point.
Not Using a Sanding Block
When sanding larger, flat surfaces, it’s easy to miss spots without a sanding block. A block helps to apply equal pressure across the wood, preventing uneven wear. If you don’t have a sanding block, create one using scrap wood and adhesive sandpaper.
Rushing the Process
Sanding can be time-consuming, but rushing leads to oversights and mistakes. Take your time to ensure each pass is thorough. Give each stage the attention it deserves.
The Importance of Sanding in Wood Finishing
Sanding wood is a crucial step in achieving a smooth and professional finish on any woodworking project. The technique not only enhances the aesthetic appeal, but it also prepares the surface for staining or sealing, ensuring that your finished product looks its best. When How To Sand Wood Properly is understood and executed, it can transform a rough piece of lumber into a stunning, smooth surface ready for its final coat.
Smoother Surface for Finishing
One of the most important reasons to sand wood is to create a smoother surface. Uneven or rough surfaces can hinder the application of paints, stains, and varnishes. Proper sanding helps:
- Remove any mill marks or imperfections.
- Eliminate existing finishes or topcoats.
- Prepare the wood to absorb stains or finishes evenly.
Proper Techniques for Sanding Wood
To sand wood properly, follow these steps:
- Choose the Right Sanding Tools: Hand sanders, electric sanders, or sanding blocks.
- Select Appropriate Grit: Start coarse and progress to fine.
- Sand in the Direction of the Grain: Always sand along the grain.
- Check for Smoothness: Regularly run your hand over the surface.
- Clean the Dust: Essential for ensuring good adhesion.
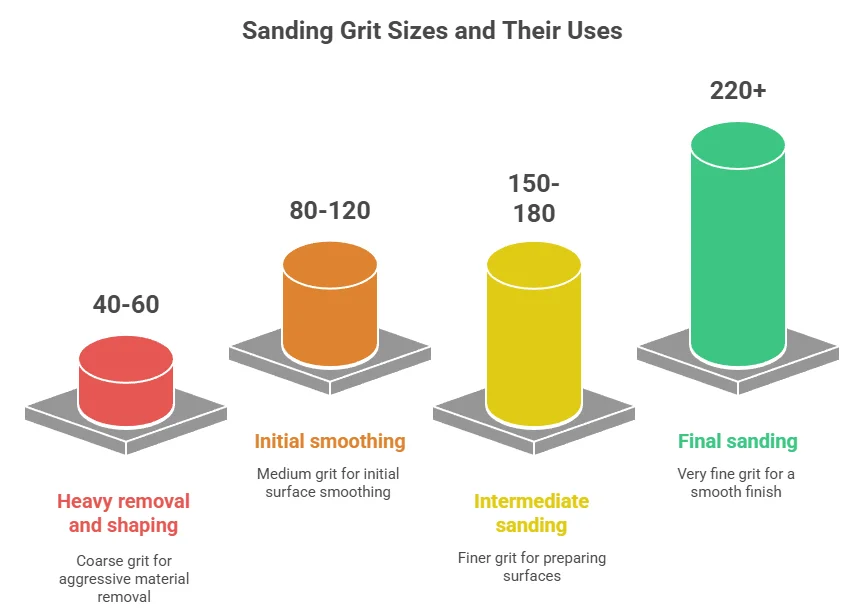
Types of Sanding Sand and Their Uses
| Grit Size | Use |
|---|---|
| 40-60 | Heavy removal of material and shaping. |
| 80-120 | Initial sanding for smoothing surfaces. |
| 150-180 | Intermediate sanding before finishes. |
| 220+ | Final sanding for a smooth finish. |
Why It Matters for Longevity
Properly sanding wood not only enhances its appearance but also contributes to its durability. A well-applied finish protects the wood from moisture, dirt, and wear. Proper sanding impacts longevity by improving adhesion and reducing the chances of flaking or peeling.
Tools and Materials You Might Need
- Sandpaper of various grits
- Sanding blocks
- Power sander (optional but recommended for larger projects)
- Tack or damp cloth for cleaning
For more tips and insights into woodworking, consider exploring resources like Wood Magazine and Woodworker’s Journal.
How to Achieve a Smooth Finish: Tips and Tricks for Sanding Wood
Sanding wood is an essential process in woodworking that creates a smooth and polished finish. Whether you’re refurbishing furniture or finishing a project, doing it properly is key. Here’s How To Sand Wood Properly, ensuring a breathtaking finish.
The Right Tools for Sanding
- Sandpaper: Start with coarse (40-60) and progress to fine (220+).
- Sanding Block: Helps apply even pressure on flat surfaces.
- Power Sander: Orbital or belt sander for larger areas.
- Dust Mask & Safety Goggles: Essential protection.
Preparing the Wood
Before you even start sanding, preparation is crucial. Ensure the wood is clean and dry. Look for any previous finishes or severe imperfections like scratches or dents. If the wood is previously stained or varnished, you may need to strip it. A wood magazine guide offers insights on stripping wood finishes effectively.
Step-by-Step Sanding Process
Now let’s get into How To Sand Wood Properly, step by step:
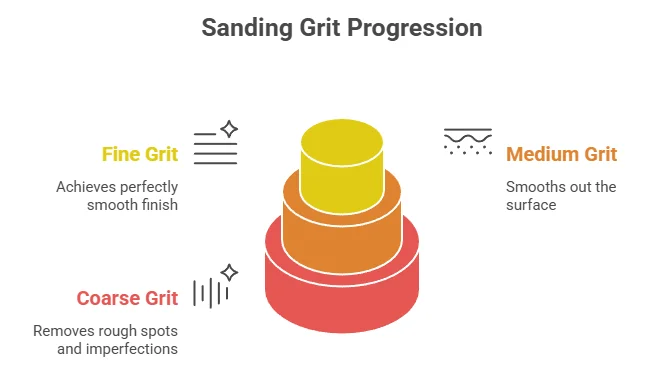
- Start with Coarse Grit: Remove rough spots and imperfections.
- Progress to Medium Grit: Smooth out the surface.
- Finishing with Fine Grit: Perfectly smooth finish for edges and corners.
Techniques to Enhance the Finish
- Cross-Sanding: Alternating sanding direction to eliminate scratches.
- Last Pass with a Block: Ensures an even final finish.
- Hand-Sanding: Reach spots a machine may miss.
Cleaning Up Dust
Dust removal is a vital step in achieving a smooth finish. After sanding with each grit, use a vacuum or a damp cloth to clean the dust and ensure the surface is completely free of debris before finishing.
Common Mistakes to Avoid
When learning How To Sand Wood Properly, be aware of common mistakes: sanding against the grain, skipping grits, and not cleaning the surface between grits.
Additional Resources
Conclusion
Achieving a flawless finish when working with wood is an art, and mastering How To Sand Wood Properly is crucial to this process. By following the proper techniques outlined, you can take the right steps to ensure that your projects turn out beautifully. Selecting the correct sandpaper for each type of wood is also central to achieving the best results; fine-grained papers may work wonders on softwoods, while coarser grains are better suited for hardwoods.
Avoiding common pitfalls during sanding can save you both time and frustration. It’s important to take your time and never rush through the sanding process. Recognizing mistakes early—such as applying too much pressure or skipping grits—will prevent future issues with wood finishing. Armed with this knowledge on How To Sand Wood Properly, you’re now ready to enhance your skills and transform your pieces into lasting works of art.