
Building a Collapsible Wooden Table is a rewarding project that combines functionality with aesthetic appeal. Whether you’re looking for extra dining space or a convenient workspace, a collapsible table fits your needs perfectly. This step-by-step guide will help you build your own collapsible wooden table with ease.
Materials Needed
- Wood boards (choose your preferred type, like pine or oak)
- Wood screws
- Hinges
- Wood glue
- Sandpaper (various grits)
- Wood finish or paint
- Measuring tape
- Drill
- Saw
Step 1: Designing Your Table
Before you begin, sketch a design for your table. Consider the dimensions you want. A common size for a collapsible table is 4 feet by 2 feet, but you can customize this based on your space. Ensure it’s proportional to the area where you plan to use it.
Step 2: Cutting the Wood
Once you have your design, it’s time to cut the wood. Using a saw, cut pieces for the tabletop and legs as follows:
- One piece for the tabletop (4’ x 2’)
- Two side panels for support (2’ x 1’)
- Four legs (at least 28” tall, depending on desired height)
Step 3: Sanding the Edges
Smooth out the edges and surfaces of each piece with sandpaper. Start with a coarse grit and progress to a finer grit for a polished finish. This step is crucial not just for aesthetics but also for safety, as it helps prevent splinters.
Step 4: Assembling the Tabletop
Attach the side panels to the longer tabletop piece. Use wood glue and screws for stability. Ensure that everything is aligned properly. This will add support and prepare the tabletop for the legs.
Step 5: Attaching the Legs
For collapsible functionality, you will attach the legs at points that allow them to fold. Use hinges to connect each leg to the corners of the table. Ensure the legs can swing out and collapse easily:
- Mark where to place the hinges on each leg and the table.
- Drill pilot holes before screws to avoid splitting the wood.
Step 6: Finishing Touches
Once the table is assembled, apply your chosen wood finish or paint. This will protect the wood and enhance its appearance. Allow this to dry completely based on the manufacturer’s instructions. Finishing your table makes it not only durable but also more attractive.
Step 7: Testing Your Table
Before using your new collapsible wooden table, test its stability. Open and close the legs multiple times to ensure they function seamlessly. Check for any wobbling or loose screws, making adjustments as needed. This will ensure your table is safe and ready for use.
Helpful Tips
- Choose high-quality wood to ensure longevity.
- Consider using a table hinge that locks, providing extra stability.
- Explore different finishes like stains or paints for a personalized touch.
If you’re looking for more detailed plans or additional woodworking techniques, consider visiting sites like Wood Magazine or Popular Woodworking. Building A Collapsible Wooden Table not only gives you a functional piece of furniture but also the satisfaction of creating something with your own hands. Follow these steps, and you’ll have a unique table that adds charm and utility to your space!
Essential Tools and Materials for Your Collapsible Table Project
Building A Collapsible Wooden Table is a rewarding project that can enhance your home or outdoor space. To ensure a smooth and successful DIY experience, it’s essential to gather the right tools and materials. Here’s a comprehensive list to guide you through your collapsible table project.
Tools
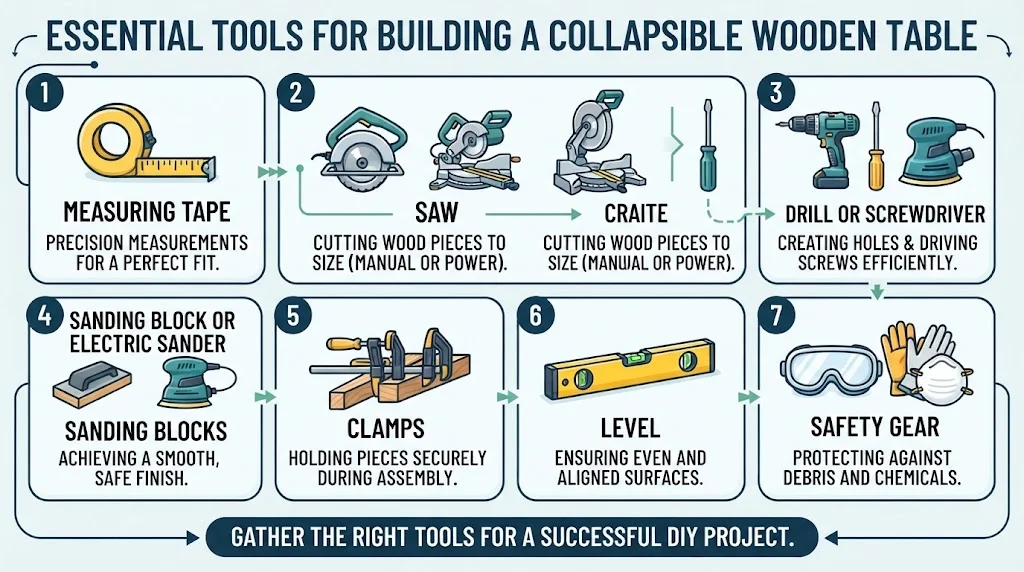
- Measuring Tape: Accurate measurements are critical for ensuring your table fits perfectly in your intended space. A good measuring tape will help you take precise dimensions.
- Saw: You’ll need either a circular saw or a miter saw for cutting your wood pieces to the right sizes. Depending on your comfort level, you may choose between a manual or powered saw.
- Drill or Screwdriver: A cordless drill is ideal for creating holes and driving screws. If you prefer a more manual approach, a screwdriver will suffice, but it may take more time.
- Sanding Block or Electric Sander: A smooth surface is crucial for both aesthetics and safety. Sanding tools will help you achieve a professional finish.
- Clamps: These are vital for holding pieces together while you work, ensuring accuracy and stability during assembly.
- Level: To ensure your table is even, a level tool will help you check that all surfaces are flat and correctly aligned.
- Safety Gear: Prioritize your safety by wearing goggles, gloves, and a dust mask to protect against debris and strong chemicals.
Materials
Selecting the right materials is just as important as having the right tools. Here are key components needed for constructing your collapsible table:
- Wood: Choose high-quality hardwood like oak, maple, or birch. These types of wood are durable and provide a beautiful finish. You’ll need to cut them into table tops, legs, and any additional support pieces.
- Hinges: Heavy-duty hinges are essential for allowing the tabletop to fold down. Look for stainless steel or brass options that are resistant to rust and wear.
- Screws: Invest in wood screws that are suitable for your wood type. The choice of screw size and type will impact the stability and longevity of your finished product.
- Wood Glue: For extra support, wood glue can be applied at joints before using screws. This ensures a stronger bond and helps prevent wobbling over time.
- Finish or Sealant: After building your table, you will want to protect the wood with a finish. Options include paint, stain, or sealant. Choose one that complements your decor while also providing a protective layer against moisture and wear.
- Leg Supports: Consider using collapsible leg supports. These can often be purchased and provide additional stability when the table is set up.
Tips for Selecting Materials
When picking your materials, consider the style, functionality, and durability. Look for quality over quantity. Check Wood Magazine for expert advice on wood choices and finishing techniques. You can also compare products and prices on sites like Home Depot or Lowe’s to find what best suits your needs.
Prepare Your Workspace
Before diving into your project, it’s beneficial to set up an organized workspace. Make sure you have ample room to maneuver, and keep your tools within reach. A clean workspace not only enhances efficiency but also ensures safety while you work.
Check your local regulations for any restrictions if you are carrying out your DIY in a public space or communal area. This is especially true if using loud equipment like saws or drills.
Gathering the right tools and materials for making a collapsible wooden table is an essential step in ensuring your project’s success. With a clear understanding of what you need and a well-planned approach, you’ll be well on your way to creating a functional piece that suits your lifestyle.
Design Variations for Collapsible Wooden Tables
When considering a How to Make A Collapsible Wooden Table, exploring different design variations is both exciting and practical. These tables not only save space but also add a touch of elegance to any setting. Here are some popular design options you might consider for your next project:
Traditional Folding Tables
Traditional folding tables are classic and widely used. These tables typically feature a rectangular shape with sturdy hinges for easy collapsing. They are often made of solid wood, offering durability and style. Traditional designs can be painted or stained to match your décor. You can easily set them up for family gatherings or outdoor events.
Round Collapsible Tables
Round collapsible tables are great for small spaces. Their design promotes conversation, making them perfect for dining. These tables often come with a central leg that can be folded down. The tabletop can swivel, making storage even easier. You could choose a rustic finish for a cozy dining atmosphere or a sleek modern look for urban spaces.
Drop-leaf Tables
Drop-leaf tables are versatile and ideal for small apartments. The leaves of the table can be folded down when you need extra space. When you have guests over, just lift the leaves to create a larger dining surface. Here are some key features:
- Easy to store when not in use.
- Available in various wood finishes.
- Can serve as a side table or desk.
This type is compact, allowing you to adapt your living space as needed.
Nested Tables
Nesting tables come as sets of smaller tables that fit together. When you need additional surface area, simply pull them apart. They are perfect for entertaining guests, as you can use them for snacks or drinks. Choose natural wood finishes for a warm look or painted options for a vibrant feel.
Portable Picnic Tables
Portable picnic tables can be a fantastic choice for outdoor enthusiasts. Designed for easy transport, these tables can be folded into compact shapes. Opt for lightweight materials combined with wood for sturdiness. Features to consider include:
- Integrated handles for easy carrying.
- Weather-resistant finishes.
- Adjustable height options.
These tables are great for park outings, beaches, or backyard events.
Multi-functional Tables
Multi-functional collapsible tables combine function and style. Some tables are designed to serve as both a dining table and a workspace. They can be equipped with storage options, like drawers or shelves, to optimize space. With a little creativity, you can even add specialized features such as:
- Built-in charging ports.
- Modular designs for various activities.
This type offers flexibility, making them perfect for those who work from home and need a dining setup.
Outdoor/Patio Tables
Outdoor collapsible wooden tables are specifically designed for patio use. These tables often feature a weather-resistant finish, making them ideal for outdoor gatherings. They come in designs that can withstand the elements while still looking beautiful. Select styles that complement your patio furniture for a cohesive look.
Tips for Finishing and Maintaining Your Wooden Table
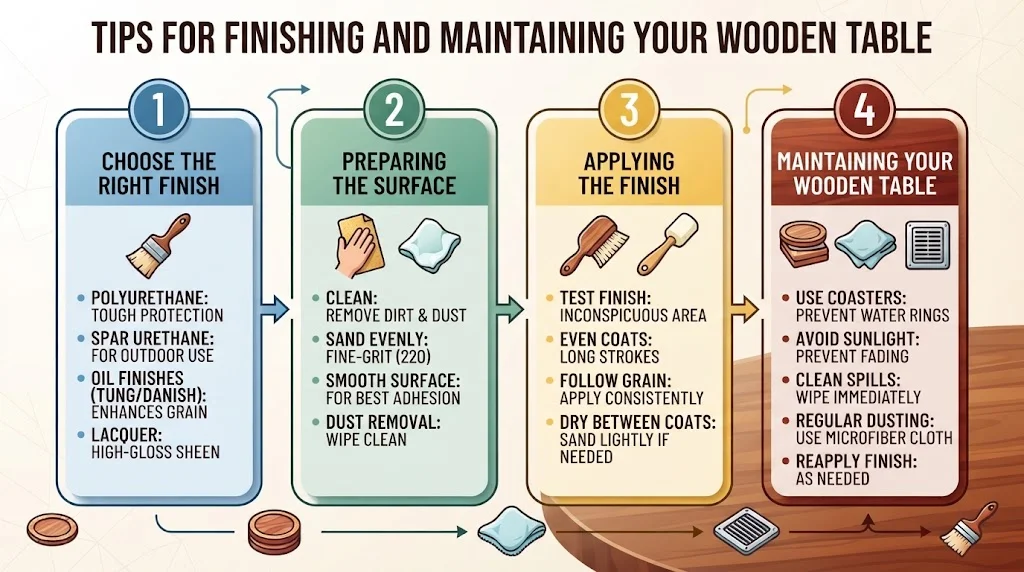
Wooden tables bring charm and warmth to any home, but they require the right finishing and maintenance techniques to keep them looking their best. Here are some essential tips to help you care for your wooden table, enhancing both its appearance and longevity.
Choose the Right Finish
The finish you choose will significantly affect the durability and look of your table. Here are a few popular options:
- Polyurethane: This finish offers a tough layer of protection that resists water, stains, and scratches.
- Spar Urethane: Ideal for outdoor use, it can withstand the elements effectively.
- Oil Finish: Natural oils like tung or Danish oil penetrate the wood and enhance its natural beauty, though they require regular reapplication.
- Lacquer: This high-gloss finish dries quickly and provides a durable surface but can be difficult to repair.
Preparing the Surface
Before applying any finish, you need to prepare the wooden surface. Proper preparation helps the finish adhere better and ensures a smoother final appearance. Follow these steps:
- Clean the Surface: Remove dirt, dust, and grease. Use a soft cloth and mild soap, ensuring the surface is dry before proceeding.
- Sanding: Sand the table evenly using fine-grit sandpaper (220 grit). This creates a smooth surface for the finish to adhere to.
- Dust Removal: After sanding, vacuum the table and wipe it down with a damp cloth to remove any dust.
Applying the Finish
Once the surface is prepared, it’s time to apply the finish. Here’s a step-by-step guide:
- Test the Finish: Always do a small test in an inconspicuous area to check how the wood reacts to the finish.
- Apply the First Coat: Use a brush or a foam applicator to apply the finish in long, even strokes. Make sure to follow the wood grain.
- Drying Time: Allow the first coat to dry completely. Follow the manufacturer’s instructions for drying times.
- Sanding Between Coats: Lightly sand the surface with fine-grit sandpaper between coats for a smooth finish.
- Apply Additional Coats: For added durability, apply two to three additional coats, sanding lightly between each one.
Maintaining Your Wooden Table
After finishing, regular maintenance is key to keeping your wooden table in prime condition:
- Use Coasters: Always place coasters under drinks to prevent water rings. This simple practice can save you from extensive damage.
- Avoid Direct Sunlight: Prolonged exposure to sunlight can fade and damage the finish. Use curtains or blinds to protect your table.
- Clean Spills Immediately: Wipe up spills quickly with a soft cloth. Never let liquids sit on the table’s surface.
- Regular Dusting: Use a microfiber cloth to dust the table regularly, preventing dirt buildup that can scratch the surface.
- Reapply Finish: Depending on the usage, consider reapplying the finish every few years to maintain a protective layer.
Common Issues and Solutions
It’s not uncommon for wooden tables to face wear and tear. Here are some common problems along with solutions:
| Issue | Solution |
|---|---|
| Water Rings | Use a mixture of equal parts vinegar and olive oil to gently rub away marks. |
| Scratches | Fill scratches with matching wood filler, sand, and then apply the finish over the area. |
| Fading | Refinish the surface to restore its original shine and color. |

By following these finishing and maintenance tips, your wooden table can remain a beautiful centerpiece in your home for years to come. For further information on caring for wood furniture, visit Wood Magazine or Popular Woodworking for expert advice and tutorials.
Creative Uses for a Collapsible Wooden Table in Your Home
Are you looking for innovative ways to enhance your living space using multifunctional furniture? A Collapsible Wooden Table project could be your perfect solution. These tables offer flexibility and style, making them both practical and appealing in various settings around your home. Let’s explore some creative uses that will inspire you to make the most of this versatile piece of furniture.
Dining Solutions for Small Spaces
If you live in a compact apartment or a home with limited dining space, a collapsible wooden table allows you to enjoy meals without sacrificing room. When not in use, you can fold it away, creating more space. You can use it for:
- Intimate dinners with family.
- Brunch with friends.
- Meal prepping while using your kitchen efficiently.
A Workspace that Adapts to Your Needs
In today’s remote work environment, having a dedicated workspace is essential. A collapsible wooden table can serve as your home office desk, ensuring you have a comfortable place to work. When you need more room, simply fold it up to make way for other activities. This feature is especially useful for small apartments.
Consider setting it up near a window for natural light or in a quiet corner of your home to boost your productivity. You can also use it for:
- School projects.
- Crafting and DIY activities.
- Working from home without taking over your living space.
Hosting Game Nights or Movie Marathons
Game nights or movie marathons are always fun, but where do you put all the snacks and drinks? A collapsible wooden table can transform your living room into a cozy entertainment space. Here are ways to utilize it:
- Set it up as a snack station during game night.
- Use it for board games where all players need a surface to play.
- Transform it into a mini bar while enjoying your favorite movies.
Outdoor Entertaining

If you enjoy spending time outdoors, a collapsible wooden table is ideal for patio or garden gatherings. You can easily set it up for:
- Picnics in the park.
- Barbecues with family.
- Outdoor birthday parties and celebrations.
When the occasion is over, simply fold and store it away until your next gathering. It keeps your outdoor space tidy and organized.
Crafting and Hobby Projects
For those who love crafting or have hobbies like painting or woodworking, a collapsible wooden table serves as the perfect workspace. Unlike a traditional table, you can set it up anywhere in your home that has enough room. When you’re finished, fold it away. With this setup, you can:
- Keep your craft supplies organized on the table surface.
- Use it as a staging area for larger projects.
- Create a temporary workspace in your garage or living room.
Smart Storage Solutions
The flexibility of a collapsible wooden table doesn’t just stop at functionality; it can also offer clever storage options. When folded down, it can easily slide into a closet or under a bed, minimizing clutter. You can enhance this function by:
- Storing other small items on it while it’s set up.
- Using it to display decorative items or plants when open.
A collapsible wooden table is more than just a piece of furniture; it’s a versatile addition to your home that can change the way you use your space. From dining to crafting and beyond, these tables save space and creativity under one roof. If you want to explore the potential of collapsible wooden tables further, consider visiting websites like The Spruce or Wood Magazine for some great options and ideas. They’re not just practical; they can elevate your home in style!
Conclusion
Creating your own Collapsible Wooden Table can be a rewarding and practical project. By following the step-by-step guide outlined, you now have a clear pathway from conception to completion. Remember, having the right tools and materials is essential. They not only ensure your table is sturdy and functional but also make the building process smoother and more enjoyable.
Exploring design variations allows you to customize the table to fit your unique style and needs. Whether you prefer a rustic look or a sleek modern finish, the options are limitless. Just as important is considering how you can finish and maintain your wooden table. Proper care keeps your creation looking beautiful and prolongs its life, making it a lasting addition to your home.
The versatility of collapsible wooden tables means you can use them in various settings. From family gatherings to outdoor picnics, these tables adapt to your lifestyle and create functional space wherever needed.
By investing your time and effort into building a collapsible wooden table, you not only gain a functional piece of furniture but also a satisfaction that comes from crafting something with your own hands. Dive into this project and enjoy the benefits it brings, both in utility and personal fulfillment. Happy building!