Creating your own wooden plantation shutters is a rewarding project that can elevate the look of any room while also providing excellent light control and privacy. Whether you’re an experienced woodworker or a beginner looking to try something new, this step-by-step guide will help you make beautiful shutters that fit your windows perfectly.
Before starting, gather the materials and tools you’ll need:
- Wood (select hardwood for durability)
- Measuring tape
- Chop saw or table saw
- Router with a round-over bit
- Screwdriver or drill
- Sandpaper (various grits)
- Paint or wood stain
- Hinges
- Shutter pins
- Wood glue
Once you have your supplies ready, follow these steps:
Step 1: Measure Your Windows
Start by measuring the width and height of your window openings. Make sure to measure in three places: top, middle, and bottom for width, and left, center, and right for height. Use the smallest measurements for the most accurate fit.
Step 2: Plan Your Design
Decide on the style and layout of your shutters. Traditional plantation shutters typically have horizontal slats, so plan how many slats you want and their width. A common option is to leave around 2-3 inches between each slat.
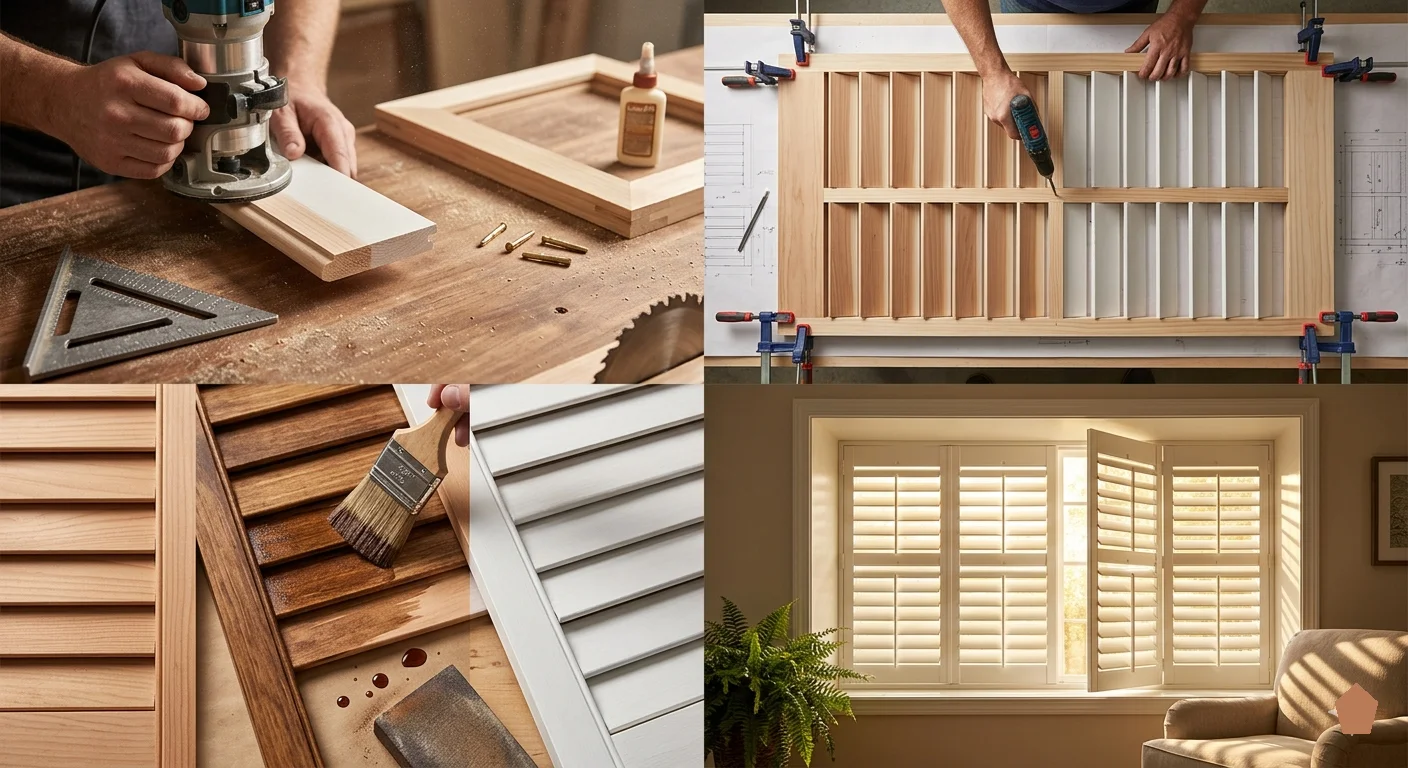
Step 3: Cut the Wood
Using your chop saw or table saw, cut the wood according to your measurements. You’ll need pieces for the main frame and slats. Make sure to wear safety goggles during this process and double-check all measurements before making cuts.
Step 4: Shape the Edges
Once you’ve cut all the pieces, use a router with a round-over bit to smooth the edges of the slats. This will not only make them look nicer but also help prevent chipping.
Step 5: Assemble the Frame
Use wood glue and screws to assemble the frame of your shutter. Start by making a rectangular frame from the wood, ensuring all corners are square. Allow the glue to dry according to the manufacturer’s instructions before moving on.
Step 6: Attach the Slats
Once your frame is ready, space out the slats according to your plan. You can attach them using wood glue and screws or use shutter pins for adjustable functionality. Ensure the slats are horizontal and secure before the glue dries.
Step 7: Sand and Finish
After the shutters are assembled, it’s time to sand them smooth. Use various grits of sandpaper, starting with a coarser grit and moving to finer grits for a polished look. Once sanded, you can paint or stain your shutters as desired.
Step 8: Hang Your Shutters
To install the shutters, attach hinges to one side of the frame and then mount the hinges to your window frame. Ensure everything is level so your shutters fit and operate well. Check that they open and close smoothly.
Essential Tools and Materials Needed for Your Shutter Project
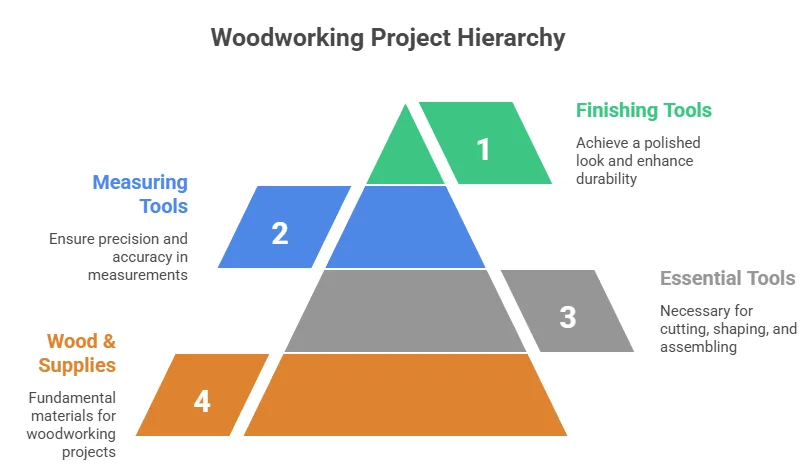
Creating wooden plantation shutters is a fantastic home improvement project that adds both beauty and functionality to your windows. However, before embarking on this rewarding journey, you need to gather the essential tools and materials that will make the process smooth and efficient. Here’s a detailed list to help you prepare for your shutter project.
Wood and Supplies
The first step in building your own plantation shutters is choosing the right wood. Here are some options:
- Pine: Affordable and easy to work with.
- Cedar: Naturally resistant to moisture and insects.
- Oak: Durable and strong, but can be more expensive.
You’ll also need to purchase the following supplies:
- Wood Glue: For bonding pieces together securely.
- Wood Filler: To fill any imperfections before painting or staining.
- Sandpaper: Various grits for smoothing surfaces.
Essential Tools
Equipping yourself with the right tools is crucial for building sturdy wooden plantation shutters. Here’s a list of essential tools you will need:
- Table Saw: For cutting wood to size accurately.
- Miter Saw: Perfect for making angled cuts.
- Drill: For creating holes for screws or dowels.
- Screws and Dowels: Necessary for assembling the shutters.
- Screwdriver: To fasten screws securely.
Measuring Tools
Accurate measurements are vital for your project. Here’s what you’ll need:
- Tape Measure: To ensure correct dimensions for each shutter.
- Square: A 90-degree tool to check for accuracy.
- Level: To ensure your installation is even.
Finishing Tools
After constructing your shutters, finishing touches will enhance their beauty:
- Brushes or Rollers: For applying paint or stain evenly.
- Stain or Paint: Choose a color that complements your decor.
- Clear Coat: To protect the finish and provide shine.
Optional Accessories
Consider these items to improve the function and look of your shutters:
- Hinges: For installing movable shutters.
- Latch mechanisms: To keep shutters closed securely when needed.
- Custom Hardware: Adds a unique touch to your shutters.
Building your wooden plantation shutters can be a fulfilling task when you have all the right tools and materials. Investing in quality supplies can also pay off in durability and aesthetics. If you’re looking for more detailed guides or product recommendations, you may find it helpful to check out DIY Network for tutorials or The Home Depot for materials. This preparation will aid in ensuring that your project is successful and visually stunning.
By following this guide, you will be well-equipped to start building your own wooden plantation shutters. Remember, choosing the right tools and materials is key to achieving a professional finish that enhances the beauty of your home.
Design Styles and Customization Options for Plantation Shutters
Plantation shutters are more than just window coverings; they are a stylish addition that can elevate any room’s design. With multiple design styles and customization options available, you can find the perfect shutters that suit your home decor and personal taste. Understanding the various styles and options can greatly enhance your selection process.
Popular Design Styles for Plantation Shutters
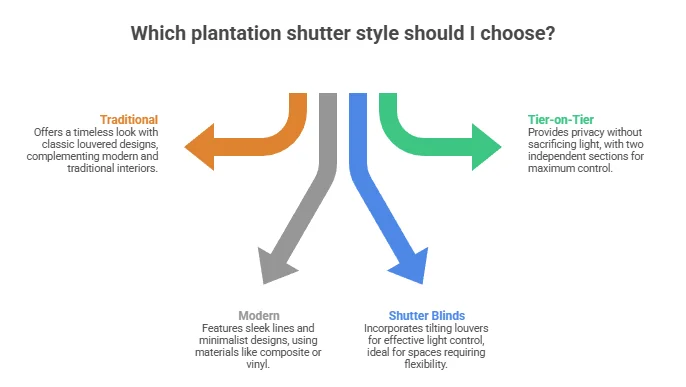
When choosing plantation shutters, you’ll encounter a variety of design styles that cater to different aesthetics. Here are some of the most sought-after options:
- Traditional Plantation Shutters: These shutters feature classic louvered designs, often made from wood or faux wood. They provide a timeless look that complements both modern and traditional interiors.
- Modern Plantation Shutters: With sleek lines and minimalist designs, modern plantation shutters often use materials like composite or vinyl. Choose bold colors to make a statement or stick to neutral shades for a more understated look.
- Shutter Blinds: This design incorporates tilting louvers, allowing you to control light more effectively. It’s an ideal choice for spaces that require flexibility in lighting.
- Tier-on-Tier Shutters: Ideal for homes needing privacy without sacrificing light, these shutters are split into two independent sections. You can open the top while keeping the bottom closed, giving you maximum control over your space.
Customization Options for Plantation Shutters
The beauty of plantation shutters lies in their customization options. Here are several aspects you can personalize to match your home perfectly:
- Material Choices: You can select from hardwood, faux wood, and vinyl. Each material presents different benefits in terms of durability, maintenance, and cost. Hardwood offers elegance, while faux wood is moisture-resistant and easier to clean.
- Color Selection: Custom painting or staining options allow you to match your shutters with your home’s color scheme. Consider popular shades like white, off-white, greys, or even bold colors to add character.
- Size and Shape: Custom sizing allows you to fit your plantation shutters to various window shapes, from standard rectangles to arches and circles. This ensures a perfect fit that enhances your window’s natural beauty.
- Louvers Sizes: Louvers typically come in 2.5-inch, 3.5-inch, and 4.5-inch sizes. Larger louvers allow for more light and better views, while smaller ones enhance privacy and insulation.
Enhancing Your Home With Plantation Shutters
Plantation shutters provide not only privacy but also insulation and sound reduction. They can drastically reduce energy bills by controlling the amount of heat entering or escaping your home. When properly installed, they can enhance your room’s energy efficiency significantly.
With the right design and customization, you can also boost your property’s value. Potential buyers often appreciate the style and function plantation shutters bring, as homes equipped with quality window treatments often command higher prices.
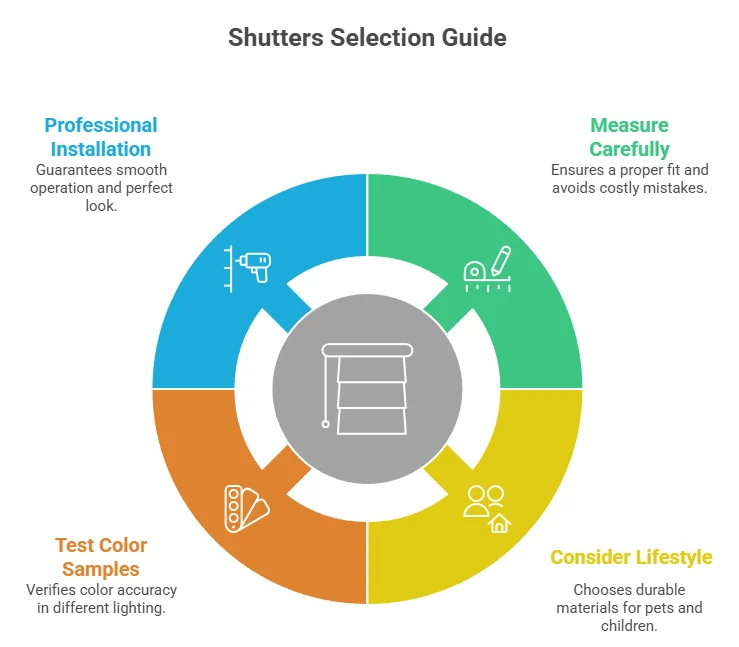
Expert Tips for Choosing the Right Shutters
Choosing the right plantation shutters requires thoughtful consideration. Here are some expert tips to help you make an informed decision:
| Tip | Description |
|---|---|
| Measure Carefully | Always take precise measurements of your windows before ordering. This ensures a proper fit and avoids costly mistakes. |
| Consider Your Lifestyle | If you have pets or children, a more durable material like faux wood may be a better choice compared to real wood. |
| Test Color Samples | Colors can look different in different lighting. Always test samples in your home before making a final choice. |
| Professional Installation | For the best results, consider hiring a professional for installation. They can ensure the shutters operate smoothly and look perfect. |
Plantation shutters into your home design offers a beautiful mix of functionality and elegance. Whether enhancing a traditional or contemporary space, investing in quality plantation shutters can transform your living areas into stylish retreats.
For further reading and professional advice on plantation shutters, visit Shutt Custom Shutters or check out Blinds.com.
Tips for Installing Wooden Plantation Shutters Like a Pro
Installing wooden plantation shutters can transform your space, giving it an elegant look while providing light control and privacy. If you’re ready to take on this rewarding home project, here are some invaluable tips to ensure you install your wooden plantation shutters like a true professional.
Gather Your Tools and Materials
Before diving into the installation, it’s essential to have all the necessary tools and materials. Here’s what you typically need:
- Wooden plantation shutters
- Measuring tape
- Screwdriver (flathead and Phillips)
- Drill
- Level
- Pencil
- Bracket hardware (usually included with the shutters)
Having the correct tools will make the installation process smoother and more efficient.
Measure Your Windows Accurately
The key to a successful shutter installation lies in precise measurements. Follow these steps:
- Width Measurement: Measure the width of your window from the inside edges of the frame. Repeat this measurement at the top, middle, and bottom to ensure consistency.
- Height Measurement: Measure the height from the top edge of the window frame to the bottom edge. Again, check at different points (left, center, and right) for accuracy.
Ensure you note the smallest measurements to avoid any fitting issues later on. Make sure your measurements are in whole numbers for easier calculations and adjustments.
Choose the Right Style of Shutters
Wooden plantation shutters come in various styles. Here are the most common options:
- Full Height: Covers the entire window for maximum light control and privacy.
- Tier on Tier: Individual sections that open separately, giving you more flexibility.
- Cafe Style: Covers only the lower half of the window, allowing light in while maintaining privacy.
Selecting the right style will depend on your design preferences and practical needs.
Prepare the Shutters for Installation
After ensuring your shutters are the correct fit, preparation is key:
- Remove any packing materials.
- Check the shutters and hardware for any damage.
- Label each panel or section to prevent mixing them up during installation.
Taking these steps will save you time and frustration later in the installation process.
Install the Hardware
Begin by installing the brackets that hold the shutters in place. Follow these general steps:
- Position the brackets according to the manufacturer’s instructions.
- Use your level to make sure they’re straight.
- Secure the brackets with screws, using your drill for optimal tightness.
This step is crucial, as proper alignment ensures that the shutters operate smoothly.
Attach the Shutter Panels
Once the hardware is installed, it’s time to attach the shutter panels. Here’s how:
- Lift the panel and align it with the brackets.
- Secure it using the provided pins or screws. Make sure it’s snugly attached.
- Repeat for any additional panels.
Check each panel’s operation before moving on; they should open and close smoothly.
Final Adjustments and Trial Runs
After everything is installed, perform a final inspection:
- Test the opening and closing of each panel.
- Ensure all screws are tight and brackets are stable.
- Make adjustments to the panels if they are misaligned or obstructing any part of the window.
A few tweaks may enhance functionality and finish. For additional tips on maintenance and care for your shutters, visit EWG’s recommendations.
By following these steps, you can install wooden plantation shutters that not only look fantastic but also function effectively. Enjoy the beauty and utility these shutters bring to your home!
For a visual guide on installation, you might find the resources on Home Depot’s website particularly helpful.
Maintenance and Care Tips for Longevity of Your Shutters

Your shutters are more than just a decorative touch to your home; they are also essential for privacy and light control. To maintain their beauty and functionality, proper care and maintenance are required. By following the right tips, you can ensure that your shutters last for years to come.
Regular Cleaning Practices
Keeping your shutters clean is crucial. Dust and dirt can accumulate over time, causing your shutters to look dull and unkempt. Here are some simple cleaning methods:
- Dusting: Use a soft, dry microfiber cloth or a feather duster to remove dust from the slats. For vinyl or faux wood shutters, a damp cloth can be used.
- Washing: Every few months, wash your shutters with warm soapy water and a sponge. Avoid harsh chemicals that can damage the finish.
- Vacuuming: For fabric or plantation shutters, using a vacuum with a brush attachment can help remove dirt gently.
Inspect Regularly for Damage
Regular inspections can catch problems before they escalate. Here are areas to focus on during your checks:
- Check the Hinges: Ensure that all hinges and mounting brackets are secure. Tighten screws if necessary.
- Look for Warping: Examine wooden shutters for any signs of warping, especially in humid areas.
- Check for Paint Chipping: Inspect the shutters for any chipping paint or peeling finishes. Touch up these areas as needed.
Handling Seasonal Changes
Seasons can influence the condition of your shutters. Here’s how to manage them through the year:
- Winter: Ensure that your shutters are closed during storms to prevent damage from snow or ice.
- Summer: Close the shutters during the hottest part of the day to reduce heat exposure.
- Spring: Conduct a thorough washing after winter and inspect for any residual winter damage.
Sun Exposure and Moisture Control
Excessive sunlight can fade the colors of your shutters. Here are tips to protect them from UV damage:
- Use UV-Protective Film: Consider applying a window film that offers UV protection.
- Install Awnings: Using external shades or awnings can provide an additional layer of protection against sun exposure.
For moisture control, it’s essential to keep the area around your shutters dry. If you notice humidity, a dehumidifier can help maintain optimal levels.
Repairs and Touch-Ups
Over time, your shutters may need repairs. Here’s how to handle basic issues:
- Replace Slats: If a slat is damaged, it can usually be removed and replaced without replacing the entire shutter.
- Touch-up Paint: Use touch-up paint for any chips or scratches. You can often find matching colors at your local home improvement store.
- Refinish Wood Shutters: If wood shutters appear worn, a fresh coat of finish can rejuvenate their appearance.
Professional Maintenance
Sometimes, professional help is necessary. Consider hiring experts for:
- Deep Cleaning: Professionals can provide deep cleaning services, ensuring that your shutters maintain their beauty.
- Repairs: Any major repairs should ideally be done by trained technicians who understand the intricacies of shutter design.
Remember, a little care goes a long way in preserving the beauty and functionality of your shutters. Regular cleaning, timely repairs, and proper seasonal handling can enhance their lifespan and keep your home looking stylish.
Conclusion
Building wooden plantation shutters can be a rewarding project that adds both beauty and function to your home. By following the step-by-step guide, you can easily create shutters that suit your style and tastes. Having the right tools and materials is crucial, so make sure to gather everything on the list before starting your work.
Exploring various design styles and customization options allows you to tailor your shutters to reflect your personality and harmonize with your interior decor. Taking the time to install your shutters properly ensures they fit well and operate smoothly, presenting a professional appearance that enhances your home’s value.
Maintaining your newly built plantation shutters will extend their life and keep them looking fresh. Regular cleaning and care will prevent dust buildup and ensure the wood finishes remain vibrant for years to come. With proper attention and a little love, your shutters can become a lasting feature in your home, offering both privacy and aesthetic appeal.
Transforming your living space with wooden plantation shutters is not just a functional upgrade; it’s a creative outlet that showcases your skill and taste. Embrace the journey of building your own shutters, and enjoy the satisfaction that comes with a job well done. Each time you open and close your shutters, you’ll be reminded of the effort you put into crafting something truly special for your home. Happy building!