Building a wooden storage shed can be a rewarding DIY project that adds extra space to your home. Whether you need it for gardening tools, outdoor equipment, or extra storage, a wooden shed offers durability and aesthetics. Follow this step-by-step guide to learn How to Build a Wooden Storage Shed.
Gather Your Materials
Before you begin building, gather all the necessary materials. Having everything ready will make the process smoother. Here’s a list of what you will need:
- Wood (cedar or pressure-treated lumber)
- Plywood for flooring and walls
- Nails and screws
- Hinges and a latch for the door
- Roofing materials (shingles or metal roof)
- Wood stain or paint for weather protection
- Tools: saw, hammer, drill, measuring tape, level, and square
Plan Your Shed
Draft a plan that outlines the size and style of your shed. Consider the following:
- What will you store in the shed?
- How much space do you need?
- What dimensions fit your yard?
You might want to check out websites like Family Handyman for example plans. Once you have your plan, you can create a materials list.
Prepare the Site
Choose a flat, well-drained location for your shed. Remove any grass or debris from the area. If the ground is uneven, you may need to level it. You can lay down a foundation made of concrete blocks or treated wood beams to ensure stability.
Build the Floor Frame
Start by creating a frame for the floor. Measure the dimensions based on your plan and cut the lumber accordingly. Assemble the floor frame using nails or screws. Once assembled, lay down plywood sheets on top to create the floor of your shed. Make sure everything is square, and secure the plywood with screws.
Construct the Walls
Next, you’ll build the walls. Here’s how:
- Cut lumber pieces for vertical supports.
- Attach horizontal supports to the vertical supports, creating a frame.
- Cover the frames with plywood, securing it with screws.
- Create openings for windows and doors as per your design.
Once the walls are ready, raise them into position and secure them to the floor. Use braces temporarily until you secure them fully to the frame.
Add the Roof
The roof adds protection and character to your shed. You can opt for a sloped or flat roof. For a sloped roof, cut two triangular pieces for the peak and attach them to the top of the wall frames. Then, create horizontal beams to support the roof. Cover the roof with plywood and then add the roofing material you’ve chosen, be it shingles or metal.
Install Doors and Windows
Build doors from plywood or pre-made panels. Secure them onto hinges and attach a latch. If you opted for windows, install them in the openings you created earlier. This step adds natural sunlight to your shed, improving visibility.
Finishing Touches
Now that the basic structure is in place, it’s time for finishing touches:
- Sand any rough edges to prevent splinters.
- Paint or stain the shed to protect it from weather elements.
- Add shelves or hooks inside to maximize storage.
Essential Materials Needed for Your Wooden Storage Shed Project
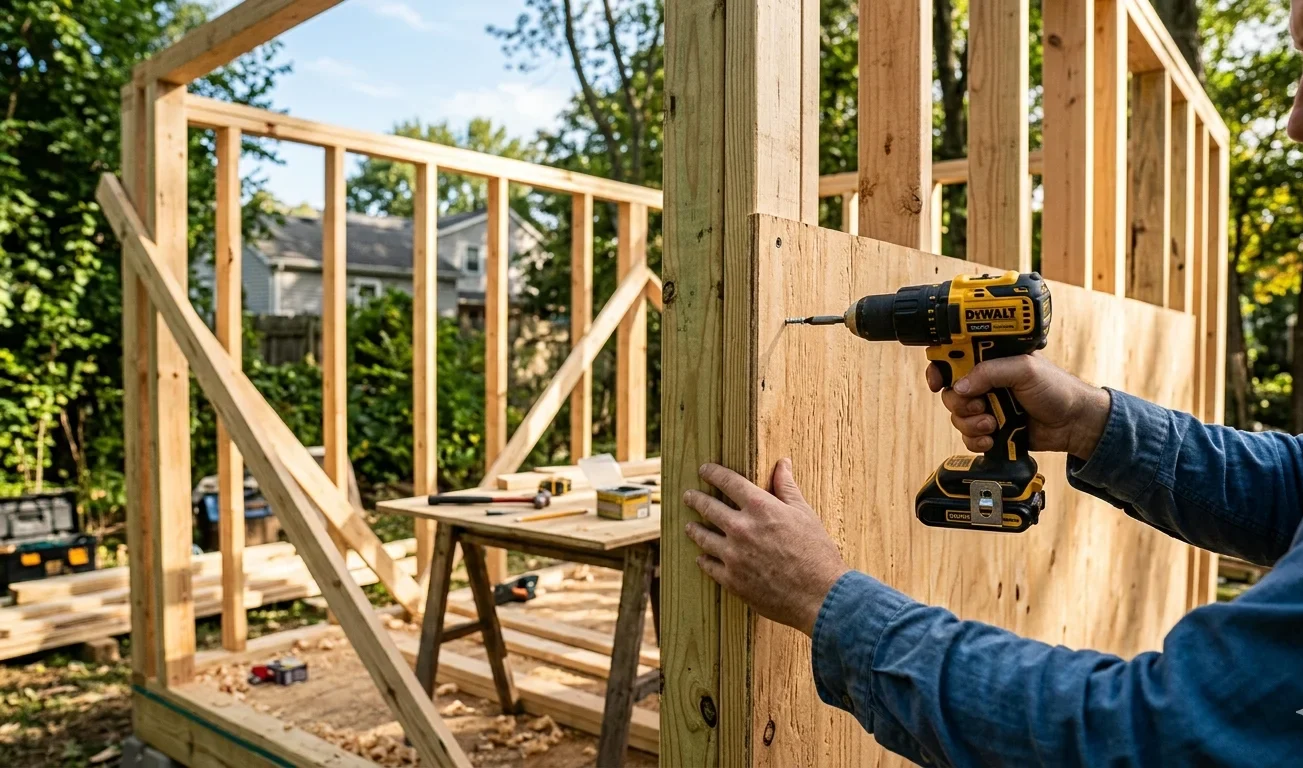
Building a wooden storage shed can be a rewarding project that not only helps you organize your belongings but also adds value to your property. To ensure your project goes smoothly, you need to gather essential materials before you start. Below is a comprehensive list of materials you will need, along with explanations of their importance. This will help you stay organized and make the construction process enjoyable. To help you visualize the structure, refer to this diagram of a typical shed frame:
Wood Components
Start by selecting the kind of wood you’ll use for your storage shed. Here are some common types:
- Pressure-Treated Lumber: This is crucial for the base and ground contact areas, as it resists moisture and decay.
- Exterior Grade Plywood: Use this for the walls, as it provides both strength and insulation.
- OSB (Oriented Strand Board): A cost-effective alternative to plywood, it is excellent for internal walls.
Fasteners
To hold everything together, you’ll need various fasteners. Consider these essentials:
- Wood Screws: Use these for joining panels and sections. They provide a strong hold.
- Nails: Common nails can be used for framing and assembling walls quickly.
- Metal Brackets: For added stability, especially in corners and joints.
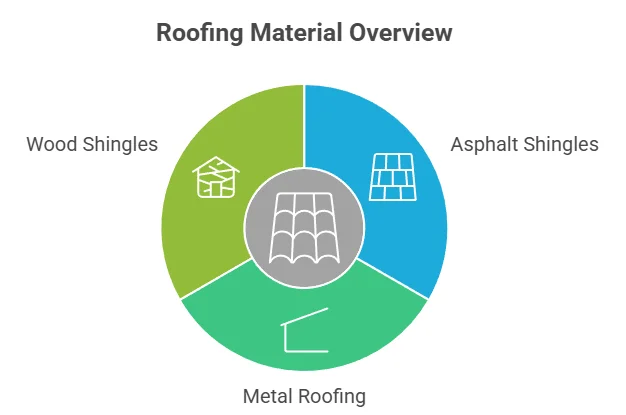
Roofing Materials
The roof is one of the most critical parts of your shed. You have several options, including:
| Material | Benefits |
|---|---|
| Asphalt Shingles | Cost-effective and easy to install. |
| Metal Roofing | Durable, long-lasting, and reflects heat. |
| Wood Shingles | Aesthetic appeal and natural insulation. |
Flooring Materials
A strong floor is fundamental to your shed’s longevity. You’ll typically need:
- Floor Joists: Use 2×6 or 2×8 lumber to support your flooring.
- Subflooring: OSB or plywood for durability and moisture resistance.
Tools
Having the right tools will make your project easier. Here are some basic tools you’ll likely need:
- Circular Saw: For cutting wood to size precisely.
- Drill: Essential for making holes and driving screws.
- Level: Ensure your shed is built straight and correctly aligned.
- Tape Measure: Accurate measurements are key to a successful build.
Finishing Materials
Don’t forget about finishing touches that can protect your shed from the elements and enhance its look:
- Wood Sealant or Stain: This protects the wood and helps it withstand moisture.
- Paint: A coat of paint can provide a personal touch while also protecting the wood.
- Hardware for Doors: Hinges, locks, and handles that match your shed’s design.
It’s vital to plan your project by gathering all necessary materials before you start. If you need more guidance, consider visiting sites like Lowe’s for more tips on supplies or Home Depot for specific tools and materials designed for building wooden structures. By preparing adequately, you’ll make your wooden storage shed project a success. Planning and careful selection of materials not only ensures a sturdy shed but also makes the building process enjoyable and efficient. Happy building!
Common Mistakes to Avoid When Building a Storage Shed
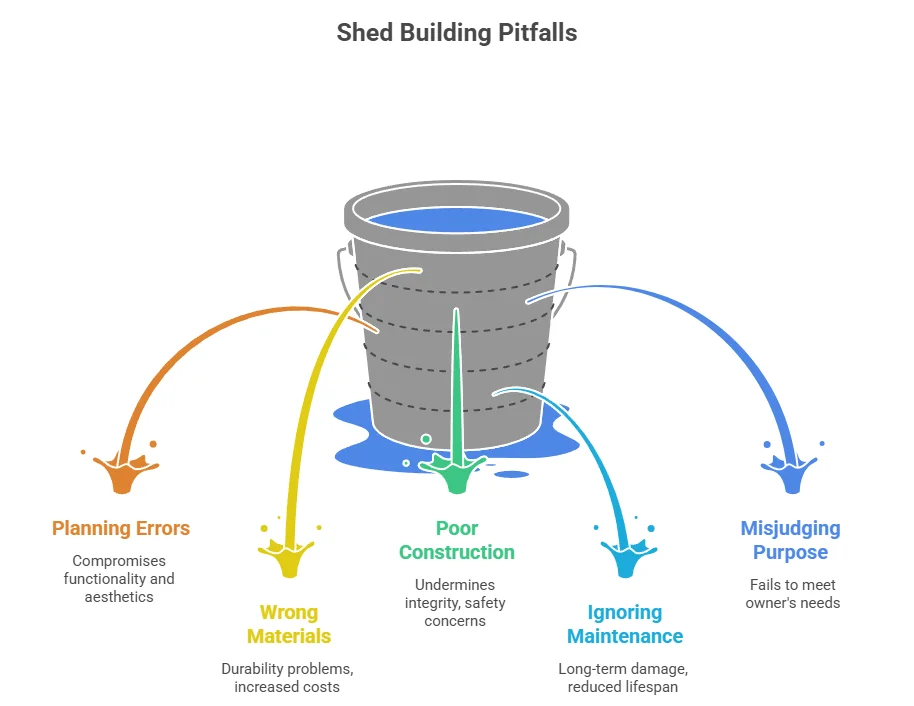
Building a wooden storage shed can be an exciting project. However, many people encounter problems along the way. To help you avoid these common pitfalls, here are some key mistakes you should watch out for when constructing your wooden storage shed.
Planning and Design Errors
The foundation of a successful shed begins with a solid plan. Many newcomers skip detailed designs, which can lead to significant issues later on.
- Ignoring Local Regulations: Before you start, check if you need permits or if there are zoning restrictions in your area. Failing to comply can lead to costly fines and even mandates to dismantle your shed.
- Inadequate Site Assessment: Evaluate the site’s drainage, sunlight, and accessibility. Poor site choices can result in leaks or mold growth later on.
- Not Measuring Correctly: Take precise measurements of your space. Incorrect dimensions can result in a shed that is either too small or overly cumbersome.
Choosing the Wrong Materials
The choice of materials is crucial for durability and functionality. Using subpar materials can undermine the entire structure.
- Low-Quality Wood: Opt for treated lumber that can withstand weather conditions. Cheap wood can warp, crack, or rot over time, leading to unnecessary repairs.
- Skimping on Hardware: Invest in quality hinges, screws, and locks. High-quality hardware contributes to the overall integrity of the shed.
- Neglecting Insulation and Ventilation: If you plan to store sensitive items, consider insulation and ventilation from the start. This will help protect your belongings from temperature fluctuations and humidity.
Poor Construction Techniques
Even the best materials won’t help you if the construction isn’t done right. Several errors can detract from the shed’s stability and appearance.
- Inadequate Foundation: Your shed needs a solid base, whether it’s a concrete slab or a wooden frame. A poor foundation can lead to settling, which might result in structural failure.
- Rushing the Assembly: Take your time during construction. Rushing can lead to misaligned pieces and gaps that may become problematic later.
- Overlooking Safety Measures: Always wear proper safety equipment and follow best practices to avoid accidents. Safety should never be an afterthought.
Ignoring Maintenance Considerations
After you finish building, many people forget about ongoing maintenance. This can lead to costly repairs down the line.
- Neglecting Regular Inspections: Set a schedule to regularly inspect your shed for any signs of wear and tear or damage.
- Forgetting About Sealing and Painting: Sealant and paint help protect your shed from the elements. Reapply them as needed to prolong its life.
- Avoiding Cleanup After Use: Maintaining a clean space not only keeps your shed functional but also prevents damage caused by clutter and debris.
Misjudging the Shed’s Purpose
Understanding the purpose of your shed is crucial. Many people fail to plan what they will store in the shed, leading to wasted space and poor organization.
- Not Considering Future Needs: Design your shed with potential future uses in mind. This can help you avoid having to rebuild sooner than expected.
- Failing to Organize Properly: Use shelving or storage bins to keep everything organized. An organized shed enhances accessibility and ensures you use the space efficiently.
Building a wooden storage shed can be a fulfilling project when approached correctly. By avoiding these common mistakes, you can ensure that your shed serves its purpose efficiently for years to come. If you want to learn more about the materials and techniques, consider visiting Wood Magazine for expert advice and resources.
Creative Ideas for Organizing Your Wooden Storage Shed
Maximizing Your Wooden Storage Shed Space
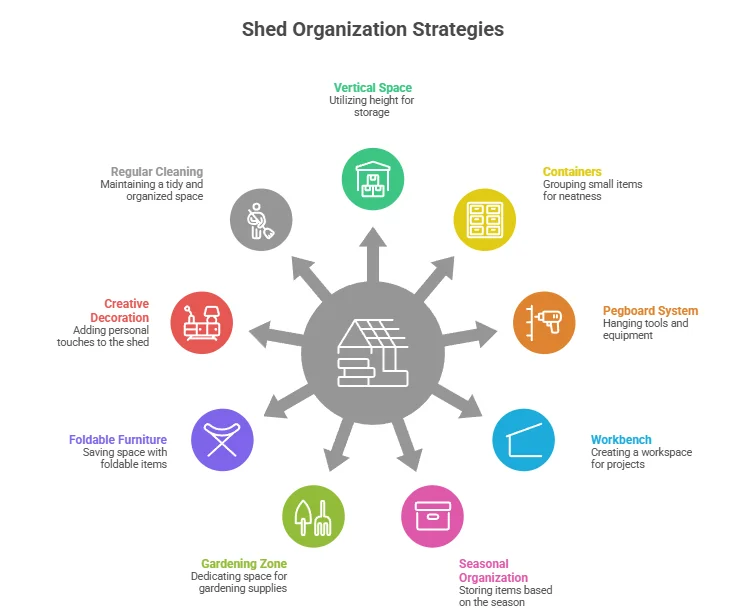
If you want to get the most out of your wooden storage shed, clever organization is key. Here are some creative ideas to help you arrange and utilize the space effectively. Keep in mind that a clean and organized shed not only makes it easier to find what you need but also helps in maintaining the longevity of your belongings.
Utilize Vertical Space
One of the best strategies is to take advantage of vertical space. Shelving units can help store items like seasonal decorations, gardening tools, or sports equipment. Consider these options:
- Install adjustable shelves to hold different items.
- Use wall-mounted racks for tools and larger items.
- Hang bikes or ladders from the ceiling to free up floor space.
Use Containers for Smaller Items
Containers are fantastic for organizing smaller tools and accessories. Clear plastic bins can help you easily see what’s inside. Here are a few tips:
- Label each bin clearly for quick identification.
- Group similar items together, like gardening supplies or holiday decorations.
- Stack bins to save floor space.
Implement a Pegboard System
A pegboard can be a game-changer for organization. You can customize it to fit your needs. Hang tools, scissors, and other items that are used frequently. Benefits include:
- Easy access to tools without digging in boxes.
- Versatile layout that can change as your needs do.
- Holds a variety of items securely and visually appealing.
Incorporate a Workbench
If you like to work on projects in your shed, having a workbench can be very helpful. A dedicated space keeps everything tidy. Consider these aspects:
- Underneath the bench, store tools or boxes out of sight.
- Add hooks to hang tools right by the work area.
- Use a folding bench if you need to save space when not in use.
Implement Seasonal Organization
Keep your storage shed dynamic by organizing items seasonally. This method adds practicality to your storage system. You can:
- Take inventory at the start of each new season.
- Store seasonal items in clearly labeled bins for easy rotation.
- Keep space clear for items that will be in use for the next few months.
Set Up a Gardening Zone
If you love gardening, consider creating a dedicated gardening zone within your shed. For organizing garden tools:
- Use a vertical planter for pots and seed packets.
- Keep soil and fertilizers in tight-sealing containers to avoid spills.
- Have a designated area for gloves and other gear.
Consider Foldable Furniture
Foldable furniture can save space in your wooden storage shed while providing utility. This is especially useful if your shed serves multiple purposes. Look for:
- Collapsible tables for extra workspace.
- Chairs that tuck away when not in use.
Embrace Creative Decoration
Why not make your shed a bit more stylish? Using creative decorations can personalize your space while keeping it organized. You could:
- Paint the interior to make it inviting.
- Add a corkboard for notes or reminders.
- Hang artwork or add a plant for a touch of greenery.
Maintain Regular Cleaning
Regular cleaning helps keep your wooden storage shed functional. Try to organize and clean your shed every few months:
- Remove items that you no longer use.
- Sweep out debris and clear out cobwebs.
- Reassess your organization and make changes as needed.
For more detailed storage solutions and ideas, you can check out The Family Handyman and Good Housekeeping. By implementing these creative organizational strategies, your wooden storage shed will not only be functional but also a welcoming place for all your items. Take the time to customize your storage to fit your lifestyle, and you’ll find everything you need at your fingertips.
Maintenance Tips for Longevity of Your Wooden Storage Shed
Your wooden storage shed is a valuable asset, providing essential space for tools, gardening supplies, and other materials. To ensure it serves you well for many years, regular maintenance is crucial. With the right care, you can avoid costly repairs and keep your shed looking great. Here are some helpful tips to maintain your wooden storage shed.
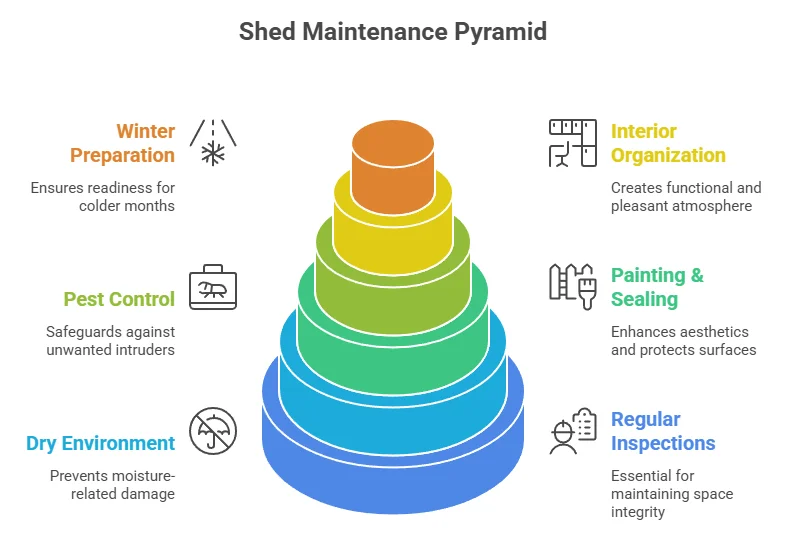
Regular Inspections
Performing inspections regularly can help you catch problems early. Here’s what to look for:
- Roof Condition: Check for missing or damaged shingles. Water damage can lead to expensive repairs.
- Walls and Foundation: Look for any signs of rot or insect infestation. If you spot any, addressing it quickly can save you hassle later.
- Door and Windows: Ensure that doors and windows close properly, and check for cracks or gaps that may allow pests inside.
Keep It Dry
Moisture is the enemy of wooden structures. Here’s how to keep your shed dry:
- Make sure your shed is well-ventilated. This can help prevent condensation from forming inside.
- Use gutters and downspouts on the roof to divert rainfall away from the shed.
- Consider elevating the shed slightly off the ground to help with drainage.
Painting and Sealing
Regularly applying paint or sealant can protect the wood from moisture and UV damage:
- Choose the right product: Use a high-quality exterior-grade paint or sealant specifically designed for wood.
- Frequency: Reapply every 2-3 years, or sooner if you notice wear. Make sure to clean the surface before applying new paint.
Pest Control
Keeping pests at bay is essential for the longevity of your shed. Follow these pest control steps:
- Seal any cracks or gaps that might allow pests to enter.
- Keep the area around your shed clean and free from debris, which may attract pests.
- Consider using natural repellents like cedar chips or essential oils that deter insects without harming the environment.
Organizing the Interior
Clutter in the shed can make maintenance more difficult and increase the risk of accidents. Here are some organizing tips:
- Use shelving units to maximize space efficiently.
- Label storage bins so you can quickly find what you need.
- Store items off the ground when possible to avoid contact with moisture.
Winter Preparation
Preparing your shed for winter is vital, especially in colder climates:
- Remove any perishable items that could be damaged by freezing temperatures.
- Check insulation and make any necessary repairs to prevent heat loss.
- When possible, remove snow buildup from the roof to prevent damage.
Conclusion
Building a wooden storage shed is a rewarding project that not only enhances your outdoor space but also provides you with valuable storage solutions. By following the step-by-step guide outlined in this article, you can confidently embark on your shed project and create an attractive and functional structure. Remember that having the right materials is critical to your success, so take the time to gather all essential supplies before you start. Avoiding common mistakes, such as improper measurements or neglecting proper ventilation, can help you achieve a structure that stands the test of time.
By being mindful of these pitfalls, you can save time, money, and frustration. Once your shed is complete, consider the creative organization ideas we’ve discussed to maximize your new space. Clever shelving, hooks, and designated zones can transform your shed into a tidy and efficient workspace. Moreover, regular maintenance is key to ensuring the longevity of your wooden storage shed. Simple tasks like checking for rot, repainting, and cleaning gutters can keep your shed looking great and functioning well for years to come. As you reflect on your woodworking project, take pride in the knowledge and skills you’ve gained, as they will serve you well in future DIY endeavors. Whether for gardening tools, outdoor gear, or crafting supplies, your wooden storage shed will be not just a structure but a valued addition to your home. Happy building!