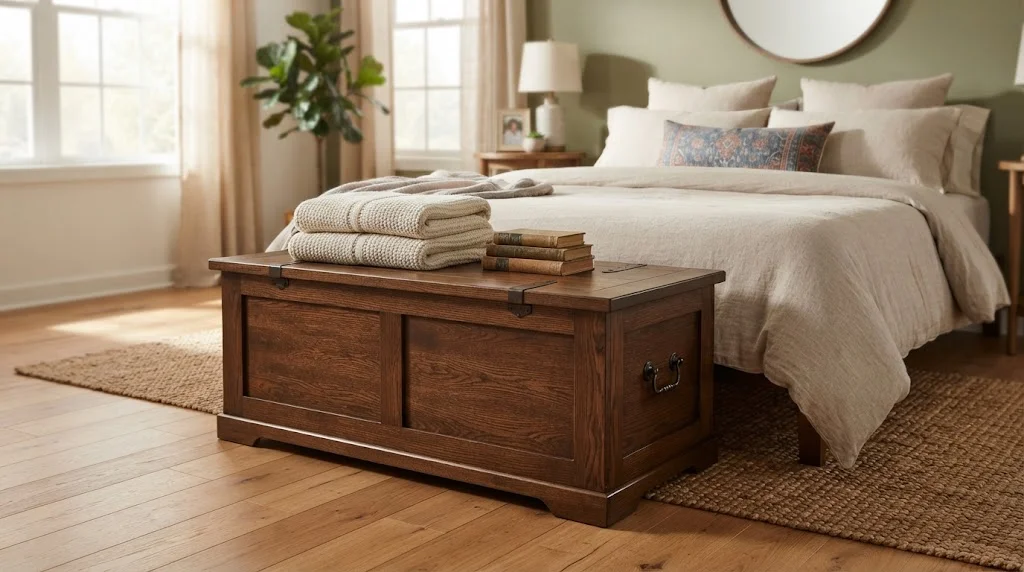
If you’re looking for a functional yet stylish solution for your storage needs, building a wooden storage chest is a rewarding project. Not only does it help you declutter your space, but it also allows you to showcase your carpentry skills. This guide will walk you through the steps on How to Build A Wooden Storage Chest from start to finish.
Gathering Materials
Before you start building your Wooden Storage Chest, it’s important to gather all the necessary materials. Below is a list of what you will need:
- 3/4 inch plywood sheets (two for the top and bottom, one for sides)
- Wood screws (1 1/4 inch screws)
- Wood glue
- Sandpaper (various grits)
- Wood finish or paint (optional)
- Hinges (for the lid)
- Safety glasses and ear protection
- Power saw or hand saw
- Drill
Designing Your Chest
Next, you should sketch a simple design for your Wooden Storage Chest. Decide on dimensions that suit your space. A common size is about 36 inches long, 18 inches wide, and 18 inches high. Remember, a good design will ensure that your chest is not only functional but also aesthetically pleasing.
Cutting the Wood
Using your power saw or hand saw, cut the plywood into the following pieces:
- Top: 36″ x 18″
- Bottom: 36″ x 18″
- Sides: 18″ x 18″ (cut two)
- Ends: 36″ x 18″ (cut two)
Ensure that you measure carefully and make straight cuts for a solid structure. Sand the edges of each piece using your sandpaper to prevent splinters.
Assembling the Chest
Now it’s time to assemble your Wooden Storage Chest. Here’s how:
- Attach the sides to the bottom using wood screws and glue. Make sure everything is square.
- Next, add the ends in the same way, securing everything tightly.
- Once the frame is built, place the top onto the top of the chest and secure it with wood screws.
- Attach the hinges on the back to enable the lid to open smoothly.
Finishing Touches
To enhance the appearance of your Wooden Storage Chest, consider applying a stain or paint. This not only protects the wood but also adds an element of style. Select a color that complements your room’s decor.
Allow the finish to dry completely before using your Wooden Storage Chest. You can also consider adding felt pads on the bottom to protect your floors.
Maintenance Tips
To keep your Wooden Storage Chest looking great over time, follow these maintenance tips:
- Clean with a soft cloth regularly to avoid dust build-up.
- Check the hinges periodically to ensure they function smoothly.
- If using outdoors, apply a weatherproof sealant.
Essential Tools and Materials Needed for Your Wooden Storage Chest Project
Building A Wooden Storage Chest is a rewarding project that not only adds functionality to your home but also allows you to express your creativity. To ensure your project goes smoothly, it’s essential to gather all the necessary tools and materials ahead of time. Here’s a comprehensive guide to help you prepare for your Wooden Storage Chest project.
Essential Tools for Your Wooden Storage Chest Project
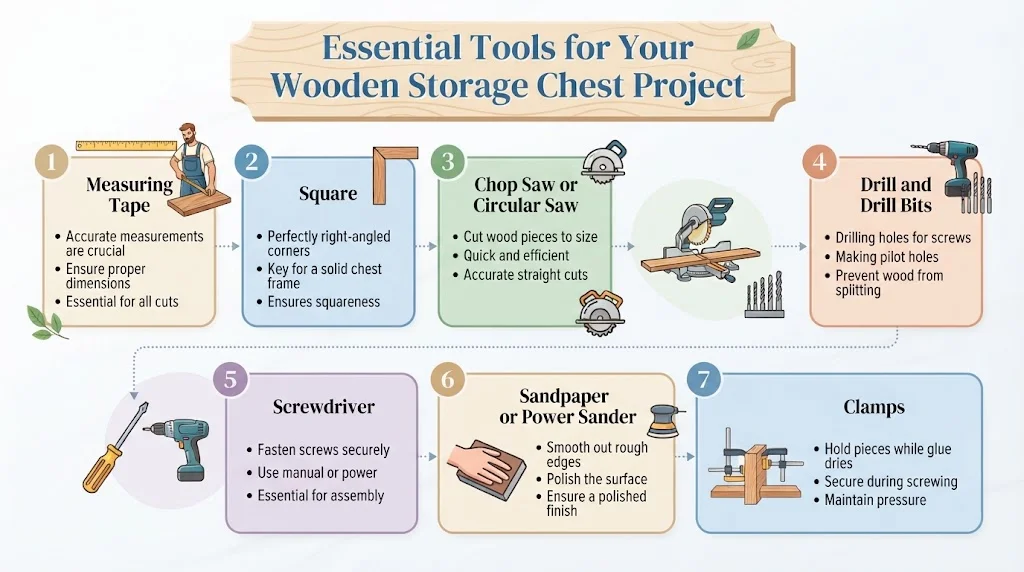
Using the right tools can significantly affect the quality and efficiency of your work. Here’s a list of the must-have tools:
- Measuring Tape: Accurate measurements are crucial. A good tape measure will help you measure wood pieces and ensure proper dimensions.
- Square: This tool ensures your corners are perfectly right-angled, which is key for a solid chest.
- Chop Saw or Circular Saw: These tools will allow you to cut your wood pieces to the correct size quickly and efficiently.
- Drill and Drill Bits: A power drill is necessary for drilling holes for screws and can also assist in making pilot holes to prevent wood from splitting.
- Screwdriver: A standard screwdriver or a power screwdriver will help you fasten screws securely.
- Sandpaper or Power Sander: Smooth out rough edges and surfaces to ensure a polished finish.
- Clamps: Use clamps to hold pieces together while the glue dries or while screwing them in place.
Essential Materials for Your Wooden Storage Chest
Choosing the right materials is just as important as having the right tools. Here’s a breakdown of the materials you’ll need for your Wooden Storage Chest:
- Wood: Choose high-quality wood for durability. Common options include pine, cedar, or plywood. Each type has a unique aesthetic and level of durability.
- Wood Glue: A strong adhesive that will help hold your wooden pieces together firmly.
- Screws: Make sure your screws are adequate for the thickness of the wood you are using.
- Wood Finish or Paint: A protective finish like varnish or a coat of paint will not only enhance the appearance but also protect the wood from moisture.
- Felt Pads: Placing felt pads on the bottom can prevent scratches on floors and make the chest easier to move.
Getting Started with Your Project
Once you have gathered your tools and materials, you can begin crafting your Wooden Storage Chest. Follow these steps to maximize your efficiency:
- Start by measuring and cutting your wood pieces according to your design.
- Sand down the edges of each piece for a smoother finish, ensuring all surfaces are prepared for assembly.
- Assemble your chest by applying wood glue and using screws to fasten the pieces together. Ensure to use clamps to hold everything in place until the glue sets.
- Once assembled, apply your chosen finish or paint to protect the wood and add visual appeal.
Creative Design Ideas for Customizing Your Storage Chest
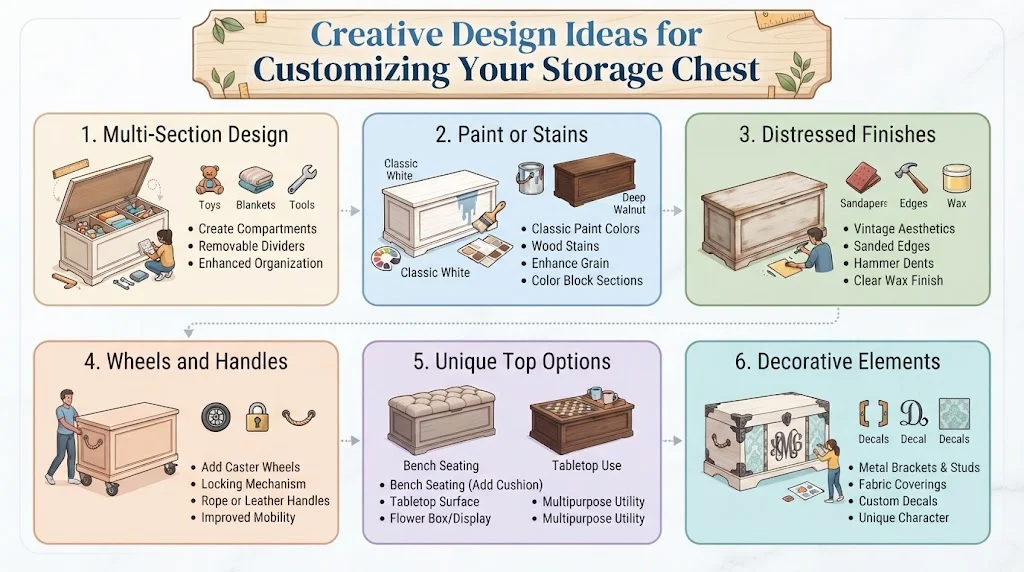
Enhancing Functionality with Multi-Section Design
A great way to customize your Wooden Storage Chest is by incorporating multi-section designs. This allows you to keep different items separate and organized. For instance, you could create compartments for toys, blankets, or tools.
Materials Needed:
- Plywood or MDF boards
- Wood screws
- Hinges for lids
You can create removable inserts by using simple dividers. This way, when you don’t need the extra storage, you can remove them for more space. Consider using different colors for each section to make it visually appealing.
Adding a Touch of Color with Paint or Stains
Adding color to your Wooden Storage Chest can transform it into a masterpiece that complements your home decor. Before painting or staining, ensure you prepare the surface by sanding it smooth.
Staining Tips:
- Choose a stain that highlights the natural grain of the wood.
- Apply in thin layers for better control.
Painting Suggestions:
- Use acrylic-based paint for more vivid colors.
- Consider stenciling patterns for artistic flair.
You can also create an ombre effect by gradually blending shades, making your Wooden Storage Chest an eye-catching feature in any space.
Vintage Style with Distressed Finishes
If you love a rustic or vintage look, distressing your Wooden Storage Chest is an excellent option. This method gives the wood a timeworn appearance that adds character.
Distressing Methods:
- Lightly sand edges and corners to expose the raw wood.
- Use a hammer to add small dents for an authentic aged look.
Finish it off with a coat of clear wax to protect the surface while maintaining that vintage aesthetic.
Functional Features: Wheels and Handles
Adding wheels or handles to your Wooden Storage Chest not only enhances its practicality but can also add to the aesthetic.
Using Wheels:
- Attach heavy-duty wheels for easy mobility.
- Ensure the wheels lock in place to prevent rolling when needed.
Handles:
- Use decorative handles for added style.
- Leather or rope handles can give a modern or rustic look.
These features can make it easier to move your Wooden Storage Chest around, whether you’re cleaning or changing the layout of your room.
Unique Top Options for Extra Utility
The top of your Wooden Storage Chest can provide additional functions beyond just closing off the storage area.
Options for the Top:
- Use the top as a bench or seating area.
- Add a soft cushion for comfort if it’s used regularly.
Multipurpose Surface:
- Create a tabletop for games or snacks.
- Design a flower box on the lid for a touch of nature.
These ideas make your Wooden Storage Chest useful for more than just storage.
Decorative Elements to Personalize Your Chest
Customize the appearance of your Wooden Storage Chest by adding decorative elements. This can make your storage chest a focal point in your home.
Decorative Elements:
- Add metal embellishments or decorative brackets.
- Use fabric to cover parts of the chest for texture and warmth.
Engagement Through DIY Projects and Community
Creating your custom Wooden Storage Chest can be a fantastic DIY project, but don’t forget to connect with your community. Sharing your design can inspire others. Websites like Instructables offer numerous ideas and instructions where you can share and discover unique techniques.
As you explore designs and materials for your Wooden Storage Chest, you might find inspiration from sites like DIY Network, where creative minds converge.
When customizing your Wooden Storage Chest, always remember that the goal is to blend functionality with personal style. Your unique choices will not only make the chest serve as storage but also enhance your living space’s overall vibe.
Tips for Choosing the Right Type of Wood for Durability
When embarking on a project that involves building furniture or storage solutions like A Wooden Storage Chest, one of the essential factors to consider is the type of wood you’ll be using. Durability is key to ensuring that your item withstands the test of time, especially if it will see daily use. Here are some tips to help you choose the right type of wood for your project.
Consider the Wood’s Hardness
The hardness of wood plays a significant role in its durability. Hardwoods like oak, maple, and cherry are much denser and more durable compared to softwoods such as pine and cedar. If you’re building a Wooden Storage Chest that will hold heavy items or will be opened and closed frequently, opting for a hardwood will provide greater resistance to wear and tear.
Look for Resistance to Warping and Cracking
When selecting wood for furniture, consider materials that are less likely to warp or crack. Some types of wood naturally resist these issues better than others. For example:
- Teak: This tropical hardwood is known for its natural oils that help prevent warping.
- Cedar: While soft, cedar is resistant to moisture, making it ideal for outdoor storage chests.
- Maple: This wood type is stable and resists warping, making it a great choice for various furniture projects.
Examine the Wood Grain
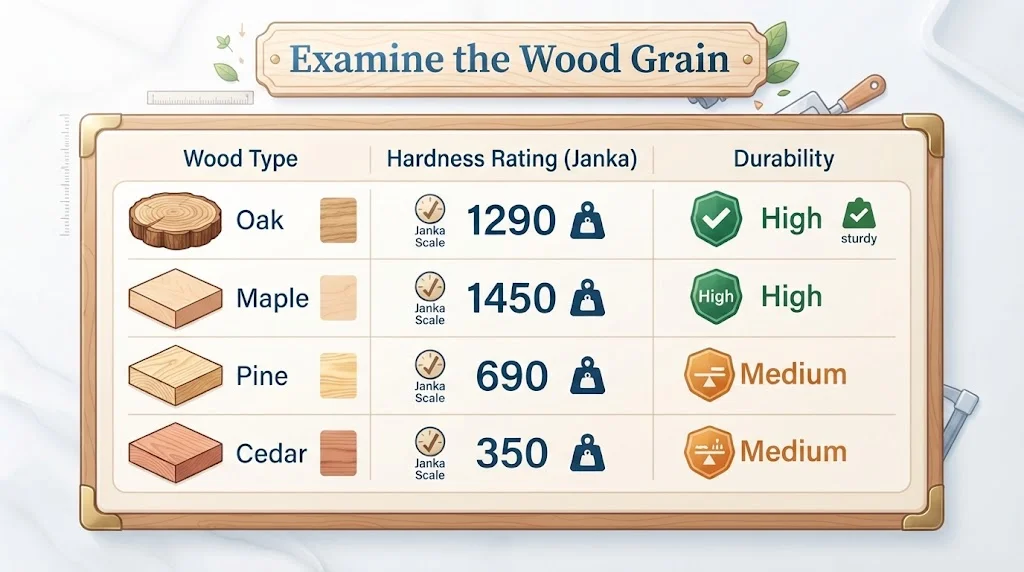
The wood grain can also offer clues about the durability of the material. Tight, even grain patterns often indicate stronger, more stable wood, while loose or uneven grain can suggest weaknesses. Additionally, visually appealing grain patterns can also enhance the aesthetics of your furniture. Here are some popular choices:
| Wood Type | Hardness Rating (Janka) | Durability |
|---|---|---|
| Oak | 1290 | High |
| Maple | 1450 | High |
| Pine | 690 | Medium |
| Cedar | 350 | Medium |
Consider the Environment
Where you plan on using your Wooden Storage Chest plays an important role in the type of wood you should choose. If it is destined for an outdoor setting, you’ll want a wood that can handle moisture, rain, and sun exposure. Teak and cedar are excellent choices for outdoor use due to their natural resistance to the elements.
Check for Treatment and Finishing
Many woods can be treated or finished to enhance their durability. Look for pressure-treated wood or wood that has been sealed with a protective finish, especially for items that will be used outdoors. These treatments can prevent moisture damage, pests, and other environmental factors that could compromise your Wooden Storage Chest over time.
Budget Considerations
Your budget may also influence your choice of wood for your Wooden Storage Chest. Hardwoods tend to be more expensive than softwoods. However, investing in a more durable wood can save you money in the long run by reducing the need for repairs or replacements. Be sure to evaluate the long-term costs versus the initial expense when making your decision.
Selecting the right type of wood for durability is crucial in building a Wooden Storage Chest that lasts. Whether you prefer the sturdiness of hardwoods or the natural beauty of softwoods, each choice has its benefits. For more in-depth information about various types of wood and their characteristics, visit Wood Magazine and Woodworker’s Source. With careful consideration and the right materials, you can create a storage chest that meets your needs and stands the test of time.
Maintenance and Care Guide for Your Wooden Storage Chest
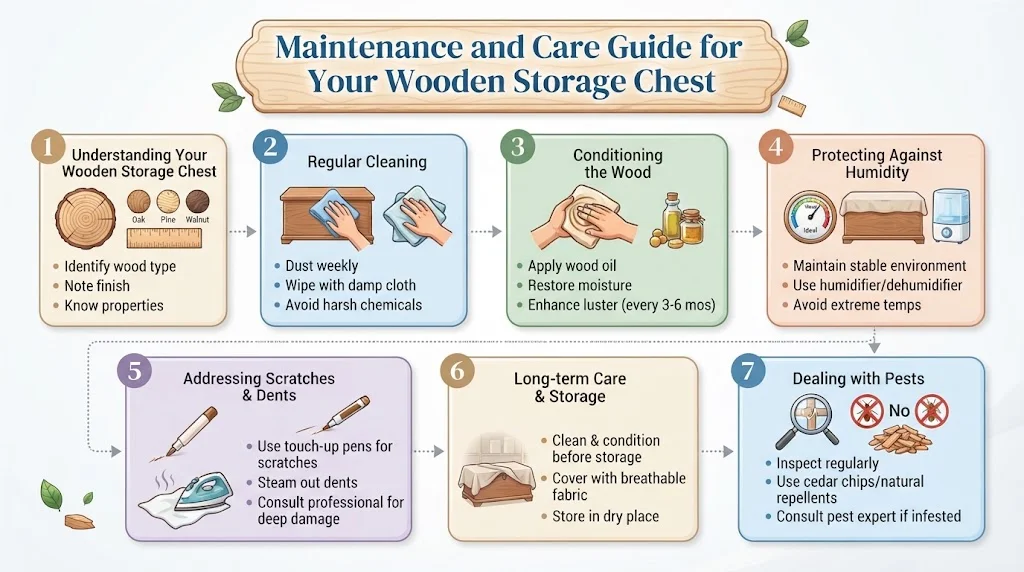
Your Wooden Storage Chest is not just a practical piece of furniture; it’s also a beautiful addition to your home. To keep it looking great and functioning well, regular maintenance and care is essential. This guide will provide you with easy-to-follow tips and strategies to ensure your Wooden Storage Chest lasts for years.
Understanding Your Wooden Storage Chest
Before diving into maintenance, it’s important to understand what type of wood your Wooden Storage Chest is made from. Different wood types have unique properties that may affect how you care for them. Common types include:
- Oak: Durable and resistant to scratches.
- Pine: Softer wood, easier to scratch but can be treated.
- Walnut: Expensive, rich in color, and requires special care.
Regular Cleaning
Keeping your Wooden Storage Chest clean is the first step to proper maintenance. To clean it effectively:
- Use a soft cloth to dust the surface regularly.
- For deeper cleaning, mix a small amount of mild soap with warm water.
- Dip the cloth in the soapy water, wring it out, and gently wipe the chest.
- Immediately follow up with a dry cloth to prevent water damage.
Always avoid using harsh chemicals or abrasive cleaners, as they can damage the wood finish of your Wooden Storage Chest.
Conditioning the Wood
Wood needs moisture to prevent it from drying out and cracking. Conditioning the wood of your Wooden Storage Chest will help maintain its luster and durability:
- Choose a suitable wood conditioner or mineral oil.
- Apply a small amount to a clean cloth.
- Rub it onto the wood in circular motions, working small sections at a time.
This process should be done every three to six months, depending on the climate and usage of your Wooden Storage Chest.
Protecting Against Humidity
Wooden chests are susceptible to changes in humidity. To protect your Wooden Storage Chest, consider these tips:
- Keep the chest in a climate-controlled room to avoid extreme fluctuations.
- Use a dehumidifier if you live in a particularly humid area.
- Store the chest in a dry place, away from walls that retain moisture.
Addressing Scratches and Dents
Accidents happen, and scratches or dents may occur over time on your Wooden Storage Chest. Here’s how to handle them effectively:
- Scratches: Use a wood touch-up pen that matches your chest’s color. Apply it carefully to hide the scratch.
- Dents: Place a damp cloth over the dent and use a hot iron to steam it gently. The wood may swell back into place.
Long-term Care and Storage
If you plan to store your Wooden Storage Chest or won’t use it for an extended period, follow these tips:
- Clean and condition the chest before storage.
- Cover it with a breathable cloth to keep dust off while allowing airflow.
- Check it periodically for signs of damage or pests.
Dealing with Pests
Wood can attract pests like termites or woodworms. Here are preventive measures for your Wooden Storage Chest:
- Regularly inspect the chest for signs of pests.
- Consider using natural repellents, such as cedar chips, to deter insects.
- If you find an infestation, consult a pest control expert immediately.
By implementing these maintenance strategies, you can enjoy yourooden Storage Chest for many years. A well-cared-for piece not only adds beauty to your home but also serves its purpose efficiently. For more advice on wooden furniture care, you can check out the Wood Magazine or Woodworker’s Source. Remember, preventive care is far easier than addressing issues after they arise. Keep your Wooden Storage Chest clean, conditioned, and stored properly, and it will be a cherished part of your home for years to come.
Conclusion
Building your own Wooden Storage Chest can be a rewarding and practical project. By following the step-by-step guide, you can create a piece that is not only functional but also a great addition to your home. Choosing the right tools and materials is crucial for ensuring the project runs smoothly and yields a high-quality finish. Remember to select durable wood that stands the test of time, as this will impact the longevity of your Wooden Storage Chest.
Don’t hesitate to infuse creativity into your design. Personalizing your Wooden Storage Chest can make it a unique piece that reflects your style, whether you prefer a rustic finish or a modern look. Special features like dividers or decorative hardware can elevate its functionality and aesthetics.
After your Wooden Storage Chest is complete, ongoing maintenance is key to preserving its beauty and usability. Regular cleaning and proper care will help you protect your investment and keep your Wooden Storage Chest looking new for years to come.
By embarking on this project, you not only gain a valuable storage solution but also acquire new skills and knowledge. Whether you are an experienced woodworker or a beginner, the satisfaction of building something with your own hands is unparalleled. Embrace the journey of creating your Wooden Storage Chest, and enjoy the fruits of your labor in your everyday life. Happy building!