
Building a wooden sailboat hull requires a combination of skill, knowledge, and the right techniques. If you’re venturing into this rewarding endeavor, there are several methods to consider that will help you craft a strong and beautiful hull. Here, we explore some effective techniques that can guide you through the process.
Choosing the Right Wood
The type of wood you choose has a significant impact on the performance and longevity of your sailboat. Common choices include:
- Mahogany: Known for its durability and water resistance.
- Cedar: Lightweight and rot-resistant, great for the hull.
- Pine: Affordable and readily available, but less durable.
- Oak: Very strong, but heavier and more challenging to work with.
Selecting the right type of wood based on your design requirements is crucial. It’s often beneficial to consult resources like Wood Magazine for detailed information on selecting the best wood for your sailboat hull.
Designing the Hull
Once you have your wood, focus on the design. Draft plans that include the hull shape you envision. Considerations include:
- Length and width
- Draft (how deep the hull sits in the water)
- Shape (flat-bottomed, V-shaped, etc.)
Using computer-aided design (CAD) software can simplify the design process. You might check out Boat Design Net, where you can find inspiration and shares designs from other boat builders.
Building Techniques
The actual construction methods vary depending on the design and materials. Here are some popular techniques:
1. Strip Planking
This method involves gluing together thin strips of wood to create the hull shape. It offers flexibility in design and results in a strong and lightweight hull. Use tape to hold the strips in place while the adhesive cures.
2. Plywood Construction
Plywood is another effective material for building a sailboat hull. It provides strength and is generally easier to handle. Cut out the pieces according to your design, and then assemble them using epoxy glue. This method can save time and labor compared to traditional methods.
3. Stitch and Glue
This technique combines the benefits of both strip planking and plywood. You cut plywood panels to shape, stitch them together with wire, and then apply a layer of epoxy. It is a quick way to create a sturdy hull.
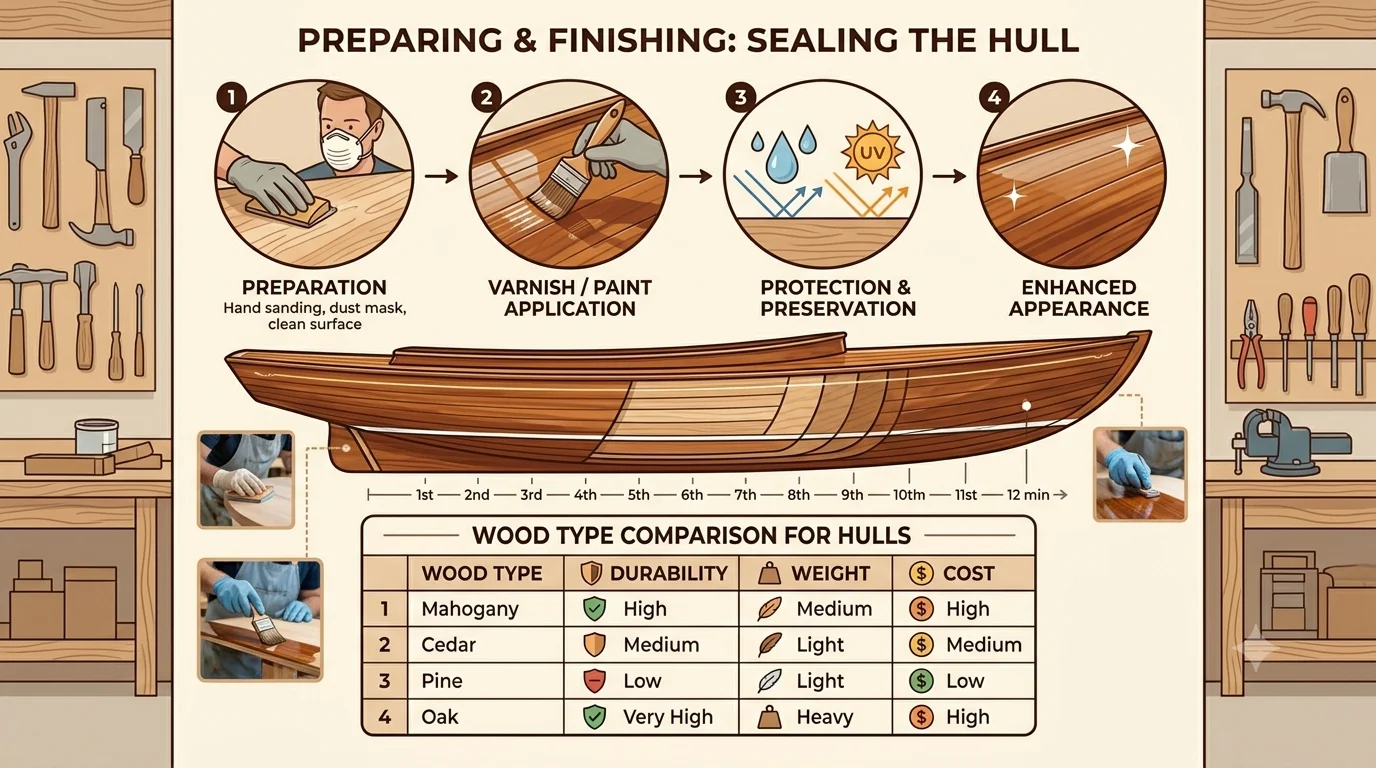
Preparing and Finishing
Once your hull is shaped, the next step is to seal it. Applying several coats of marine varnish or paint will protect the wood from moisture and UV damage. This process preserves the integrity of the hull and enhances its appearance.
| Wood Type | Durability | Weight | Cost |
|---|---|---|---|
| Mahogany | High | Medium | High |
| Cedar | Medium | Light | Medium |
| Pine | Low | Light | Low |
| Oak | Very High | Heavy | High |
Safety Considerations
Throughout the building process, ensure safety is a priority. Always wear appropriate safety gear, such as gloves and goggles, especially when using power tools or working with epoxy. Proper ventilation is necessary when working with glues and finishes to avoid inhaling harmful fumes.
Essential Tools and Materials for Hull Construction
How to Build a Wooden Sailboat Hull is an exciting and rewarding project. To embark on this journey, you must gather the essential tools and materials that will ensure your success. Having the right equipment helps streamline the process and enhances the quality of your craftsmanship. Here is a comprehensive list of tools and materials you will need.
Basic Tools Required
- Handsaw: A good handsaw is vital for cutting wood accurately. Choose a fine-toothed saw that can handle both thick and thin materials.
- Jigsaw: If you want to make intricate cuts or curves, a jigsaw will be invaluable. It allows for more flexibility than a traditional handsaw.
- Router: A router enables you to create smooth edges and elaborate designs. It’s an excellent tool for adding detailed touches to your hull.
- Drill: A power drill is essential not just for making holes but also for driving screws. Opt for a cordless drill for greater mobility.
- Chisels: A set of chisels in various sizes will help you shape wood precisely, especially in tight or complex areas.
- Clamps: You’ll need various sizes of clamps to hold pieces together while the glue sets. They are crucial for ensuring joints are tight and secure.
- Sandpaper: Different grits of sandpaper will help you smooth out the wood surfaces for a clean finish.
- Measuring Tape: Accurate measurements are crucial in boat building, making a sturdy measuring tape a must-have tool.
Advanced Tools for Precision
- Planer: This tool helps you to flatten and thickness the wood. A planer can drastically improve the accuracy of your cuts.
- Table Saw: While not strictly necessary, a table saw allows for very straight and precise cuts, making it a worthy investment.
- Throatless Shear: This specialized tool is excellent for cutting fiberglass and upholstery if you decide to reinforce your hull.
Essential Materials for Hull Construction
- Lumber: The main material needed for the hull, often from types of wood like mahogany, oak, or plywood. Make sure you choose high-quality, marine-grade wood.
- Epoxy Resin: Used for sealing joints and waterproofing, epoxy is a critical component in the longevity and durability of your hull.
- Fiberglass Cloth: Reinforces the hull’s structure and adds strength, particularly important for areas that may face impact.
- Wood Glue: Quality wood glue creates strong bonds between wooden parts and is crucial in assembling your hull.
- Varnish or Paint: To protect your finished hull, you should choose high-quality marine varnish or paint that can withstand the elements.
Safety Gear
When working with tools and materials, safety should be your top priority. Here’s a quick list of recommended safety gear:
- Safety Glasses: Protect your eyes from sawdust and debris.
- Gloves: Wear gloves to protect your hands from splinters and harsh chemicals.
- Dust Mask: A dust mask will help you breathe easier when sanding or working with materials that emit fumes.
Building a Wooden Sailboat Hull can be a fulfilling project that blends creativity with craftsmanship. Equipping yourself with the right tools and materials will not only enhance your effectiveness but will also lead to a greater sense of satisfaction once you see your finished product.
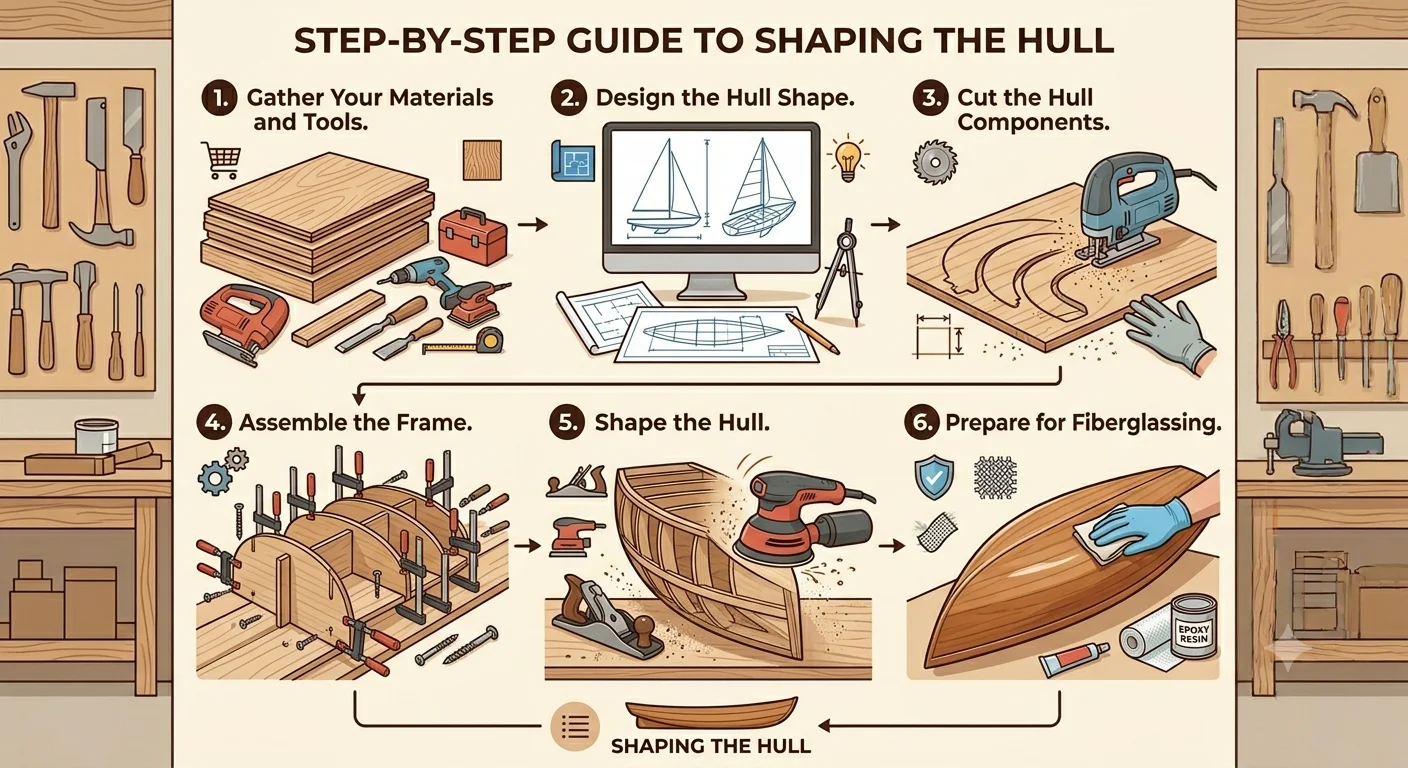
Building a Wooden Sailboat Hull is a rewarding project that requires careful planning, attention to detail, and a bit of skill. Here is a step-by-step guide to shaping the hull, helping you turn your dream vessel into reality.
Gather Your Materials and Tools
Before you begin shaping the hull, ensure you have all the necessary materials and tools at your disposal. This will make the process smoother and more efficient. Here’s a list of what you’ll need:
- Marine plywood or solid timber
- Epoxy resin
- Wood glue
- Clamps
- Saw (jigsaw or circular saw)
- Sanding tools (sander, sandpaper)
- Measuring tape
- Woodworking tools (chisels, planes, etc.)
- Safety gear (gloves, goggles)
Design the Hull Shape
The first step in shaping the hull is determining the design. You can create your design or find plans online. Some popular resources for sailboat plans include Boat Design and Instant Boats. Make sure your design considers the boat’s size, purpose, and buoyancy.
Cut the Hull Components
Once you have your design finalized, it’s time to cut the hull components. Follow these steps:
- Trace the hull shape on your chosen material.
- Use a saw to cut out the shapes carefully. Make sure to follow the lines closely for accuracy.
- Sand down the edges of each cut piece to remove any rough spots and ensure a smooth finish.
Assemble the Frame
With the individual parts ready, you’ll start assembling the frame of the hull:
- Lay out the cut pieces on a flat surface according to your design.
- Join the pieces together using wood glue and clamps. Allow the glue to set according to the manufacturer’s instructions.
- If using epoxy resin, mix it according to the package directions and apply it for additional strength.
Shape the Hull
Once your frame is assembled and the glue has dried, you can begin shaping the hull. This is where precision is key:
- Use a plane to smooth out large surfaces and create the correct curves. Work your way from the top down to achieve a good shape.
- Employ sanding tools to refine the shape further. Pay special attention to the curve of the bottom of the hull, as it directly affects the boat’s performance.
- Continuously check your work against the original design to maintain consistency.
Prepare for Fiberglassing
After shaping the hull, you need to prepare for fiberglassing, which adds durability:
- Clean the surface thoroughly to remove any dust and debris.
- Apply a coat of epoxy resin to seal the wood and prevent water intrusion.
- While the resin is wet, lay down fiberglass cloth to reinforce the hull. Make sure to saturate the cloth with resin.
- Allow it to cure fully before proceeding to the next steps.
Common Mistakes to Avoid When Building a Wooden Hull

Building a wooden sailboat hull is a rewarding but challenging project. If you are taking on this endeavor, it’s vital to be aware of common mistakes that can lead to significant setbacks. Navigating through these pitfalls will save you time and enhance the quality of your craftsmanship. Here are some frequent mistakes to avoid when building a wooden hull.
Neglecting the Importance of Planning
One of the biggest errors is diving into the project without a solid plan. A detailed design and step-by-step process will guide you throughout the build. Start by researching various hull designs that suit your needs, and then create detailed measurements and a cutting plan. This foresight will make your construction much smoother.
Ignoring Material Quality
The choice of wood is critical for the durability and performance of your hull. Using low-quality or untreated wood can lead to structural issues down the line. For a robust and long-lasting hull, opt for high-quality marine-grade plywood or solid timber. Always research the characteristics of the wood you plan to use, ensuring that it meets the needs of your specific design.
Overlooking Proper Hull Shape
Getting the hull shape consistent and accurate is essential. An uneven hull will not only affect your boat’s aesthetics but can also lead to stability issues when sailing. Make sure to frequently check measurements and symmetry as you shape the hull. A well-formed hull translates to better navigation and comfort while sailing.
Forgetting About Weight Distribution
Weight distribution plays a critical role in the performance of your boat. Incorrect placement of heavy materials can lead to capsizing or poor handling. Aim for a balanced distribution of weight across the hull. During the build, consider where you will install heavier components, such as engines or batteries, and plan accordingly.
Skimping on Fasteners and Adhesives
The joints in your wooden hull need to be strong enough to withstand the forces of sailing. Many builders underestimate the importance of high-quality fasteners and adhesives. Use stainless steel screws that resist corrosion and marine-grade glue. This will ensure that your joints remain secure and prevent leaks over time.
Neglecting Sealing and Finishing
Even if you’ve built a strong hull, neglecting to seal and finish it properly can end in disaster. Without adequate sealing, the wood becomes vulnerable to rot and damage from water exposure. Once your hull is built, make sure to apply several coats of marine varnish or epoxy resin to create a waterproof barrier. Regular maintenance of these finishes is also key to protecting your investment.
Underestimating Time and Labor
Taking on the project of building a wooden sailboat hull requires a significant time commitment. Many first-time builders underestimate how much time they will need to complete the project. Ensure you allocate enough time for each phase of the build, including planning, purchasing materials, and actual construction.
Skipping the Testing Phase
Once your hull is complete, the testing phase is crucial. Do not presume that everything will work perfectly on the first sail. Perform a series of tests to ensure that the hull is watertight and performs as expected. This step can help identify any structural weaknesses or design flaws and allow you to rectify them before taking your boat out for a longer voyage.
Building a wooden sailboat hull can be a complex yet fulfilling journey. By being mindful of these common mistakes, you can enhance both the process and the end result. Whether you’re a beginner or an experienced builder, paying attention to these details will lead to a better sailing experience. For additional resources, consider visiting Boats.com and WoodenBoat Magazine for expert advice and inspiration in your wooden hull building adventure.
Maintenance Tips for Wooden Sailboat Hulls
Owning a wooden sailboat is a rewarding experience, but it comes with its own set of responsibilities, especially when it comes to maintaining the hull. Regular upkeep is essential to ensure your boat remains safe, efficient, and visually appealing. Here are some effective maintenance tips for wooden sailboat hulls.
Regular Inspections
Start by conducting routine inspections of your sailboat hull. Look for signs of damage, such as cracks, blisters, or signs of rot. Pay attention to joints and seams, as these areas are most vulnerable. A thorough inspection should include:
- Checking for soft spots
- Inspecting the keel and transom
- Reviewing the hardware and fittings
By catching issues early, you can prevent more significant problems down the road.
Cleaning the Hull
The cleanliness of your wooden hull impacts not only aesthetics but also longevity. Dirt, algae, and marine growth can lead to decay and increased drag while sailing. Here’s how to keep your hull clean:
- Rinse your boat with fresh water after every use to remove salt and debris.
- Use a non-abrasive cleaner specifically designed for wooden boats to scrub away stubborn stains.
- Consider applying a marine-grade sealant to create a protective layer against dirt and grime.
Maintaining the Finish
Wooden hulls require special attention to their finish. This serves as a barrier against water infiltration. Follow these tips:
- Reapply varnish or paint regularly, depending on your sailing conditions.
- Allow at least 24 hours of drying time before adding additional coats.
- Sand the surface lightly between coats to ensure good adhesion.
For optimal results, consider using high-quality products from reputable brands, which can be found at Epifanes.
Dealing with Rot
Rot is one of the biggest threats to wooden sailboats. If you notice any soft areas during inspections, act quickly. Here’s how:
- Remove the affected area using a chisel or rot saw.
- Apply a wood hardener to the remaining wood to reinforce it.
- Replace the removed sections with new wood and ensure they are sealed properly.
Consult resources from the WoodenBoat foundation to get more insight on dealing with wood rot.
Regular Maintenance Schedule
Create a maintenance schedule for your wooden sailboat hull. Here’s a simple guide:
| Task | Frequency |
|---|---|
| Inspect Hull | Monthly |
| Clean Hull | After Every Use |
| Reapply Varnish/Paint | Annually |
| Check for Rot | Bi-Annually |
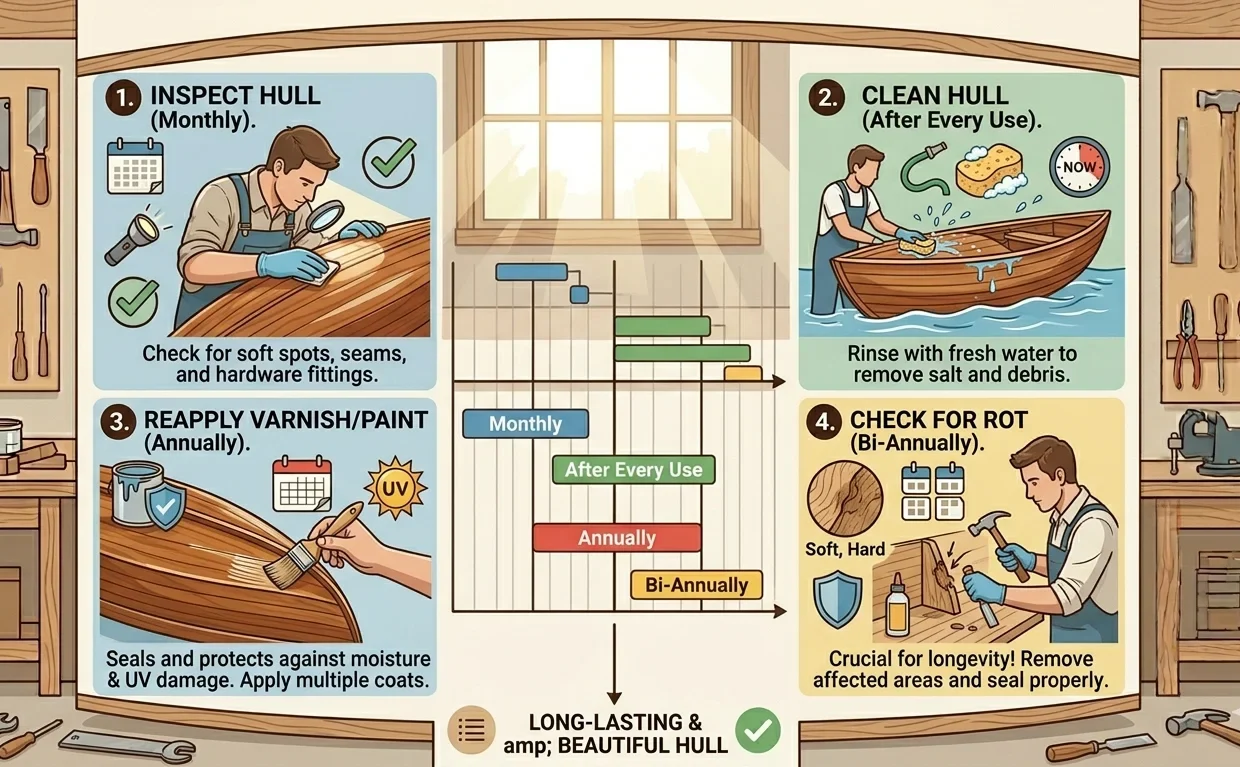
Keeping to this schedule will help ensure your wooden sailboat hull stays in excellent condition.
Storage Considerations
When not in use, how you store your boat can significantly impact its condition. Consider these practices:
- Store in a dry place, avoiding damp areas that can encourage rot.
- Use a cover to protect from moisture and sunlight.
- Consider lifting your boat above the ground to minimize contact with wet surfaces.
By following these maintenance tips, you can enjoy your wooden sailboat for many years to come. Proper care ensures safety, performance, and aesthetics are never compromised. Always consult resources and communities who share a passion for wooden sailboats to learn further and share experiences. Please refer to Sail Magazine for additional tips and tricks to enhance your sailing experience.
Conclusion
Building a Wooden Sailboat Hull can be a rewarding experience, blending craftsmanship with a love for the sea. By mastering various techniques and using the right tools and materials, you lay the foundation for a strong and beautiful vessel. Shaping the hull requires precision, and following a step-by-step guide can make the process smoother. Remember that avoiding common mistakes, like improper measurements or neglecting wood quality, is key to ensuring your hull’s integrity.
Your journey doesn’t end once the hull is built; maintaining it is just as important. Regular upkeep, including checking for rot, performing minor repairs, and applying protective finishes, can extend the lifespan of your sailboat. This ongoing care enhances the boat’s performance and keeps your investment safe.
Embrace the learning curve of constructing and maintaining your wooden sailboat hull. Each project will deepen your understanding and improve your skills, making future builds easier and more enjoyable. Whether you’re a seasoned builder or a beginner, the joy of watching your wooden hull take shape—and eventually set sail—is well worth the effort. So gather your tools, stay patient, and let the adventure begin!