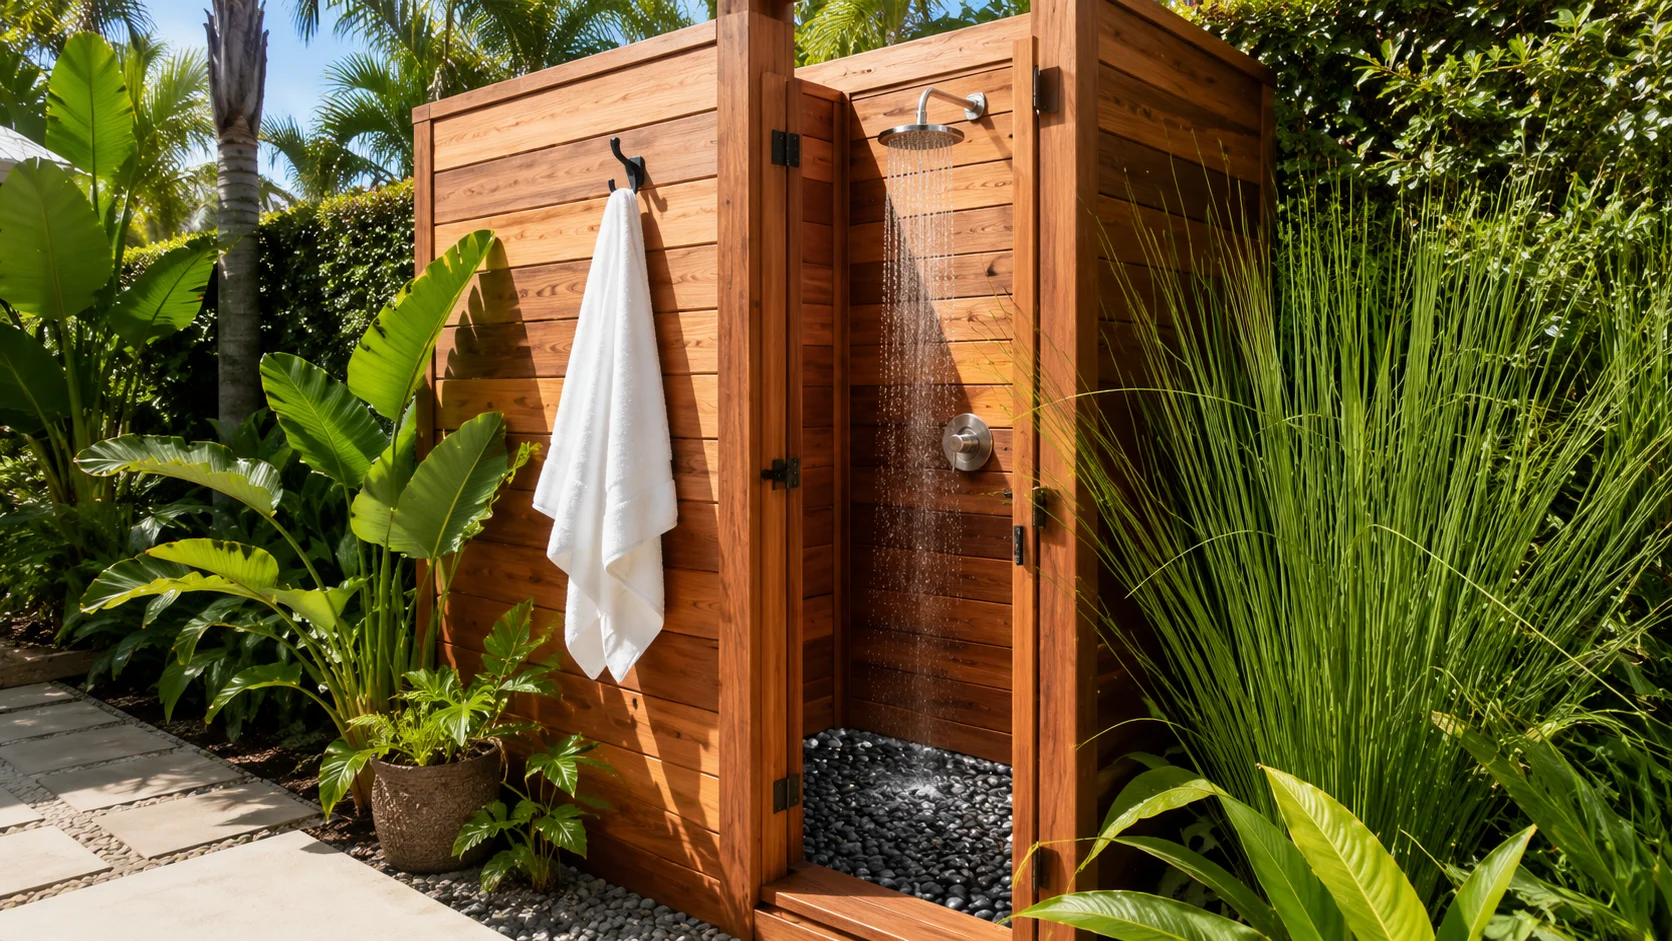
Building a wooden outdoor shower enclosure can transform your backyard into a refreshing oasis. Not only does it provide a convenient place to rinse off after a swim, but it also adds charm and utility to your outdoor space. This guide will take you through the step-by-step process of creating a sturdy and stylish wooden shower enclosure.
Materials You Will Need
- Pressure-treated wood (2x4s and 1x6s)
- Shower head and plumbing kit
- Wood screws
- Wood stain or outdoor sealant
- Concrete blocks (for the base)
- Measuring tape
- Level
- Drill
- Saw
- Brackets (optional for extra stability)
Step 1: Choose Your Location
Select a spot in your yard that provides privacy and is near your home’s water supply. Ensure the area has adequate drainage to avoid standing water.
Step 2: Designing the Enclosure
Before you start building, it’s important to plan the size and shape of your outdoor shower. A typical design is a rectangular enclosure with an entrance. Consider a height of 6 to 8 feet for privacy.
Step 3: Verify Local Regulations
Check your local building codes to ensure that you comply with regulations regarding outdoor showers. You may need permits, especially for plumbing and electrical work.
Step 4: Build the Base
Start by laying down concrete blocks to form a solid base for the shower. Use a level to ensure the blocks are evenly placed. This base will prevent your wooden enclosure from sitting in water, prolonging its life.
Step 5: Construct the Frame
Using pressure-treated wood, construct the frame of the enclosure. Cut two vertical 2x4s for each corner and connect them with horizontal 2x4s at the top and bottom. Ensure that the frame is square, using a measuring tape to double-check the dimensions.
Step 6: Add Walls
Once the frame is sturdy, attach the wooden planks to form the walls. Using 1×6 boards provides a sleek, finished look. Secure them with wood screws, leaving a small gap for water drainage.
Step 7: Install the Shower Plumbing
Now it’s time to install the showerhead and plumbing. Run the water line from your home to the shower location, ensuring there are no leaks. Attach the showerhead securely at a comfortable height for regular use.
Step 8: Finish the Enclosure
Once the plumbing is installed, it’s time to add finishing touches. Apply a wood stain or outdoor sealant to protect the wood from moisture and UV rays. This step is crucial for durability.
Step 9: Add Amenities
Consider adding a few extra touches to enhance your outdoor shower. You might want to include hooks for towels, a bench, or even potted plants for added privacy. These small additions can elevate the overall experience.
Step 10: Enjoy Your New Shower
Once everything is set, it’s time to enjoy your new outdoor shower enclosure. Make sure to conduct a test run to check for leaks and ensure that everything is working properly.
Maintenance Tips
To keep your outdoor shower in great shape, regularly check for any wood damage and reapply sealant every couple of years. Drain the water lines to prevent freezing in colder climates.
Building a wooden outdoor shower enclosure is a fun and rewarding project that can significantly enhance your outdoor living space. Make sure to take your time and enjoy each step of the process. For further information and inspiration, check out Purdue Extension for maintenance tips and enhancements.
With the right materials and a little bit of effort, your outdoor shower can be a relaxing retreat right in your backyard!
Choosing the Right Materials for Your Shower Enclosure
When planning your outdoor shower enclosure, one of the key aspects to consider is the choice of materials. The right materials not only enhance the aesthetics of your shower but also ensure durability, privacy, and weather resistance. Here, we’ll explore various options to help you make an informed decision.
Types of Materials for Wooden Shower Enclosures
Wooden outdoor shower enclosures can create a beautiful and natural look in your yard. However, not all wood is suitable for outdoor use. Here are some materials you might consider:
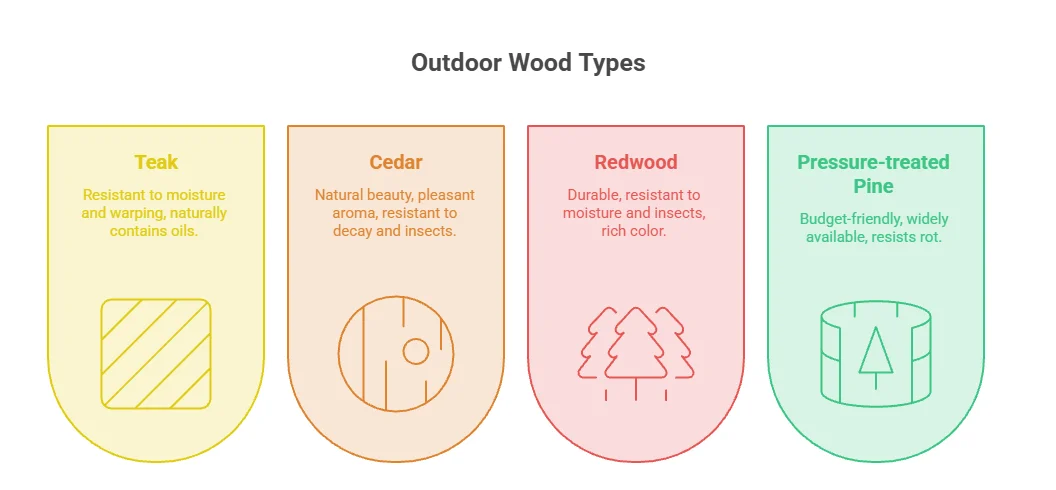
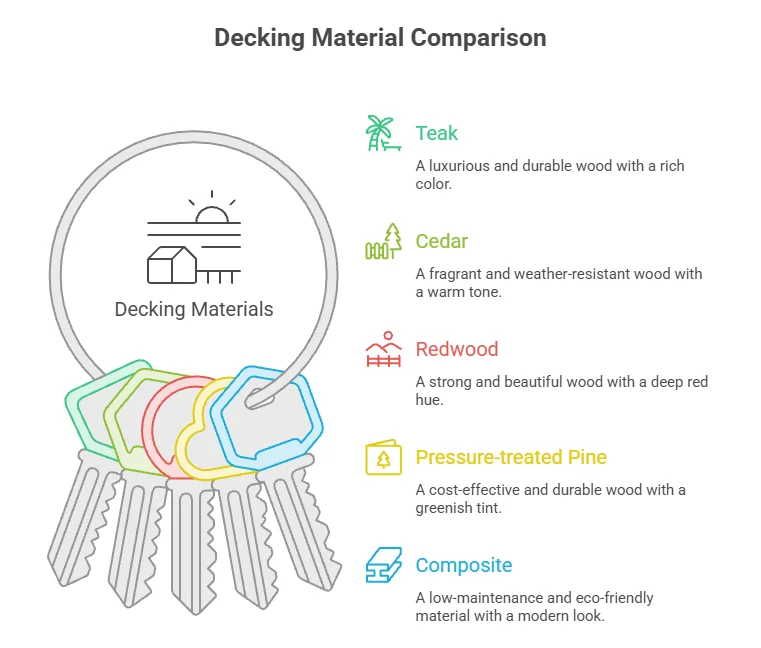
- Teak: Often regarded as the best choice for outdoor applications, teak is resistant to moisture and doesn’t warp easily. It naturally contains oils that help it withstand the elements.
- Cedar: A popular choice for its natural beauty and pleasant aroma, cedar is also resistant to decay and insects. Its lightweight nature makes it easy to work with, but it may require regular maintenance.
- Redwood: Like cedar, redwood is durable and offers great resistance to moisture and insects. Its rich color adds character, but it can be more expensive than other woods.
- Pressure-treated Pine: This option is budget-friendly and widely available. However, while it’s treated to resist rot, it may not last as long as the more expensive hardwoods. Regular sealing is recommended.
Considerations for Material Selection
Beyond aesthetics, here are some factors to keep in mind when choosing the right materials for your outdoor shower enclosure:
1. Weather Resistance
Your outdoor shower will be exposed to rain, sun, and humidity. Choose materials that can withstand the elements without deteriorating quickly. Woods like teak and cedar are known for their resilience.
2. Maintenance Requirements
Every type of wood has its maintenance needs. Some may require regular staining or sealing to maintain their beauty and durability. Consider how much time and effort you are willing to invest in the upkeep.
3. Budget
Wood types come at various price points. Establish your budget upfront. Teak and redwood can be pricey, while treated pine is more cost-effective. Know your limits and shop accordingly.
4. Style and Aesthetics
Think about the overall design of your yard and home. The wood you choose should complement your existing decor. Teak offers a luxurious look, while cedar provides a warm and rustic feel.
Additional Material Options
While wood is a popular choice, consider incorporating other materials for a more unique design:
- Composite Materials: These materials often look like wood but require less maintenance. They’re made from recycled wood and plastic, offering durability without the same level of upkeep.
- Vinyl: Vinyl enclosures are low-maintenance and resistant to water and mildew. They come in various colors and styles, providing versatility.
- Metal Accents: Using stainless steel or aluminum frames can enhance durability and add an industrial touch to your enclosure. They can be used alongside wooden structures for a modern look.
Environmental Impact and Sustainability
Consider the environmental impact of your material choices. Opting for sustainably sourced wood can minimize your carbon footprint. Look for certifications like the Forest Stewardship Council (FSC) to ensure you’re making an eco-friendly choice.
| Material | Estimated Cost per Square Foot | Durability | Maintenance |
|---|---|---|---|
| Teak | $50 and up | High | Low |
| Cedar | $30-$40 | Medium | Medium |
| Redwood | $40-$50 | High | Medium |
| Pressure-treated Pine | $10-$20 | Medium | High |
| Composite | $20-$30 | High | Low |
The choice of materials for your outdoor shower enclosure is crucial to ensure both functionality and aesthetic appeal. Taking into account durability, maintenance, budget, and environmental impact will guide you in making an informed decision. For additional resources on materials and designs, check out HGTV or Remodelaholic.
Design Ideas to Enhance Your Outdoor Shower Experience
If you’re looking to transform your outdoor shower experience, there are numerous design ideas that can elevate both functionality and aesthetics. An outdoor shower can serve as a refreshing retreat, allowing you to enjoy nature while staying clean after outdoor activities. Here are some creative ways to enhance your outdoor shower experience.
Use Natural Materials
Natural materials can create a seamless connection between your shower and the surrounding environment. Consider using:
- Wood: Cedar or redwood is perfect for the enclosure, providing a warm look and resistance to moisture.
- Stone: Using river stones or slate for the floor can create a rustic feel underfoot.
- Bamboo: This can make for an eco-friendly and natural look for your shower walls.
Add Privacy with Plants
Integrating plants around your outdoor shower can enhance privacy while adding beauty. Here are some ideas:
- Tall Grasses: Ornamental grasses not only create a barrier but also sway gently in the breeze.
- Vines: Use climbing plants like jasmine or morning glory on trellises to create a natural curtain.
- Hedges: A dense hedge can provide excellent privacy while serving as a natural backdrop.
Implement Functional Accessories
A few smart accessories can make your outdoor shower more convenient and enjoyable. Consider these additions:
- Shower Shelves: Install sturdy shelving to hold your shower essentials, such as shampoo and soap.
- Hooks: Place hooks on the wall for hanging towels or robes.
- Seating: A small bench or stool can be handy for placing items or resting after a rinse.
Install a Rainfall Showerhead
Opting for a rainfall showerhead can provide a luxurious experience reminiscent of a tropical getaway. The soft, cascading water simulates a natural rain shower, perfect for enjoying the great outdoors. Adjustable settings can further enhance your shower experience.
Consider Lighting Options
The right lighting can turn your outdoor shower into a serene oasis, especially in the evenings. Here are lighting ideas to consider:
- Solar-Powered Fairy Lights: String lights can create a magical ambiance.
- Wall Sconces: Install water-resistant fixtures that provide focused light.
- Motion Sensor Lights: These lights can turn on when you enter, offering both safety and convenience.
Incorporate Decorative Elements
Personalizing your outdoor shower with decorative elements can make it feel more inviting. Here are some ideas:
- Artwork: Waterproof art pieces can add character to your shower space.
- Colorful Tiles: A mosaic design can add a splash of color and uniqueness.
- Hammocks or Swing Chairs: If space permits, adding a hammock nearby can create a relaxing atmosphere.
Choose Sustainable Solutions
Consider eco-friendly solutions to enhance your outdoor shower experience. Ideas include:
- Recycled Water Systems: Implement a system that redirects water from the shower to irrigate your garden.
- Solar Water Heater: This eco-friendly option can provide warm water without increasing your energy bill.
- Biodegradable Soaps: Use environmentally friendly products to protect local wildlife and plants.
Maintain Cleanliness and Organization
Keeping your outdoor shower tidy can make it more enjoyable to use. Simple steps include:
- Regular Cleaning: Sweep and rinse the area frequently to prevent buildup.
- Storage Solutions: Utilize bins for organized storage of supplies.
For more inspiration on designing your outdoor shower, you can visit House Beautiful and HGTV.
With these ideas, your outdoor shower can become a peaceful retreat, combining relaxation and functionality while enhancing your home’s outdoor experience.
Common Mistakes to Avoid When Building an Outdoor Shower
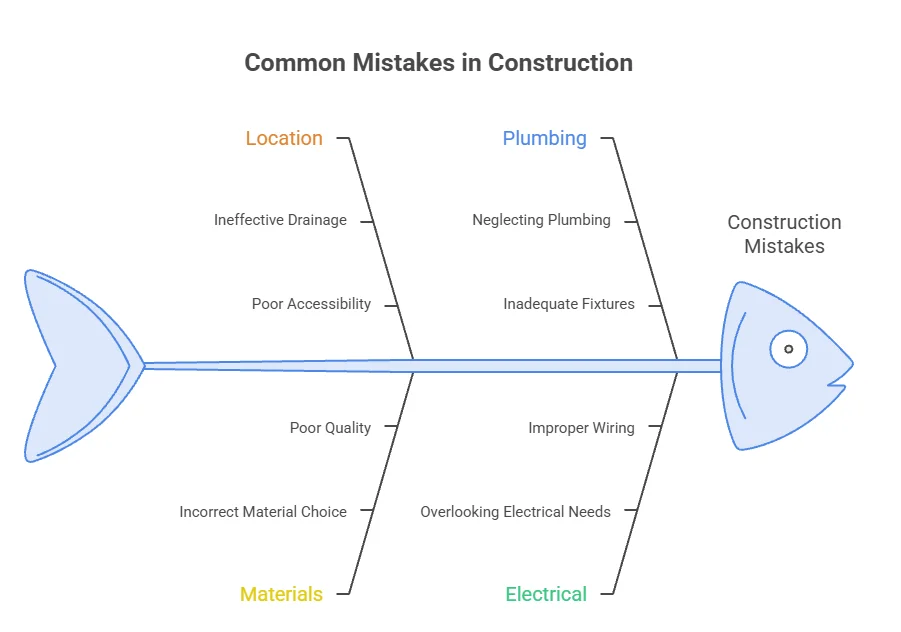
Building an outdoor shower can be an exciting project that adds functionality and charm to your backyard. However, rushing into it without proper planning can lead to common mistakes that might cost you time and money. Here are some pitfalls to avoid when constructing your wooden outdoor shower enclosure.
Choosing the Wrong Location
One of the most crucial steps is picking the right spot for your outdoor shower. Avoid places too close to your home, as water and humidity may damage your walls. Also, consider privacy; placing your shower where neighbors can see is not ideal. Look for spots that have good drainage and are away from trees that can drop leaves and debris.
Ineffective Drainage Systems
Proper drainage is vital to ensure the water doesn’t pool around your shower. An ineffective drainage system can lead to muddy areas, unpleasant odors, and pest problems. When planning your outdoor shower, consider these tips:
- Use gravel or perforated pipes to create an effective drainage system.
- Ensure the ground slopes away from the shower enclosure.
- Install a drain that connects to existing stormwater systems.
Incorrect Materials
Choosing the wrong materials can cut short the lifespan of your outdoor shower. While wood is a popular choice, not all types of wood are suitable for outdoor use. Avoid untreated wood that can warp and rot. Instead, opt for:
- Cedar: Naturally resistant to moisture.
- Redwood: Durable and aesthetically pleasing.
- Composite materials: Provide a modern look and require less maintenance.
Neglecting Plumbing Considerations
Don’t overlook the plumbing setup when building your outdoor shower. Out-of-sight issues can lead to leaks over time. To ensure a solid plumbing system, remember these pointers:
- Use high-quality fittings and connections.
- Install temperature control for comfort.
- Plan for winterization if you live in colder climates.
Overlooking Privacy Features
Privacy is often overlooked but is essential for an outdoor shower. Make sure to include features that shield you from prying eyes. Here are some ideas:
- Build walls tall enough to obscure your shower setup.
- Use natural materials, like bamboo, for a more organic feel.
- Add strategic landscaping to enhance privacy.
Ignoring Ventilation
Good ventilation ensures air circulation around your shower. Failing to provide adequate airflow can lead to mold and buildup. To improve ventilation:
- Include windows or vents in your shower enclosure.
- Enhance area drainage to reduce humidity.
Not Considering Electrical Needs
If you plan to add lighting or heating elements, think about electricity from the start. Failing to plan can result in additional costs later. It’s wise to consult with a licensed electrician to safely include:
- Water-resistant lighting fixtures.
- Heated outdoor shower options for colder climates.
Failing to Build a Solid Foundation
The foundation is key to a stable and lasting outdoor shower. If you skip this step, you might end up with an unstable structure. Here’s how to do it right:
- Use concrete blocks or deck footings for stability.
- Ensure your base is level and solid to prevent shifting over time.
By keeping these common mistakes in mind, you can build your outdoor shower enclosure more effectively. For a visual guide, check out Homedit’s guide.
Moreover, you may want to consider additional resources for design inspiration. Visit Family Handyman for step-by-step plans.
If you’re looking for advice on maintenance and upkeep, you can find useful tips at Better Homes & Gardens.
Building a wooden outdoor shower enclosure can be a rewarding DIY project. Avoiding these common mistakes will ensure your addition enhances your outdoor living space for years to come.
Maintenance Tips for Keeping Your Wooden Shower Enclosure Durable
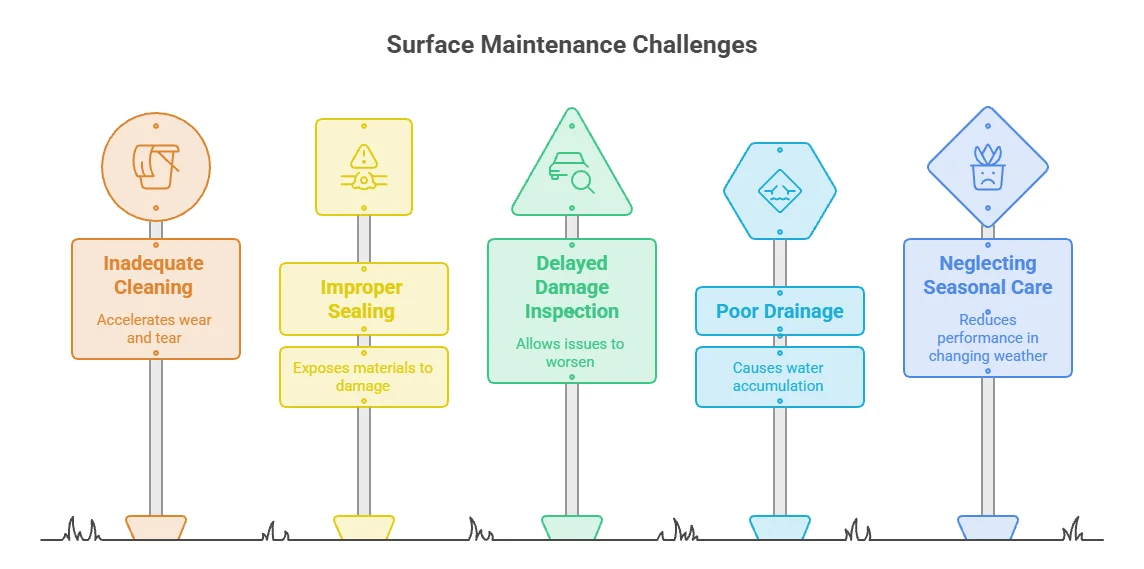
Having a wooden shower enclosure can add a touch of elegance and comfort to your outdoor space. To keep it looking beautiful and functioning well, regular maintenance is essential. Here are some valuable tips to ensure your wooden shower enclosure remains durable and inviting.
Regular Cleaning
Routine cleaning is crucial to prevent grime, mildew, and discoloration. Follow these steps:
- Use Mild Detergents: A gentle soap solution works well. Avoid harsh chemicals that can harm the wood finish.
- Soft Brushes: Use a soft-bristle brush or sponge to scrub the surfaces gently. This helps in removing dirt without damaging the wood.
- Rinse Thoroughly: After cleaning, make sure to rinse off any soap residue to avoid buildup.
Proper Sealing and Finishing
Sealing your wooden shower enclosure is vital to protect it from moisture. Here’s how:
- Choose the Right Sealant: Use a water-resistant sealant specifically designed for outdoor wood applications.
- Reapply Regularly: Depending on your climate, check the sealant every year and reapply as needed. A good seal should repel water effectively.
- Consider Staining: Applying a stain can enhance the appearance of your enclosure while offering additional protection against UV rays. Choose a stain that is also waterproof.
Inspect for Damage
Regular inspections can help you catch problems early. Look for:
- Cracks and Splits: Check for any damages in the wood that may compromise its integrity.
- Termite Infestation: Be on the lookout for signs of termites or other pests. If you spot any, consider contacting a pest control expert immediately.
- Mildew Growth: Check corners and hidden areas for mildew. Address it promptly to avoid spreading.
Maintain Drainage
Proper drainage is essential to avoid water pooling around your shower enclosure.
- Check for Obstructions: Make sure that drainage paths are clear. Leaves and debris can trap water and cause rot.
- Grade the Area: Ensure that the ground around your enclosure slopes away for efficient water runoff.
- Install a Drain: If necessary, installing a small drain can help dispense water away from the enclosure more effectively.
Seasonal Care
In different seasons, you’ll want to adjust your maintenance routine.
- Spring Cleaning: Remove dirt and debris that accumulated over the winter. Reseal the enclosure if needed.
- Summer Sun Protection: Apply UV-protective finishes to prevent fading and drying out of the wood.
- Winter Preparation: If you live in a cold region, consider insulating or covering your wooden enclosure to protect it from harsh temperatures.
By implementing these maintenance tips, you can prolong the life of your wooden outdoor shower enclosure. For additional resources, you can visit Wood Magazine for information on wood treatment or Thermory for insights on wooden products. Regular attention to cleaning, sealing, and inspecting your enclosure will ensure it remains a delightful feature in your outdoor oasis.
Conclusion
Building a wooden outdoor shower enclosure can transform your backyard into a relaxing oasis. By following the step-by-step guide, you gain practical insights on how to create a beautiful and functional space that enhances your outdoor experience. Choosing the right materials is crucial; selecting durable, weather-resistant wood ensures longevity while maintaining aesthetics. Don’t forget to consider design ideas that reflect your personal style, whether it’s a sleek modern look or a rustic charm.
Avoid common mistakes, such as poor drainage and inadequate privacy, which can diminish the enjoyment of your new shower. Planning your layout and understanding your local regulations will save you time and effort in the long run. Once construction is complete, ongoing maintenance will be key to keeping your wooden enclosure in great shape. Regular cleaning, sealing, and wood treatments will protect against the elements and extend the life of your shower.
Ultimately, taking a hands-on approach to your outdoor shower project allows you to create a unique retreat tailored to your needs. With careful planning, the right materials, and ongoing care, your wooden outdoor shower will be a delightful addition to your home that offers both functionality and fun for years to come. Embrace this opportunity to enjoy nature and refresh yourself under the open sky, ultimately enriching your outdoor lifestyle.