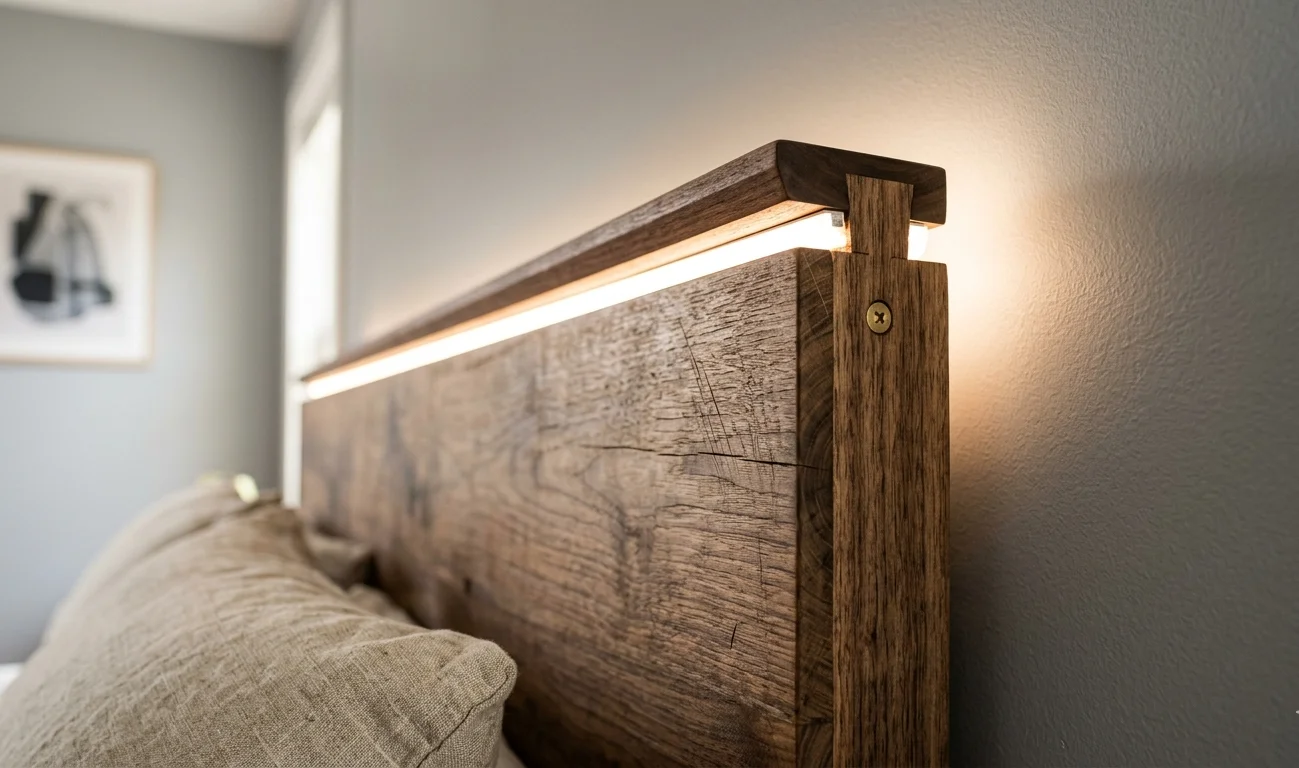
Creating a wooden headboard with lights can enhance your bedroom’s aesthetics and add functionality. This DIY project allows you to express your style while providing a cozy ambiance. Follow these simple steps on How to Build A Wooden Headboard with Lights with integrated lighting.
Gather Your Materials
Before starting, gather all necessary materials. Here’s a list to get you started:
- Wood Planks: Choose the type of wood you prefer, like pine or oak.
- Wood Screws: These will be used to attach the structure together.
- Sandpaper: Use various grits for smooth finishing.
- Lamp Fixtures: Select LED strip lights or small bedside lamps.
- Drill and Drill Bits: Essential for making pilot holes and attaching screws.
- Wood Glue: Optional, for added strength in joints.
- Measuring Tape and Level: For accurate measurements and alignment.
- Finishing Material: Stain or paint to personalize your headboard.
Design Your Headboard
Start by deciding on the design. Think about the following:
- Headboard Height: Typically, headboards range from 48 to 60 inches high.
- Width: Measure your bed frame to ensure a perfect match.
- Style: Choose between a simple, rustic look or a more modern design with geometric shapes.
Cut and Prepare the Wood
Once you’ve designed your headboard, it’s time to cut the wood:
- Using your measuring tape, mark the required lengths on the wooden planks.
- Cut the wood accordingly with a saw. Ensure the cuts are straight for a neat finish.
- Sand the edges and surfaces of each piece to avoid splinters and create a smooth finish.
Assemble the Headboard
Start assembling the wood pieces:
- Lay the cut pieces on a flat surface, arranging them according to your design.
- Use wood screws to attach each piece. Pre-drill holes to avoid splitting the wood.
- For added sturdiness, apply wood glue along the joints before screwing them together.
Install the Lighting
Once your headboard is assembled, it’s time to add the lights:
- Decide where you want the lights. You can place them on the top, bottom, or integrate them into the wood.
- If using LED strips, cut them to length and peel off the adhesive backing, then stick them in place.
- For fixtures, mark where you’ll mount them, drill holes, and attach them securely.
- Ensure all wiring is neatly tucked away and secure, enhancing the overall look.
Finishing Touches
Now that your headboard is assembled and lit, it’s time to finish:
- Apply stain or paint according to your style preference.
- Consider using a sealer to protect the wood and keep it looking fresh.
- Allow everything to dry completely before moving your headboard into position.
Mounting the Headboard
To finalize your project, mount the headboard to your bed frame:
- Align your headboard with the bed frame.
- Use bolts or screws to secure it in place, ensuring stability.
Choosing the Right Type of Wood for Your Headboard
Building a wooden headboard is a rewarding project that can enhance the overall style of your bedroom. One of the crucial first steps is choosing the right type of wood. Different types of wood not only vary in appearance but also in durability, cost, and ease of working with. Here’s a closer look at the most popular wood choices for headboards and what you should consider.
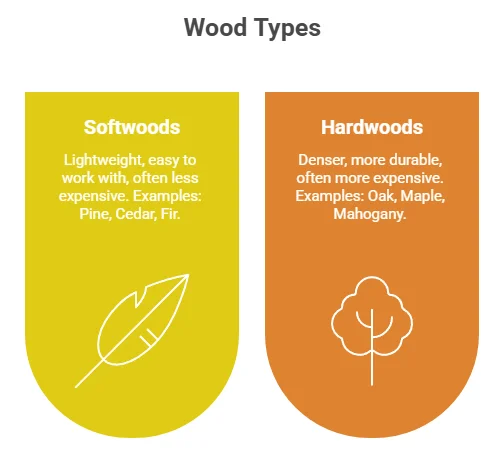
Softwoods vs. Hardwoods
Wood is categorized into two main types: softwoods and hardwoods. Here’s what you need to know:
| Type | Characteristics | Examples |
|---|---|---|
| Softwoods | Lightweight, easy to work with, often less expensive | Pine, Cedar, Fir |
| Hardwoods | Denser, more durable, often more expensive | Oak, Maple, Mahogany |
Popular Wood Choices
When it comes to headboards, here are some of the most popular wood types:
- Pine: A softwood that’s affordable and easy to work with, making it ideal for beginners. Pine has a light color with subtle grain patterns.
- Maple: This hardwood is strong and durable. Its light color and fine grain make maple a beautiful choice for modern headboards.
- Oak: Known for its strength and classic look, oak is available in two main varieties: red and white. Both have unique grain patterns that add elegance.
- Cedar: A softwood that is naturally resistant to moisture and pests. Its rich aroma is an added bonus, perfect for creating a cozy atmosphere.
- Walnut: A popular choice for high-end projects, walnut offers a rich, dark color and intricate grain patterns that make any headboard visually stunning.
Factors to Consider
Before making your final choice, consider the following factors:
- Budget: Softwoods tend to be more affordable than hardwoods. Determine how much you’re willing to spend early in the process.
- Aesthetic: Think about the overall feel you want for your bedroom. Light woods like pine and maple give a clean, bright look, while darker woods like walnut provide warmth.
- Durability: If you want a headboard that lasts, opt for hardwoods like oak or walnut, which can withstand daily use for many years.
- Finish: Some types of wood take stains and finishes better than others. Make sure your wood choice matches your planned design and finish.
Where to Find Quality Wood
Finding quality wood for your project is essential. Here are a few sources to consider:
- Home Depot – A reliable source for a wide range of types and sizes of wood.
- Lowe’s – Offers a selection of both softwoods and hardwoods suitable for custom projects.
- Woodworker’s Source – Specializes in quality hardwoods and plywood.
Finishing Touches
Once you’ve selected the wood for your headboard, you might want to finish it to enhance the beauty and protect it from wear and tear. Popular finishing options include:
- Stain: Enhances the natural grain and color of the wood.
- Paint: Offers a solid, modern look and can match any room theme.
- Varnish: Provides protection while adding a glossy finish.
Choosing the right type of wood for your headboard is a key step in your building process. With the right materials, you can create a stunning and functional addition to your bedroom. Happy building!
Creative Lighting Options for Your Headboard Design
When designing a headboard, incorporating creative lighting can elevate the entire look of your bedroom. Not only does it provide essential illumination, but it also adds an artistic touch that reflects your personality. Here are various lighting options to make your headboard a focal point of your room.
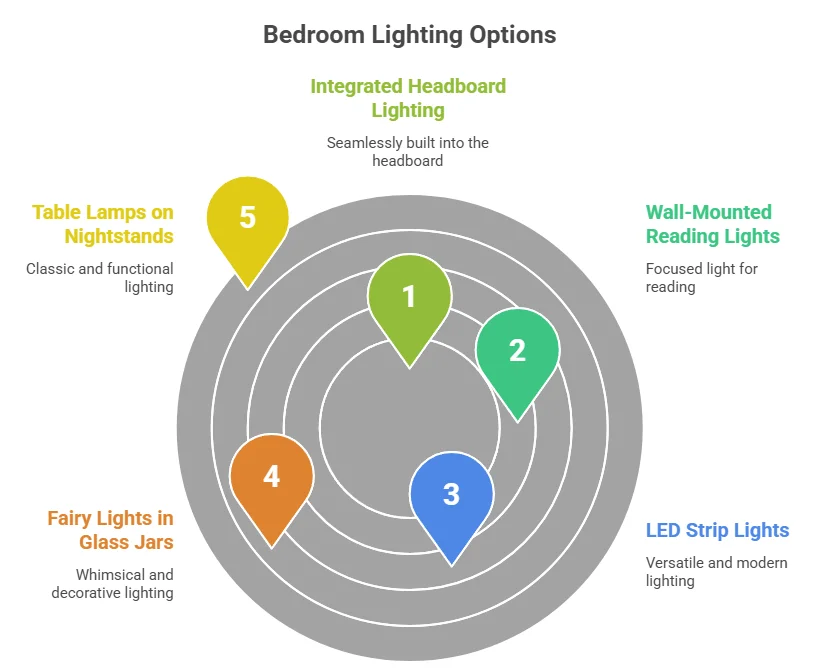
Wall-Mounted Reading Lights
Wall-mounted reading lights are not just functional; they also add a modern twist to your headboard. You can choose adjustable models that allow you to direct light wherever you need it. This is perfect for late-night reading without disturbing your partner. Consider vintage-style sconces for a more classic aesthetic or sleek, contemporary designs for a minimalist vibe.
LED Strip Lights
LED strip lights are a versatile and budget-friendly option. They can be easily attached to the back of your headboard, creating a soft glow that enhances the ambiance of your room. You can choose from various colors and even install a remote for convenient control. This option allows you to change the mood instantly based on your preferences.
Fairy Lights in Glass Jars
For a whimsical touch, consider using fairy lights in decorative jars on either side of your headboard. This not only provides soft lighting but also serves as an attractive decor element. The warm glow creates a cozy atmosphere, perfect for winding down after a long day. You can customize the jars with seasonal themes or personal touches to match your style.
Integrated Headboard Lighting
If you’re crafting a headboard from scratch, why not integrate lighting directly into the design? You can install small, recessed lights above or below the headboard. This creates an elegant halo effect while keeping the lighting discreet. With proper planning, you can conceal the wiring to maintain a clean look.
Table Lamps on Nightstands
Using table lamps on your nightstands can add both style and functionality. Choose designs that complement your headboard. For example, if your headboard is wooden, consider ceramic or metal lamps with a similar finish. This layer of lighting not only illuminates your bedside but also enhances the overall aesthetic of your room.
Track Lighting
Track lighting offers versatility and is adjustable to your liking. You can aim the lights directly at your headboard for a dramatic effect or create general room ambiance. This option is especially stylish in modern designs and can contribute to a gallery-like feel, as it highlights your artwork or features on the wall in tandem with the headboard.
Here are some important points to consider when choosing lighting options for your headboard:
- Functionality: Choose options that fit your needs – whether it’s for reading, mood lighting, or decorative purposes.
- Style: Make sure your lights complement the overall design of your bedroom. Consider colors, materials, and shapes.
- Energy Efficiency: Opt for LED options to save on electricity bills and ensure durability.
- Installation: Consider whether you want permanent fixtures or adjustable options that you can change easily.
To enhance your experience further, check out websites that specialize in home decor and lighting solutions. Useful sources include Good Housekeeping and The Spruce. These sites provide extensive guides and product recommendations that can help you select the best lighting for your headboard design.
Transforming a simple headboard into a lit masterpiece not only boosts aesthetics but also enhances functionality. Now that you have an array of creative lighting ideas, you can choose the options that best suit your needs and style.
Tools and Materials Needed for Woodworking Projects
Starting a woodworking project requires a solid understanding of the tools and materials essential for creating beautiful furniture, decorations, or functional items. Each piece you intend to craft will determine which tools and materials you will need. Let’s dive in and explore what you should have in your woodworking toolbox.
Essential Hand Tools
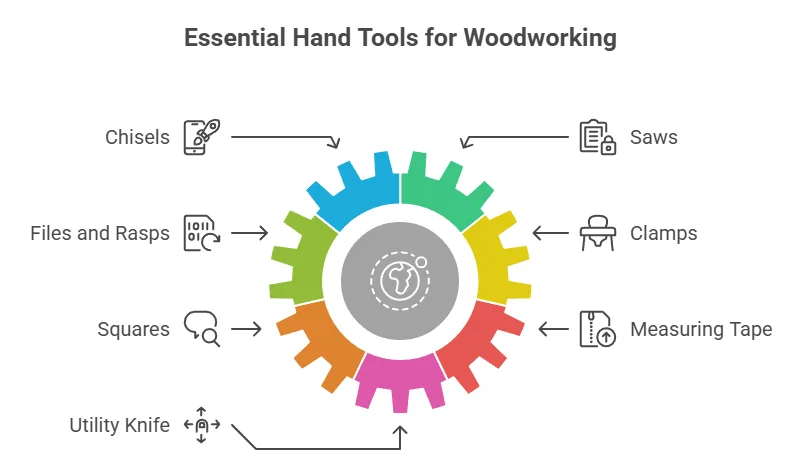
Hand tools are fundamental in woodworking. They allow for precision and control that power tools may not achieve. Here are the key hand tools you should have:
- Chisels: Ideal for carving and shaping wood.
- Saws: A range of handsaws, including a coping saw and dovetail saw.
- Files and Rasps: Important for smoothing edges and surfaces.
- Clamps: To hold pieces securely while you work or glue them together.
- Squares: Essential for checking and establishing right angles.
- Measuring Tape: For accurate measurements of wood and workpieces.
- Utility Knife: Versatile for numerous cutting tasks.
Power Tools
Power tools can significantly speed up your woodworking tasks. Here’s a list of must-have power tools:
- Drill: Perfect for making holes and driving screws. Consider getting a cordless drill for more versatility.
- Jigsaw: Useful for cutting curves and intricate designs.
- Router: Excellent for hollowing out an area in the wood or adding decorative edges.
- Saw: A circular saw is crucial for making straight cuts quickly. A miter saw aids in cutting angles accurately.
- Sander: Invest in an orbital or belt sander for a smooth finish.
Materials Needed
While tools are essential, your selection of materials can impact your project’s quality and aesthetic. Here are common materials you’ll work with:
- Wood: The choice between hardwoods (like oak, maple, or cherry) and softwoods (like pine) will depend on your project type.
- Wood Glue: A strong adhesive, especially useful for joining pieces.
- Wood Finish: Paints, stains, and varnishes can enhance the natural beauty of the wood and protect it.
- Sandpaper: Necessary for surface preparation before applying finishes.
Safety Gear
Your safety should always come first when working on woodworking projects. Here are the necessary safety gear items:
- Safety Glasses: Protect your eyes from sawdust and debris.
- Hearing Protection: Especially important when operating power tools.
- Dust Masks: Prevent inhalation of harmful dust particles.
- Gloves: Suitable gloves protect your hands from cuts and splinters.
Where to Purchase Tools and Materials
Finding your tools and materials is easy. Several online and physical stores cater exclusively to woodworking enthusiasts:
- Woodcraft – A great resource for a wide range of woodworking tools and materials.
- Rockler – Known for quality woodworking products and supplies.
- Highland Woodworking – Offers a variety of hand and power tools, along with woodworking education.
Organizing Your Workspace
Having a well-organized workspace makes a huge difference in the quality and ease of your woodworking. This includes:
- Tool Storage: Invest in toolboxes or pegboards to keep your hand tools organized and easily accessible.
- Workbenches: A sturdy workbench is integral for holding your projects securely.
- Material Storage: Designate a specific area for keeping your wood and other materials organized.
With the right tools and materials, you’re well on your way to starting exciting woodworking projects. Set up your toolkit, gather your materials, and let your creativity flow!
Tips for Enhancing Your Bedroom with Custom Furniture
Your bedroom is your sanctuary, and creating a personal space starts with the right furniture. Custom furniture helps you engage with your bedroom in a way that mass-produced pieces can’t match. Here are some practical tips for enhancing your bedroom with custom furniture.
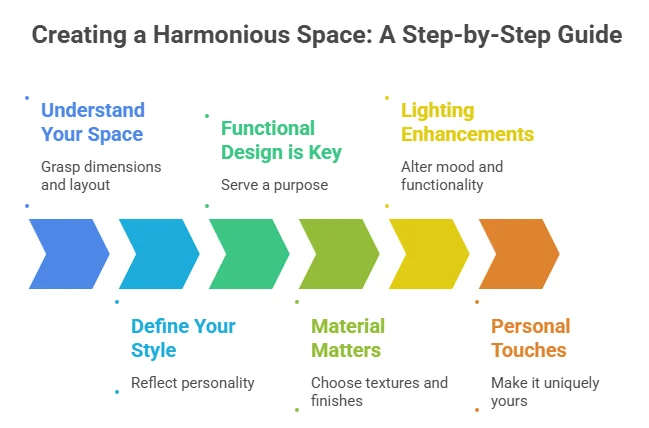
Understand Your Space
Before diving into custom furniture, take a good look at your bedroom. Consider these aspects:
- Dimensions: Measure your room’s length and width accurately.
- Layout: Think about flow and how you move around the room.
- Light sources: Determine natural and artificial light locations.
Define Your Style
What kind of atmosphere do you want? Your furniture style sets the tone for your bedroom. Consider these common styles:
- Modern: Minimalist designs with clean lines and neutral colors.
- Rustic: Warm woods and vintage accents for a cozy feel.
- Bohemian: Colorful patterns and varied textures create a lively space.
Pick the style that resonates with you and stick to it. Consistency enhances visual appeal.
Functional Design is Key
Custom furniture should not only be beautiful but also functional. Think about how each piece will serve your daily life. For instance:
- Storage: Create custom nightstands with drawers to reduce clutter.
- Multi-purpose pieces: Consider a bed with built-in storage or a bench at the foot of the bed.
- Workspace: If you work from home, integrate a small desk into your decor.
Material Matters
The materials you choose can greatly affect the mood and durability of your furniture. Some popular options include:
- Wood: Offers a classic look, available in various finishes.
- Metal: Provides a modern touch, often used for bed frames and accents.
- Upholstery: Adds comfort to chairs and benches, consider durable fabrics.
Lighting Enhancements
Integrating custom lighting into your bedroom furniture enhances both function and ambiance. Here are some ideas:
- Headboard Lights: Install LED strips around your headboard to create a soft glow.
- Floating Shelves: Add lights underneath for a stylish display of decor.
- Custom Lamps: Match lamps to your furniture style to maintain cohesion.
Personal Touches
Don’t forget to add personal touches. Custom furniture allows for unique finishes and details that represent your personality. Consider:
- Inscribed messages: Personalize with your name or a meaningful quote.
- Color choices: Pick hues that reflect your personality.
- Unique shapes: Customize the form of your pieces for added flair.
Enhancing your bedroom with custom furniture requires thoughtful planning and creativity. By considering your space, style, and functionality, you can create a bedroom that reflects your taste and lifestyle perfectly. Don’t rush the process; take your time to design pieces that truly feel like yours.
Conclusion
Building A Wooden Headboard with Lights can be a fulfilling project that transforms your bedroom into a cozy retreat. By following the steps outlined, you can create a striking focal point that not only serves a functional purpose but also adds a personal touch to your space. Selecting the right type of wood is essential for durability and aesthetics; whether you choose pine for its affordability or hardwood for its strength, each option brings unique qualities to your design.
Moreover, getting creative with lighting can truly elevate your headboard. Consider options like LED strips for a modern look or soft fairy lights for a whimsical touch. The right lighting not only enhances visibility but also creates a soothing ambiance conducive to relaxation.
Equipping yourself with the proper tools and materials is vital for a successful woodworking project. Ensure you have everything you need, from saws and drill bits to sandpaper and screws. Proper preparation can make the building process smoother and more enjoyable, allowing you to focus on crafting something unique.
Custom furniture like your handmade headboard can significantly enhance your bedroom’s style. Pair your new piece with complementary decor, bedding, and furniture to create a cohesive look. This personalized touch not only reflects your style but also elevates the overall atmosphere of your space.
Embrace this project, and enjoy the satisfaction of creating a stunning Wooden Headboard with Lights that beautifully transforms your bedroom into a personalized haven.