
Building a wooden hammock stand can be a rewarding project that enhances your outdoor relaxation experience. Follow this step-by-step guide to create your very own sturdy and stylish hammock stand at home.
Gather Your Materials
Before you start, ensure you have the following items:
- Two 4×4-inch wooden posts, each at least 12 feet long
- Two 2×6-inch wooden boards, around 10 feet long
- Outdoor wood screws (3-inch)
- Wood glue
- Sandpaper (medium and fine grit)
- Wood stain or sealant (optional)
- Hammock
- Basic tools (saw, drill, measuring tape, level, etc.)
Step 1: Cut the Wood
Begin by cutting the two 4×4 posts into three equal sections, making six pieces of about 4 feet each. These will serve as the main support beams. Next, take the two 2×6 boards and cut them to a length of 6 feet each. These will create the cross supports for the structure.
Step 2: Create the Base
To provide stability, form a rectangular base using the cut 4×4 posts. Position two posts parallel to each other and place the remaining two posts at each end, creating a rectangle. Secure these posts together using outdoor wood screws. Drill pilot holes to prevent the wood from splitting.
Step 3: Add Cross Supports
Once the base is complete, it’s time to add stability. Attach the two 2×6 cross supports to the top of the 4×4 posts, ensuring they are at the same height and level. Use wood glue and screws to secure them firmly. This will create a sturdy frame that can hold the hammock.
Step 4: Assemble the Stand
Stand up the frame and make sure it is stable. You may need a friend to help hold it in place while you secure it. Ensure your stand is even and balanced before you proceed. Use a level tool to verify that everything is aligned properly.
Step 5: Attach the Hammock
With the frame standing securely, it’s time to hang your hammock. Use sturdy hooks that can support the weight of the hammock and the person using it. Drill the hooks into the 2×6 cross supports where you want to place your hammock. Make sure they are evenly spaced and securely fastened. Follow the instructions provided with your hammock to attach it safely.
Step 6: Finishing Touches
Now that the basic structure is complete, you can add a personal touch! Sand down any rough edges using medium and fine-grit sandpaper to give your stand a smooth finish. Additionally, you might want to apply a wood stain or sealant to protect your hammock stand from weather damage.
Maintenance Tips
- Check the stability of the stand regularly to ensure it remains safe to use.
- Reapply wood stain or sealant annually for weather protection.
- Inspect the screws and hooks before every use to confirm they are secure.
Essential Tools and Materials for Your Hammock Stand Project
Building a hammock stand is a rewarding project that can enhance your outdoor space, offering you a perfect spot to relax and enjoy the weather. Before you dive into the construction, it is important to gather the essential tools and materials you will need. Below is a comprehensive list that will guide you through preparing for your hammock stand creation.
Essential Tools for Your Hammock Stand Project
The right tools make the construction process smoother and more efficient. Here’s a list of the essential tools you’ll need:
- Measuring Tape: A measuring tape is crucial to ensure accurate dimensions when cutting wood. Aim for a tape that can extend at least 25 feet.
- Saw: A circular saw or a miter saw will help you make clean and precise cuts. If you prefer hand tools, a handsaw will work as well.
- Drill: A power drill is necessary for creating pilot holes and securing screws. A cordless drill can provide more flexibility.
- Screwdriver: A screwdriver will help you fasten screws securely to maintain the structure’s integrity.
- Level: A level tool is essential to ensure your stand is balanced. This ensures comfort while you relax in your hammock.
- Clamps: Clamps can hold pieces together while you work, making it easier to drill or screw without keeping everything in place manually.
- Safety Gear: Always wear safety goggles and gloves to protect your eyes and hands while working with wood and tools.
Materials Needed to Build Your Hammock Stand
Choosing the right materials is just as important as having the right tools. Here’s a list of materials you’ll need for your hammock stand:
- Wood: You will need quality lumber that can withstand the weight of the hammock and the person using it. Common choices include pressure-treated lumber, cedar, or redwood for durability and weather resistance.
- Screws: Use durable wood screws suitable for outdoor use. Stainless steel screws are great as they resist rust and corrosion.
- Wood Glue: While screws are important, adding wood glue will enhance the strength of your joints.
- Hanging Hardware: You’ll need eye bolts or hammock hooks designed specifically for hanging hammocks securely.
- Paint or Stain (Optional): If you want to give your hammock stand a personalized look, consider using outdoor paint or stain to protect the wood from weather elements.
Planning Your Project
Before starting, it’s wise to sketch a plan for your hammock stand. This plan should include measurements for all angles and joints, ensuring that you have all the right sizes for your pieces. Here’s a sample layout for a typical hammock stand:
| Part | Dimensions (inches) |
|---|---|
| End Beams | 96 |
| Center Beam | 96 |
| Side Legs | 72 |

These dimensions can be adjusted based on the hammock size you have chosen. It’s crucial to verify your hammock’s specifications to ensure the stand is the perfect fit. For inspiration and additional information on different hammock styles, visit Hammock Universe.
Safety Considerations
Safety is a key element in any DIY project. Always double-check your measurements before cutting to avoid costly mistakes. Additionally, when working with power tools, make sure to use them according to the manufacturer’s instructions. For guidelines on safe tool usage, check out Woodworking Talk.
With these essential tools and materials on hand, you are now ready to embark on your hammock stand project. The effort you put into building it will yield countless hours of relaxation and enjoyment. Happy building!
Choosing the Right Location for Your Hammock Stand

Finding the perfect spot for your wooden hammock stand is a crucial step that can greatly enhance your lounging experience. The right location adds to both comfort and aesthetics, providing a serene environment to unwind. Considering a few key factors will ensure you make the best choice for your hammock stand.
Assess Your Space
First, take a good look at your yard or outdoor space. Measure the area you have available to set up your hammock stand. You’ll want ample room not just for the stand but also for your personal space. A good guideline is to have at least a few feet of clearance around the stand for easy access and safety. Here are some aspects to consider:
- Width and Length: Your hammock stand requires enough length for the hammock to be comfortably suspended. Typically, a distance of 10 to 15 feet between the stand’s support points is ideal.
- Height: Make sure your stand will allow the hammock to hang at a comfortable height, ideally around 18 inches above the ground.
- Surface: Level ground is important for setting up your stand, ensuring stability and safety while you relax.
Consider Sunlight and Shade
The amount of sunlight your chosen location receives throughout the day plays a significant role in comfort. A sunny spot can be inviting, but too much heat may make the hammock uncomfortable. Find a balance by looking for a combination of sun and shade. Here’s how you can think about it:
- Morning Sun: Exposure to morning sunlight can help warm you up without overwhelming heat in the afternoon.
- Afternoon Shade: Afternoon sun can become quite intense, so a shaded area during this time can offer a more comfortable lounging experience.
Check for Wind and Weather Protection
Weather conditions can quickly change, so think about how exposed your hammock stand might be. A windy area may lead to an uncomfortable experience or even damage to your hammock. Here are considerations for weather protection:
- Windbreaks: Natural vegetation like trees and shrubs can act as windbreaks, providing a buffer against strong breezes.
- Overhanging Branches: Make sure no branches are too close to your hammock; they could pose a risk during storms or bad weather.
Access to Amenities
Make your lounging experience more enjoyable by considering proximity to amenities. This could make a significant difference when you want refreshments or entertainment while relaxing in your hammock. Think about:
- Shade Sources: If you want to enjoy a drink or snack while you unwind, ensure you are close to a patio or deck with shade.
- Power Outlets: If you enjoy reading or listening to music on digital devices, being near a power source is a great idea.
Noise Levels and Privacy
The tranquility of your hammock experience can be disrupted by noise. This is why assessing noise levels in your chosen spot is essential. Choose a location that offers a sense of peace and privacy. Consider:
- Distance from Roads: Being too close to roads can be noisy with traffic sounds. Opt for a quieter area away from highways.
- Proximity to Neighbors: If you live close to others, special attention should be paid to how private and secluded your hammock stand location feels, especially for nap times.
Tips for Maintaining Your Wooden Hammock Stand
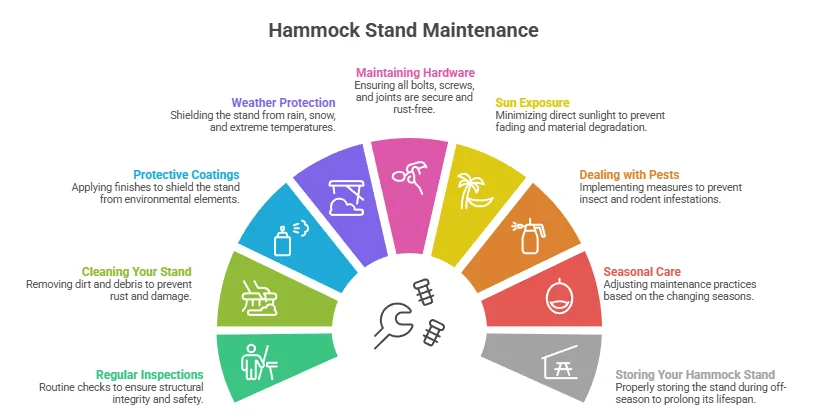
Taking care of your wooden hammock stand is essential to ensure its longevity and maintain its beauty. By following some straightforward tips, you can keep your hammock stand in prime condition, providing a comfortable relaxation spot for years. Here are some effective strategies for maintaining your wooden hammock stand.
Regular Inspections
Always start by routinely inspecting your wooden hammock stand. Look for any signs of wear and tear, such as splintering, cracking, or significant discoloration. These checks should be done at least once a month, especially if the stand is exposed to changing weather conditions.
Cleaning Your Stand
Cleaning your hammock stand is pivotal in preserving the wood. Use a mild soap solution and a soft cloth or sponge to gently scrub the surface. Avoid using harsh chemicals or abrasive materials as they can damage the finish. After cleaning, rinse thoroughly with water and let it dry completely before using the hammock.
Protective Coatings
Applying a protective coating can help shield your wooden hammock stand from moisture and UV rays:
- Sealer: A quality wood sealer can create a barrier against moisture. Apply it every six months for optimal results.
- Varnish: If you prefer a glossy finish, consider applying a polyurethane varnish to enhance resistance against the elements.
- Stain: Regularly staining your wood stand not only adds color but also protects against fading over time.
Weather Protection
Weather can be rough on wooden structures. If possible, store your hammock stand indoors during harsh weather conditions, such as heavy rains or snow. Alternatively, using a tarp to cover your stand can also provide extra protection when not in use. This simple step can prevent water damage and extend the life of your stand.
Maintaining Hardware
Don’t forget about the hardware of your hammock stand. Bolts, screws, and brackets should be checked regularly for rust and corrosion. If you notice any rusty hardware, replace it promptly to ensure the safety and stability of your stand. Using stainless steel hardware can help minimize rust issues.
Sun Exposure
Constant sun exposure can lead to fading and drying out of the wood. Consider positioning your hammock stand in a shaded area, such as under a tree, or using an umbrella for additional shade. Additionally, rotating the stand every few months can help it wear evenly.
Dealing with Pests
Wooden structures are often a target for pests like termites and carpenter ants. Regular inspections can help spot any infestation early. If you spot signs of pests, such as small holes or wood shavings around the base, consider applying a pest control solution specifically designed for wooden structures.
Seasonal Care
Seasonal care can greatly enhance the lifespan of your stand. In cooler months, check for any lingering moisture and allow it to dry out thoroughly. In spring, give your stand a good cleaning and reapply protective coatings as needed. Each seasonal change is an opportunity to give your stand some extra attention.
Storing Your Hammock Stand
If you decide to store your hammock stand for an extended time, follow these steps:
- Clean thoroughly to remove dirt and moisture.
- Apply a protective coating as discussed earlier.
- Store in a cool, dry place away from direct sunlight.
Creative Designs for Customizing Your Hammock Stand

Creating a custom hammock stand can be a fun and rewarding project that enhances your outdoor space. With a little creativity and some tools at your disposal, you can design a hammock stand that not only serves a practical purpose but also adds aesthetic value to your patio, backyard, or garden.
Choosing the Right Materials
Before diving into the design process, consider which materials will work best for your hammock stand. Here are some popular options:
- Wood: Cedar or redwood is highly recommended for its natural resistance to rot and insects.
- Metal: Stainless steel or powder-coated steel offers durability and a modern look.
- PVC: Lightweight and inexpensive, perfect for DIY enthusiasts on a budget.
Design Ideas to Customize Your Hammock Stand
Now that you have your materials selected, it’s time to explore some creative designs that can elevate your hammock stand:
1. Curved Wooden Stand
If you’re looking for a unique design, consider a curved wooden stand. This not only looks beautiful but also adds ergonomic support to your hammock. To create a curved stand:
- Cut two long pieces of wood into a curve using a bandsaw.
- Connect the two ends with crossbeams for stability.
- Sand down rough edges for safety and appeal.
2. A-Frame Stand
The A-frame design is a classic but with a twist. You can customize this structure by painting it in bright colors or adding decorative elements. Construction steps include:
- Cutting two angled wood pieces for the sides.
- Adding a horizontal beam at the top to hold the hammock.
- Stabilizing the A-frame with diagonal braces.
3. Swinging Hammock Stand
For those who love a bit of movement, a swinging stand can be a delightful innovation. The design mimics a swing set, giving your hammock a fun, dynamic quality. To build one:
- Use sturdy wood or metal poles to create the frame.
- Attach the hammock using strong chains or ropes for added flexibility.
Storage Solutions
Why not add functionality with a storage solution attached to your hammock stand? Here are some ideas:
- Storage Netting: Add a mesh storage net underneath your stand for keeping books, drinks, or small toys handy.
- Side Shelves: Install small shelves on the sides to hold beverages or snacks.
Personal Touches and Accessories
Once your design is complete, consider accessorizing your hammock stand to make it uniquely yours. Here are some finishing touches:
- Outdoor Lighting: Wrap fairy lights around your stand for a cozy, enchanting atmosphere at night.
- Colorful Pillows: Use decorative pillows and blankets to add comfort and style.
- Planters: Attach small flower pots to the sides of your stand for natural beauty.
Maintaining Your Customized Hammock Stand
After building your hammock stand, it’s essential to maintain it to ensure longevity. Here are some tips:
- Regularly check for any wear and tear, especially on the joints and connections.
- Sand and refinish wooden components yearly to protect against weather elements.
- For metal stands, ensure all surfaces are rust-free and paint as necessary.
Conclusion
Building a wooden hammock stand can be a rewarding project that enhances your outdoor space. By following the step-by-step guide, you can create a sturdy and beautiful structure to support your relaxation time. Remember to gather all the essential tools and materials before getting started, as having everything on hand will make the process smoother and more enjoyable. Choosing the right location is key to maximizing your comfort. Look for shaded areas away from strong winds or hazards. Once your hammock stand is complete, maintaining it ensures its longevity. Regular checks for weather damage, applying sealant, and cleaning the wood will keep it looking fresh for many seasons to come.
Don’t hesitate to put your personal touch on your hammock stand. With creative design ideas, you can turn a simple piece of furniture into a statement of your style. Adding custom paint, unique shapes, or even integrated storage options can make your stand not only functional but also a beautiful part of your patio or backyard. Embracing this DIY project allows you to enjoy lazy afternoons swinging in your hammock, surrounded by nature. With patience and creativity, you’ve not only built a functional piece of furniture but also a cozy spot to unwind and take a break from daily life. So gather your tools, choose your design, and let your creativity flow as you embark on Building A Wooden Hammock Stand.