Building a wooden dresser can be a rewarding and enriching experience. By creating something functional with your own hands, you not only save money but also gain a unique piece of furniture tailored to your needs. Below is a step-by-step guide on How To Build A Wooden Dresser that combines simplicity with creativity.
Gathering Your Materials
Before starting, it’s essential to gather all necessary materials and tools. Here’s what you will need:
- 1-inch thick plywood or hardwood (for the dresser body)
- 3/4-inch thick wood boards (for the drawers)
- Wood screws
- Wood glue
- Wood finish or paint
- Sandpaper (medium and fine grain)
- Table saw or circular saw
- Drill and drill bits
- Measuring tape
- Clamps
- Drawer slides
Creating the Dresser’s Frame
Start by cutting your plywood or hardwood to the desired dimensions for the dresser. Typically, a standard dresser is around 30 to 36 inches in height, with a width of 48 to 60 inches, and a depth of about 18 to 24 inches. Here’s how to proceed:
- Measure and mark the material based on your desired size.
- Using a table saw or circular saw, cut the front, back, sides, and top pieces for the body of the dresser.
- Attach the side panels to the top panel using wood screws and wood glue. Ensure it is sturdy.
- Connect the bottom panel, making sure to allow room for the drawer slides.
Building the Drawers
Next, it’s time to build the drawers. Typically, a dresser consists of multiple drawers for storage. Here is how to make them:
- Cut your 3/4-inch wood boards into panels for the front, back, and sides of each drawer. Drawers are commonly around 6-10 inches in height and should fit snugly within the dresser.
- Assemble the drawers using wood screws and glue, making sure to construct a box shape.
- Attach the bottom panel for additional support and fill with wood glue.
- Sand down any rough edges and apply finish as desired.
Installing Drawer Slides
For smooth operation, install drawer slides in your dresser. Here’s a quick guide:
- Follow the manufacturer’s instructions for your specific slide type (side-mounted or bottom-mounted).
- Secure the slides inside the dresser body using screws.
- Attach the corresponding part of the slide to the sides of each drawer.
- Test the drawers to ensure they glide smoothly.
Finishing Touches
Once the structure is complete, it’s time to focus on aesthetics. Here is what you should do:
- Sand the entire dresser and drawers thoroughly to prepare for finishing.
- Choose a wood finish or paint that suits your home décor.
- Apply the finish in layers, allowing adequate drying time between each coat.
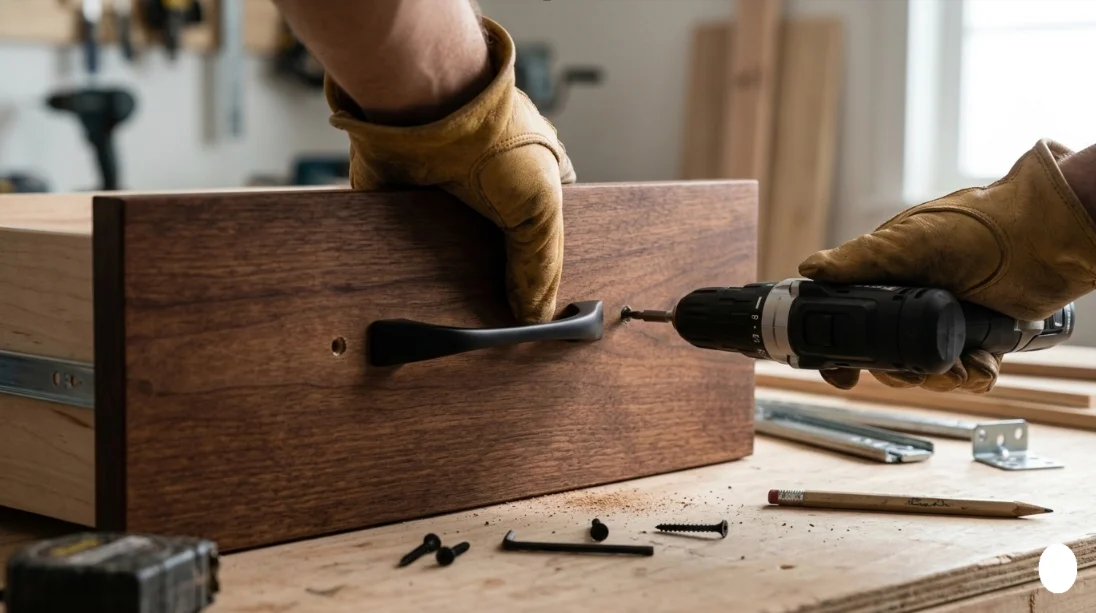
- Add drawer pulls to each drawer for functionality.
Maintaining Your Dresser
Once your wooden dresser is built, proper maintenance will ensure its longevity:
- Regularly dust the surface to prevent grime buildup.
- Avoid placing heavy items on top to prevent warping.
- Use coasters or mats to protect against scratches and moisture.
For more in-depth tips and woodworking inspiration, consider checking out Wood Magazine or Popular Woodworking.
By following this step-by-step guide, you will not only learn How To Build A Wooden Dresser but will also have a piece of furniture that showcases your skills and personal style. Happy building!
Essential Tools and Materials for Crafting Your Own Dresser
Building your own wooden dresser can be a rewarding project, allowing you to customize the design to match your personal taste and needs. To embark on this journey, you’ll need a selection of essential tools and materials. Understanding what you’ll require will make the process smoother and more enjoyable. Here’s a detailed guide to the tools and materials necessary for crafting your own dresser.
Essential Tools
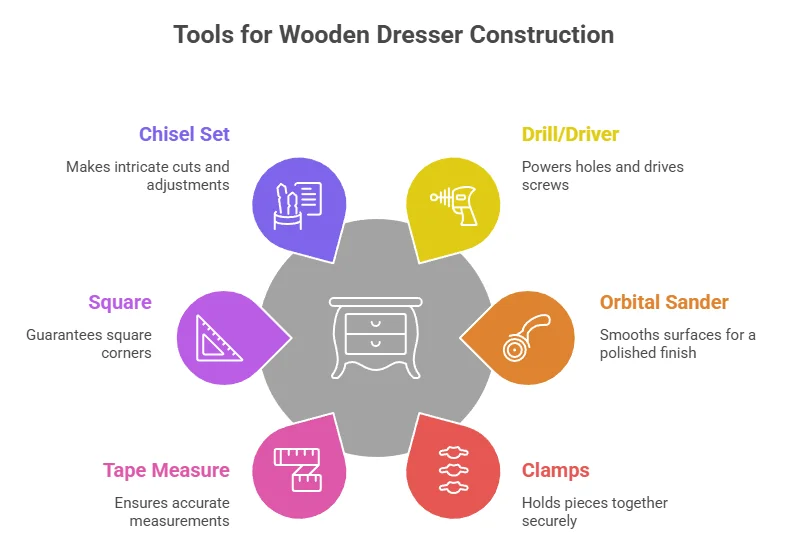
Before you begin constructing your wooden dresser, gather the following tools:
- Table Saw or Circular Saw: A table saw offers precise cuts for larger sheets of wood, while a circular saw is perfect for more portable jobs.
- Miter Saw: Ideal for creating angled cuts, which you may need for the dresser’s frame or decorative accents.
- Drill/Driver: A power drill is crucial for making holes and driving screws. A drill/driver combo is highly beneficial.
- Orbital Sander: Smooth out rough edges and surfaces to achieve a polished final look on your dresser.
- Clamps: These are vital for holding pieces together securely while glue dries or for precise assembly.
- Tape Measure: Ensure your measurements are accurate to avoid miscuts and maintain uniformity in your design.
- Square: A framing square is necessary for ensuring that corners are square and assemble properly.
- Chisel Set: Useful for making intricate cuts or adjustments to wooden joints.
Essential Materials
Next, you’ll need the right materials to construct your dresser:
- Wood: Select the type of wood based on your budget and desired appearance. Popular options include pine, oak, and plywood. High-quality plywood can be ideal for the carcass, while hardwood can enhance the appearance of drawers and surfaces.
- Wood Glue: A strong adhesive is crucial for joining pieces of wood together securely.
- Screws: Choose the right size and type to ensure all parts stay firmly in place.
- Drawer Slides: Depending on the design, you may opt for side-mounted or under-mounted drawer slides for smooth operation.
- Stain or Paint: Finish your dresser with a durable stain or paint that enhances the wood’s natural beauty and protects it from wear.
- Finish: A topcoat such as polyurethane can provide a protective layer, enhancing durability.
Optional Accessories
Adding a few optional accessories can elevate your dresser construction:
- Drawer Pulls or Knobs: These add both functionality and style to your dresser.
- Wood Filler: Use this for filling any gaps or imperfections for a professional finish.
- Sanding Blocks: A manual sanding option for finishing touches around delicate areas.
Where to Buy Tools and Materials
When sourcing your tools and materials, it’s essential to choose reliable vendors. You can find many of the items needed at local hardware stores or online. Here are some recommended websites:
- Woodcraft – A great source for woodworking tools and materials.
- Rockler – Offers a wide selection of quality woodworking supplies.
- Home Depot – A one-stop-shop for many DIY home improvement needs.
- Lowe’s – Provides a broad range of tools and materials for furniture crafting.
Crafting your own wooden dresser is a fantastic way to express your personal style while also acquiring a functional piece of furniture. By gathering the proper tools and materials, you will be well on your way to creating a beautiful and sturdy dresser that you can be proud of. Remember, taking your time and ensuring accurate measurements will lead to the best results in your woodworking project.
Tips for Choosing the Right Wood for Durability and Style
When crafting furniture, particularly a wooden dresser, the choice of wood plays a vital role in both durability and style. Selecting the right type of wood can enhance the lifespan of your dresser while complementing your home decor. Here are some tips to help guide your decision-making process.
Understanding Wood Types
There are two main categories of wood: hardwood and softwood. Each has distinct properties that make them suitable for different styles and applications.
- Hardwoods: These woods, such as oak, maple, and cherry, come from deciduous trees and are known for their durability and resistance to wear. Hardwoods are ideal for making long-lasting furniture.
- Softwoods: Pine and cedar are common softwoods derived from coniferous trees. They are usually lighter and easier to work with, making quick assembly possible. However, they may not withstand heavy use as well as hardwoods.
Durability Considerations
When choosing wood for your dresser, consider how much wear and tear it will face. Here are some durable wood options:
| Wood Type | Durability Rating | Best Use |
|---|---|---|
| Oak | High | Dressers, cabinets |
| Maple | High | Dressers, tables |
| Pine | Medium | Decorative pieces |
| Cedar | Medium | Storage, wardrobes |
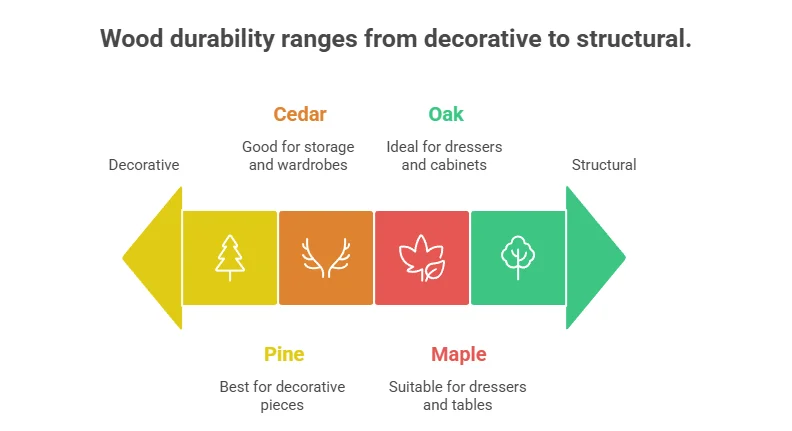
Choosing a wood type with a high durability rating ensures your dresser will stand the test of time. If longevity is your primary concern, hardwood options are the way to go.
Style Options
The wood you choose can significantly influence the aesthetic of your dresser. Here are popular wood types that can enhance your desired decor style:
- Cherry: With its rich color that deepens over time, cherry wood adds a warm and inviting touch to any room.
- Walnut: Known for its dark hues and intricate grain patterns, walnut makes a stunning statement in modern and traditional decor.
- Mahogany: This luxurious wood exudes elegance, often found in classic and formal designs.
Finishing Touches
Once you’ve selected the wood type, consider its finish. A good finish not only enhances the beauty but also protects the wood. Here are some popular finishing options:
- Stains: They allow you to alter the color of the wood while still showcasing its natural grain.
- Polyurethane: This finish provides a tough layer of protection against scratches and spills.
- Oil finishes: They penetrate the wood, offering a natural look while providing moisture resistance.
Eco-Friendly Choices
Choosing sustainably sourced wood supports the environment. Look for certifications like FSC (Forest Stewardship Council) or PEFC (Programme for the Endorsement of Forest Certification), which assure responsible forest management practices.
Budget Considerations
Your budget can significantly influence your choice of wood. Here’s a simplified overview:
| Wood Type | Price Range | Value for Money |
|---|---|---|
| Oak | $$$ | Excellent |
| Maple | $$$ | Excellent |
| Pine | $$ | Good |
| Cedar | $$$ | Good |
Investing in quality wood may initially seem costly, but in the long run, it ensures your furniture remains functional and stylish. For more detailed insights on wood types and their applications, check out Wood Magazine and Woodworking Network. These resources offer valuable information that can further inform your wood selection process.
The right wood can significantly impact the durability, aesthetics, and value of your dresser. By considering your personal style, the level of durability you require, and current trends, you can make an informed decision that will enhance your home for years to come.
Finishing Techniques to Enhance Your Wooden Dresser
Enhancing the beauty and durability of your wooden dresser is a rewarding part of woodworking. Whether you’re building from scratch or refinishing an old piece, applying the right finishing techniques can elevate your project. Here are some effective methods to consider.
Why Finishing Is Important
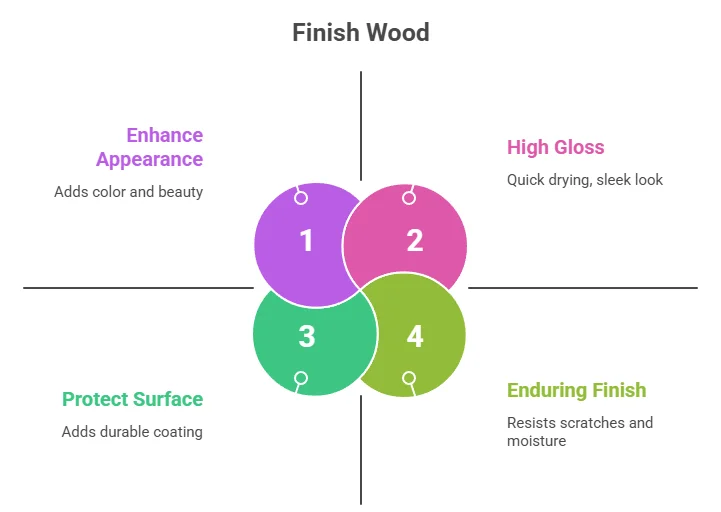
Finishing not only beautifies the wooden surface but also protects it from damage caused by moisture, sunlight, and wear. Here are key reasons to invest time in finishing your wooden dresser:
- Protection: Finishes guard against scratches, spills, and fading.
- Enhancement: A good finish enhances the natural grain of the wood, highlighting its color and texture.
- Longevity: A proper finish prolongs the life of your furniture.
Types of Finishing Techniques
There are several techniques to finish your wooden dresser, each with its advantages. Let’s explore some of the most popular methods:
1. Staining
Using wood stains is an excellent way to add color to your dresser while allowing the wood grain to show through. Stains come in gel or liquid forms and are available in various colors. Here’s how to apply stain:
- Surface Preparation: Sand the surface to ensure it’s smooth and clean.
- Application: Use a brush or cloth to apply the stain, working in the direction of the grain.
- Wipe Excess: After a few minutes, wipe off any excess stain for a more even color.
2. Varnish
Varnish provides a tough, protective layer that is resistant to damage. It comes in various sheens from matte to high gloss. To apply varnish:
- Preparation: Ensure the surface is clean and dust-free.
- First Coat: Apply a thin coat with a brush or roller, following the wood grain.
- Drying: Allow it to dry completely before sanding lightly and applying a second coat.
3. Polyurethane
Polyurethane is a popular choice for its durability and ease of application. It’s available in both water-based and oil-based forms. Here’s how to use it:
- Environment: Ensure adequate ventilation when using oil-based products.
- Coats: Apply at least 3 coats for optimal protection, sanding in between each for a smooth finish.
- Cleanup: Water-based polyurethane cleans up easily with soap and water, while oil-based requires mineral spirits.
4. Lacquer
Lacquer dries faster than other finishes, making it a favorite among professional woodworkers. This high-gloss finish gives a beautiful appearance and is highly protective. Follow these steps to apply lacquer:
- Preparation: Prepare the wood by sanding and dusting it off.
- Application: Use a spray gun or brush for even application.
- Multiple Coats: Apply several thin coats, allowing each to dry before the next application.
Maintenance Tips for Your Finished Wooden Dresser
To keep your wooden dresser looking its best, consider these maintenance tips:
- Dust Regularly: Use a soft cloth to dust off surfaces to prevent dirt buildup.
- Avoid Harsh Cleaners: Use a gentle cleaner and avoid ammonia-based products.
- Reapply Finish: Depending on use, you may need to reapply the finish every few years.
Choosing the right finishing technique for your wooden dresser not only enhances its visual appeal but also contributes to its longevity. For further guidance and information on woodworking techniques, you can check out websites like Wood Magazine or Woodworker’s Journal. Experimenting with different finishes can yield remarkable results. Remember, the right finish will create a beautiful piece of furniture that you’ll enjoy for years. Happy woodworking!
Common Mistakes to Avoid When Building a Wooden Dresser
Building a wooden dresser can be a rewarding project, but it can also be filled with pitfalls if you’re not careful. To help you along the way, here are some common mistakes to avoid that will ensure you create a beautiful and functional piece of furniture.
One of the biggest mistakes is not planning adequately before you start. Sketch out your design and take measurements of the space where the dresser will sit. Having a clear plan helps you avoid making costly errors. Consider using design software or consulting resources like Wood Magazine for tips on design and layout.
Another common oversight is rushing through the shopping list. Picking the right wood is essential for both appearance and durability. Ensure that you select a hardwood like oak or maple for strength, and for a more rustic look, pine can be a good choice. Keep in mind that different types of wood can behave differently during the construction process, so do some research before purchasing.
It’s also vital to gather all the necessary tools before you begin. Tools like a saw, drill, clamps, and sandpaper are crucial for the building process. If you’re not sure what you need, tools are often outlined in guides found on sites such as Popular Woodworking.
Make sure you’re familiar with your tools. Improper use can lead to mistakes and injuries. Spend some time reading the manuals or watching tutorial videos to ensure you know how to handle each tool safely. safety should always be your number one priority.
When cutting your wood, be meticulous about your measurements. A common error is not accounting for the width of the saw blade, which can lead to incorrect sizes. Use a combination square and a measuring tape to double-check your dimensions. A small mistake here can snowball into a major issue once you start assembling the dresser.
During assembly, many newcomers rush through the process. It’s crucial to allow glue to set in between joints before moving on to the next step. Clamping joints might seem tedious, but it ensures a solid build. Also, take your time with fastening pieces together—misaligned parts can ruin the aesthetics of your dresser.
Sanding may seem simple, but it’s often overlooked. Skipping this step can lead to a rough finish and affect the overall appearance. Sand all surfaces thoroughly, progressing from coarse to fine grit. This will provide a smooth finish that not only looks great but also helps with the application of your stain or paint later on.
Painting or staining is another area where mistakes often occur. Do thorough research on the type of finish you would like to use. A common mistake is applying too thick a coat or not allowing adequate drying time, which can lead to bubbling or peeling. For detailed finishing tips, refer to articles on Wood Magazine’s finishing guide.
After the dresser is assembled and finished, don’t forget about hardware selection. Many people fail to choose hardware that complements their design. For example, modern handles won’t look right on a vintage-styled dresser. Take time to select knobs and handles that enhance your design.
Always keep track of your budget and stick to it. It’s easy to overspend, especially if you stumble upon something “perfect” mid-project. A budget helps you stay focused and not go down rabbit holes that can lead to unnecessary expenses.
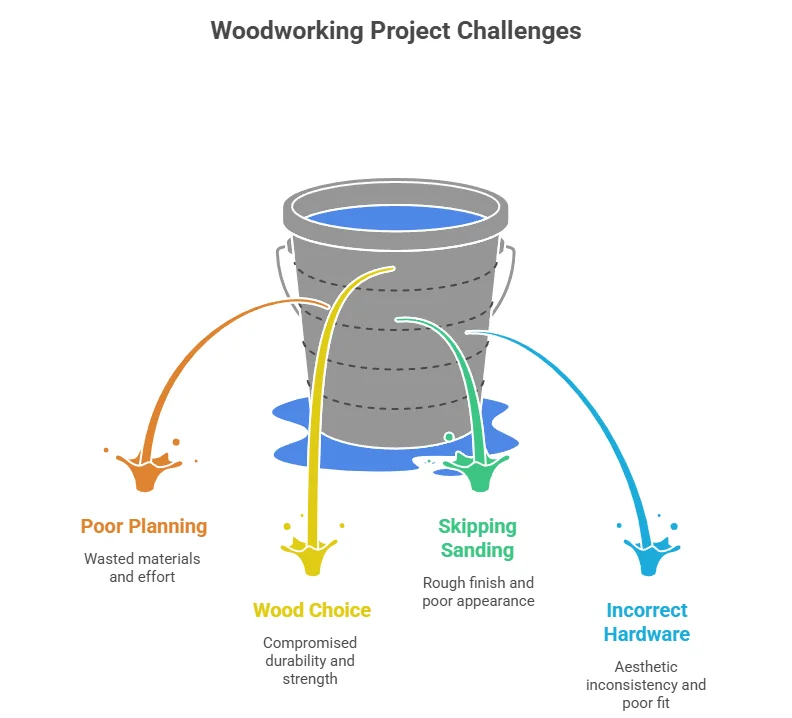
| Mistake | Impact | Solution |
|---|---|---|
| Poor planning | Wasted materials | Sketch your design and take measurements |
| Wood choice | Compromised durability | Select appropriate wood for the project |
| Skipping sanding | Rough finish | Sand all surfaces thoroughly |
| Incorrect hardware | Aesthetic inconsistency | Choose hardware that matches your style |
By steering clear of these common mistakes, you’ll find that building a wooden dresser becomes more enjoyable and the results can truly reflect your personal style. Remember, attention to detail and patience is key—happy woodworking!
Conclusion
Building your own wooden dresser can be a rewarding and enjoyable project. By following a step-by-step guide, you can carefully craft a beautiful piece of furniture that suits your needs and style. Make sure to gather all essential tools and materials before starting, as this will make the process smoother and more efficient.
Choosing the right type of wood is crucial for both durability and aesthetic appeal. Whether you opt for a classic oak, elegant walnut, or a more budget-friendly plywood, consider the final look you want to achieve. Additionally, mastering finishing techniques will help protect your dresser and enhance its beauty. A well-applied stain or varnish not only brings out the grain of the wood but also adds a layer of protection against wear and tear.
As you embark on this journey, be mindful of common mistakes that can hinder your progress. From miscalculating measurements to rushing through the finishing process, avoiding these pitfalls will ensure that your dresser turns out just as you imagined. Take your time and enjoy the process; woodworking is as much about the journey as it is about the end result.
By following these guidelines, you’ll be well-equipped to create a handcrafted wooden dresser that will be both functional and eye-catching. So, gather your materials, roll up your sleeves, and let your creativity flow—you’re about to make a piece of furniture that you can be proud of for years to come. Happy building!