
Building a wooden canoe or kayak is a rewarding project that allows you to combine creativity and craftsmanship. Whether you’re a seasoned woodworker or a beginner, this step-by-step guide will help you construct your very own vessel. With some basic tools and materials, you will soon be gliding across the water with pride.
Materials Needed
- Marine plywood (recommended thickness: 1/4 inch)
- Epoxy resin and hardener
- Wood glue
- Fiberglass cloth (optional for added strength)
- Sandpaper (various grits)
- Wooden ribs (for canoes)
- Clamps
- Hand saw or jigsaw
- Router
- Paintbrush and roller
- Varnish or marine paint
- Measuring tape
- Pencil
- Plan or design layout (you can download plans from Bear Mountain Boats)
Step 1: Choosing Your Design
Before you start building, pick a design that suits your skills and needs. You can find many canoe and kayak plans online that provide detailed dimensions and specifications. Consider factors such as intended use, size, and whether you want a canoe or kayak. Some resources include Kayak Building and Canoe Craft.
Step 2: Preparing the Wood
Once you have your design, gather your marine plywood. Use a hand saw or jigsaw to cut out the shapes needed for the hull based on your plans. Ensure you measure accurately to maintain symmetry. After cutting, spend time sanding the edges to prevent splinters and sharp corners. Start with a rough grit and progress to a finer grit for a smooth finish.
Step 3: Assembly of the Hull
Begin assembling the hull pieces using wood glue and clamps. Ensure that each piece is positioned according to your design. For added strength, consider using epoxy resin to attach the seams. If your design includes ribs (for canoes), attach them as per your plans, ensuring they are evenly spaced and secured properly.
Step 4: Reinforcement
Optional: Add fiberglass cloth to the exterior for additional strength. Cut the cloth to size and apply a layer of epoxy resin to the hull. Lay the fiberglass on top, then cover with another layer of resin. This will give your canoe or kayak increased durability and resistance to wear and tear.
Step 5: Finishing Touches
Once the hull is assembled and any fiberglass is cured, you can begin finishing your project. Sand the entire surface to remove any rough spots and prepare for paint or varnish. Choose a marine-grade varnish or paint to protect your vessel from water damage. Apply it using a paintbrush or roller, and allow it to dry completely as per the manufacturer’s instructions.
Step 6: Adding Final Details
Now it’s time to add any accessories you desire, such as seats, foot pegs, or storage compartments. Follow your design plan for these elements. Make sure everything is securely fastened, and double-check that your canoe or kayak is ready for its maiden voyage.
Step 7: Testing Your Craft
Once everything is dry and assembled, take your wooden canoe or kayak for a test on calm water. Ensure that it is balanced and stable. Make any necessary adjustments before taking it out on longer trips.
Essential Tools and Materials for Canoe and Kayak Construction
Building your own canoe or kayak can be an exciting and rewarding project. Nevertheless, starting this journey requires the right set of tools and materials to ensure your venture is successful. Knowing what you need can significantly enhance your building experience and create a sturdy vessel. Here, we outline essential tools and materials you will need to embark on this wonderful journey of canoe or kayak construction.
Basic Tools for Canoe and Kayak Construction
To start your canoe or kayak build, gather these foundational tools:
- Measuring Tape: A reliable measuring tape is crucial for ensuring precision in your measurements and cuts.
- Hand Saw or Power Saw: Depending on your comfort level, both hand saws and power saws can efficiently cut wood sheets and other materials.
- Chisel Set: A good set of chisels helps refine edges and create pockets or grooves needed during assembly.
- Drill with Drill Bits: A powerful drill and a variety of drill bits are essential for making holes for screws and fittings.
- Screwdriver Set: Having both Phillips and flat-head screwdrivers will streamline the assembly process.
- Clamps: These help hold materials together while glue sets or when screws are being inserted.
- Sandpaper or Sander: To give your canoe or kayak a smooth finish, you’ll need different grits of sandpaper or a power sander.
Essential Materials for Construction
After gathering your tools, selecting the right materials is just as important. Here’s a breakdown of the essential materials you’ll require:
- Wood: Common choices include marine plywood or cedar. Both provide excellent buoyancy and durability.
- Epoxy Resin: This waterproof adhesive is vital for bonding wooden parts and ensuring the canoe or kayak is sealed against water. Make sure to choose marine-grade epoxy.
- Fiberglass Cloth: When applied over wood with epoxy, fiberglass enhances the strength and durability of your kayak or canoe.
- Paint or Varnish: Protecting your craft from the elements is vital. Marine-grade paint or varnish add an additional layer of safety against water damage.
- Rope: Strong and durable rope can be used for securing gear and personal items while boating.
Advanced Tools for Precision Work
Once you’re comfortable with the basics, consider adding some advanced tools for enhanced accuracy and efficiency:
- Jigsaw: Great for making intricate cuts and curves that may be necessary in your design.
- Router: Useful for hollowing out wood and adding decorative edges for an aesthetically pleasing finish.
- Table Saw: Allows for straight cuts with precision and is especially useful for larger sheets of plywood.
Additional Resources
There are numerous resources available to guide you through the canoe or kayak building process. Websites like Canoe & Kayak and American Whitewater provide valuable insights and community support for both novice and experienced builders.
As you embark on this exciting project, remember that patience and practice are crucial. The more you work with your tools and materials, the more skilled you will become, enhancing both your building experience and the quality of your finished product.
Design Considerations for Your DIY Canoe or Kayak
When embarking on the journey of building your own canoe or kayak, design considerations play a crucial role. Your project’s success hinges on several factors that influence performance, stability, and aesthetics. Here’s a detailed exploration to help you make informed decisions.
Purpose of the Canoe or Kayak
Define what you want to achieve with your canoe or kayak. Will it be used for recreational paddling, fishing, or long-distance touring? The purpose significantly influences your design parameters.
Types of Canoe and Kayak Designs
Understanding the different designs is vital. Here are some popular types:
- Canoes: Generally open on top, can seat multiple people, and ideal for calm waters.
- Kayaks: Usually closed with a cockpit, better suited for rough conditions and greater maneuverability.
- Sit-on-top models: Ideal for warm weather, offering easy access and great for fishing.
- Inflatable designs: Lightweight and portable, these are excellent for casual outings.
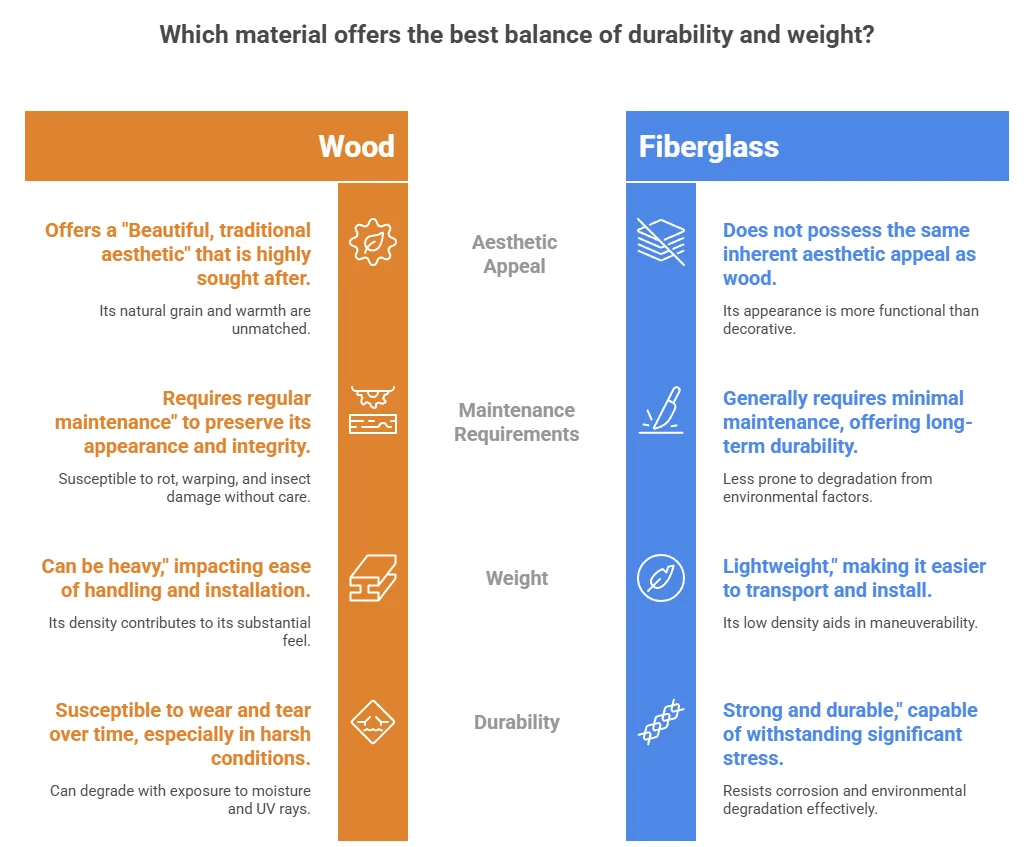
Materials
The choice of materials directly impacts your canoe or kayak’s performance and durability. Consider these options:
| Material | Pros | Cons |
|---|---|---|
| Wood | Beautiful, traditional aesthetic; easy to shape | Requires regular maintenance; can be heavy |
| Fiberglass | Lightweight; strong and durable | Can be expensive; may need repair after heavy use |
| Plastic | Affordable; very durable | Heavier than other options; limited design flexibility |
| Aluminum | Extremely durable; lightweight | Can be noisy; potentially heavier than fiberglass |
Dimensions and Stability
Size matters when building your canoe or kayak. Length, width, and weight capacity all contribute to stability.
- Length: Longer canoes are typically faster but harder to maneuver, while shorter ones offer more control.
- Width: Wider designs provide enhanced stability, making them ideal for beginners.
- Weight Capacity: Ensure your design accommodates all passengers and gear without compromising safety.
Design Features to Consider
Adding specific features can significantly improve your paddling experience. Here are some to think about:
- Seating: Comfortable and adjustable seats enhance paddling long distances.
- Storage: Integrated storage compartments are helpful for trips where gear is essential.
- Rocker: A design element that affects a canoe’s or kayak’s maneuverability. More rocker enhances turning ease.
- Bow and Stern Shapes: These should be shaped to slice through water efficiently. A pointed bow works well for cutting through waves.
Safety Considerations
Safety should never be overlooked in your design. Consider the following:
- Floatation: Incorporate flotation devices to prevent sinking.
- Stability Tests: Conduct tests in controlled conditions before taking it into unpredictable waters.
- Paddle Length: Choose paddles that complement your design dimensions and paddler height.
Common Mistakes to Avoid When Building a Wooden Canoe or Kayak
Building a wooden canoe or kayak can be a fulfilling project, but there are several common mistakes that many builders make along the way. Avoiding these pitfalls will help you create a craft that is not only beautiful but also safe and functional. Here are key points to consider as you embark on this exciting journey.
Choosing the Wrong Materials
Using the correct type of wood is crucial for the durability and performance of your canoe or kayak. Many amateurs may choose softwoods like pine, thinking they are easier to work with. However, hardwoods such as mahogany or oak provide better strength and longevity. Always opt for marine-grade plywood, which is specifically designed to resist moisture and prevent rot.
Neglecting Proper Plans
Having a solid set of plans or blueprints is vital. Some builders might skip this step, thinking their experience will guide them. This can lead to significant errors in cutting and assembly. Make sure to acquire plans from reputable sources like Chesapeake Light Craft or Glen-L Boat Plans to ensure accuracy.
Ignoring Joint Quality
Joint connections are the backbone of your canoe or kayak’s structure. If you neglect to pay attention to how you connect the pieces, you risk creating a weak structure. Here are a few tips on joints:
- Use Epoxy: Always use high-quality epoxy to bond joints. It provides excellent strength and waterproofing.
- Reinforce with Fiberglass: Adding a layer of fiberglass over joints can enhance strength and provide additional protection against water.
- Keep Your Edges Clean: When gluing, ensure your edges fit snugly for a cleaner bond.
Inadequate Weight Distribution
When constructing your wooden canoe or kayak, consider how the weight will distribute. A common mistake is to place heavy components unevenly, which can lead to instability. Ensure that heavier items, like seats and gear, are evenly distributed. This will help maintain proper balance and make your boat easier to handle.
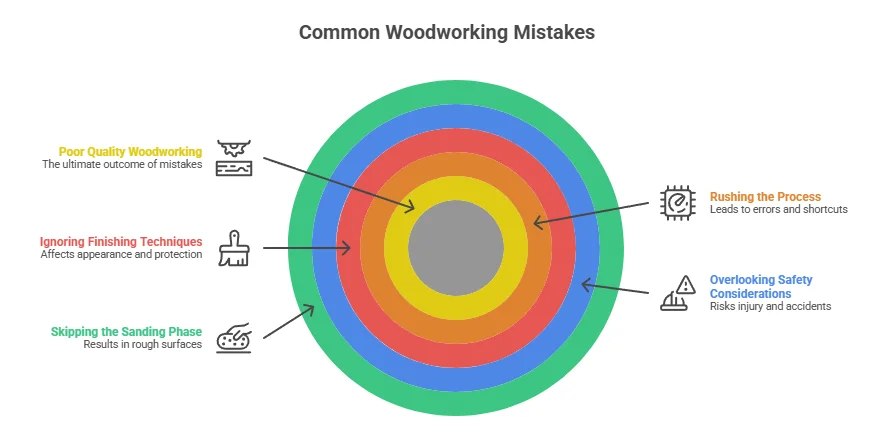
Skipping the Sanding Phase
Some builders may view sanding as an unnecessary step, especially if they believe their cuts are smooth. However, thorough sanding can make a significant difference in both the look and feel of your canoe or kayak. It also prepares the surface adequately for finishing, which helps protect the wood from the elements. Take your time with this process!
Overlooking Safety Considerations
Safety should always come first. Ensure that you follow safety guidelines throughout the construction process. This includes wearing a mask while sanding and using proper eye protection. Additionally, once your boat is complete, conduct tests in a controlled environment before taking it into open waters. Make sure your canoe or kayak is correctly equipped with necessary safety gear like life jackets and whistles.
Ignoring Finishing Techniques
Once you’ve completed your build, don’t overlook the finishing touches that can enhance both aesthetics and functionality. Applying a marine finish will protect wood from moisture and UV damage. Be sure to apply multiple coats and allow ample drying time between layers.
Rushing the Process
One of the biggest mistakes is rushing through the project. Building a wooden canoe or kayak is not a sprint; it’s a marathon. Take your time at each stage, ensuring that you’ve completed everything correctly before moving on to the next step. Impatience can lead to mistakes that may compromise your final product.
By avoiding these common mistakes and focusing on quality materials, thorough planning, careful construction, and the right finishing techniques, you can produce a durable and beautiful wooden canoe or kayak. Happy building!
Maintenance Tips for Keeping Your Wooden Canoe or Kayak in Top Shape
Owning a wooden canoe or kayak is a wonderful experience, but it also comes with the responsibility of regular maintenance to keep your vessel in pristine condition. Here are some essential tips to help you maintain your wooden canoe or kayak for years of enjoyable paddling.
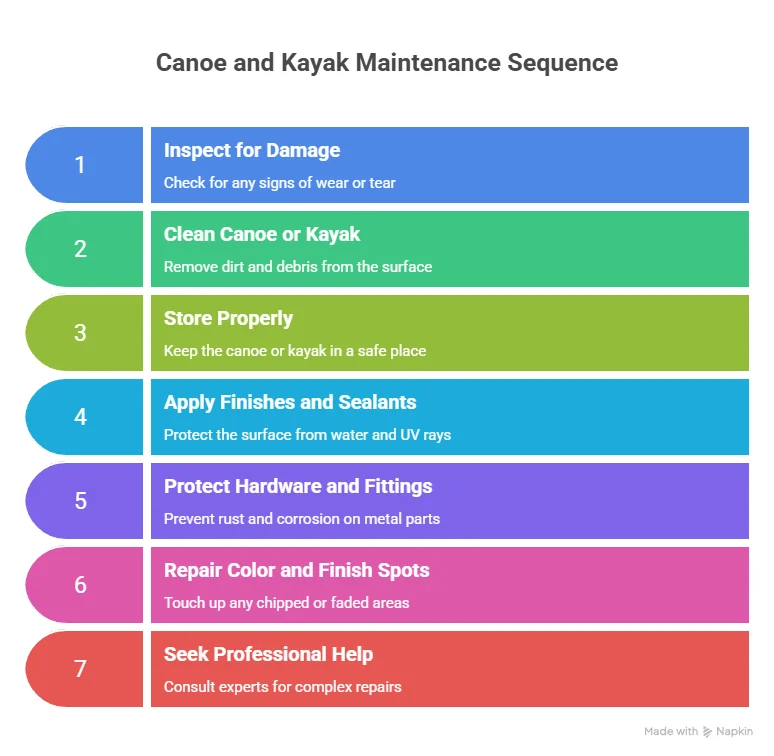
Inspect for Damage Regularly
It’s essential to regularly check your wooden canoe or kayak for any signs of wear or damage. Look for cracks, splinters, or signs of rot. Keep an eye on the seams where the wood joins, as these areas may be more prone to water damage. A periodical inspection will allow you to catch any issues early, ensuring your safety and extending the life of your watercraft.
Clean Your Canoe or Kayak
After every use, especially in muddy or sandy conditions, rinsing your canoe or kayak with fresh water is essential. This simple act helps prevent the build-up of debris that may cause damage over time. Use a gentle scrub brush for any stubborn stains but avoid harsh chemicals that may harm the wood.
Cleaning Steps:
- Remove any dirt or debris with a soft brush.
- Rinse with clean, fresh water.
- Dry completely to prevent mold and mildew.
Store Properly
How you store your wooden canoe or kayak plays a significant role in its longevity. Ideally, you should store it indoors in a cool, dry environment. If that’s not possible, use a cover to protect it from the elements. Avoid placing heavy objects on top of it, as this can cause deformation.
Storage Tips:
- Use a padded support system to store your canoe or kayak.
- Keep it away from direct sunlight to prevent fading and drying out the wood.
- Store it upside down to allow water to drain and prevent moisture accumulation.
Apply Finishes and Sealants
Maintaining the finish of your canoe or kayak is crucial. Regularly applying a quality marine varnish or sealant protects the wood from water damage, UV rays, and general wear and tear. Depending on your usage, you may want to reapply the finish every 1-2 years or whenever you notice the finish looking dull or worn.
Application Steps:
- Sand the surface lightly to ensure proper adhesion.
- Clean the surface of dust and debris.
- Apply the varnish or sealant according to the manufacturer’s instructions.
Protect Hardware and Fittings
Metal fittings and hardware can corrode, especially when exposed to water. Check these components regularly for rust and make necessary replacements. Consider using stainless steel or other rust-resistant materials during any repairs or replacements to avoid future issues.
Repair Color and Finish Spots
Over time, your canoe or kayak’s wood finish may fade or suffer from scratches. Touch up these areas promptly to prevent further damage. Use matching stain or varnish to blend repairs seamlessly with the existing wood.
Seek Professional Help When Needed
If you encounter significant damage or are unsure how to proceed with maintenance, don’t hesitate to contact a professional. A skilled boat repair technician can offer invaluable advice, perform repairs, or even provide maintenance services to ensure your canoe or kayak remains in excellent condition.
Resources and Further Reading
For more information about maintaining your wooden canoe or kayak, consider exploring the following resources:
By following these maintenance tips, you can keep your wooden canoe or kayak in top shape, ready for your next adventure on the water. Remember, a little effort goes a long way in preserving the beauty and functionality of your vessel.
Conclusion
Building a wooden canoe or kayak can be a rewarding and enjoyable project, allowing you to create a unique watercraft tailored to your needs. By following the step-by-step guide, you can confidently navigate the construction process, ensuring that each phase is manageable and engaging. Gathering essential tools and materials is crucial not just to streamline the building process but also to deliver a high-quality finish that will enhance your paddling experience.
As you design your canoe or kayak, remember to consider elements like stability, buoyancy, and aesthetics to create a watercraft that performs well and suits your style. Avoiding common mistakes—such as incorrect measurements or neglecting proper sealing—will save you time and frustration, helping you build a durable vessel that stands the test of time.
Once your canoe or kayak is complete, committing to regular maintenance will keep it in excellent condition for years of adventures. Simple tasks like checking for leaks, cleaning the hull, and applying protective coatings can significantly extend the life of your wooden craft.
Embarking on this journey not only allows you to connect with nature through paddling but also sparks creativity and boosts your woodworking skills. So gather your tools, consult your plans, and dive into the satisfying experience of building your very own wooden canoe or kayak. Your countless journeys on the water await!