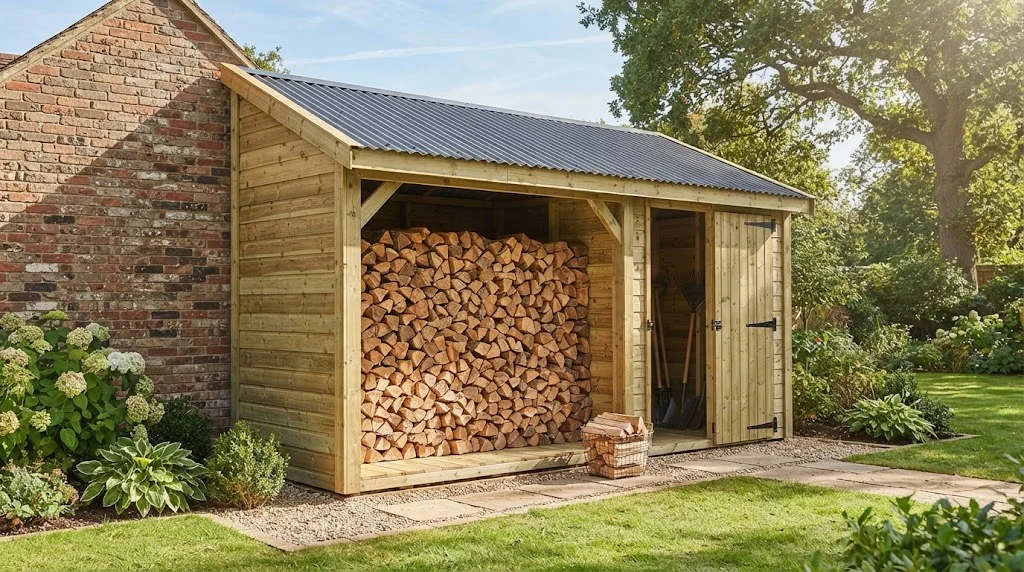
Building a Lean to Wood Shed is a practical and efficient way to store your outdoor tools and wood for the fireplace. This guide will walk you through the step-by-step process, ensuring you have a compact and sturdy structure. Let’s dive into the steps you need to follow to create your own Lean to Wood Shed.
The first thing you’ll need is a plan. Having a detailed plan allows you to visualize the project and gather all necessary materials. You can find many free plans online, such as on Wood Magazine. Choose a size that fits your needs and available space. Sketch out your ideas and take measurements to ensure accuracy.
Next, you’ll gather your materials. The basic supplies include:
- Pressure-treated wood for the frame
- Plywood or wood boards for the shed walls
- Roofing materials such as shingles or metal sheets
- Concrete blocks or a solid foundation material
- Wood screws and nails
- A door and hinges (if desired)
Prepare the site
Once you have everything ready, the next step is to prepare the site. Choose a location that is level and has good drainage. Clear any debris, rocks, or vegetation. For a solid foundation, consider laying concrete blocks or building a small gravel pad.
Building the frame
Now, it’s time to start building the frame. You will create a rectangular base with your pressure-treated wood. Cut the wood to size and use wood screws to join the corners, ensuring they are square. Use a level to check that everything is even as you work.
Construct the vertical posts
After the base is ready, construct the vertical posts. These should be tall enough to accommodate your roof pitch, allowing water to run off. Secure the posts to the corners of your base using screws. Then, connect horizontal beams at the top of the posts to create the roof structure.
Add the walls
Your next task is to add the walls. Use plywood or wood boards to create the walls. Cut them to size and attach them to the framing with wood screws. Be mindful of leaving space for a door if you plan to include one. This step not only adds stability but also provides a barrier against the elements.
Securing the roof
For the roof, you have options. A common choice is a slanted roof to facilitate drainage. Cut your roofing material to fit and secure it over the frame. If you’re using shingles, start from the bottom and work your way to the top, overlapping each row to prevent leaks.
Finishing up
After securing the roof, it’s time to finish up your Lean to Wood Shed. Add the door, attach hardware like hinges and a latch, and give it a coat of weather-resistant paint or stain to enhance durability. Not only does this protect your shed, but it also improves its appearance. For maintenance tips and more on preserving your wood shed, visit Woodworker’s Journal.
Install shelving units
Organize the interior of your shed. You can install shelving units to store smaller items or hooks for hanging tools. This maximizes space and keeps everything accessible. Make the most of your new structure by using it effectively.
Building a Lean to Wood Shed is not just about the structure; it’s about creating a functional space tailored to your needs. With careful planning and execution, you’ll have a sturdy shed that meets your storage requirements.
| Material | Quantity | Cost (Approx.) |
|---|---|---|
| Pressure-treated wood (4×4) | 4 | $40 |
| Plywood sheets | 4 | $80 |
| Roofing material | 1 set | $100 |
| Wood screws and nails | 1 box | $20 |
| Concrete blocks | 10 | $30 |

Taking this step-by-step approach will lead you to successfully building a How to Build a Lean to Wood Shed that is both functional and aesthetically pleasing. Enjoy your project, and remember that the more you practice woodworking, the better you will become. Happy building!
Essential materials and tools for constructing your wood shed
Building a wood shed can be a fulfilling project, but having the right materials and tools is essential. To ensure your project goes smoothly, it’s crucial to gather everything you need ahead of time. Understanding what you require will help you stay organized and focused.
Essential Materials
When constructing a wood shed, the following materials are essential for achieving a sturdy and reliable structure:
- Wood: Your primary material will be wood. Choose pressure-treated lumber for the frame to withstand the elements. For the walls and roof, plywood or OSB (oriented strand board) works well.
- Roofing Material: You can use asphalt shingles, metal sheets, or even a green roof system, depending on your preference and budget.
- Fasteners: Use galvanized nails or screws to prevent rust and corrosion. These fasteners will secure everything together, ensuring the longevity of your shed.
- Concrete: If you’re constructing a foundation, consider using concrete blocks or a concrete slab for a solid base.
- Insulation: If you plan to use your shed year-round, include insulation materials such as foam boards or fiberglass batts to keep it comfortable.
- Paint or Sealant: A good exterior paint or wood sealant will protect your shed from moisture and decay, enhancing its lifespan and aesthetics.
Recommended Tools
A solid set of tools will make your wood shed construction more efficient. Here’s a list of the basic tools you need:
- Measuring Tape: Precision is key in construction. A measuring tape helps ensure accurate measurements for your wood pieces.
- Circular Saw: This tool is excellent for cutting wood sheets and lumber efficiently. It ensures clean cuts, reducing waste.
- Power Drill: A good power drill is critical for driving screws and drilling holes. Consider having both drill bits and screwdriver attachments.
- Hammer: For nailing and delicate adjustments, a hammer is indispensable in your toolkit.
- Level: A level tool will help you make sure that your shed is built evenly and upright, preventing future issues.
- Safety Gear: Don’t forget gloves, a dust mask, and safety goggles to protect yourself while working.
Gathering Additional Supplies
Depending on your design and requirements, you may need additional supplies such as:
| Supply | Description |
|---|---|
| Windows | For natural light and ventilation, consider adding windows, which can also improve the overall aesthetic of your shed. |
| Doors | Choose a sturdy door that matches your design. Make sure it can securely close and lock if valuables will be stored inside. |
| Gutters | Installing gutters can help channel rainwater away from your shed, protecting its foundation. |

Planning Your Project
Before starting your construction, map out your projects, such as planning the dimensions, layout, and interior organization. Having a clear blueprint will save you time and reduce errors during the building process.
With the right materials and tools identified, you will be ready to build a wood shed that is both functional and durable. Ensure to take your time, follow safety protocols, and enjoy the process of creating your own wood shed!
Design considerations for an efficient lean to wood shed
When planning to build a How to Build a Lean to Wood Shed, it is vital to consider various design elements to ensure efficiency and functionality. The purpose of the shed will dictate many of your choices, from its size and shape to the materials used in construction. Let’s explore several key design considerations that will help you create a sturdy, practical, and aesthetically pleasing How to Build a Lean to Wood Shed.
Location and Orientation
The first step in building a successful How to Build a Lean to Wood Shed is selecting the right location. Make sure to choose a site that receives adequate sunlight and is free from overhanging branches that could cause damage. Also, consider the orientation of your shed:
- Sunlight Exposure: Position your shed so that it benefits from direct sunlight, which can help dry out wood and prevent rot.
- Wind Direction: Facing the open side away from prevailing winds can protect your wood from harsh weather elements.
In addition, you might want to place your shed close to your home or workspace for easier access and convenience.
Size and Dimensions
Determining the size of your How to Build a Lean to Wood Shed is essential for both functionality and aesthetics. Here are a few factors to consider:
- Intended Use: Think about what you will store, such as firewood, gardening tools, or outdoor equipment. This will help you decide on the necessary size.
- Available Space: Make sure the dimensions of your shed fit comfortably within your yard’s available space.
- Local Regulations: Some areas have restrictions on shed sizes. Check local building codes to comply with regulations.
Materials Selection
The choice of materials directly impacts the durability and visual appeal of your shed. Common materials for a How to Build a Lean to Wood Shed include:
- Wood: Aesthetically pleasing and easy to work with, wood is the traditional choice for shed construction. Select rot-resistant options like cedar or pressure-treated lumber.
- Metal: Galvanized steel or aluminum can provide a modern look with high durability, though this may have higher upfront costs.
- Roofing: Choose roofing materials that can withstand local weather conditions, such as shingles, corrugated metal, or even rubber roofing.
Ventilation
Proper ventilation is critical to prolonging the life of your stored wood and preventing mildew buildup. Here’s how to enhance ventilation:
- Windows: Install small windows that allow airflow while providing natural light.
- Ventilation Openings: Create gaps near the roofline and eaves to facilitate air circulation.
Foundation and Base
A stable foundation is crucial for the longevity of your How to Build a Lean to Wood Shed. Consider the following options:
- Concrete Slabs: A concrete slab provides a solid, flat base that can support heavy loads.
- Skids: Using skids allows for easy relocation of the shed and keeps it off the ground, minimizing moisture exposure.
Aesthetic Considerations
An attractive How to Build a Lean to Wood Shed can enhance your property’s appearance. Here are some ways to improve the aesthetics:
- Color Schemes: Choose colors that complement your home and surroundings.
- Landscaping: Planting flowers or shrubs around the shed can create a more inviting atmosphere.
Common mistakes to avoid when building a lean to wood shed

Building a Lean to Wood Shed can be a rewarding project, but it’s important to avoid common mistakes that could lead to structural issues or wasted time and resources. Proper planning and execution are key to ensuring your shed stands the test of time. Here are some common pitfalls and how to avoid them.
Choosing the Wrong Location
One of the primary mistakes people make is selecting an inappropriate location for their Lean to Wood Shed. Consider these factors:
- Drainage: Ensure your shed is on higher ground or a slope to avoid water pooling underneath.
- Sunlight: Think about shade from trees; too much can lead to dampness and rot.
- Accessibility: Ensure you can easily access the shed for loading and unloading supplies.
Ignoring Building Codes
Before you start construction, check local building codes. Ignoring these regulations can lead to fines or even having to dismantle your shed. Always verify:
- The required permits for structures of this size.
- Height and setback restrictions based on local zoning laws.
- Any specific requirements for foundations, especially in flood zones.
Underestimating Material Requirements
It’s easy to miscalculate the amount of wood and other materials you’ll need. Here’s how to avoid this mistake:
- Plan your design: Create clear blueprints, including dimensions and measurements.
- Take inventory: List out all materials required, including lengths for beams and numbers of screws or nails.
- Account for waste: Always buy about 10% more material than your calculations to cover errors and cuts.
Not Creating a Solid Foundation
A firm foundation is crucial for the longevity and stability of your wood shed. Common foundation errors include:
- No foundation: Building directly on the ground can lead to rot and instability. Consider using concrete blocks or a gravel base.
- Uneven surface: An unlevel foundation will cause your shed to be uneven, leading to potential structural issues.
Ineffective Ventilation and Insulation
Many people overlook ventilation when building their shed. If you plan to store items that need to stay dry or pulld a line of tools, consider these tips:
- Add vents: Install vents on the upper and lower parts of the walls for air circulation.
- Insulate if necessary: If storing sensitive materials, consider adding insulation to regulate temperature.
Failing to Plan the Roof Structure
The roof is a critical part of your Lean to Wood Shed. Make sure to avoid these mistakes:
- Improper pitch: Design a roof with enough slope so that rain and snow can easily run off.
- Choosing the wrong materials: Select roofing materials that are weather-resistant and suit your climate.
Neglecting Aesthetics
While functionality is key, don’t overlook how your shed looks. An unattractive shed can lower the value of your property. Here’s what to keep in mind:
- Coordinate colors: Use colors that complement your home and yard.
- Architectural style: Choose a design that fits well with the existing structures in your area.
Failure to Regularly Maintain the Shed
Your Lean to Wood Shed will require maintenance even after construction is complete. Regular check-ups can prevent bigger problems. Remember to:
- Check for signs of rot or pest infestations.
- Repaint or stain the exterior as needed to protect the wood.
- Inspect the roof and siding to ensure they are in good condition.
Maintenance tips to prolong the life of your wood shed
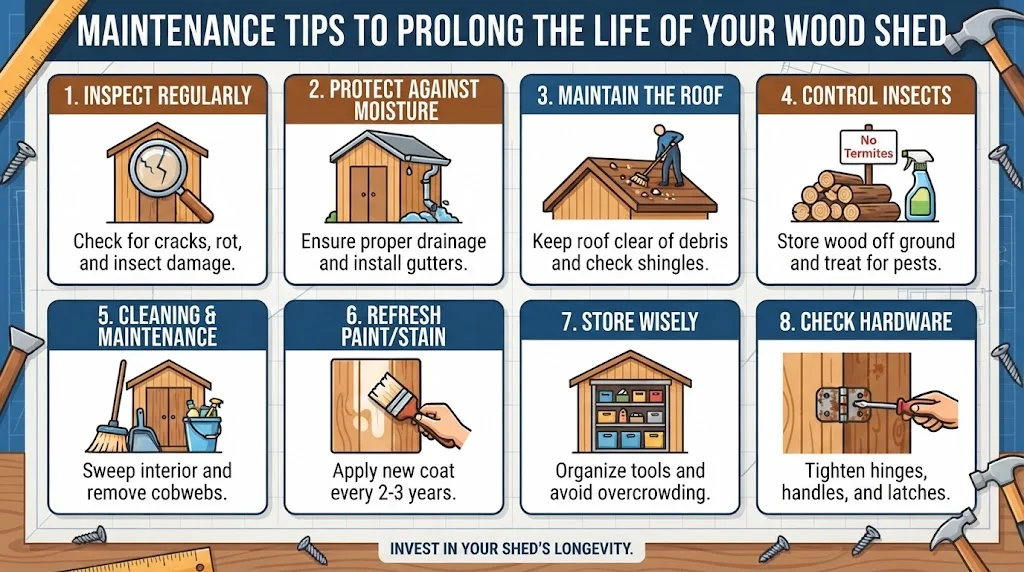
Wood sheds are a great investment for organizing your outdoor space and protecting your gardening tools or seasonal equipment. However, to ensure that your wood shed lasts for years to come, establishing a routine maintenance plan is essential. Below are some practical and effective tips that will help you prolong the life of your wood shed.
Inspect Regularly
Routine inspections play a critical role in maintaining your wood shed. Make it a habit to check your shed for any signs of wear and tear. Here’s what to look for:
- Cracks in the structure
- Wood rot or decay
- Insect infestations
- Loose or damaged roofing
If you find any issues, address them promptly. Repairing small problems can prevent larger, more expensive repairs down the line.
Protect Against Moisture
Moisture is one of the biggest threats to any wood structure. Here are some ways to protect against it:
- Proper Ventilation: Ensure your shed has adequate airflow. This minimizes humidity levels inside the shed.
- Gutter Installation: Install gutters to channel rainwater away from your shed.
- Sealants: Use a good quality sealant on the wood surfaces. Clear sealants can maintain the natural look while providing waterproof protection.
Maintain the Roof
Your shed’s roof is vital for protecting its contents. Consider these roof maintenance tips:
- Regularly check for leaks or damage.
- Clear debris off the roof to prevent moisture buildup.
- Inspect shingles or roofing material for wear, and replace as necessary.
Control Insect Infestations
Insects can weaken the structure of your wood shed, particularly carpenter ants and termites. To combat this:
- Store wood off the ground, using racks or pallets.
- Apply an insect repellent treatment designed for wood.
- Consult professionals for inspections and treatments if necessary.
Cleaning and Maintenance
A clean shed can last significantly longer. Here’s how to keep it tidy:
- Dust and Sweep: Regularly remove dirt and debris from the interior.
- Remove Cobwebs: Check corners and crevices to keep insects at bay.
Refresh Paint or Stain
Regularly updating the paint or stain can protect against the elements. Consider these options:
- Choose an exterior-grade paint or stain that’s suitable for wood.
- Apply a new coat every 2-3 years, or as needed based on wear.
Store Wisely
How you store items inside your wood shed matters. Here are some tips:
- Keep heavy items on the lower shelves to prevent tipping.
- Avoid overcrowding to maintain airflow.
- Use bins and racks for better organization.
Taking these simple maintenance steps can significantly prolong the life of your wood shed. Not only will this keep your shed looking nice, but it will also help protect the items you store inside. For more detailed guides and resources on caring for your wood structures, check out Better Homes & Gardens and Wood Magazine.
Conclusion
Building a Lean to Wood Shed can be a rewarding project that enhances your outdoor space while providing necessary storage. With the right step-by-step guide, you can confidently navigate through the construction process. Remember to gather all essential materials and tools beforehand to ensure a smooth build. design considerations such as size, location, and ventilation will further enhance the functionality of your shed and make it well-suited to your needs.
Avoiding common mistakes is crucial in achieving a successful outcome. Keep an eye on measurements, foundation stability, and weatherproofing to prevent issues down the line. As you embark on your construction adventure, staying informed will save you time and effort.
Once your Lean to Wood Shed is complete, regularly maintaining it will prolong its life and ensure it continues to serve you well. Routine inspections for weather damage, wood rot, and cleanliness can protect your investment and keep it looking great for years to come.
By following these guidelines and insights, you can build a sturdy, functional, and attractive Lean to Wood Shed that meets your storage needs. Embrace the project with enthusiasm, and you’ll not only end up with a practical addition to your property but also enjoy the satisfaction of completing a DIY endeavor. Happy building!