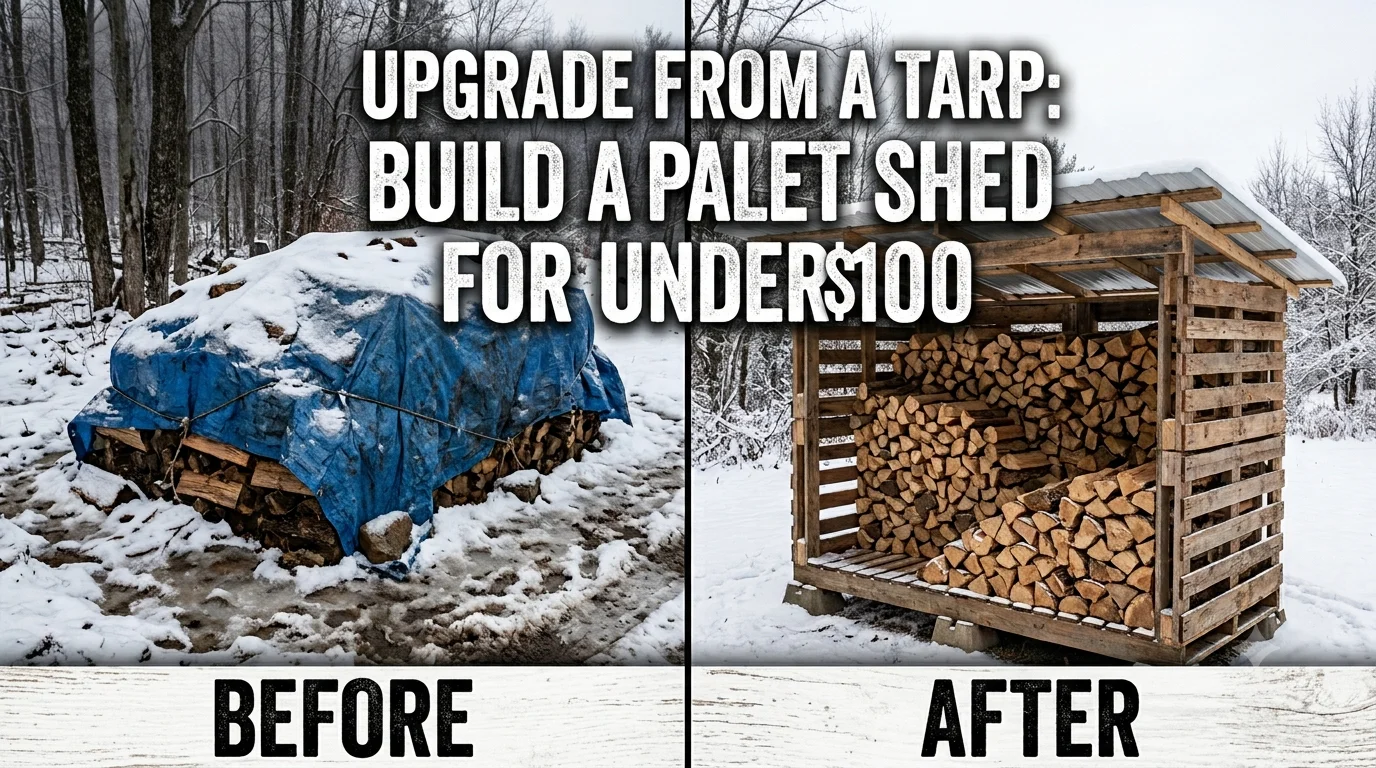
Why a Firewood Shed Beats a Tarp Every Time
Before grabbing tools, it’s worth understanding why this small structure earns its keep so quickly.
- It keeps wood dry from the top and the ground. Tarps trap moisture underneath just as often as they block it from above, which leads to mold, rot, and wood that hisses and smokes instead of burning clean.
- It protects your investment. Whether you bought a cord of wood or spent a whole weekend splitting it yourself, a shed protects that effort from being wasted by weather damage.
- It keeps pests where they belong — outside. A raised, ventilated shed discourages the termites, ants, and rodents that love to nest in damp wood piles.
- It burns better, plain and simple. Seasoned, properly dried wood lights faster, burns hotter, and produces far less smoke and creosote buildup in your chimney.
None of this requires a fancy build. It just requires a smart one.
The Secret to Staying Under $100: Think Salvage First, Lumber Yard Second
The biggest budget-killer in any outdoor project is buying everything brand new. Skip that trap entirely by treating your local area like a free materials warehouse before you ever step into a hardware store.
- Pallets make excellent framing, flooring, and even walls, and they’re often free for the taking behind hardware stores, garden centers, and warehouses if you simply ask.
- Reclaimed fence panels or deck boards from a neighbor’s renovation project can supply siding or roofing at zero cost.
- Corrugated metal roofing scraps or leftover shingles from a roofing job can often be picked up free or dirt cheap from local contractors.
- Facebook Marketplace and Craigslist “free” sections are goldmines for exactly this kind of material — search terms like “free pallets,” “free lumber,” or “scrap wood” regularly turn up usable finds.
Once you’ve gathered what you can for free, fill in the gaps with a short shopping list from a hardware store like Home Depot or Lowe’s — just screws, a roll of roofing felt, and maybe a few pressure-treated posts if your salvaged materials don’t cover it.
What You’ll Actually Need
Here’s a simple materials list built around a shed roughly 8 feet wide, 4 feet deep, and 5 feet tall — enough to hold about a half to a full cord of wood, depending on how tightly you stack it.
- 4 pressure-treated 4×4 posts for the corners (roughly $8–$12 each if bought new, often free if scavenged from an old deck).
- Salvaged pallets for the back wall and side panels, broken down and reassembled as needed.
- 2×4 lumber for the roof frame and any structural bracing (buy new if needed, roughly $4–$6 per board).
- Corrugated metal panels or leftover shingles for the roof.
- A roll of roofing felt or a tarp as a waterproof underlayer beneath the roofing material.
- A box of exterior-grade deck screws (roughly $10–$15 for a full box, and you’ll use far less than you think).
- Concrete deck blocks or paver stones to keep the base off the ground and prevent rot.
If you’re resourceful with your scavenging, most builders land somewhere between $60 and $95 total, leaving room in the budget even if a few unexpected purchases pop up.
Picking the Right Spot Before You Build Anything
Location matters just as much as construction quality. A poorly placed shed will fight against you no matter how well it’s built.
- Choose a spot with good drainage — never a low point in your yard where water naturally pools after rain.
- Position it for sun and wind exposure. A spot that catches afternoon sun and a bit of breeze will season and dry your wood far faster than a shaded, still corner of the yard.
- Keep it a reasonable distance from your house for practicality, but not so far that hauling wood inside becomes a daily chore in the middle of winter.
- Check local codes if you’re near a property line. Many municipalities allow small utility structures like this without a permit, but it’s worth a quick check if you’re building close to a boundary.
Designing for Airflow — The One Detail You Cannot Skip
This is the single most important design principle in the entire build, and it’s the one detail that separates a shed that actually seasons wood from one that just creates a fancy-looking damp pile.
- Leave the front completely open or use widely spaced slats rather than solid walls, so air can constantly move through the stack.
- Use gapped pallet boards for the back and sides instead of solid sheathing — the small gaps between boards are a feature, not a flaw.
- Raise the floor off the ground using deck blocks, pavers, or even a base layer of pallets, so ground moisture never wicks directly into your wood.
- Angle the roof slightly so rain and snow shed off the back rather than pooling on top.
A shed with great airflow will season green wood faster and keep already-dry wood from reabsorbing moisture, which matters just as much as the roof overhead.
Building the Base So Everything Stays Dry From Day One
Start by leveling your chosen spot and laying out concrete deck blocks or pavers in a simple grid pattern, spaced to support the weight of a loaded pallet floor. This raised base is what keeps ground moisture from creeping into your wood pile, and it takes less than an hour to set up correctly.
- Lay two or three pallets flat across the deck blocks to create the floor.
- Check that the floor sits level using a basic level tool, adjusting the blocks underneath as needed.
- Secure the pallets together with a few screws if they shift at all when you step on them.
This simple raised floor alone solves the majority of the moisture problems that plague uncovered wood piles.
Framing the Walls and Structure
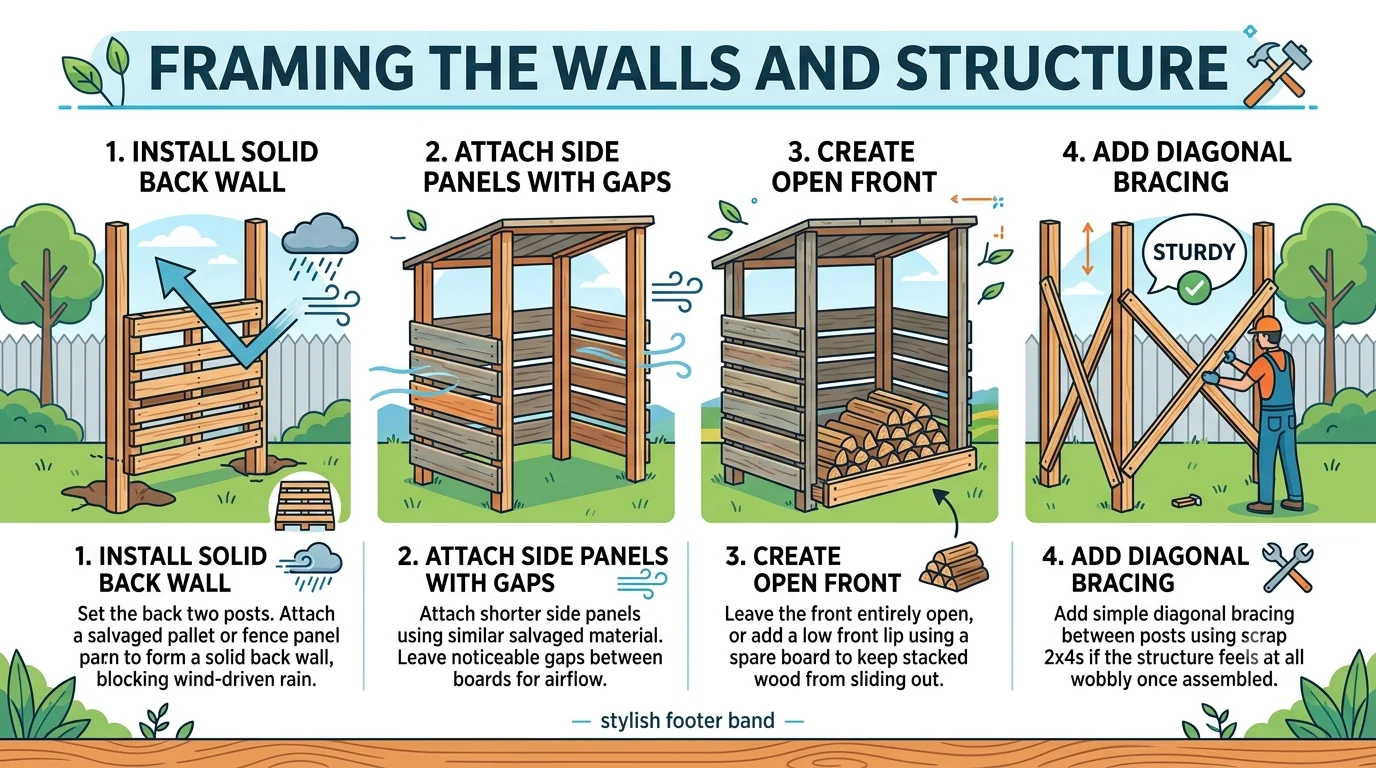
With your base solid, set your four corner posts into place, either sunk directly into the ground with quick-set concrete or bolted to the base frame if you want the shed to be movable later.
- Set the back two posts and attach a salvaged pallet or fence panel to form the solid back wall, which blocks wind-driven rain.
- Attach shorter side panels using the same salvaged material, leaving noticeable gaps between boards for airflow.
- Leave the front entirely open, or add a low front lip using a spare board to help keep stacked wood from sliding out.
- Add simple diagonal bracing between posts using scrap 2x4s if the structure feels at all wobbly once assembled.
You don’t need perfectly matched, uniform materials here. A shed made of mismatched, reclaimed pallets is just as functional as one made from pristine new lumber — rustic charm included at no extra charge.
Topping It Off With a Roof That Actually Sheds Water
The roof is where most of your remaining budget will go, and it’s worth doing right since it’s your primary defense against rain and snow.
- Frame a simple sloped roof using 2x4s, angled from a higher point at the back to a lower point at the front for water runoff.
- Lay roofing felt or a heavy tarp across the frame first as a waterproof base layer.
- Top it with corrugated metal panels, which are lightweight, inexpensive, and highly weather-resistant, or use leftover shingles if you have access to them.
- Let the roof overhang the front and sides by several inches so rain drips clear of your wood stack instead of running down the walls.
If you’re looking for visual inspiration or slightly more detailed framing diagrams, sites like Family Handyman and This Old House both feature simple outdoor structure tutorials that pair well with this build.
Stacking Your Wood the Smart Way
A great shed can still underperform if the wood inside it is stacked poorly. Keep these principles in mind once your structure is finished:
- Stack with the bark facing up on the top row to help shed any rain that makes it past the roof overhang.
- Leave small gaps between rows rather than packing wood in tightly, so air can continue circulating through the pile.
- Stack newest wood at the back and pull from the front, so older, more seasoned wood always gets used first.
- Avoid stacking directly against the back wall — leave an inch or two of space so air can move behind the pile as well as through it.
Keeping the Total Cost Under $100
Here’s a realistic breakdown of where your money goes when you prioritize salvaged materials:
- Posts and framing lumber: $25–$35 (less if scavenged)
- Pallets and reclaimed siding: $0 (free, if sourced locally)
- Roofing felt and metal panels: $25–$40
- Screws and hardware: $10–$15
- Concrete deck blocks: $10–$15
That lands most builds comfortably between $70 and $95, with plenty of room to spare if you’re patient about sourcing free materials rather than rushing to buy everything new in one trip.
Smart Tips to Save Even More
- Ask local businesses directly. Garden centers, appliance stores, and hardware stores often give pallets away simply because hauling them off is a hassle for them.
- Time it around a renovation season. Spring and early summer bring a wave of homeowners tearing out old fences and decks, which means free lumber posted online almost daily.
- Buy hardware in bulk rather than piecemeal. A single box of screws is almost always cheaper per unit than buying several small packs.
- Repurpose an existing structure. If you already have a lean-to, old shed wall, or fence section, building your firewood shed directly against it can cut your material needs significantly.
Mistakes That Quietly Ruin an Otherwise Great Build
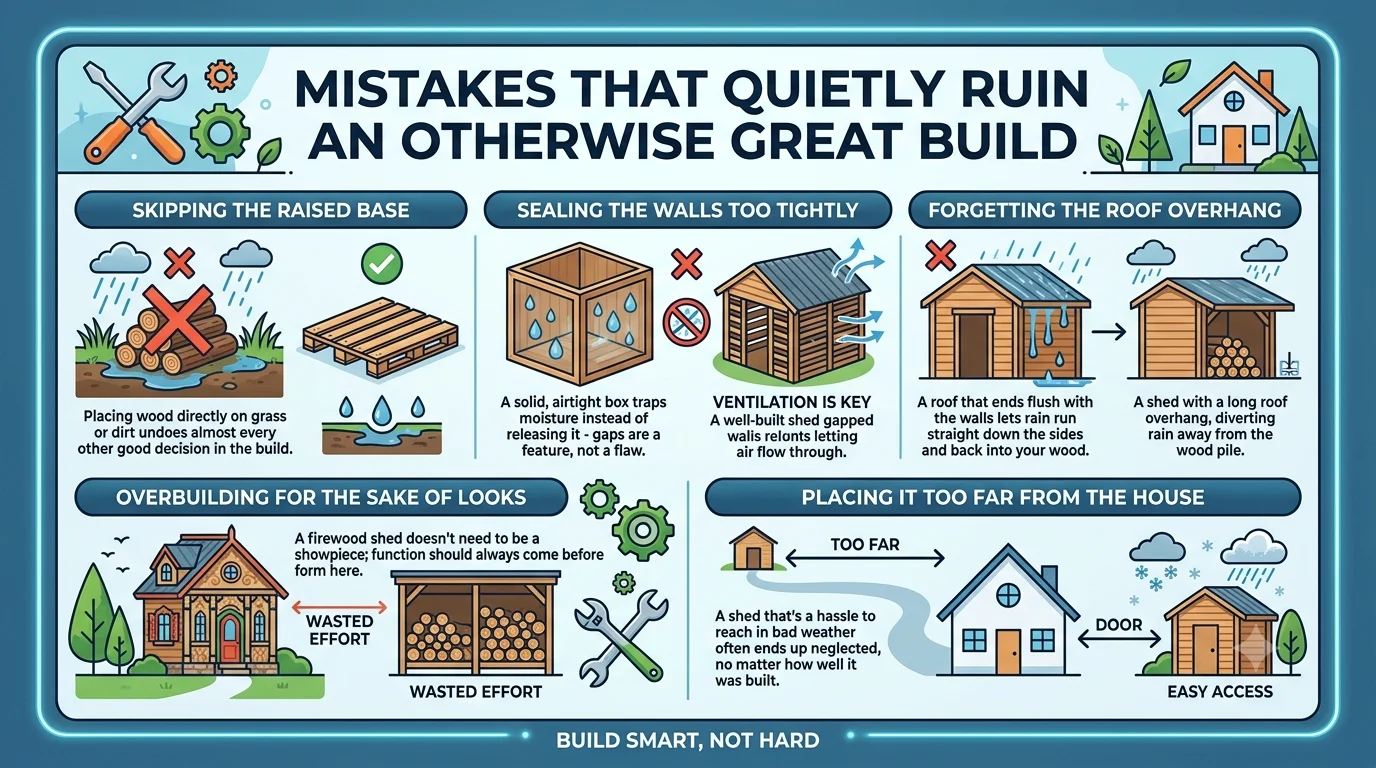
- Skipping the raised base. Placing wood directly on grass or dirt undoes almost every other good decision in the build.
- Sealing the walls too tightly. A solid, airtight box traps moisture instead of releasing it — gaps are a feature, not a flaw.
- Forgetting the roof overhang. A roof that ends flush with the walls lets rain run straight down the sides and back into your wood.
- Overbuilding for the sake of looks. A firewood shed doesn’t need to be a showpiece; function should always come before form here.
- Placing it too far from the house. A shed that’s a hassle to reach in bad weather often ends up neglected, no matter how well it was built.
Adjusting the Design for Your Climate
Not every region has the same weather challenges, and a few small tweaks can make your shed work even better depending on where you live.
- Heavy snow regions benefit from a steeper roof pitch so snow load slides off rather than building up and stressing the frame over winter.
- Windy, exposed areas do better with a partial side wall on the prevailing wind side, blocking driving rain while still leaving the opposite side open for airflow.
- Humid, coastal climates should prioritize even more ventilation gaps than usual, since ambient moisture in the air alone can slow seasoning without strong airflow to counteract it.
- Hot, dry climates can get away with a smaller roof overhang and less wall coverage overall, since rain protection matters less than simple shade and pest control.
Take a moment before you start cutting to think through which of these situations applies to your yard. A five-minute adjustment to the plan up front can save you from rebuilding a section later.
Simple Upgrades If You Want to Go Slightly Beyond the Basics
Once the core structure is finished, a few optional additions can make the shed more functional without pushing your budget much past the $100 mark.
- Add a small side compartment for kindling and fire-starting materials, keeping everything you need for lighting a fire in one dry, organized spot.
- Attach a simple latch or hook to a spare board so you can secure a tarp over the open front during particularly severe storms without sacrificing daily airflow.
- Paint or stain the exposed frame with leftover exterior paint from another project, extending the life of the wood for next to nothing.
- Install a scrap piece of gutter along the roof’s low edge to direct runoff away from the areas where you walk to grab wood, keeping the ground in front from turning to mud.
None of these upgrades are necessary for the shed to function well, but they’re inexpensive ways to make daily use just a little more convenient, especially during the coldest, snowiest stretches of the season when every trip outside counts.
Maintaining Your Shed So It Lasts for Years
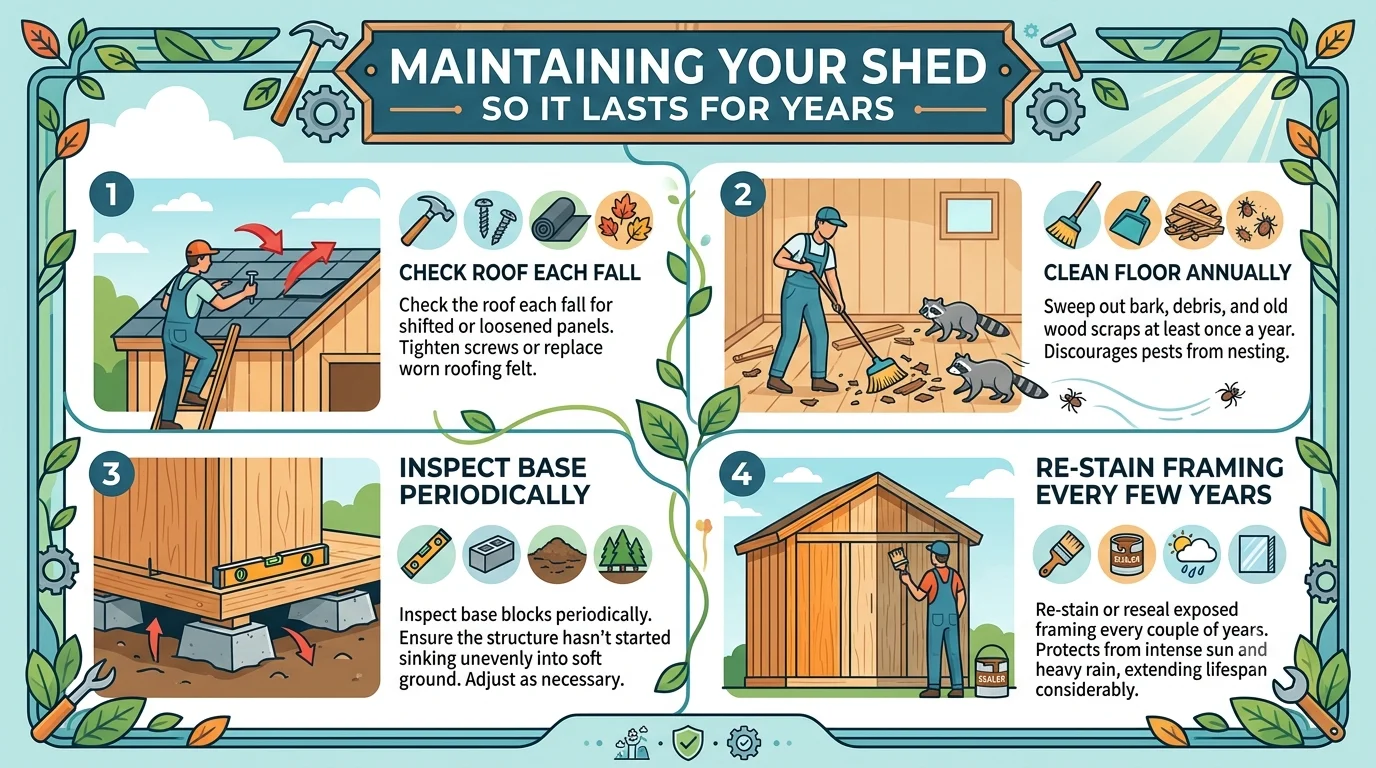
A firewood shed built from salvaged materials can easily last five to ten years or more with a small amount of seasonal upkeep.
- Check the roof each fall for any panels that have shifted or loosened over the summer, tightening screws or replacing worn roofing felt as needed.
- Sweep out bark, debris, and old wood scraps from the floor at least once a year to discourage pests from nesting.
- Inspect the base blocks periodically to make sure the structure hasn’t started sinking unevenly into soft ground, adjusting as necessary.
- Re-stain or reseal exposed framing every couple of years if you live somewhere with intense sun or heavy rain, extending the structure’s lifespan considerably.
Because this build relies on simple, replaceable materials rather than complex construction, repairs are almost always quick and cheap. A cracked pallet board or a shifted roof panel can typically be swapped out in under thirty minutes.
Frequently Asked Questions About Building a Firewood Shed
How much wood can a shed this size actually hold?
A shed built at roughly 8 feet wide, 4 feet deep, and 5 feet tall will comfortably hold a half to full cord of wood, depending on how tightly it’s stacked and how much airflow gap you leave between rows.
Do I need a permit to build one of these?
Most small, open-air utility structures like a firewood shed fall well below the size threshold that triggers permitting requirements, but rules vary by location. A quick call to your local building department is worth the five minutes if you’re unsure, especially if you’re building near a property line.
Can I build this without any power tools?
Yes, though a basic drill and a circular saw will save significant time and effort. If you don’t own either, many hardware stores rent tools by the day for a small fee, which is still far cheaper than buying new tools for a single project.
How long does wood actually take to season inside a shed like this?
Properly split hardwood typically takes six months to a year to fully season with good airflow, while softer woods can season in as little as three to six months. A well-ventilated shed speeds this process up considerably compared to wood left uncovered or stacked in a solid, airtight structure.
What’s the single most important thing to get right on a tight budget?
Airflow. You can build with mismatched, ugly, free materials and still end up with a shed that works beautifully, as long as air can move freely through and around the wood. Skimp on materials before you ever skimp on ventilation.
Your Wood Deserves Better Than a Tarp
Building a firewood shed for under $100 isn’t about cutting corners — it’s about spending your limited budget on the details that actually matter, like airflow, a raised base, and a roof that sheds water properly, while sourcing everything else through a little patience and some free salvaged materials. A weekend of effort now means dry, clean-burning wood all winter long, and a structure sturdy enough to keep doing its job for years to come.
There’s also something quietly satisfying about a build like this one. Unlike a big-ticket renovation project, a firewood shed is small enough to finish in a single weekend, forgiving enough that mismatched, reclaimed materials only add character, and useful enough that you’ll notice the payoff the very first time you reach for a dry log during a snowstorm instead of wrestling with a frozen, soaked tarp. It’s the kind of practical, low-cost project that pays for itself many times over in convenience alone, long before you factor in the wood it actually protects.
Grab a drill, round up some free pallets, and get building. Your future self, reaching for a dry log on the coldest night of the year, will thank you.