 ATTENTION: World's Largest Collection of 16,000 Woodworking Plans!
Stop struggling with incomplete plans that waste your time and money!
Step-by-step instructions that make woodworking super easy, even for beginners
Detailed schematics, cutting lists, and materials lists for every project
Get new plans monthly for life - no recurring fees or hidden costs
Request custom plans for your unique projects at no extra charge
Get 4 valuable bonuses including woodworking guides and business tips
GET INSTANT ACCESS NOW!
ATTENTION: World's Largest Collection of 16,000 Woodworking Plans!
Stop struggling with incomplete plans that waste your time and money!
Step-by-step instructions that make woodworking super easy, even for beginners
Detailed schematics, cutting lists, and materials lists for every project
Get new plans monthly for life - no recurring fees or hidden costs
Request custom plans for your unique projects at no extra charge
Get 4 valuable bonuses including woodworking guides and business tips
GET INSTANT ACCESS NOW!
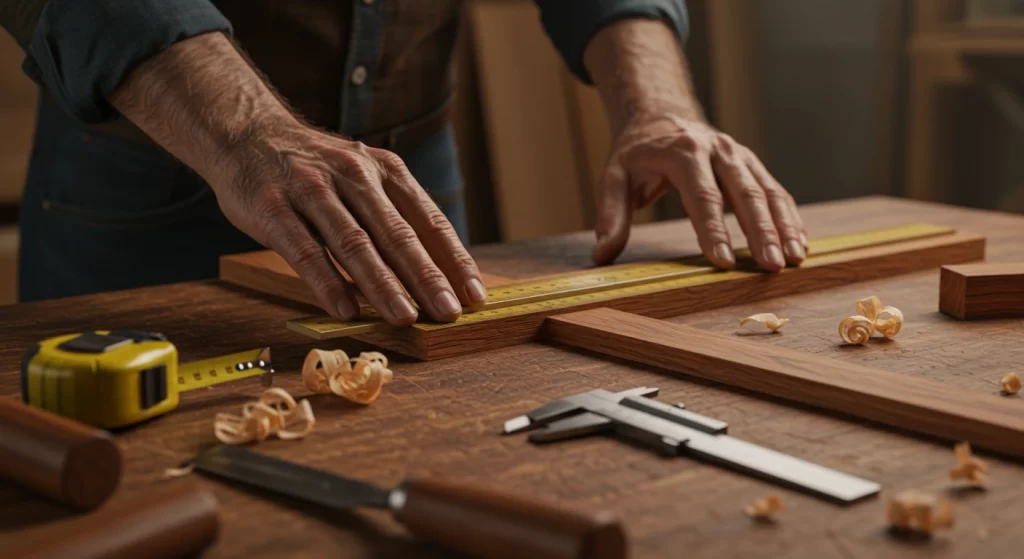
Accurate measurements are the backbone of successful woodworking projects. For beginners, mastering woodworking measuring techniques is critical to ensure precision and avoid costly mistakes. Here, we will explore several essential techniques that will help you expand your measuring skills and enhance your woodworking capabilities.
Understanding Basic Measuring Tools
Before diving into specific techniques, it’s vital to know the basic measuring tools you’ll use. Here are some common ones:
- Measuring Tape: Flexible and portable, perfect for measuring long distances.
- Yardstick: A straight measuring stick, useful for quick, straight measurements.
- Square: Essential for ensuring right angles, particularly when cutting and assembling joints.
- Calipers: Great for measuring small, precise dimensions.
- Ruler: A reliable tool for smaller measurements, typically marked in both inches and centimeters.
Employing the Measuring Tape
The measuring tape is one of the most versatile tools in woodworking. Here are a few tips to maximize its effectiveness:
- Read the Measurements Carefully: Make sure you’re aligning the measure starting at zero, as some tapes have a hook that may cause confusion.
- Use the Lock Mechanism: Lock the tape in place to get accurate measurements without it sliding back.
- Measure Twice, Cut Once: This age-old adage is your best friend. Always double-check your measurements to ensure they are correct.
Using the Square for Precision
The square is crucial for marking precise cuts. Here’s how you can effectively use it:
- Check for 90-Degree Angles: Use your square to ensure that any edges you are working with meet at right angles.
- Marking Cuts: Position the square against the edge of your material, and use it as a guide to mark straight lines for cutting.
Calipers for Small Measurements
If you’re working on delicate parts or need precise interior measurements, calipers are ideal. Here are some insights:
- Measuring Thickness: Use the jaws of the caliper to measure the thickness of wood pieces accurately.
- Interior and Exterior Measurements: Switch between inside and outside measurement functions for versatile usage.
Marking Techniques
Once you have taken your measurements, marking them correctly is equally important. Here’s how to do it effectively:
- Pencil Marks: Always use a fine-point pencil for clear markings that can easily be read.
- Mark the Cut Lines: Clearly indicate where you need to cut to avoid confusion later.
- Stay on the Material: Whenever possible, mark the wood on the waste side of your cuts to guarantee accuracy.
Using a Reference Point
When measuring larger pieces of wood, establish a reference point. This helps ensure that all measurements stem from the same location, which simplifies the process. Here’s how:
- Choose One Corner: Use one corner of your board as a reliable starting point for each measurement.
- Mark with Clarity: Always indicate the reference point clearly, allowing for easy alignment with other pieces.
Checking for Square
After cutting, it’s essential to double-check for square. You can do this by:
- Using a Framing Square: Place the square against the edges to ensure you have perfect right angles.
- Diagonal Method: Measure diagonally from corner to corner. If both measurements are the same, your frame is square.
The skills you develop in woodworking measuring techniques will significantly influence the quality of your final products. For comprehensive insights into woodworking and relevant tools, explore resources at Wood Magazine or Woodworker’s Source.
By honing these fundamental techniques, you can level up your woodworking skills, leading to more impressive and precise projects. Remember, practice makes perfect, so get out there and start creating!
The Importance of Accurate Measurements in Woodworking Projects
Accurate measurements are critical in woodworking, impacting both the success of your project and the overall quality of the finished product. Whether you are a beginner or an experienced woodworker, understanding various measuring techniques can enhance your skills and ensure precision in your work.
Why Accuracy Matters
When engaging in woodworking, you may have a vision for your project that includes unique dimensions and intricate designs. However, without accurate measurements, your vision may not come to life as expected. Here are a few reasons why accurate measurements matter:
- Fit and Finish: Without proper measurements, pieces may not fit together correctly, leading to gaps or misalignment.
- Materials Waste: Inaccurate measurements often result in cutting mistakes, leading to wasted wood and cost overruns.
- Structural Integrity: Ensuring each piece is measured correctly helps maintain the overall strength and stability of the project.
Essential Woodworking Measuring Techniques
Utilizing the right measuring tools and techniques can dramatically improve the accuracy of your woodworking projects. Here are several essential methods:
1. Measuring Tape
The measuring tape is one of the most versatile tools in a woodworker’s arsenal. When using a tape measure:
- Always extend the tape fully to avoid inaccuracies.
- Ensure it is flat against the surface you are measuring.
- Check if the tape’s hook is secure before taking any measurements.
2. Square or Framing Square
A square is crucial, especially when you need to create right angles. It is also helpful in checking the squareness of cut pieces. Here’s how to use a square effectively:
- Align the square flush against the edge of the material.
- Mark along the edge of the square for precise cutting lines.
3. Calipers
Calipers offer a way to measure both internal and external dimensions. This tool is particularly useful for intricate parts of your project:
- Use them to ensure your joints fit together tightly.
- For precision, they can also measure the depth of holes, ensuring all parts meet correctly.
4. Marking Tools
After measuring, marking is the next step to achieving accuracy. You might consider:
- Pencil: Ideal for temporary marks that can be erased or sanded away easily.
- Carpenter’s Pencil: Offers a finer point for detailed markings.
Maintaining Measurement Consistency
Maintaining consistency in your measurements is another vital aspect of woodworking. Consider these strategies:
- Always double-check measurements before cutting.
- Keep a measuring log, especially for larger projects, to track your dimensions.
- Calibrate your tools regularly to ensure they remain accurate.
Error Management in Woodworking
No matter how careful you are, errors may still occur. Here’s how to address them:
- Identify the error source: Was it the tool, technique, or the material itself?
- Adjust the cut instead of scrapping materials when possible.
- Learn from mistakes by documenting them to prevent future occurrences.
Utilizing Digital Tools
Modern woodworking has embraced technology, and several digital tools can assist with measurement accuracy:
- Laser Measuring Tools: These devices can provide precise measurements over longer distances.
- Digital Calipers: Offer instant readings and can reduce human error in measurement.
Resources for Further Learning
To explore more about woodworking measuring techniques, consider checking out these resources:
In the world of woodworking, the old adage “measure twice, cut once” holds more truth than ever. By mastering accurate measuring techniques, you will not only improve the quality of your projects but also derive greater satisfaction from your craftsmanship. Whether you are building furniture, cabinets, or intricate decor, taking the time to measure accurately is an essential skill that lays the foundation for success.
Tools You Need for Effective Woodworking Measurements

Accurate measurements are crucial in woodworking, ensuring that your projects fit together flawlessly. The right tools can make all the difference in achieving precision. Let’s explore some essential tools you need for effective woodworking measurements and how they contribute to the success of your craft.
Measuring Tape
A measuring tape is one of the most basic yet crucial tools in woodworking. It’s flexible and can easily measure large pieces of wood or awkward angles.
- Length: Most tapes extend between 16 to 25 feet, allowing for versatile measurement capabilities.
- Lock Feature: A locking mechanism ensures that the measurement remains stable while you take readings.
- Retractable: Tapes retract neatly, making them portable and easy to store.
Square
A woodworker’s square, often referred to as a framing square or a combination square, is indispensable for marking and checking right angles.
- Types: Combination squares typically include a ruler and a movable head for versatile measurements.
- Accuracy: Essential for ensuring joints fit tightly and corners are square.
Caliper
Calipers provide precision measurements for thickness, depth, and diameter. Whether you’re working on detailed projects or ensuring your wood pieces fit perfectly, calipers are invaluable.
- Types: Available in digital and analog models, with digital offering immediate readouts.
- Measurement Range: They can typically measure from zero to six inches or more, depending on the model.
Marking Tools
Accurate marking is just as important as measuring. Having reliable marking tools can set you on the path to precision and accuracy.
- Pencils: A sharp carpenter’s pencil creates fine lines for accurate cuts.
- Chalk Lines: Use these for long, straight lines over larger surfaces or projects.
- Marking Gauge: This tool is great for marking consistent widths or depths, especially when you need to replicate measurements.
Protractor
When working on angles, a protractor is your best friend. Many woodworking tasks require precise angle measurements, and a protractor will provide flexibility and accuracy.
- Types: Digital protractors offer precise readings and can save time compared to traditional models.
- Usage: Ideal for miter cuts or any project where angles matter significantly.
Laser Distance Measure
For larger projects, a laser distance measure is a game changer. It offers quick and accurate measurements without the need for continuous tape pulling.
- Features: Many models include a digital display, memory functions, and even area or volume calculations.
- Range: Can measure distances up to 100 feet or more, depending on the device.
Tools for Measurement Calibration
Taking care of your tools ensures they provide accurate results. Calibration tools help maintain measurement accuracy, allowing you to detect any discrepancies early.
- Calibration Blocks: Use these to check the accuracy of your calipers and other measuring tools.
- Digital Gauge Checkers: These help confirm that your electronic measuring tools are functioning correctly.
In woodworking, achieving precise measurements is essential for every project. Investing in quality measuring tools not only enhances the quality of your work but also makes the process enjoyable. Whether you are a novice or an expert, having these measuring devices at your fingertips will help you create stunning, professional-quality woodwork.
For more in-depth insights and resources on woodworking, you can explore Wood Magazine and Woodworker’s Journal.
Common Measuring Mistakes and How to Avoid Them
When you’re diving into woodworking, precision is key. Getting measurements wrong can lead to frustrating mistakes, wasted material, and a project that doesn’t come together as planned. Understanding common measuring mistakes is crucial for every woodworker. Here are some frequent errors and practical tips to steer clear of them.
Overlooking Setup and Calibration
A common mistake is failing to ensure your measuring tools are set up properly. Whether you’re working with a tape measure, square, or caliper, make sure your tools are calibrated before starting.
- Check the tape measure for accuracy.
- Make sure the square is true.
- Inspect digital calipers for proper functionality.
Taking a moment to double-check your measuring devices can save you time and material in the long run.
Not Accounting for Blade Thickness
When cutting pieces from lumber, many woodworkers forget to account for the thickness of the saw blade, known as kerf. This mistake can lead to pieces that are too short.
To avoid this, adjust your measurements accordingly:
- Measure and mark your wood, then add the blade thickness to your measurement.
- Use a stop block if making multiple cuts to ensure uniformity.
Measuring from the Wrong Edge
When measuring, always clarify which edge of the material you’re using as a reference point. Measuring from the wrong edge can lead to inconsistencies and misalignments in your cuts.
- Consistently use the same edge for all measurements.
- Use a marking gauge to create a consistent reference line.
Failing to Make Accurate Marks
Even with the right measurements, improper marking can render accurate techniques useless. Avoid this by ensuring that your marks are clear and visible.
- Use a sharp pencil or knife for clean lines.
- Always extend your marks beyond the line rather than just dotting them.
- Consider using contrasting colors for clarity.
Using the Wrong Tools for the Job
Different woodworking projects require different measuring tools. Using the incorrect tool can result in errors.
Familiarize yourself with the various tools available:
- Tape Measure: Great for longer lengths.
- Folding Rule: Excellent for quick measurements in smaller spaces.
- Circular Saw Guide: Ideal for straight cuts.
- Digital Calipers: Perfect for precise measurements.
Select the right tool based on your project requirements to enhance measurement accuracy.
Ignoring Measurement Repetition
One of the golden rules of woodworking is to measure twice and cut once. Ignoring this rule can easily lead to cutting mistakes. To enforce this habit:
- Take a moment to confirm your first measurement.
- Double-check all measurements before cutting.
Introduction of Parallax Error
Parallax error occurs when the angle from which you’re reading the measurement isn’t aligned directly with the measuring tool, causing inaccuracies. Here’s how to avoid parallax errors:
- Always check your measurement from eye level.
- Stand directly in front of the measuring tape or ruler.
Each of these measuring pitfalls can affect the outcome of your woodworking project significantly. By being mindful and practicing these tips, you can enhance your measuring techniques, resulting in a more enjoyable and successful woodworking experience.
For further reading on effective woodworking practices, consider visiting Wood Magazine or Popular Woodworking.
Advanced Measuring Techniques for Experienced Woodworkers
For experienced woodworkers, accurate measuring techniques can be the difference between a flawless project and a costly mistake. Precision is key in woodworking, and understanding advanced measuring methods can elevate your craftsmanship. Here are some effective measuring techniques to consider.
Laser Measuring Tools
Laser measuring devices have revolutionized how woodworkers take measurements. These tools offer incredible accuracy over long distances and can measure difficult angles and heights. Some benefits include:
- Speed: Quickly measure longer distances without cumbersome tape.
- Precision: Reduce human error with pinpoint accuracy.
- Versatility: Many models come with additional functions like area calculation and indirect measurement.
Popular options include the Laser Measuring Tools website for various laser measuring tools suitable for woodworking.
Digital Calipers
Digital calipers are essential for taking precise measurements of both internal and external dimensions. Unlike traditional calipers, digital calipers provide readings directly on a digital screen, enhancing clarity. Tips for using digital calipers effectively include:
- Always ensure the calipers are zeroed before taking a measurement.
- Use them for thickness measurements when selecting hardwoods.
- Keep the device clean to ensure accurate readings.
Protractors for Angles
Measuring angles accurately can make or break your project. A protractor is a handy tool that helps you determine and mark angles precisely. Consider these tips:
- Use a digital protractor for more precise readings.
- Identify the angle of any cut before you start working on your wood.
- For joint work, double-check angles to ensure fitment.
Woodworking Squares
Woodworking squares, such as combination squares and framing squares, are vital for ensuring your cuts are straight and your joints are square. Here’s how to leverage these tools:
- Combining a square with a marking knife can enhance the accuracy of your cuts.
- Utilize framing squares when working on larger pieces to check for overall squareness.
- Ensure your squares are not warped or damaged to maintain their accuracy.
Electronic Tape Measures
Electronic tape measures combine the traditional tape measure with smart features. They often feature digital displays and can record multiple measurements. Some advantages include:
- Memory functions allow you to recall past measurements.
- Wireless capabilities let you transfer measurements to other devices.
For those who are looking for the best electronic tape measures, visit the Tape Measure site for reliable reviews and options that suit your needs.
Calibration Tools
Calibration is essential to maintain the accuracy of your measuring tools. Here is a list of calibration techniques:
- Regularly check the calibration of your tools against a known standard.
- Use calibration blocks or gauge blocks to verify the accuracy.
By calibrating your tools consistently, you ensure they remain reliable over time.
Layout Techniques
Advanced layout techniques enhance your overall efficiency in measuring and cutting. Consider these methods:
| Measuring Tool | Key Benefits |
|---|---|
| Story Poles | Consistent Layouts, Efficient Repetitive Measurements |
| Marking Gauges | Precise Marking Lines, Ideal for Woodworking Joints |
| Laser Measure | Speed, Precision, Versatility |
| Digital Calipers | Accuracy, Easy Reading, Versatility |
| Protractors | Precision in Angles, Handy for Joints |
| Woodworking Squares | Ensures Accuracy and Fits |
| Electronic Tape Measure | Memory Functions, Wireless Transfer |
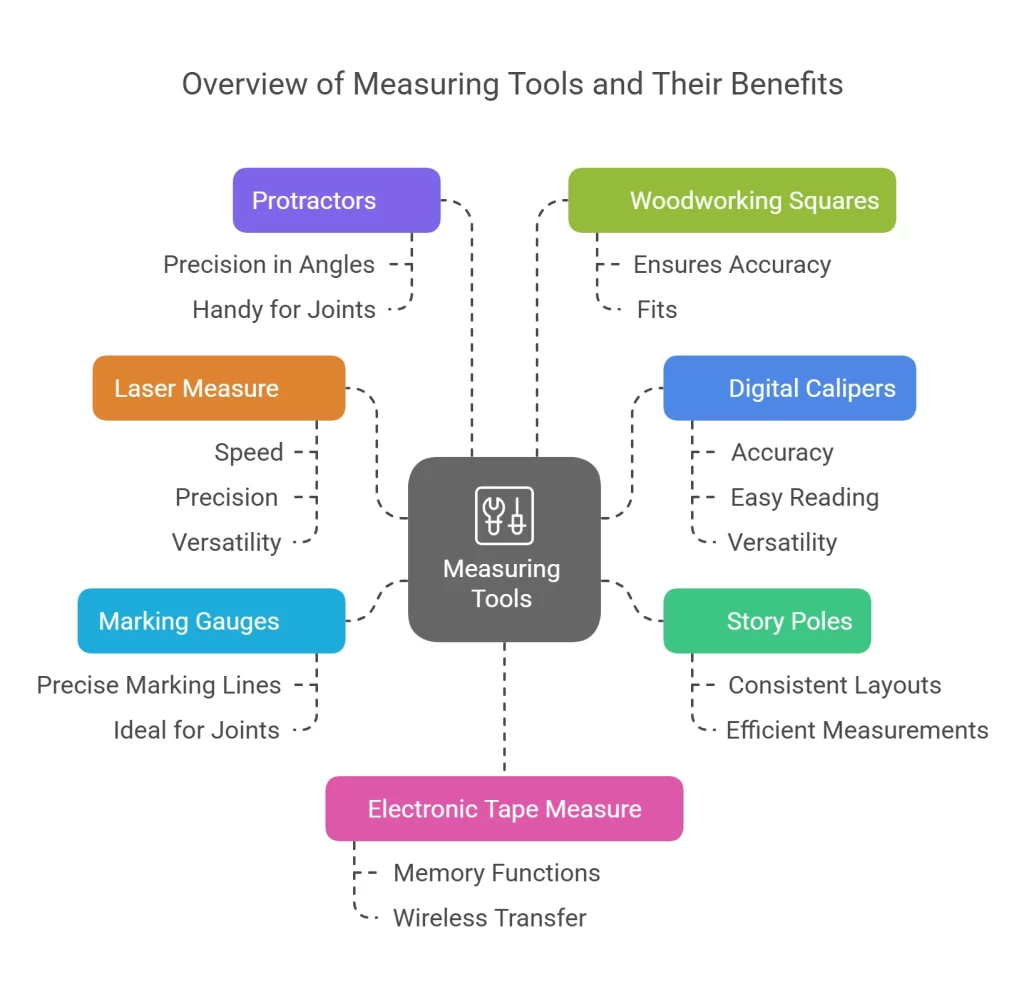
Investing time in mastering these advanced woodworking measuring techniques will undoubtedly raise the standard of your projects. Implementing these tips can help ensure the accuracy and professionalism of your work.
Conclusion
To achieve success in woodworking, mastering measuring techniques is crucial. Whether you are a beginner or a seasoned woodworker, understanding the various measuring methods can greatly enhance the quality of your projects. Precise measurements are the foundation of any successful woodworking task, ensuring that pieces fit together seamlessly and creating a polished final product that you can be proud of.
Equipping yourself with the right tools is equally important. A reliable tape measure, square, and caliper can make a world of difference in your accuracy. These instruments not only save time but also minimize frustration and costly mistakes. By investing in high-quality tools, you position yourself for better results in every project.
As you embark on your woodworking journey, awareness of common measuring mistakes is vital. It’s easy to overlook simple details, but by applying best practices and maintaining focus, you can avoid these pitfalls. Additionally, as you gain experience, exploring advanced measuring techniques will elevate your skills even further. Techniques such as using cutting jigs or the ruler and stop method can give you a distinct advantage in complex projects.
Embracing these essential measuring techniques and continuously refining your skills will not only boost your confidence but also foster a love for woodworking. Ultimately, combining accuracy with the right tools, and learning from past errors sets you up for a rewarding woodworking experience, bringing your creative visions to life with precision and care. Happy woodworking!