 ATTENTION: World's Largest Collection of 16,000 Woodworking Plans!
Stop struggling with incomplete plans that waste your time and money!
Step-by-step instructions that make woodworking super easy, even for beginners
Detailed schematics, cutting lists, and materials lists for every project
Get new plans monthly for life - no recurring fees or hidden costs
Request custom plans for your unique projects at no extra charge
Get 4 valuable bonuses including woodworking guides and business tips
GET INSTANT ACCESS NOW!
ATTENTION: World's Largest Collection of 16,000 Woodworking Plans!
Stop struggling with incomplete plans that waste your time and money!
Step-by-step instructions that make woodworking super easy, even for beginners
Detailed schematics, cutting lists, and materials lists for every project
Get new plans monthly for life - no recurring fees or hidden costs
Request custom plans for your unique projects at no extra charge
Get 4 valuable bonuses including woodworking guides and business tips
GET INSTANT ACCESS NOW!
Key Wood Types for Crafting a Durable Easel
Choosing the right wood is fundamental to any easel woodworking project. The ideal wood should balance strength, weight, and workability. Hardwoods like oak, maple, and walnut are popular for their durability and aesthetic grain, offering a solid foundation that can withstand frequent use. However, these tend to be heavier and may require higher skill levels to work with due to their density.
Alternatively, softwoods such as pine and cedar provide a lighter option that’s easier to cut and shape, making them suitable for beginners or portable easels. Pine is widely available and affordable, though it’s less resistant to dents and scratches than hardwoods.
Essential Hand Tools for Precision and Control
To ensure clean cuts and smooth finishes, a set of reliable hand tools is indispensable. At minimum, your toolbox should include:
- Measuring Tape or Ruler: Accuracy begins with precise measurement, minimizing waste and ensuring all parts fit perfectly.
- Combination Square: Useful for marking straight, square lines and verifying angles, which is critical for assembling the easel correctly.
- Chisels: Varying sizes help in fine shaping and carving joints, especially if the design includes mortise and tenon joints.
- Clamps: Essential for holding wood pieces firmly during glue-up and assembly.
- Hand Saw or Backsaw: Perfect for making straight, controlled cuts, especially in tight or precise sections.
Using quality hand tools can help you maintain control and improve the overall craftsmanship of your easel.
Power Tools to Streamline Your Build Process
While hand tools are vital, certain power tools can significantly speed up the woodworking project without sacrificing quality. Consider the following:
- Electric Drill: For drilling pilot holes and driving screws efficiently.
- Jigsaw: Useful for cutting curves or decorative shapes in the easel’s frame.
- Orbital Sander: A time-saver when smoothing surfaces and edges, giving the wood a polished feel.
- Router: If your design includes detailed edges or grooves, a router will simplify the process.
Power tools can enhance precision and reduce labor time, especially for larger or more complex easel builds.
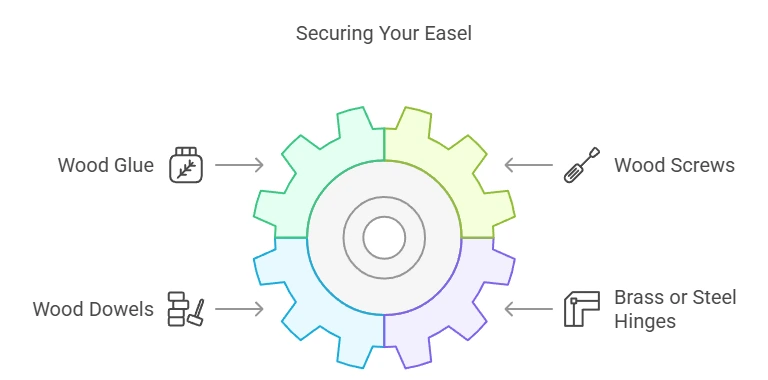
Joining Materials to Secure Your Easel
Proper joining techniques ensure the easel remains sturdy and functional over time. Common adhesives and fasteners include:
| Material | Purpose | Advantages |
|---|---|---|
| Wood Glue | Bonds wooden surfaces securely | Strong bond, fills small gaps, paintable |
| Wood Screws | Fastens components together | Easy to adjust, strong mechanical connection |
| Wood Dowels | Join parts for added strength and alignment | Invisible fastening, enhances joint stability |
| Brass or Steel Hinges | Allows for adjustable parts, such as folding legs | Durable and smooth movement |
Finishing Supplies to Protect and Beautify Your Easel
After assembling your easel, finishing is the last essential step. The goal is to protect the wood from moisture, wear, and UV damage while enhancing its natural beauty. Pay close attention to the choice of finish:
- Sanding Paper (various grits): Begin with medium grit and move to fine grit to ensure a smooth surface.
- Wood Stain: Enhances the wood’s grain and adds color. Choose oil or water-based stains depending on your preference.
- Sealants: Polyurethane (oil or water-based), lacquer, or shellac provide a durable outer layer that protects the wood.
- Brushes or Rags: For applying stain and sealants evenly without streaks.
Finishing not only preserves your easel but also ensures it looks professional and attractive.
Safety Gear for a Secure Working Environment
Woodworking involves risks, so safety equipment is non-negotiable. Equip yourself with:
- Safety Glasses or Goggles: Protect your eyes from flying wood chips and dust.
- Dust Mask or Respirator: Useful when sanding or cutting to avoid inhaling fine particles.
- Ear Protection: If using loud power tools, ear plugs or earmuffs can prevent hearing damage.
- Work Gloves: Protect your hands during handling and assembly.
Helpful Resources for Project Plans and Inspiration
For step-by-step instructions, detailed plans, or designs, several websites specialize in woodworking projects, including easels. These platforms offer free and paid plans, community forums, and video tutorials to guide you through the process:
- Ana White – A great resource for beginner-friendly woodworking plans.
- Wood Magazine – Provides detailed project plans and expert tips on woodworking tools and materials.
- Instructables – Offers stepwise guides from a community of DIY enthusiasts.
By preparing the right tools and materials outlined above, your easel woodworking project can be a rewarding and enjoyable experience. Selecting quality components paired with careful planning will result in a stable, attractive easel ready to support your artistic endeavors.
Step-by-Step Guide to Building a Sturdy Wooden Easel
If you’re looking to create a reliable and sturdy wooden easel, this step-by-step guide will walk you through the entire process, from choosing the right wood to assembling your project. Whether you’re an artist wanting a stable platform for your canvases or a woodworker seeking a satisfying project, building a wooden easel is both practical and rewarding.
Materials You Will Need
Selecting quality materials is crucial for ensuring your easel stands firm and lasts for years. Here’s what you’ll need:
- Wood boards (pine or oak work well): approximately 1×2 inches in size
- Wood screws (1¼ inch and 2 inch screws)
- Wood glue
- Sandpaper (medium and fine grit)
- Hinges (two small to medium-sized)
- Paint or wood finish (optional for protection)
- Tools: drill, screwdriver, measuring tape, pencil, saw, clamps
Choosing the Right Wood for a Durable Easel
For your easel woodworking project, hardwoods such as maple or oak provide great stability but can be pricier and harder to work with. Softwoods like pine are easier to cut and assemble and are lighter, which might be ideal if you want to move your easel frequently. Ensure the wood is straight-grained and free from knots to avoid weak points.
Measuring and Cutting the Wood Pieces
Accuracy in measurement and cuts is crucial to make sure all parts fit well and the easel stands securely.
Basic Parts and Dimensions
- Front Legs: Two pieces of 36 inches each, supporting the canvas.
- Back Leg (Rear Support): One piece of 38 inches, angled to stabilize the easel.
- Bottom Crossbar: One piece, 18 inches, connecting the front legs near the base.
- Canvas Holder Bar: Adjustable piece, approximately 14 inches long.
- Top Support Beam: One piece, 22 inches, positioned at the top of the easel.
Use a reliable saw—miter or hand saw—and mark your wood carefully before cutting.
Assembling the Easel Frame
Follow these steps to put your wooden easel together:
Step 1: Create the Front Frame
Attach the two front legs using wood glue and screws with the bottom crossbar about 6 inches from the bottom. This crossbar will brace the legs so the front frame does not wobble.
Step 2: Attach the Top Beam
Fasten the top support beam across the front legs approximately 30 inches from the bottom. This stabilizes the upper section of the easel and offers a place for the canvas holder bar to rest.
Step 3: Prepare the Rear Support Leg
Attach the hinges to the upper end of the rear leg and one side of the front frame. This allows the rear leg to pivot and provides the easel’s characteristic tripod shape.
Step 4: Install the Canvas Holder Bar
The canvas holder bar should be adjustable to accommodate different canvas sizes. You can have it slide on a notch or use a wing nut to secure it at different heights.
Sanding and Finishing Touches
Smooth all edges and surfaces using medium, then fine-grit sandpaper to prevent splinters and create a clean finish. You can leave your easel natural, or apply a wood stain or paint to protect and add style.
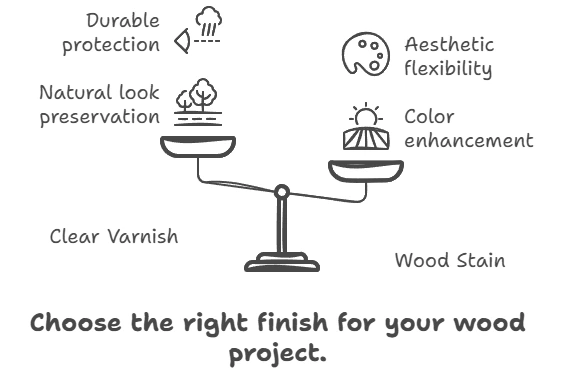
Wood Protection Options
| Option | Description | Benefits |
|---|---|---|
| Clear Varnish | Protects wood while maintaining natural look | Durable, water-resistant |
| Wood Stain | Adds color and highlights wood grain | Enhances appearance and offers moderate protection |
| Paint | Available in many colors, conceals natural wood grain | High durability and aesthetic flexibility |
Tips for Maintaining Your Wooden Easel
Periodically check and tighten screws to keep the easel sturdy. Avoid exposing your easel to extreme moisture or direct sunlight to prevent warping. If the easel will be used outdoors frequently, consider applying a weather-resistant sealant.
For detailed woodworking plans and additional ideas on customizing your easel project, explore resources like Rockler Woodworking and Hardware and Wood Magazine. These sites offer free plans and detailed tutorials perfect for beginner to advanced woodworkers.
Building your own wooden easel is a satisfying project that combines practical woodworking skills with creative customization. By carefully following these steps, taking time in assembly, and finishing with attention to detail, you’ll produce a sturdy, attractive easel that will support your artistic journeys for years to come.
Customizing Your Easel: Design Tips and Creative Ideas
Enhancing Your Easel’s Functionality Through Customization
When you dive into an easel woodworking project, customizing the design not only boosts the visual appeal but also improves its usability. Whether you are creating your easel for painting, displaying art, or as a piece of functional decor, adapting it to your specific needs can make a big difference. Here are some practical ways to tailor your easel for better performance and personal satisfaction.
Choosing the Right Wood and Finish
Wood selection plays a crucial role in determining the durability and aesthetics of your easel. Hardwoods like maple, oak, and cherry are excellent choices due to their strength and smooth finish, ideal for a stable workspace. If weight is a concern, consider softer woods such as pine, which are lighter but still sturdy enough for most applications. Finishing your easel with varnish or wood oil enhances its natural beauty and protects it from moisture and scratches. Transparent finishes preserve the wood grain, while painted or stained options allow for more creative expression.
Adjustable Features for Versatile Use
Adjustable elements into your easel’s design boosts its flexibility. Height-adjustable legs can accommodate different work environments, making it suitable for use while sitting or standing. Additionally, a tilting mechanism for the canvas support helps artists position their work at comfortable angles, reducing neck and eye strain. Installing multiple slots or hooks enables you to secure canvases of varying sizes securely.
- Include a sliding canvas holder to adapt to different canvas heights.
- Create extendable legs for portability and height adjustment.
- Add a rotatable top clamp for angled painting and display.
Creative Embellishments to Make Your Easel Unique
Customization doesn’t stop at function—adding personal touches can make your easel a standout piece. Decorative carvings, engraved patterns, or inlays using contrasting woods add character and sophistication. If you enjoy painting yourself, consider painting motifs or stenciled designs directly onto the wood. These artistic elements transform a simple tool into a piece of art, reflecting your style and craftsmanship.
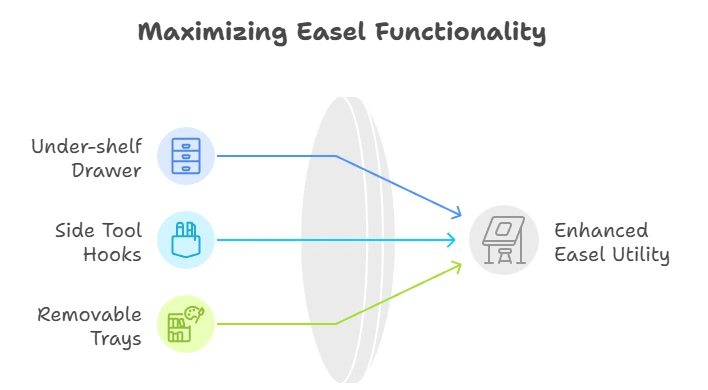
Storage Solutions Built Into Your Easel
An overlooked aspect of easel customization is storage. Adding compartments or trays for brushes, paints, and other supplies increases convenience and keeps your workspace tidy. For example, a drawer beneath the canvas shelf or side hooks for hanging tools makes your easel highly functional for anyone working with art supplies.
| Storage Feature | Benefits | Implementation Tips |
|---|---|---|
| Under-shelf drawer | Organizes supplies and keeps tools hidden | Use smooth glides and soft-close mechanisms |
| Side tool hooks | Easy access to frequently used items | Install durable metal hooks securely |
| Removable trays | Allows quick cleaning and flexible use | Design trays with handles or slots for easy removal |
Integrating Technology With Your Easel
For artists interested in combining traditional woodworking with modern innovation, there are exciting options to explore. Embedding LED lights to illuminate your canvas evenly enhances visibility, especially in low-light settings. You might also incorporate USB charging ports or power outlets within the easel to keep digital devices and tools powered while you work.
Additionally, if you’re a fan of digital art, building a stand or mounting system for tablets and styluses alongside your easel creates a seamless workspace for mixed media projects. This approach can increase productivity and allow for easy switching between digital and physical formats.
Safety and Stability Considerations
When customizing your easel, always prioritize safety. Ensure all moving parts lock securely in place to avoid accidental collapse. Check that any added fixtures are firmly attached and do not interfere with structural integrity. Adding non-slip rubber pads on the legs or base helps stabilize the easel on smooth surfaces and protects your floors.
Where to Find Inspiration and Materials
Crafting the perfect easel often involves a bit of inspiration and the right materials. For design ideas, Wood Magazine offers detailed plans and unique woodworking project tips that can spark creativity.
When sourcing quality lumber and hardware, visiting specialized woodworking supply stores or browsing online shops like Rockler Woodworking and Hardware ensures you have access to the best products tailored for your project.
Communities like Woodworking Talk provide expert advice and support from fellow woodworkers, helping you troubleshoot challenges and refine your design.
By focusing on both form and function, personalizing your easel through thoughtful woodworking techniques and creative touches will not only enhance your artistic experience but also craft a beautiful, lasting tool that suits your unique workflow.
Common Challenges and How to Overcome Them in Easel Woodworking
Understanding the Difficulties in Easel Woodworking Projects
When diving into an easel woodworking project, you may encounter several obstacles that can test your skills and patience. These challenges range from design complexity to material selection and even precision in assembly. By recognizing common issues upfront, you can approach your project with a prepared mindset and improve your chances of success.
Material Selection and Its Impact on Easel Durability
Choosing the right wood is critical in building a sturdy, lasting easel. Many beginners face trouble because they select unsuitable types of wood that either warp easily or cannot support the weight of art materials. For example, softwoods like pine might be easier to cut but are prone to dents and bending. Hardwoods such as maple or oak offer superior rigidity but require more effort to work with.
To overcome this, you should:
- Identify the primary use of your easel (portable vs. studio use)
- Select hardwood for durability if it will hold heavy canvases
- Consider treated or kiln-dried wood to minimize warping
Common Assembly Issues and How to Solve Them
One of the frequent struggles involves inaccurate measurements and misaligned joints during construction. These errors affect the stability and function of the easel, making adjustments or corrections more complicated later on.
Here’s how you can avoid these problems:
- Use a high-quality measuring tape and double-check all measurements before cutting.
- Employ jigs or guides when drilling holes to ensure precision.
- Dry fit components without glue or screws first to verify alignment.
Dealing with Surface Finishing Complications
Applying an uneven finish can detract from the visual appeal and protective qualities of your easel. Problems with blotchy stains or bubbles in varnish frustrate many woodworkers but are avoidable with careful technique.
Consider the following tips:
- Sand the wood progressively with finer grits, ending with a smooth surface before staining or painting.
- Use a pre-stain conditioner for woods prone to blotchiness, like pine or cherry.
- Apply several thin coats rather than one thick layer of finish for an even look.
- Work in a dust-free, well-ventilated area to minimize imperfections.
Enhancing Stability Without Sacrificing Portability
A significant challenge for easel woodworking projects is balancing sturdiness with the need for portability, particularly if the easel is meant for outdoor use. Too lightweight, and it may wobble. Too heavy, and it loses mobility.
Mastering this balance involves:
- cross braces or adjustable legs to improve sturdiness.
- Using lightweight but strong joinery such as mortise and tenon or dowels.
- Choosing collapsible or foldable designs to aid transport without compromising strength.
Working with the Right Tools for Easel Woodworking
Often, frustration arises from using improper or dull tools that cause rough cuts or inaccurate angled pieces essential for easel functionality. Investing in or maintaining sharp blades, quality clamps, and precision measuring tools makes a notable difference.
Focus on:
- Keeping your saw blades sharpened and clean.
- Using angles and bevel guides to achieve precise cuts.
- Employing clamps to hold parts firmly in place during gluing and assembly.
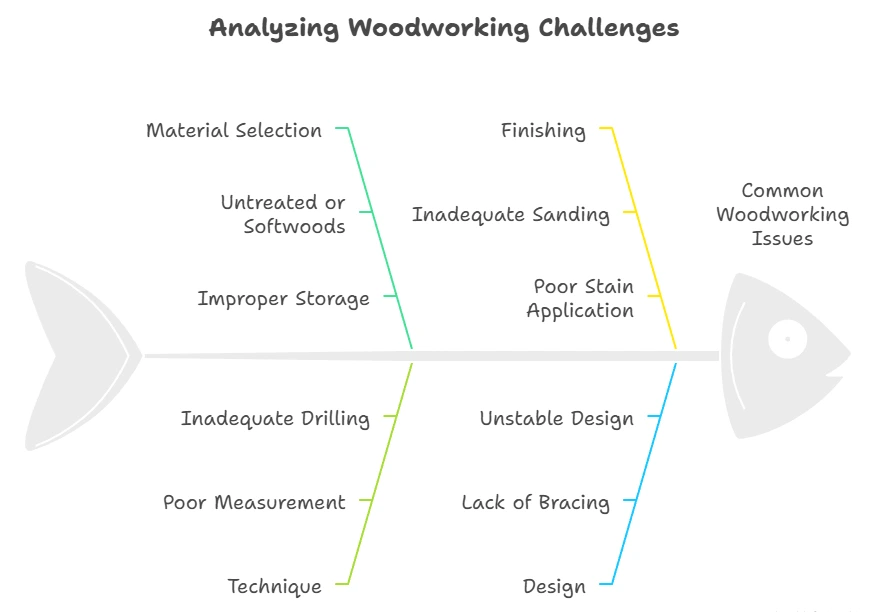
Table: Summary of Common Challenges and Solutions
| Challenge | Cause | Solution |
|---|---|---|
| Warping Wood | Selecting untreated or softwoods | Choose kiln-dried hardwood; store wood properly |
| Misaligned Joints | Poor measurement and drilling techniques | Measure twice; use jigs and dry-fitting |
| Uneven Finishing | Inadequate sanding and poor stain application | Sand with fine grit; use pre-stain conditioner |
| Lack of Stability | Design lacks supportive bracing | Add cross braces; choose foldable but sturdy designs |
| Rough Cuts | Dull or inappropriate tools | Maintain sharp blades; use bevel guides |
User Feedback for Improvement
Another effective way to overcome challenges is learning from others in the woodworking community. Platforms such as Woodworking Talk offer forums where enthusiasts share their troubleshooting advice specific to easel builds. Engaging with these communities can provide fresh perspectives and tested solutions that you may not have considered.
Additional Resources for Easel Woodworking Enthusiasts
If you are eager to expand your skills or troubleshoot specific problems, websites like Family Handyman’s Easel Project Guide offer detailed tutorials and project plans. Watching video demonstrations on Woodworker’s Journal can also enhance your understanding of cutting techniques and finishing methods.
By anticipating common difficulties and applying these practical tips, you can confidently approach your easel woodworking project, creating a beautiful and functional piece that lasts for years to come.
Finishing Techniques to Protect and Enhance Your Wooden Easel
Choosing the Right Finish for Your Wooden Easel
When you create an easel woodworking project, protecting the wood is just as important as shaping it. The right finishing technique not only shields your easel from moisture, dirt, and wear but also highlights the natural beauty of the wood grain. It’s essential to select a finish that suits both the wood type and the intended use of the easel.
Common finishing options include oils, varnishes, waxes, and polyurethane coatings. Each of these finishes offers unique benefits:
- Oils like tung oil or linseed oil penetrate deeply, nourishing the wood and giving it a warm glow.
- Varnishes provide a durable surface layer that resists scratches and moisture.
- Waxes create a soft, satin sheen and are easy to touch up but offer limited protection.
- Polyurethane offers excellent protection against damage and comes in various sheens.
Preparing the Wood Surface
Before applying any finish, proper preparation of the wooden easel’s surface is key. Sand the wood thoroughly, starting with a coarse grit and gradually moving to a finer grit to achieve a smooth surface free of splinters and rough spots. This process ensures the finish adheres evenly and enhances the wood’s texture.
Cleaning the wood after sanding is crucial. Use a tack cloth or a slightly damp cloth to remove dust and particles. Make sure the surface is fully dry before moving on to the next step.
Step-by-Step Finishing Process
Follow these steps for applying a protective finish to your wooden easel:
| Step | Action | Tips |
|---|---|---|
| 1 | Apply the first coat of finish using a brush or cloth | Work with the wood grain for even absorption. |
| 2 | Let the finish dry completely | Check manufacturer’s drying times; avoid humid, cold environments. |
| 3 | Lightly sand with fine grit (220 or higher) | Remove any raised grain or imperfections to smooth the surface. |
| 4 | Clean the easel surface again to remove dust | Use a tack cloth for best results. |
| 5 | Apply additional coats as needed (usually 2-3 total) | Each coat builds protection and depth to the finish. |

Enhancing the Natural Beauty of Wood
Some finishing products deepen the wood’s color and bring out striking grain patterns, which can beautifully enhance your easel’s appearance. For instance, tung oil creates a rich, slightly amber tone, while Danish oil offers a natural look with added protection. If you want to keep the wood as close to its original tone as possible, choose a clear satin or matte polyurethane.
Applying a wood conditioner before finishing can help achieve an even color, especially on soft or porous woods like pine. This step prevents blotchy or uneven absorption of oil-based finishes.
Maintenance Tips for Long-lasting Results
Once your easel woodworking project is finished, it’s important to maintain it properly to keep it looking its best. Here are some tips to extend the life of your finish:
- Wipe the easel regularly with a soft, dry cloth to remove dust and dirt.
- Avoid exposure to prolonged moisture or direct sunlight, which can break down finishes over time.
- If scratches or dull spots appear, a light reapplication of wax or an additional coat of finish can refresh the surface.
- For oily or wax finishes, apply a fresh layer once or twice a year depending on usage.
Eco-Friendly Finishing Choices
If you prefer environmentally friendly options, consider water-based finishes. These products emit fewer volatile organic compounds (VOCs) and dry faster than traditional oil-based products. Water-based polyurethane finishes still provide solid protection and retain a transparent look, making them great for an easel used indoors.
To learn more about woodworking finishes, visit Wood Magazine’s Finishes Guide which offers detailed advice tailored for different wood types and projects.
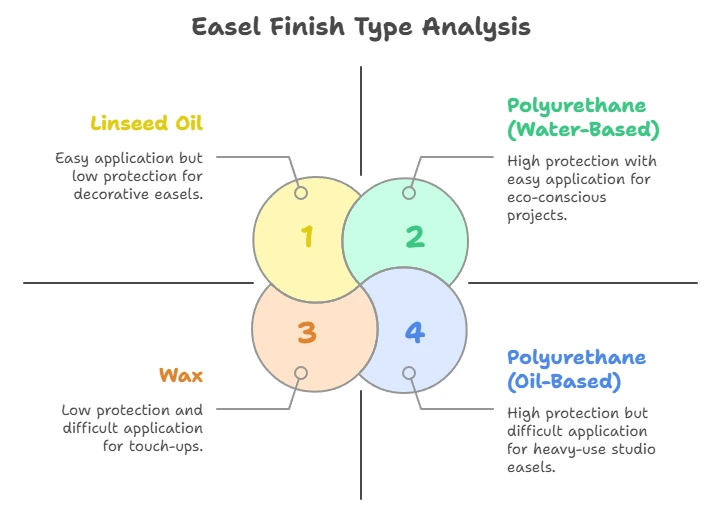
Summary Table: Popular Finish Types for Wooden Easels
| Finish Type | Protection Level | Appearance | Ease of Application | Recommended Usage |
|---|---|---|---|---|
| Linseed Oil | Moderate | Warm, natural glow | Easy | Indoor, decorative easels |
| Tung Oil | Moderate | Rich, deep finish | Moderate | Artistic easels, natural look |
| Polyurethane (Oil-Based) | High | Glossy to satin | Moderate | Studio easels, heavy use |
| Polyurethane (Water-Based) | High | Clear, non-yellowing | Easy | Indoor, eco-conscious projects |
| Wax | Low | Soft sheen | Easy | Touch-ups, light protection |
Conclusion
Crafting your own wooden easel combines creativity with practical skills, offering a rewarding woodworking experience. By gathering the essential tools and materials, you set a strong foundation for success. Following a clear, step-by-step guide helps you build a sturdy easel that can support your art projects or display needs reliably.
Don’t hesitate to personalize your easel with unique design touches—this is your chance to blend function and style in a way that suits your space and personality. Along the way, you might face some common challenges like uneven joints or stability issues, but knowing how to tackle these obstacles keeps your project on track. applying the right finishing techniques not only protects your easel from wear and tear but also brings out the natural beauty of the wood, making your creation truly stand out.
Whether you’re a beginner or an experienced woodworker, this easy-to-follow approach ensures that your easel woodworking project is both enjoyable and successful. With patience and care, you’ll end up with a custom piece that showcases your craftsmanship and supports your artistic journey.