
If you’re a wine enthusiast and enjoy crafting, creating your own DIY Wooden Wine Rack Wall Mount can be an exciting project. It allows you to showcase your wine collection while optimizing space in your home. Plus, building it yourself can save money and give you a sense of accomplishment. Here are some practical tips to help you design a wine rack that is both stylish and functional.
Choosing the Right Wood
When selecting the wood for your wine rack, consider durability, aesthetics, and the overall theme of your decor. Here are some popular choices:
- Oak: Known for its strength and beautiful grain, oak is an excellent choice for wine racks.
- Pine: More affordable and easy to work with, pine gives a rustic look but may not last as long.
- Maple: Smooth and sturdy, maple provides a contemporary aesthetic.
- Cherry: Adds a rich color and is very durable, ideal for a more elegant look.
Designing the Structure
Next, think about the size and shape of your wine rack. The size will depend on the number of bottles you want to store and the available wall space. Here are a few design ideas:
- Vertical Rack: Perfect for limited wall space, this can hold several bottles straight up.
- Horizontal Rack: Offers a classic design where bottles lie flat, preventing corks from drying out.
- Asymmetrical Rack: For a modern twist, experiment with a geometric shape that can also serve as art.
Functionality Matters
Your wooden wine rack should not only look good but also serve its purpose efficiently. Consider these functional elements:
- Easy Access: Ensure that the design allows for easy retrieval of bottles.
- Stability: Make sure the structure is sturdy and can hold the weight of the wine bottles.
- Temperature Control: If possible, place your rack away from direct sunlight to help preserve the wine.
- Label Visibility: Consider a design that allows you to easily see the wine labels for quick identification.
Finishing Touches
After you’ve constructed your rack, it’s time to add some finishing touches. This not only enhances the appearance but also protects the wood:
- Stain: Use a stain to enhance the natural beauty of the wood.
- Sealant: Apply a sealant to protect the wood from moisture and wear.
- Hooks or Shelves: Consider adding hooks for wine glasses or shelves for accessories like corkscrews and decanters.
Installation Tips
Think about the installation process. Here’s how to mount your DIY Wooden Wine Rack Wall Mount securely:
- Find Wall Studs: Use a stud finder to locate studs in your wall for secure mounting.
- Level It Out: Ensure your rack is level before fastening it to the wall.
- Use Proper Hardware: Use heavy-duty brackets or anchors to support the weight of the wine rack and bottles.
Essential Tools and Materials for Building a Wine Rack
Building your own wine rack can be a fun and rewarding project that adds character to your space. If you are ready to delve into this DIY journey, it’s essential to have the right tools and materials at your disposal. Knowing what you need will help streamline your efforts, ensuring a successful build that suits your style and needs.
Essential Tools for Your Wine Rack Project
Gathering the right tools is crucial before starting any DIY project. Here’s a list of essential tools you will need for constructing a wooden wine rack:
- Measuring Tape: Accurate measurements are vital. A measuring tape ensures that your cuts and placements are precise.
- Level: To make sure your wine rack is even, using a level is essential. It helps avoid any tilting that could lead to spills.
- Square: A framing square or speed square allows you to create right angles, ensuring the structure is sturdy.
- Saw: Depending on your wood type, a miter saw, circular saw, or jigsaw may be necessary for cutting wood pieces to size.
- Drill: A drill is essential for pre-drilling holes and securing screws to hold the wood together.
- Screwdriver: This tool will help tighten screws that fasten the rack’s components.
- Sander: A power sander or manual sandpaper will smooth out any rough edges on your wood, giving your wine rack a polished look.
- Pencil: Use a pencil for marking measurements and cut lines before you get started.
Necessary Materials for Building Your Wine Rack
Once you have your tools ready, it’s time to gather materials. The type of wood you choose can alter the aesthetic and functionality of your wine rack. Below are construction materials and considerations:
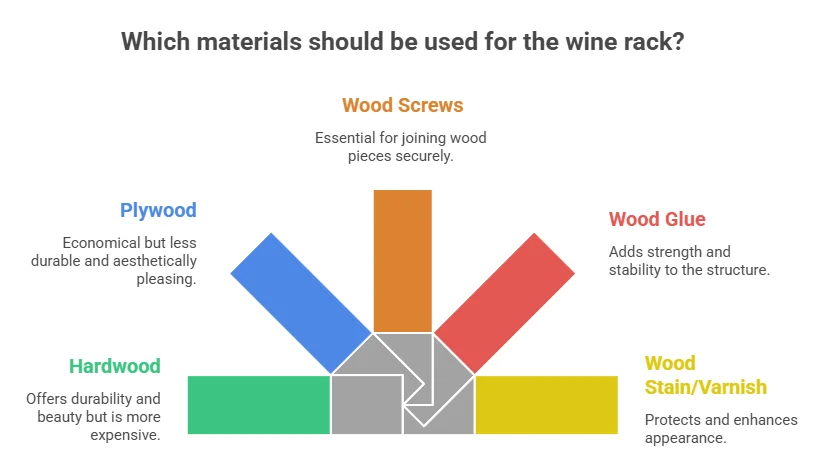
- Wood: Choose between hardwoods like oak or maple for durability and beauty, or opt for plywood for an economical option.
- Screws: Select wood screws that are suitable for the thickness of the wood you’re using.
- Wood Glue: For added strength, using wood glue in conjunction with screws can reinforce the structure.
- Finish: Consider a wood stain or varnish to protect your wine rack and enhance its appearance. Make sure to choose non-toxic options if you want a food-safe finish.
Planning and Design Considerations
Before jumping into construction, planning your design is crucial. Think about where you want to place your wine rack and how many bottles you need it to hold. Here’s how to approach it:
- Space Measurement: Measure the area where the wine rack will be installed. Ensure it fits perfectly in the allocated spot.
- Storage Capacity: Decide how many bottles your wine rack should accommodate. This decision will impact the size and design.
- Style: Choose a style that complements your décor. Options can range from rustic farmhouse styles to modern sleek designs.
Step-by-Step Guide to Constructing a Wall-Mounted Wine Rack
Creating a DIY Wooden Wine Rack Wall Mount can be an enjoyable and rewarding project. Not only does it enhance your home décor, but it also provides a chic storage solution for your wine collection. In this guide, you will find detailed steps to construct a beautiful wall-mounted wine rack that showcases your favorite bottles while saving valuable floor space. Let’s get started with the materials you’ll need.
Materials Needed
- Wood (Pine, Oak, or any hardwood of your choice)
- Wood screws
- Wood glue
- Sandpaper (various grits)
- Wood stain or paint
- Measuring tape
- Drill
- Level
- Stud finder (optional)
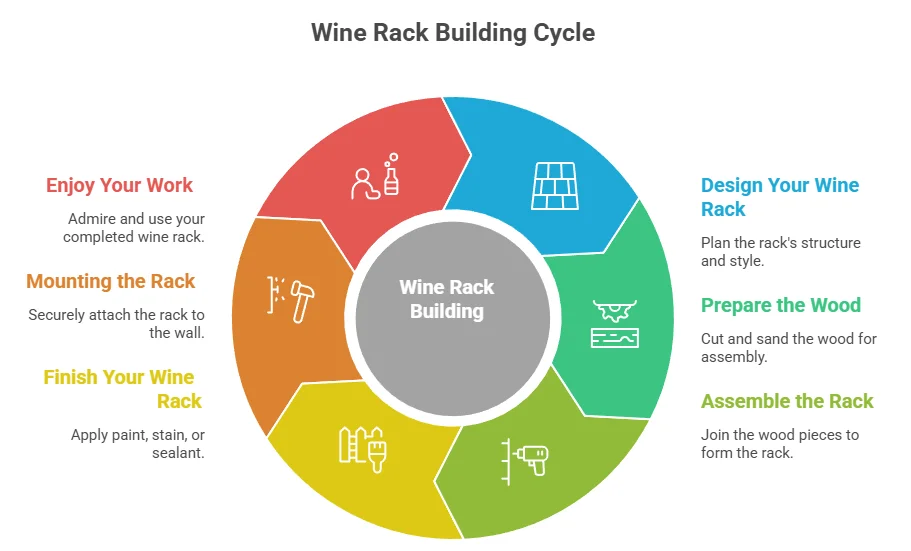
Step 1: Design Your Wine Rack
Before you grab your tools, it’s important to sketch a design. Determine how many bottles you want to store and how you would like the rack to look. A simple design could include horizontal slots for each bottle. Consider dimensions that fit your wall space well, ensuring it looks great yet is functional.
Step 2: Prepare the Wood
Once you have your design, measure and cut your wood pieces accordingly. You will generally need a back panel and horizontal slats to hold the bottles. Typical dimensions might be:
| Component | Dimensions |
|---|---|
| Back Panel | 24” x 36” |
| Horizontal Slats | 24” x 3” (each) |
After cutting your pieces, use sandpaper to smooth any rough edges. This step is vital to ensure your finished product looks clean and polished.
Step 3: Assemble the Rack
Using wood glue and screws, attach the horizontal slats to the back panel. Space the slats at least 10 inches apart to accommodate most standard wine bottles. Be sure to use a level to keep everything straight. If your design includes angles or special niches, use a drill to create pilot holes before screwing the pieces together.
Step 4: Finish Your Wine Rack
Now that your wine rack is assembled, it’s time to finish it! You can opt for a natural wood finish or add a stain or paint for color. Apply your desired finish evenly and allow it to dry completely.
Step 5: Mounting the Rack
Mounting your rack securely is critical. Locate the studs in your wall using a stud finder to ensure your rack can support the weight of the wine bottles. Mark the spots where you will drill holes. Use a level to mark straight lines for accurate placement and then attach the rack to the wall using screws.
Step 6: Enjoy Your Work
Once mounted, fill your newly constructed wall-mounted wine rack with your favorite wines. Whether for personal use or entertaining guests, it will surely elevate your space. Don’t forget to step back and admire your handiwork!
Maintenance and Care
After creating your wine rack, maintain it by cleaning the wood regularly. Use a damp cloth and avoid using harsh chemicals that can damage the finish. If you notice any wear or tear, a quick touch-up with stain or paint will keep it looking new.
If you’re seeking ideas for more DIY projects or looking for tips on wine storage, check out Love and Lemons and The Spruce Crafts. These websites provide additional insights into innovative craft and DIY options!
Creating a DIY Wooden Wine Rack Wall Mount is not only a fun project but also a functional addition to your home. Enjoy the process of building and the satisfaction of showcasing your exquisite wine collection!
Creative Ways to Decorate and Personalize Your Wine Rack
Wine racks are functional, but they can also be a source of style and personal expression in your home. If you have a wooden wine rack, decorating and personalizing it can create an inviting atmosphere while showcasing your favorite bottles. Here are some creative ways to transform your wine rack into a personal masterpiece.
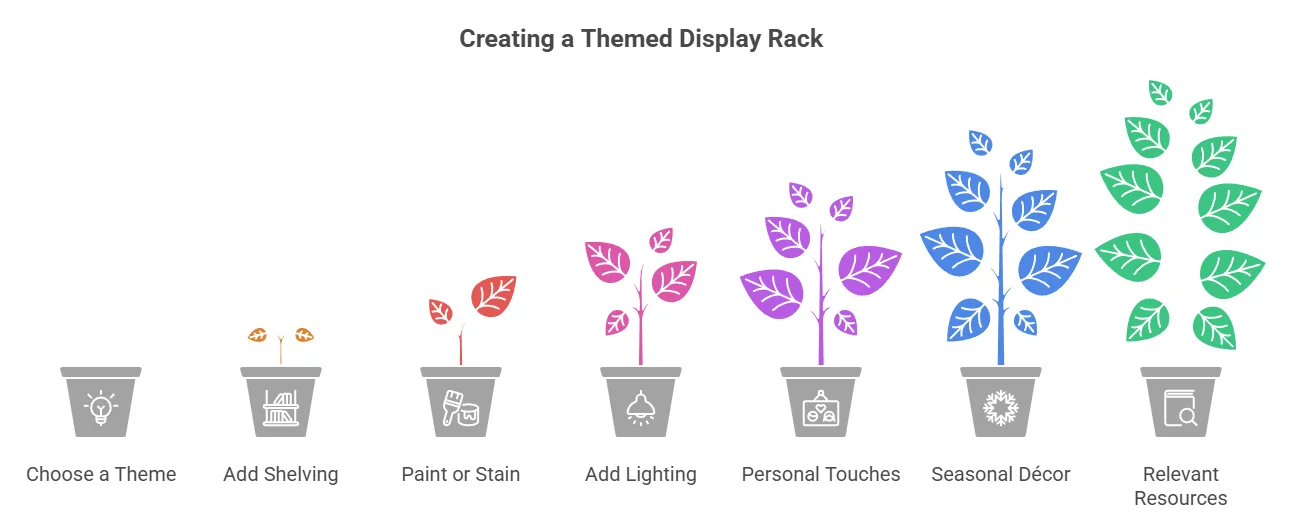
1. Choose a Theme
Selecting a theme can guide your decorating choices. Whether you prefer a rustic, modern, or vintage look, having a clear idea of your theme makes it easier to choose decor that complements your wine rack. Here are some popular themes:
- Rustic Charm: Incorporate wood, burlap, and mason jars.
- Modern Minimalism: Use sleek lines and monochromatic colors.
- Vintage Elegance: Opt for antique glassware and ornate designs.
2. Add Shelving and Display Items
Consider adding shelves to your wine rack if it doesn’t already have them. This extra space allows you to showcase decorative items alongside your wine collection. Here are some ideas of items to include:
- Wine Glasses: Hang them beneath the rack or place them on a shelf.
- Picture Frames: Personalize your space with photos of memorable moments.
- Artistic Bottles: Use decorative wine bottles as eye-catching centerpieces.
3. Paint or Stain Your Rack
A simple way to personalize your wooden wine rack is by painting or staining it. Choose a color that complements the room’s decor. This project can be a fun way to express your creativity. Consider these tips:
- Choose Quality Paint: Use paint that’s suitable for wood.
- Apply a Base Coat: Start with a primer if you are changing colors drastically.
- Seal for Protection: A clear coat will protect your work from scratches and stains.
4. Add Lighting
Lighting can dramatically change the mood and aesthetics of your wine rack area. You have several options for achieving beautiful display lighting:
- LED Strip Lights: These can be placed under shelves to highlight your collection.
- Warm Fairy Lights: Use these to create a cozy atmosphere.
- Spotlights: Position small lights to draw attention to special bottles.
5. Personal Touches
Add a unique touch by including items that hold personal meaning. Here are a few ideas:
- Travel Souvenirs: Display souvenirs from your favorite wine regions.
- Custom Labels: If you’ve bottled your wine, design fun labels that tell the story of each batch.
- Family Heirlooms: Include inherited wine accessories or related decor.
6. Seasonal Decor
Change things up throughout the year to keep your wine rack looking fresh. Seasonal decor can make your space more welcoming. Here’s how:
| Season | Decoration Ideas |
|---|---|
| Spring | Use floral arrangements. |
| Summer | Incorporate bright colors and beach-themed items. |
| Fall | Utilize pumpkins and autumn leaves. |
| Winter | Add cozy elements like faux fur or pinecones. |
7. Relevant Resources
If you’re interested in finding more ideas or purchasing decorative items, check out resources such as Houzz for inspiration and Wine Enthusiast for unique wine-related products.
Transforming your wooden wine rack into a personalized display showcases not only your wine collection but also reflects your unique style. Each decorative choice enables you to express your personality while creating a warm and inviting atmosphere in your home.
Maintenance Tips for Keeping Your Wooden Wine Rack Looking Great

Keeping your wooden wine rack in top shape not only enhances its appearance but also prolongs its lifespan. Whether your wine rack is a treasured DIY project or a stylish store-bought addition, following a few maintenance tips can help it look great for years to come. While wood is a beautiful material, it requires care to keep it from fading, cracking, or becoming damaged. Here are some simple strategies to help you maintain your wooden wine rack.
Use the Right Cleaning Products
To start, always choose cleaning products that are safe for wood. Avoid chemical cleaners that contain harsh ingredients, as they can strip the finish or damage the wood over time. Instead, opt for natural solutions such as:
- Warm soapy water with a mild detergent
- A mixture of vinegar and olive oil for polishing
- Commercially available wood cleaners designed for furniture
When using any cleaner, dampen a soft cloth rather than soaking it. Excess moisture can warp the wood, so be cautious.
Regular Dusting
Dust accumulation can dull the finish of your wooden wine rack, making it look older than it is. Set a routine to dust your wine rack every couple of weeks. Use a microfiber cloth to trap dust effectively. For hard-to-reach areas, a soft-bristle brush can work wonders without scratching the wood.
Avoid Direct Sunlight
Wood can fade over time if exposed to direct sunlight. Position your wine rack away from bright windows or use curtains to reduce sun exposure. If relocating isn’t an option, consider using UV-protective films on your windows to minimize damage.
Humidity Control
Wood is sensitive to changes in humidity levels. If you live in a particularly humid or dry environment, it’s essential to monitor the moisture in the air. Here are a few tips:
- Use a dehumidifier in humid conditions.
- Keep a humidifier running in dry months.
- Aim for a humidity level between 40% and 60% for optimal wood care.
This balance will help prevent issues like cracking or warping.
Protect the Surface
Your wine rack’s surface can eventually get scratched or nicked. To safeguard it against everyday wear and tear:
- Use coasters under bottles to prevent ring marks.
- Always lift items instead of sliding them.
- Consider placing a soft mat or cloth where bottles rest.
Implementing these small steps can save you from larger damages down the road.
Refinish When Needed
Over time, the finish of your wooden wine rack may start to dull or show signs of wear. When this happens, a light refinishing can breathe new life into your piece. Sand the surface slightly to prepare it, then apply a fresh coat of wood stain or sealer. Always test a small area first to ensure it meets your expectations.
Temperature Awareness
In addition to humidity, temperature fluctuations can negatively affect your wooden wine rack. Avoid placing it near heating vents or air-conditioning units that cause rapid heating and cooling. Sudden temperature changes can lead to wood expansion and contraction, potentially damaging your wine rack. Ideally, keep the area around your rack consistent in temperature.
Inspect for Damage
Regular inspections of your wooden wine rack can prevent small issues from becoming major problems. Look for signs of:
- Cracks or splits in the wood
- Loose joints
- Signs of pest infestations, such as wood chips or small holes
Addressing these issues promptly can help maintain the integrity of your wine rack.
Your wooden wine rack deserves attention and care. Implementing these maintenance tips ensures that it stays elegant and functional over the years. For more detailed information on wine storage and care, consider visiting Wine Enthusiast or Wine.com for expert advice.
Conclusion
Building your own DIY Wooden Wine Rack Wall Mount is not just a home improvement project; it’s a way to express your style and creativity. By carefully considering the design, you can create a functional and aesthetically pleasing focal point in your space. Whether you choose a sleek modern look or a rustic charm, the right design will enhance your décor and serve your wine storage needs effectively.
Gathering the essential tools and materials beforehand is crucial for a smooth building process. Ensuring you have everything at your fingertips reduces delays and allows you to focus on the fun part—constructing your wine rack! Following a step-by-step guide not only simplifies the process but also builds your confidence as a DIYer. With precise instructions, even beginners can create a beautiful piece that complements their home.
Personalizing your wine rack opens the door to further creativity. Adding decorative touches, such as paint or unique handles, allows you to make it truly yours, turning a simple rack into a statement piece. Plus, regular maintenance will keep your wooden wine rack looking pristine for years to come.
Taking the time to ensure your wine rack is not only functional but also stylish and well-maintained will make a lasting impression on guests and will be a source of pride for you. Creating something with your own hands not only enhances your space but also adds character and warmth to your home. So get started on your DIY Wooden Wine Rack Wall Mount today, and enjoy the perfect blend of craftsmanship and style.