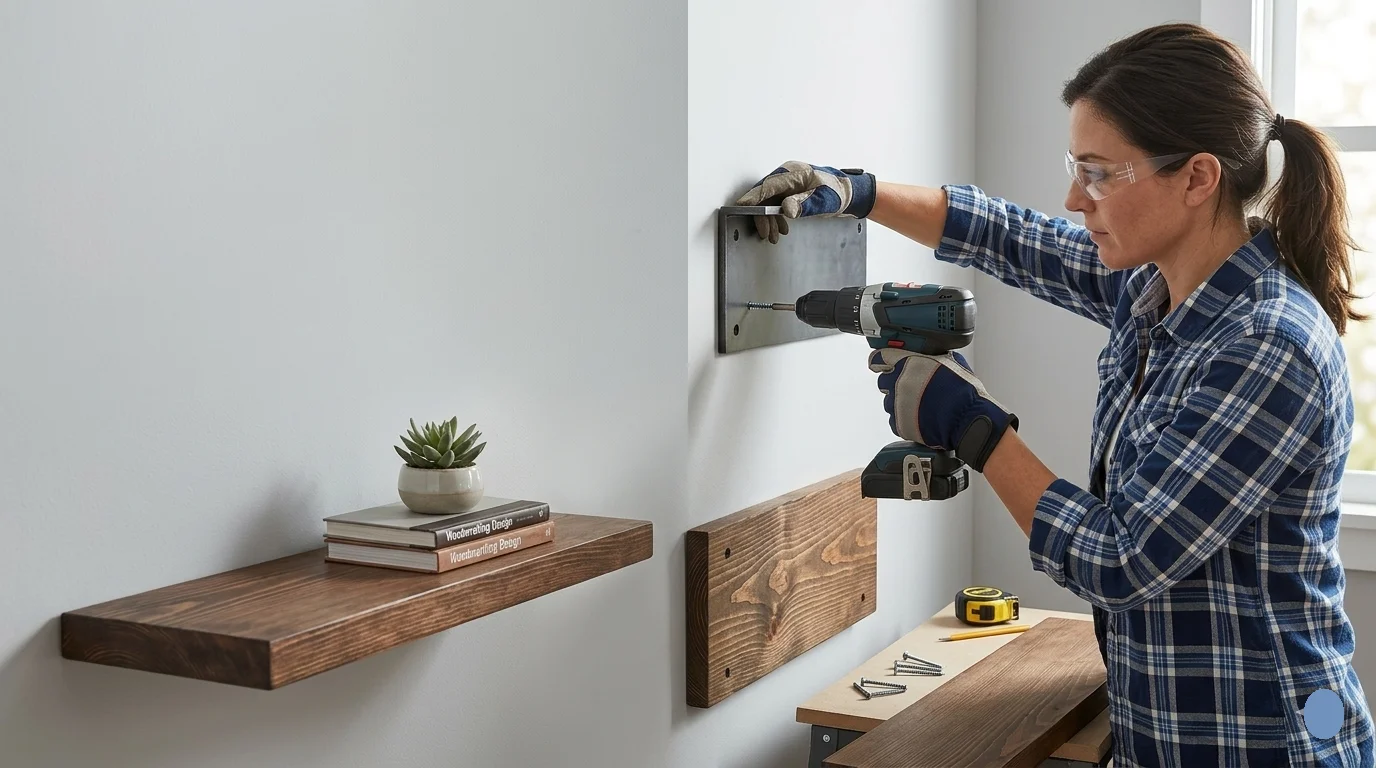
DIY wooden floating shelves are a fantastic way to enhance your living space. They’re not only stylish but also highly functional. You’ll love the way they showcase your favorite items. Installing these shelves can seem daunting, but with the right guidance, you can easily tackle this project on your own. Let’s get started with a step-by-step guide to DIY Wooden Floating Shelves Installation.
Gather Your Materials
Before diving into the installation, it’s crucial to gather all necessary materials. Here’s what you’ll need:
- Wooden boards (choose your preferred type, like pine or oak)
- Brackets (heavy-duty floating shelf brackets)
- Wood screws
- Drill and drill bits
- Screwdriver
- Level
- Measuring tape
- Pencil
- Sandpaper (optional, for smoothing edges)
- Wood stain or paint (optional, for aesthetics)
Measure and Mark
Start by measuring the space where your shelves will go. Determine the height and width of each shelf and decide how many shelves you want to install. Use a pencil to mark the wall lightly where the brackets will go. It’s crucial to level off your marks, so the shelves sit straight.
Locate Wall Studs
Using a stud finder, locate the studs in your wall. This is important, as securing your shelves to the studs will ensure they hold weight safely. If your intended placement doesn’t align with the studs, you may need to adjust your measurements or use wall anchors.
Drill Holes
Now it’s time to drill holes for the brackets. While using the drill, ensure you make holes at the marked points, aligned with the studs or appropriate wall anchors. For every bracket, drill holes according to the spacing indicated in the bracket instructions.
Attach the Brackets
Next, it’s time to install the brackets. Align each bracket with the holes and attach it to the wall using screws. Make sure they are level, as this will impact how your shelves sit on top. A level helps to ensure that everything is straight.
Prepare the Shelves
If you want your wooden shelves to have a finished look, now’s the time to sand them down. Smooth out any rough edges with sandpaper. You can also apply a coat of wood stain or paint to match your decor. Allow the shelves to dry completely before installation.
Install the Shelves
Once dry, carefully lift the shelves onto the installed brackets. Make sure to push them back securely against the wall. Check again with a level to confirm that everything looks straight. Adjust if necessary.
Final Checks and Style
Before you display your items, step back and ensure everything looks right. Check the stability of the shelves by gently placing weight on them. Once satisfied, you can start decorating by arranging books, plants, or decorative items that reflect your style.
Maintenance Tips
To keep your floating shelves looking great, dust them regularly and avoid placing overly heavy items. If you notice any warping or instability, address these issues promptly to maintain safety and aesthetics.
Choosing the Right Materials for Your Floating Shelves
When planning to install floating shelves, the choice of materials is crucial for both aesthetics and functionality. You want shelves that not only look good but also provide the strength and durability needed for everyday use. Here’s a detailed look at the best materials to consider for your DIY Wooden Floating Shelves Installation.
One of the most popular choices for floating shelves is solid wood. Solid wood is strong, versatile, and comes in various types that can match your décor. Here are some common types:
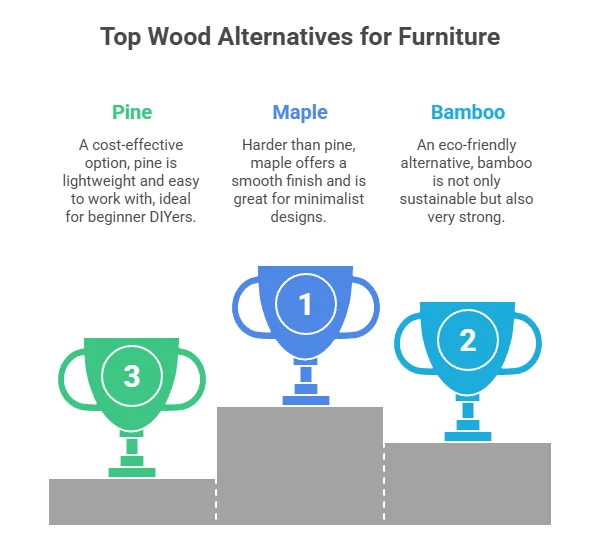
- Oak: Known for its durability, oak has a rich grain and is perfect for a classic look.
- Pine: A cost-effective option, pine is lightweight and easy to work with, ideal for beginner DIYers.
- Maple: Harder than pine, maple offers a smooth finish and is great for minimalist designs.
- Bamboo: An eco-friendly alternative, bamboo is not only sustainable but also very strong.
Each of these woods has unique characteristics that can enhance your overall design. Consider what look you want to achieve and how much weight the shelves will need to support when selecting the wood.
In addition to selecting wood, the finishing of the shelves plays a significant role in their appearance and longevity. Here are some finishing options:
- Stains: Wood stains come in various colors and enhance the natural grain. They provide a warm, rich finish.
- Sealers: A clear sealer can protect the wood from moisture and damage while maintaining its natural color.
- Paint: If you prefer a pop of color, paint is an excellent choice. Make sure to use a type that is suitable for wood surfaces.
Another important consideration is the mounting hardware. The way you mount your floating shelves dictates how well they will hold up over time. Heavy-duty brackets or invisible floating shelf brackets are great choices:
| Type of Bracket | Advantages | Disadvantages |
|---|---|---|
| Heavy-Duty Brackets | Support heavy loads; easy to install. | Can be visible unless hidden with design. |
| Invisible Brackets | Creates a seamless look; virtually invisible. | Can be tricky to install; weight limits may apply. |
Choosing the right hardware is essential for ensuring your floating shelves remain secure and functional. When selecting brackets, consider the weight and size of the items you plan to place on your shelves. Always check the manufacturer’s specifications to find the right fit.
Consider the thickness of the wood for your floating shelves. Thicker shelves tend to be sturdier and more visually appealing, but they also require heavier-duty brackets for support. A thickness of 1-1.5 inches often strikes a good balance between strength and style. Home Depot and Lowe’s are excellent resources to explore various wood types and hardware options for your DIY project.
When you factor in all these components—wood type, finishing options, mounting hardware, and thickness—you’ll be well on your way to creating stunning and functional floating shelves. Remember, a well-planned approach not only enhances your home’s aesthetics but also ensures the durability and safety of your installation.
Before you start your installation, take the time to gather all the materials you need. This way, you can work efficiently and ensure the best results. For more tips and detailed guides on DIY projects, visit Ana White, which offers a wealth of information on woodworking and shelf installation.
Creative Ideas for Styling Your Floating Shelves

Floating shelves have become a popular choice for both functionality and aesthetics in home decor. They not only save space but also enhance the overall look of your interior. With a little creativity, you can style your floating shelves to reflect your personality and elevate the charm of any room.
Mix and Match Textures
One of the simplest yet most effective ways to style your floating shelves is by incorporating a variety of textures. Combine wooden items with metal or glass decor to add depth and interest. A rustic wooden frame can pair well with a sleek metal sculpture, creating a striking contrast. Here are some ideas:
- Use woven baskets for a natural texture.
- Add glass vases for a touch of elegance.
- Incorporate ceramic pieces for a more rustic or vintage feel.
Display Your Favorite Books
Your floating shelves are the perfect place to showcase your favorite books. Arrange them both horizontally and vertically for a casual, lived-in look. Consider the following tips:
- Color-code your books for a visually appealing arrangement.
- Add small plants or decorative objects on top of stacked books.
- Use bookends to create structure and keep them organized.
Layer with Artwork
Artwork into your floating shelves can instantly elevate their style. Choose small framed pieces or canvas prints that complement your existing decor. Here are some ways to do this:
- Lean artwork against the back of the shelves for a relaxed, layered effect.
- Mix artwork with decorative objects to build an interesting visual narrative.
- Experiment with different frame styles for an eclectic look.
Incorporate Greenery
Bringing in plants adds life and enhances the beauty of your floating shelves. They provide a natural element that balances out other decor pieces. Consider the following options:
- Use small potted plants like succulents or air plants that require minimal care.
- Add trailing plants in hanging planters to create a cascading effect.
- Combine different types of plants for a lush, layered look.
Utilize Color Wisely
Color plays a crucial role in styling your floating shelves. Decide if you want to create a cohesive color palette or a bold statement. Here are some strategies:
- Choose a color scheme that complements the room’s overall color palette.
- Use accent colors in accessories to create visual pops against neutral backgrounds.
- Consider using monochromatic items for a streamlined look.
Personal Touches
Adding personal items like travel souvenirs or family photos can make your shelves uniquely yours. Here’s how you can do this effectively:
- Integrate picture frames of various sizes for dimension.
- Display items from your travels or hobbies to spark conversations.
- Rotate personal items seasonally to keep your shelves fresh and inviting.
Balance and Symmetry
While creativity is essential, it’s also important to maintain a sense of balance. Here are some tips for achieving this:
- Use larger items on one side balanced by multiple smaller items on the opposite side.
- Keep the height of objects varied for visual interest.
- Avoid overcrowding to ensure each item stands out.
Styling your floating shelves doesn’t have to be overwhelming. Just remember to have fun and express your personal style. For more great ideas and inspiration, check out House Beautiful and Love & Lemons. No matter how you choose to decorate, the key is to create a space that feels uniquely yours.
Common Mistakes to Avoid in Floating Shelves Installation
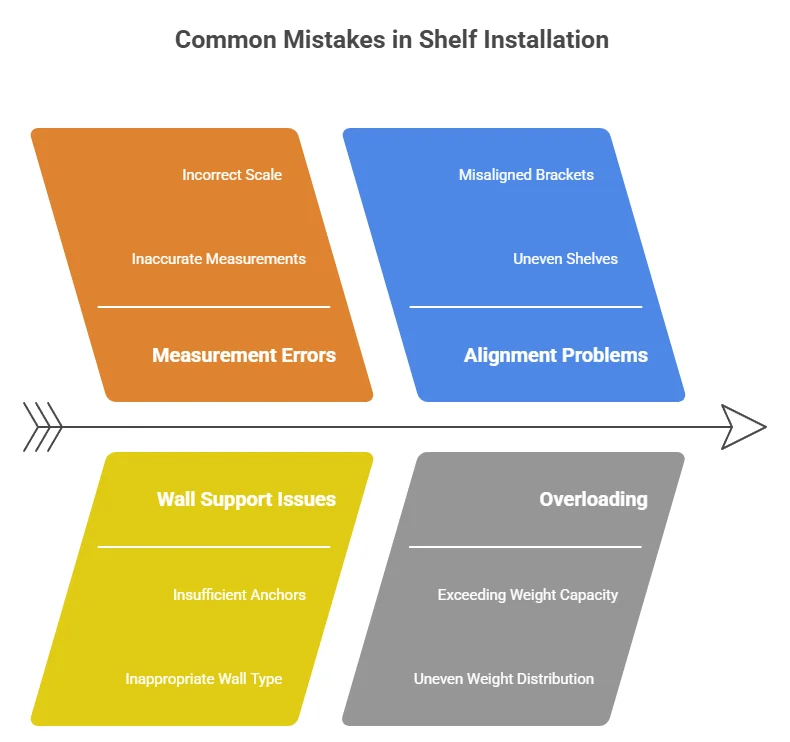
Installing floating shelves can add both style and functionality to your space. However, many DIY enthusiasts make common mistakes that can lead to faulty installations or even accidents. If you want to ensure your installation goes smoothly, familiarizing yourself with these pitfalls can be beneficial.
Incorrect Measurements
One of the most frequent errors is taking incorrect measurements. Before you start, double-check the length and width of the space where the shelf will be installed.
- Use a stud finder to locate wall studs, as they provide better support.
- Measure your shelves and mark the height and width on the wall. This will give you a visual reference.
- Consider the distance between shelves if you’re installing multiple floating shelves. You want enough space to display items comfortably.
Poor Wall Support
Floating shelves need solid wall support. Many homeowners attach shelves solely to drywall, which can lead to sagging or crashing under weight. Here’s how to ensure adequate support:
- Always install floating shelves onto wall studs whenever possible.
- If your wall doesn’t have a stud where you want to install a shelf, use wall anchors rated for the shelf’s weight.
- Check the weight capacity of both the shelf and the anchoring system before installation.
Misalignment
Another common mistake is misalignment during installation. Here are some tips to keep your shelves level:
- Use a level tool while mounting to ensure that the brackets are perfectly horizontal.
- Measure twice before drilling any holes.
- Take your time to adjust supplies as needed to prevent crooked shelves.
Overloading the Shelves
It’s easy to get excited about what you can display on your new floating shelves, but overloading them is a common mistake. Follow these guidelines to avoid this issue:
- Know the weight limit of your shelves and anchoring systems.
- Distribute weight evenly across the shelf.
- Avoid placing heavy items, like books or large photo frames, on shelves that are not designed to bear their weight.
Not Pre-Drilling Holes
Some people may think they can skip the pre-drilling step, but this can lead to cracked wood or an uneven installation. Pre-drilling helps avoid these common pitfalls:
- It ensures the screws go in straight.
- It minimizes the risk of splitting the shelf material.
- It helps you maintain better control over the installation process.
Ignoring Aesthetic Details
While installation is primarily about functionality, aesthetics matter too. Here are some things to consider:
- Choose the right color and finish for your shelves that will harmonize with your décor.
- Plan the placement of items on your shelves to create a visually pleasing setup.
- Arrange items in varying heights and widths for a more appealing display.
Not Following Manufacturer Instructions
Each floating shelf may come with different installation guidelines. Always refer to these instructions to avoid common pitfalls:
- Review the weight ratings and installation requirements provided by the manufacturer.
- Comply with safety recommendations for proper usage.
- Using the right tools specifically mentioned in the manual can make your installation easier.
Avoiding these common mistakes can help you achieve a successful DIY Wooden Floating Shelves Installation. If you’d like to learn more, consider visiting The Spruce or check the detailed installation tutorials on Better Homes & Gardens. By following these guidelines, you can enjoy the creative and organizational benefits floating shelves offer without the stress of improper installation.
Tools You Need for a Successful DIY Floating Shelves Project
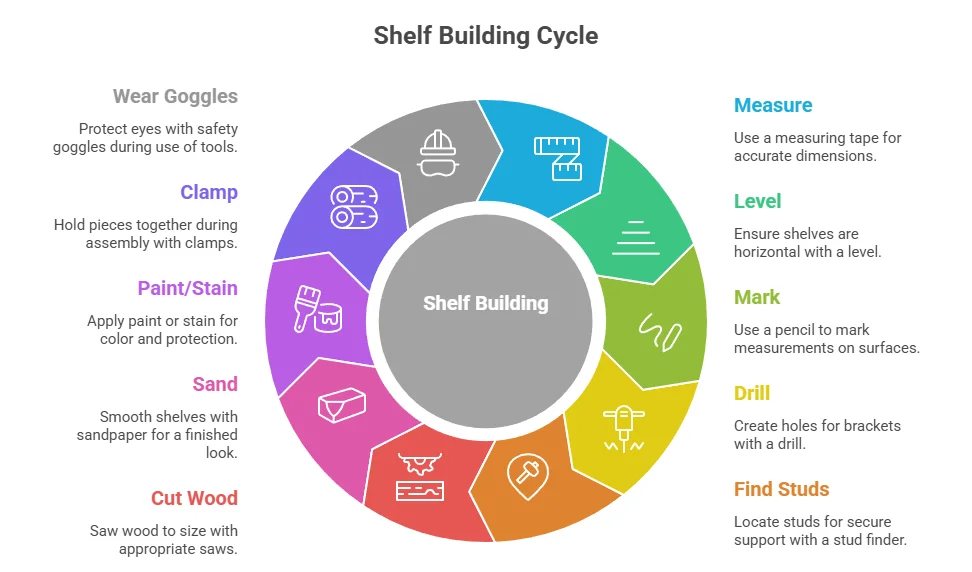
Building DIY floating shelves can be an exciting and rewarding project for your home. With the right tools and materials, you can create beautiful and functional storage or display space. Here’s a handy guide on the essential tools you’ll need to ensure your floating shelves are both sturdy and stylish.
Essential Tools for DIY Floating Shelves
Before you embark on your DIY Wooden Floating Shelves Installation journey, gather the following tools:
- Measuring Tape: Accurate measurements are the foundation of a successful project. Use a measuring tape to determine where your shelves will go and how long you want them.
- Level: This tool ensures your shelves are perfectly horizontal. Nothing looks worse than a shelf that’s tilting to one side!
- Pencil: A simple pencil is essential for marking your measurements on the wall and on the wood. It helps you visualize the placement before you commit.
- Drill: An electric drill (or a screwdriver, if you prefer) will be necessary to create holes in the wall for your shelf brackets or supports.
- Stud Finder: This tool helps you locate the wooden beams within your wall. Screwing your shelves into these studs will provide the best support.
- Wood Saws: Depending on the type of wood you choose, you’ll need a circular saw or a hand saw to cut your shelves to the desired dimensions.
- Sandpaper: Sand your shelves thoroughly to prevent splinters and give a nice finish. You can use a more aggressive grit to start and work down to a finer grit.
- Paint or Stain (optional): If you want your shelves to have color or a finished look, gather some high-quality paint or wood stain.
- Clamps: These will help you hold pieces of wood together while you drill or create your shelves.
- Safety Goggles: Always wear safety goggles to protect your eyes, especially when using power tools.
Additional Supplies to Consider
Besides tools, you’ll also need some materials to assemble your floating shelves:
- Wood: The type of wood you choose will depend on your preference and the overall design of your space. Common options include pine, oak, or plywood.
- Brackets or Supports: Depending on how you choose to install your floating shelves, you may need special brackets designed for floating shelves or a hidden support system.
- Screws: Make sure to have durable screws suitable for the weight your shelves will bear.
- Wood Glue (optional): If you are joining two pieces of wood together, wood glue provides additional strength.
Planning Your Project
Before you dive into installation, it’s wise to plan out your project. Here are some steps to consider:
- Determine the Location: Think about the best spot for your floating shelves. Is it in your living room for decor or in the kitchen for extra storage?
- Decide on Dimensions: What length and depth do you want for your shelves? Regardless of their use, balance aesthetics and functionality.
- Create a Sketch: Having a visual can help you stay organized and focused during the installation.
Where to Find More Resources
For those looking for step-by-step installation guides or expert advice, several websites offer a wealth of information. Some recommended resources include:
Having the right tools for your DIY Wooden Floating Shelves Installation project can make all the difference. With these essential items at your disposal, you can achieve stunning results, transforming any space with your unique touch. Remember to plan carefully and take your time with installation to enjoy your new shelves for years to come!
Conclusion
Successfully installing DIY Wooden Floating Shelves Installation can transform your space and showcase your personal style. By following the step-by-step guide outlined earlier, you can create beautiful, functional shelves that are tailored to your needs. Remember, selecting the right materials is essential; high-quality wood not only enhances aesthetics but ensures longevity and sturdiness.
When styling your floating shelves, let your creativity shine. Mixing textures, colors, and sizes of items can turn your shelves into a focal point in the room. Use books, plants, and décor pieces that resonate with your personality to make a space truly yours.
However, it’s important to be aware of common mistakes that can complex an otherwise simple project. Ensure you measure accurately and choose the right mounting hardware to avoid future mishaps. Taking precautions during installation is key to enjoying your new shelves for years to come.
Additionally, having the right tools on hand can make your DIY journey smoother. Simple tools like a level, drill, and measuring tape can save you time and frustration, leading to a more enjoyable installation experience. Embrace the process and remember that each step brings you closer to a beautiful result. With careful planning and a bit of creativity, your DIY Wooden Floating Shelves Installation will not only display your treasured items but also enhance the overall look of your home. Happy crafting!