Transforming your living space with a DIY wooden bar cart is a fantastic way to enhance home entertaining. Not only does a bar cart provide additional storage, but it also adds style to your décor and offers a convenient way to serve drinks and snacks to your guests. Below, you’ll find some creative and practical plans for creating your own wooden bar cart, complete with tips to make the process easy and enjoyable.
Essential Materials for Your Bar Cart
Before diving into building your wooden bar cart, gather all the necessary materials. Here’s a list of essentials you need:
- Wood Boards: Choose high-quality wood, like oak or pine, for durability.
- Wheels: Opt for sturdy, locking wheels that allow easy mobility.
- Wood Glue: Strong adhesive for secure joints.
- Screws: Get wood screws for attaching parts together.
- Sandpaper: For smoothing out rough edges.
- Paint or Stain: To finish your cart according to your home’s aesthetic.
Plan 1: Classic Two-Tiered Bar Cart
Steps to Build:
- Start by cutting wood boards for the top and bottom shelves. A common size is 24 inches long and 16 inches wide.
- Cut four vertical pieces for the frame, at a height of about 30 inches.
- Attach the shelves to the vertical pieces using screws, ensuring the bottom shelf is about 6-8 inches from the floor.
- Attach the wheels to the base of the vertical posts, allowing for easy movement.
- Sand the entire cart to remove splinters and then stain or paint as desired.
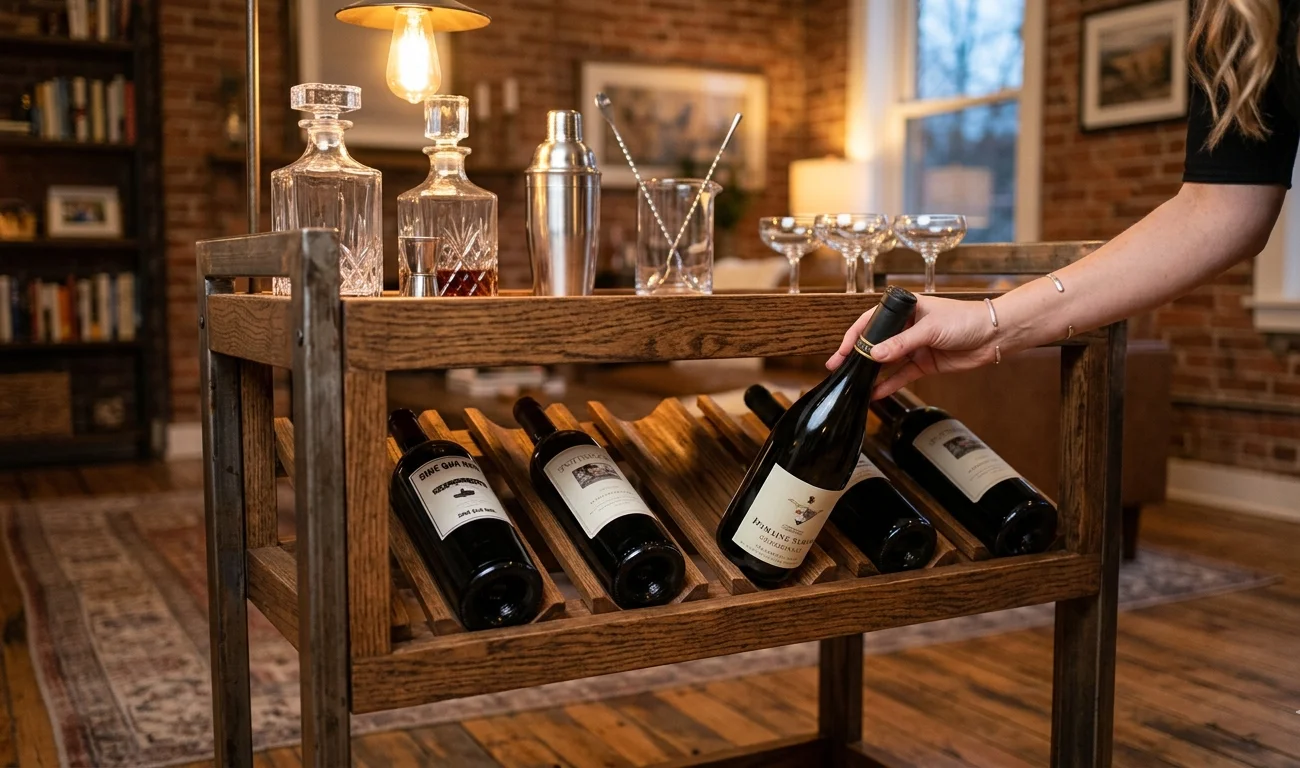
Plan 2: Rustic Bar Cart with Wine Rack
Materials Needed:
- Wood boards (1×6 for the shelves, 2×4 for the frame)
- Metal wine bottle holders (optional, for additional style)
Steps to Build:
- Construct a rectangular frame as the base. Use 2×4 boards to create a strong foundation.
- For the shelves, use 1×6 boards; measure and cut them to fit the frame.
- On one side, incorporate a wine rack by cutting additional small slats to hold wine bottles securely.
- Sand, finish, and attach wheels for mobility.
Enhancing Your Bar Cart
Once you have your bar cart built, it’s time to personalize it for entertaining:
- Add Accessories: Include glass racks, bottle openers, or cork trays to enhance functionality.
- Decorative Touches: Use decorative trays, plants, or fairy lights to give your bar cart an inviting look.
- Organize Supplies: Keep your glasses and alcohol in easy-to-reach spots to streamline the serving process.
Maintenance Tips
To keep your DIY bar cart in great shape:
- Regularly check the wheels and tighten screws as needed.
- Clean surfaces with a damp cloth to prevent stains.
- Apply a new coat of finish periodically to preserve the wood.
Additional Tools and Materials Needed for Building Your Bar Cart
Building your own bar cart can be a rewarding project, combining your creativity with practical skills. To make the process smoother and more enjoyable, it’s essential to gather the right tools and materials. This ensures your DIY Wooden Bar Cart Plans turns out just as envisioned.
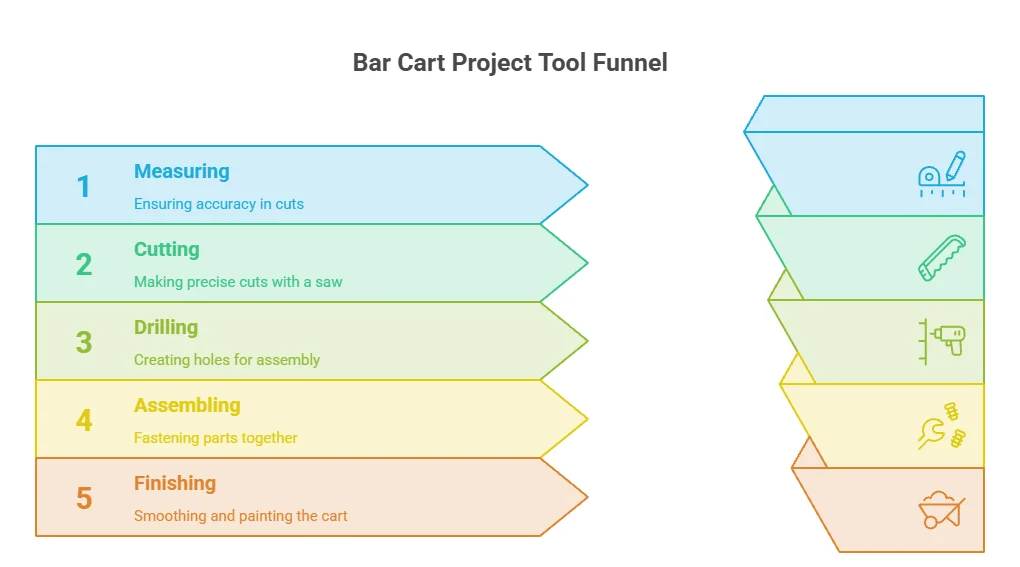
Before diving into your bar cart project, collect the tools you’ll need to create a sturdy and stylish piece of furniture. Here’s a list of the most important tools:
- Measuring Tape: Accurate measurements are crucial for cutting wood and assembling your cart.
- Square: A carpenter’s square helps ensure your joints are at perfect right angles.
- Wood Saw: Whether it’s a circular saw or jigsaw, a good wood saw is necessary for precise cuts.
- Drill: A power drill will make drilling holes and driving screws quick and easy.
- Screwdriver: Essential for fastening and assembling different parts of your cart.
- Sandpaper or Sander: To smooth edges and surfaces of your finished cart.
- Clamps: These keep your wood secure while you’re assembling components together.
- Paintbrushes or Rollers: Needed for applying paint or finish to your cart.
Materials Required
Selecting the right materials is just as important as having the proper tools. Here’s what you will typically need for your DIY Wooden Bar Cart Plans:
- Wood: Choose sturdy wood like oak or pine. Decide how many boards you need based on your design. You can often find free plans on sites like Ana White that outline the amount you’ll need.
- Wood Glue: A quality wood glue provides extra strength at joints next to screws.
- Screws: Opt for wood screws that fit the thickness and type of wood you are using.
- Finish or Paint: This can be varnish, stain, or paint to protect and beautify your cart.
- Casters: Choose functional casters that fit your cart. These make it easy to move the cart around your space. A great option can be found at Home Depot.
Additional Accessories
Depending on your bar cart’s design, you might want to include additional features. Here are a few optional materials to consider:
- Glass or Acrylic Panels: For a sleek top surface or shelving.
- Wine Rack Inserts: To add a dedicated space for your wine bottles.
- Mirrored or Decorative Elements: These can give your cart a more sophisticated look.
Planning Your Project
Before you jump into building your bar cart, it helps to have a solid plan. Consider creating a detailed design that includes dimensions and where each component will fit. Free online resources like Wood Magazine offer free plans that can guide you.
| Component | Dimensions | Material |
|---|---|---|
| Top Shelf | 36″ x 18″ | Pine |
| Bottom Shelf | 36″ x 18″ | Pine |
| Side Rails | 3″ x 3′ | Pine |
| Cross Support | 2″ x 3′ | Pine |
By ensuring you have all the tools and materials on hand before starting, you can make your DIY project enjoyable and efficient. Every step, from cutting the wood to applying the finish, becomes easier when you’re fully prepared. Once completed, your wooden bar cart will serve as a beautiful and functional addition to your home.
Design Inspiration: Styles and Themes for Your Wooden Bar Cart
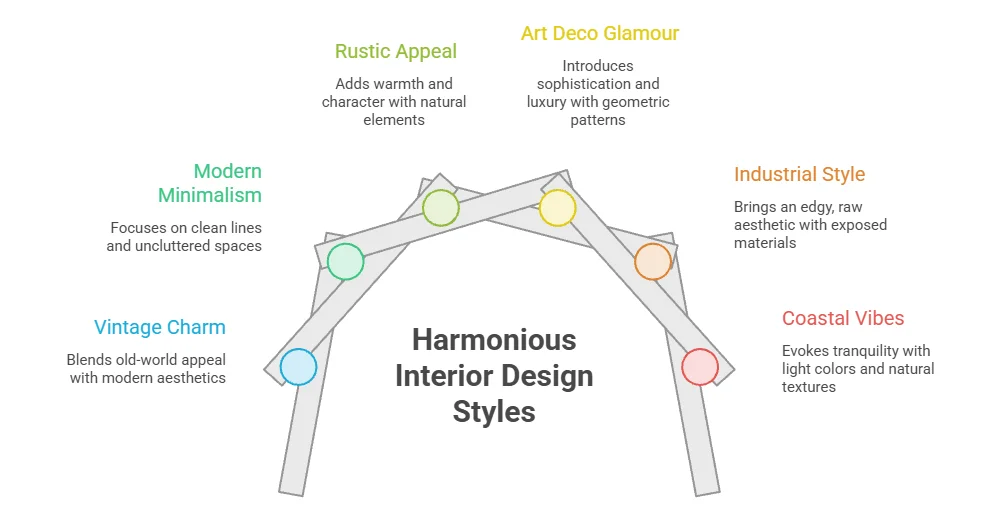
Vintage Charm
If you adore the aesthetics of bygone eras, a vintage-inspired wooden bar cart is ideal for you. To achieve this nostalgic vibe, consider sourcing reclaimed wood or opting for a distressed finish that showcases character. Adding brass or gold accents, like handles or wheels, enhances the elegant feel. You can accessorize with vintage glassware, a classic shaker, and antique cocktail recipe books to complete the look.
Modern Minimalism
For a sleek and contemporary aesthetic, a modern wooden bar cart can double as a stylish piece of furniture. Choose smooth finishes like maple or cherry, and incorporate straight lines and simple shapes. Keep the color palette neutral, using whites, blacks, or grays, and add a few statement pieces—perhaps a geometric decanter or striking glassware—to keep the focus. Combine practical shelving with smart design to maximize space while retaining a clean appearance.
Rustic Appeal
Nothing beats the warmth of rustic design. Embrace a farmhouse theme by selecting a bar cart made from reclaimed wood with a natural finish, or add touches like iron accents. Use oversized jars for beverages and rustic wooden trays to hold cocktails. Embellishing with floral arrangements or seasonal decorations can further curate a welcoming atmosphere. You can also check out Wood Magazine for projects that inspire rustic designs.
Art Deco Glamour
The Art Deco style evokes luxury and opulence. To design a wooden bar cart with an Art Deco influence, look for bold geometric patterns and rich colors. Materials such as dark woods, glass, and metallics can produce a striking contrast. Consider accessorizing with crystal glassware and decorative trays that showcase intricate designs. For a fun twist, use a mirror as a back panel to reflect light and amplify the elegance of your cart.
Industrial Style
The industrial trend revolves around raw materials and urban appeal. For a wooden bar cart with an industrial edge, incorporate dark-stained wood paired with metal pipes or brackets. This combination not only serves as a functional piece but also a stylish conversation starter. Utilize wire baskets for storage and choose a color palette that leans towards muted tones. A wall of exposed brick or a concrete floor can complement this design beautifully. Check out Ana White for DIY plans that could inspire your industrial cart project.
Coastal Vibes
If you prefer a fresh and breezy atmosphere, a coastal-themed wooden bar cart can be a fantastic addition to your space. Use light, airy wood such as pine, and think about incorporating a whitewash finish. Decorate with seashells, nautical-themed items, and pastel-colored glassware. This theme brings in a relaxed style that makes entertaining feel effortless, reminiscent of relaxing days by the shore.
Classic Elegance
Sometimes, simplicity speaks volumes. A classic wooden bar cart showcases timeless appeal. Opt for high-quality wood with a rich finish, and keep lines simple and refined. Accessorize with classic glassware and a few select drinks that evoke sophistication. A vintage ice bucket or a simple floral arrangement can help to elevate the overall feel of your bar cart.
Personal Touches
Ultimately, this is your bar cart, so add personal elements that resonate with your style. Think about incorporating your favorite books or local artisan cocktail mixes to make it unique. Seasonal decorations can also freshen up the look—just don’t forget to rotate items so your bar cart always feels fresh and inviting. For more tips and trend ideas, the House Beautiful website is a great resource.
Step-by-Step Guide to Assembling Your DIY Bar Cart
Creating your own bar cart can be an enjoyable and rewarding project. Whether you want a stylish way to entertain guests or a functional piece to store your favorite drinks, building a DIY wooden bar cart is an excellent choice. Let’s walk through the steps to assemble your DIY bar cart, making sure you have all the essentials for success.
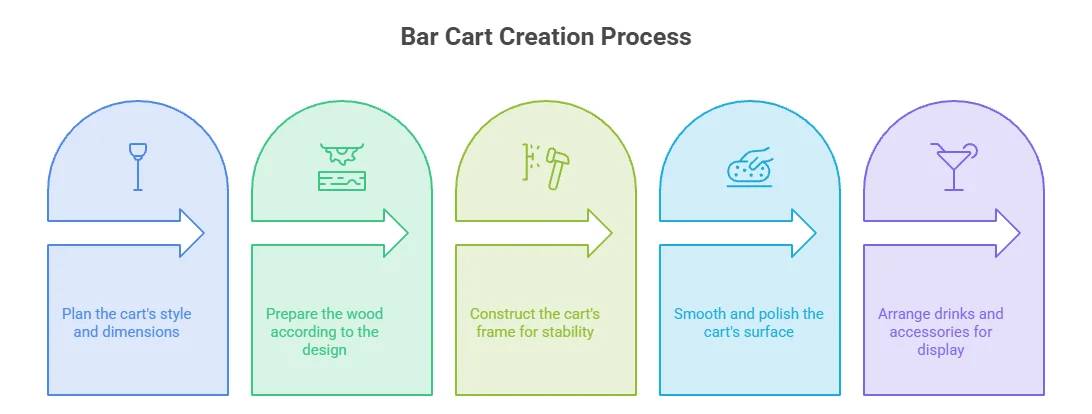
Design Your Bar Cart
Before cutting any wood, sketch out your design. Consider the dimensions based on your available space and desired aesthetic. A common design features:
- A top shelf for displaying glassware and bottles.
- A lower shelf for additional storage.
- Shelves wide enough to accommodate standard liquor bottles.
- Space for accessories like wine openers or cocktail shakers.
Cut the Wood
Using your measuring tape and saw, cut the wood according to your design. Ensure your cuts are straight and precise. Here’s a simple cutting guide based on a typical bar cart size:
| Part | Dimensions |
|---|---|
| Top Shelf | 36″ x 18″ |
| Bottom Shelf | 36″ x 18″ |
| Side Panels (2) | 36″ x 4″ |
| Support Beams (2) | 4″ x 3″ |
| Wheels (4) | Choose appropriate size |
Assemble the Frame
With your pieces cut, it’s time to start assembling. Follow these steps:
- Take the side panels and attach them to the support beams using screws and wood glue. Ensure they are square and level.
- Next, attach the bottom shelf to the frame, securing it with screws. Use wood glue for added strength.
- Once the bottom shelf is secure, attach the top shelf, using the same method.
- Fix the swivel casters to the bottom corners of the frame for mobility.
Sand and Finish Your Bar Cart
Now that your bar cart is assembled, it’s time to smooth the surfaces. Use sandpaper to eliminate any rough edges or splinters. Start with a coarse grit and move to a finer grit for a polished finish. This step is vital for achieving a professional look.
After sanding, it’s time to apply your chosen wood finish or paint. Follow these guidelines:
- If staining, apply with a clean cloth and let it penetrate before wiping off excess.
- If painting, use a primer first for better adhesion and a uniform finish.
Style and Organize Your Bar Cart
Once your bar cart is finished, it’s time to style and organize it. Start with your favorite liquors and mixers. Add elegant glassware on the top shelf and decorative items like plants or artwork. Consider using trays to group similar items for a neat presentation. You can also explore ideas for stylish bar carts on sites like Good Housekeeping.
Tips for Customizing and Finishing Your Wooden Bar Cart
Creating a custom wooden bar cart can be an exciting DIY project. However, to truly make it your own, personalization and finishing touches are crucial. This guide will provide valuable tips on customizing and finishing your wooden bar cart to enhance its appeal and functionality.
Choosing the Right Wood for Your Bar Cart
The first step in customizing your wooden bar cart is selecting the right type of wood. The wood you choose can significantly affect both the appearance and durability of your cart.
- Softwoods: Pine and cedar are excellent for beginners due to their ease of handling and sanding. However, they may not be as durable as hardwoods.
- Hardwoods: Oak, maple, and cherry are popular choices for a more elegant look and robust structure. They might be a bit more challenging to work with but can last a lifetime.
Designing Your Custom Bar Cart
Before moving onto the actual building, take the time to sketch your bar cart design. Think about the following elements:
- Size: Measure your space to determine the ideal dimensions.
- Storage: Consider open shelves, drawers, or a wine rack to fit your needs.
- Wheels: Decide whether you want your bar cart to be mobile. Adding wheels can help with flexibility and ease of movement.
Personalizing Your Cart with Unique Features
Customization is key to making your bar cart suit your style. Here are some ideas:
- Color Stains: Different stains bring out the natural beauty of the wood. You can achieve classic looks with dark walnut or cedar and modern styles with white or teal stains.
- Hardware Selection: Choose handles and knobs that reflect your taste. Sleek silver, rustic bronze, or even colorful ceramic can add personality.
- Decorative Accents: Adding decorative elements like carved details, or stenciling can enhance the overall look.
Finishing Techniques
The finishing touches on your wooden bar cart are essential for protecting the wood and giving it a polished appearance. Here are some popular finishing techniques:
- Sealer: Use a high-quality wood sealer to protect against moisture and stains.
- Varnish: A clear varnish not only enhances the wood’s color but also provides a hard protective layer.
- Polyurethane: This product can give your bar cart a durable finish, but make sure to choose a water-based version for lower odor and quicker drying time.
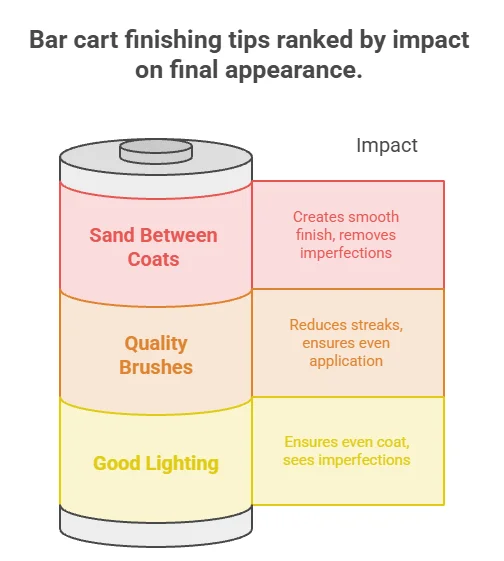
Tips for a Professional Finish
Achieving a professional finish on your bar cart doesn’t have to be daunting. Follow these handy tips:
| Tip | Description |
|---|---|
| Sand Between Coats | Lightly sand between coats of varnish or paint to create a smooth finish. |
| Use Quality Brushes | Investing in good brushes helps reduce streaks and ensures even application. |
| Apply in Good Lighting | Working in a well-lit space helps you see imperfections and ensures an even coat. |
Accessorizing Your Bar Cart
Your wooden bar cart can become a centerpiece for gatherings. To achieve this, accessorize wisely:
- Lime and Lemon Zester: Keep your cocktails fresh with perfect garnishes.
- Cocktail Shaker: A stylish shaker is a must for creating mixed drinks.
- Barware Set: Include everything from glasses to stirring sticks for a complete look.
By following these customizing and finishing tips, you can create a wooden bar cart that is not only functional but also a reflection of your style. Remember, the key is to take your time and personalize each detail as you go. For more design ideas and plans, check out resources like Wood Magazine and Ana White. Happy crafting!
Conclusion
Building your own wooden bar cart is a rewarding project that adds both style and functionality to your home. With the creative DIY Wooden Bar Cart Plans discussed, you can transform any space into a sophisticated entertaining area. From selecting the right tools and materials to inspiring design themes, you have all the knowledge you need to embark on this journey.
Assembling your bar cart step-by-step will not only enhance your woodworking skills but also provide a sense of accomplishment as you see your ideas take shape. Remember, the process can be enjoyable, so take your time and don’t hesitate to infuse your personality into the design.
Customizing and finishing your wooden bar cart is where your vision truly comes to life. Adding personal touches—like unique stains, colors, or decorative elements—ensures your cart reflects your style and complements your home decor.
Ultimately, this project isn’t just about creating a piece of furniture; it’s about crafting a space where friends and family can gather, laugh, and make memories over good drinks. You now have the tools, tips, and inspiration to create something special. So gather your materials, roll up your sleeves, and start building your very own bar cart that can elevate your entertaining game for years to come. Enjoy the process, and cheers to your DIY success!