
If you’re short on space but desire functional furniture, a folding wooden table might be the ideal solution. These versatile tables can fold away when not in use, making them a perfect fit for apartments, small homes, or any area where maximizing space is essential. Let’s dive into some creative DIY Folding Wooden Table Plans that you can easily execute.
One popular option is the drop-leaf table. This design features hinged leaves that can be raised or lowered, allowing you to adjust the table size for various needs. Materials needed include:
- Wood (plywood, solid wood, or a combination)
- Hinges
- Screws
- Wood glue
- Sandpaper
- Wood stain or paint (for finishing)
The basic steps to create a drop-leaf table include:
- Cut your wood to the desired size for the tabletop and legs.
- Attach hinges to the leaves and secure them to the main table.
- Attach the legs securely to the base to ensure stability.
- Finish the wood with a stain or paint that matches your decor.
This kind of table can be quite stylish and functional. For a more modern look, consider adding metal legs or sleek finishes. Another creative option is a folding picnic table design, perfect for both indoor and outdoor use. A simple DIY Folding Wooden Table Plans involve using sturdy wooden slats and creating a bench setup that can fold away easily. Materials needed include:
- Wood planks of your choice
- Wood screws
- Folding hinges
- Outdoor sealant or paint (if intended for outdoor use)
To construct your folding picnic table, follow these steps:
- Design the layout of the table and benches on paper to visualize the final product.
- Cut your wood according to your design.
- Build the table surface and attach the folding hinges to both the table and bench sections.
- Finish with an outdoor sealant if it will be outside.
This table can be a fantastic addition for hosting outdoor gatherings or enjoying casual meals with family. For those who enjoy a rustic look, consider crafting a farmhouse-style folding wooden table. This design enhances cozy interiors with its charm. Basic materials required include:
- Reclaimed wood or new lumber
- Screws
- Folding brackets
- Wood finish or paint
To create a farmhouse-style table, you can follow these steps:
- Use reclaimed wood for a rustic touch and cut to your desired table size.
- Attach folding brackets that allow the table to collapse.
- Sand down any rough edges and finish with a wood stain to enhance its character.
This table style is not only functional but can also act as a beautiful focal point in any room. For additional guidance and inspiration, you can explore resources such as Instructables, which offers a variety of folding table plans and instructions. Another great site is Wood Magazine, where you can learn more about different wood types and joinery techniques. Whether you’re an experienced DIYer or just starting, these creative DIY Folding Wooden Table Plans can suit any space. Simplifying your living area doesn’t mean sacrificing style or functionality. By crafting your own furniture, you not only save space but also create pieces that cater specifically to your needs. Plus, each table becomes a unique representation of your personal style. Enjoy making your DIY folding table!
Essential Tools and Materials Needed for Crafting Your Folding Table
Building your own folding wooden table can be a rewarding project. It allows for personalization and adds a touch of craftsmanship to your living space. To get started, you need the right tools and materials at your disposal. Having everything you need on hand will simplify the process and help ensure your project is a success.
Tools You’ll Need
Before diving into crafting your folding table, it’s essential to gather a few tools. Here’s a comprehensive list:
- Measuring Tape: This is crucial for ensuring accurate dimensions. A retractable measuring tape is ideal for measuring your wood pieces effectively.
- Square: A carpenter’s square will help you create right angles and keep your project aligned.
- Level: A level is necessary to ensure that your table stands evenly on the ground, preventing wobbling.
- Power Drill: A drill is essential for making holes and securing screws. Consider a cordless option for portability.
- Saw: A circular saw or miter saw will allow you to cut your wood to the desired lengths. A hand saw can work too, but power tools save time.
- Sander: For a smoother finish, a power sander helps refine edges and surfaces, making your table safer and more aesthetically pleasing.
- Clamps: Use clamps to hold pieces together securely while you drill or glue. This ensures better accuracy and stability.
- Safety Gear: Always use safety glasses and a dust mask to protect yourself while you work.
Materials Required
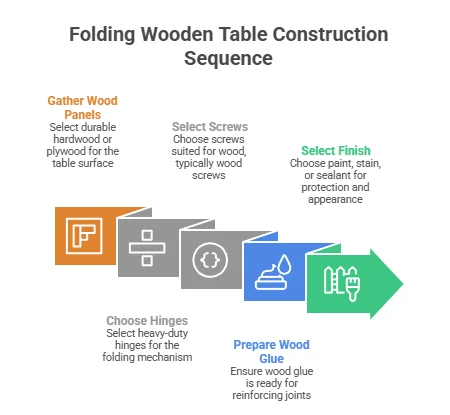
With the right tools in hand, the next step is to gather your materials. Here’s what you will need for constructing a folding wooden table:
- Wood Panels: Choose durable hardwood or plywood for the table surface. Consider using Wood Magazine for insights on selecting the right type of wood for your project.
- Hinges: Heavy-duty hinges are essential for the folding mechanism. Look for those that provide strong support and smooth operation.
- Screws: Select screws suited for wood. Usually, wood screws are recommended for joining your wood pieces.
- Wood Glue: This is an excellent adhesive for reinforcing joints and ensuring structural integrity.
- Finish: Consider paint, stain, or sealant as a finishing option to protect your table and enhance its appearance.
Steps for Crafting Your Folding Table
Once you have all the necessary tools and materials, you can start crafting. Here’s a simple approach to guide you through:
- Measure and Cut: Start by measuring your wood panels and cutting them to size with your saw.
- Assemble the Frame: Use screws and wood glue to construct a supportive frame for your table.
- Attach the Hinges: Secure the hinges to the sides of the table’s surface and the frame, allowing for ease of folding.
- Smooth the Edges: Use the sander to smooth out any rough edges and prepare the surface for finishing touches.
- Finish: Apply your chosen finish to protect the wood while enhancing its natural beauty.
Tips for a Successful Project
Consider these tips to increase your chances of creating a fantastic folding wooden table:
- Plan your design on paper before starting to visualize size and proportions.
- Practice cuts on scrap wood if you’re unsure about your technique.
- Don’t rush the finishing process; allow the stain or paint to dry thoroughly.
Crafting a folding wooden table can be both practical and enjoyable. Remember to take your time and enjoy the process. By using reliable resources like Instructables, you can also find specific DIY Folding Wooden Table Plans and tutorials tailored to various styles. With the right tools and materials, you are well on your way to creating a functional and stylish addition to your home.
Step-by-Step Guide to Building a Functional and Stylish Folding Table
Building a functional and stylish folding table can be a rewarding project that adds utility to your space. Whether for entertaining guests, working on hobbies, or saving space in a small area, a folding table meets many needs. Follow this step-by-step guide to create your own folding wooden table with ease and precision.
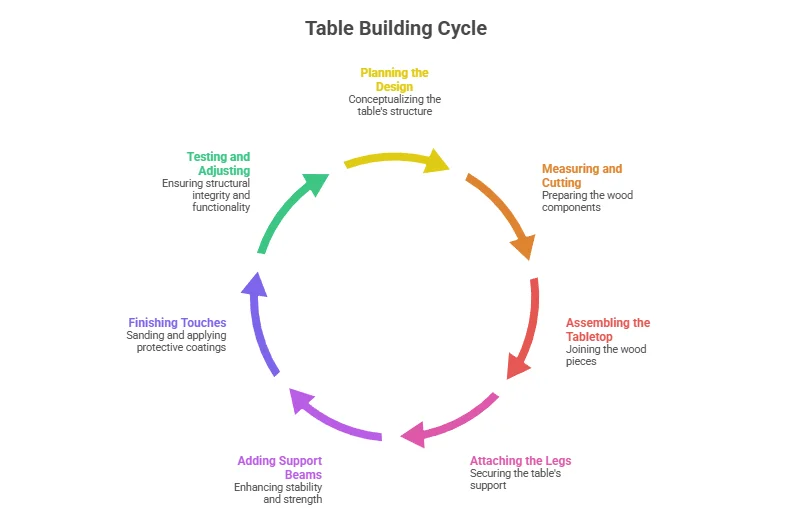
Step 1: Planning the Design
Before cutting any wood, take time to plan your table’s dimensions. A typical folding table is often around 4-6 feet in length and 2-3 feet in width. Decide on the size that suits your space and function best. Sketch your design including legs, tabletop, and the folding mechanism. This will act as your roadmap throughout the project.
Step 2: Measuring and Cutting the Wood
Measure your wood boards accurately according to your design. The main components to cut include:
- Tabletop: Two large pieces to create the top surface
- Legs: Four sturdy pieces for support
- Support Beams: Two pieces for stability across the width
Carefully use a saw to cut these pieces. Make straight and clean cuts to prevent any difficulties during assembly.
Step 3: Assembling the Tabletop
Once your pieces are cut, lay out your tabletop pieces side by side. Use wood glue between the boards for added strength, and secure them with clamps while the glue dries. This process can take about an hour. To enhance durability, drive screws along the joins after the glue has set.
Step 4: Attaching the Legs
Take the four leg pieces and attach them securely to the corners of the tabletop using hinges. It’s best to position the hinges 2-3 inches from the tabletop edge. This will allow the table to fold properly. Ensure the legs swing outward easily, and that they lock firm when extended.
Step 5: Adding Support Beams
Add two support beams across the underside of the tabletop, near where the legs meet it. This will provide extra strength and stability. Secure each beam using wood screws.
Step 6: Finishing Touches
Once your folding table is assembled, it’s time for finishing touches. Sand all surfaces starting with medium-grit sandpaper and progressing to fine-grit to achieve a smooth finish. If you choose to stain or paint your table, apply your desired finish using a paintbrush and allow ample drying time.
Step 7: Testing and Adjusting
Now that your table is assembled and finished, test its functionality. Open and close the table multiple times to ensure the hinges operate smoothly. If needed, adjust the tightness of screws or the positioning of the hinges for optimal performance.
Additional Tips for Building a Folding Table
- Use weather-resistant wood if the table will be outdoors.
- Consider adding rubber feet to the legs to prevent slipping and protect flooring.
- Explore different styles of folding mechanisms available online for unique designs.
For more inspiration and detailed plans, visit Woodworking for Beginners or Ana White’s Folding Table Plans. A DIY folding wooden table is not just a practical addition to your home but also a chance to express your creativity. With some attention to detail and patience, you’ll have a piece that looks great and performs well. Happy building!
Tips for Finishing and Refinishing Your DIY Wooden Table
Finishing and refinishing your DIY wooden table can elevate its beauty and durability. Whether you’re working on a brand new piece or giving an old table a fresh look, the right finishing techniques can make all the difference. Here are some valuable tips to help you achieve stunning results.
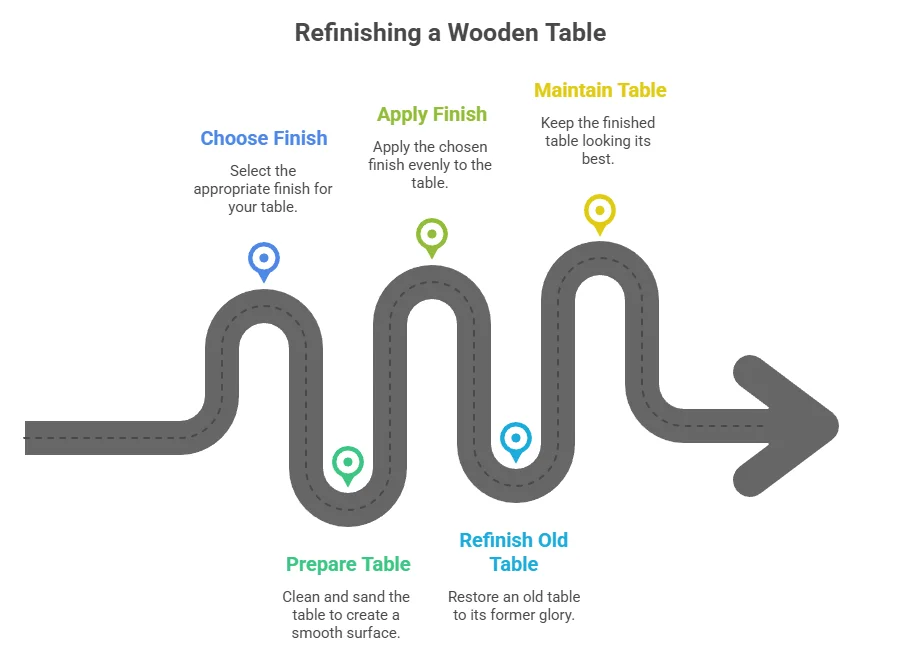
Choosing the Right Finish
Selecting the proper finish for your wooden table is crucial. Common options include:
- Varnish: Offers a hard, protective layer that is resistant to scratches and water.
- Polyurethane: Provides excellent durability and comes in both oil and water-based varieties.
- Oil: Enhances the natural look of the wood while offering a warm finish, though it requires more frequent reapplication.
- Shellac: Quick-drying and easy to repair, but it’s less durable against water and heat.
Preparing Your Table for Finishing
Proper preparation is essential to achieving the best finish. Here are the steps you should follow:
- Sand the Surface: Use a fine-grit sandpaper (between 120 and 220 grit) to smooth the surface. Always sand in the direction of the wood grain to avoid scratches.
- Clean the Dust: After sanding, clean the table thoroughly using a damp cloth to remove all dust particles.
- Test the Finish: Before applying the finish to the entire table, test it on a small, inconspicuous area to ensure you like the color and sheen.
Applying the Finish
Once you’re ready to apply the finish, follow these tips:
- Use Quality Brushes: Invest in high-quality brushes or applicators tailored for your chosen finish to achieve an even application.
- Work in Thin Layers: Apply the finish in thin layers to avoid drips and bubbles. Allow each layer to dry completely before applying the next one.
- Follow the Grain: Apply the finish in the direction of the grain, as this helps the finish absorb better and creates a smoother appearance.
Refinishing an Old Wooden Table
If you’re refinishing an old table, you may face additional challenges. Here’s how to tackle them:
- Remove Old Finish: Use a chemical stripper or sandpaper to remove the existing finish. Make sure to wear gloves and a mask for protection.
- Repair Damage: Fill any dents or scratches with wood filler that matches the color of your table. Sand it smooth once dry.
- Stain if Desired: If you want to change the color, apply a wood stain after sanding and before finishing. Ensure the stain dries thoroughly.
Maintaining Your Finished Table
Regular maintenance will keep your wooden table looking fantastic. Follow these tips:
- Wipe Spills Immediately: Don’t let liquid sit on the table; clean spills as soon as they happen to prevent damage.
- Avoid Direct Sunlight: Keep your table out of direct sunlight to prevent fading and warping.
- Use Coasters: Protect the surface from heat and scratches by using coasters for drinks and placing mats under utensils.
Resources and Further Reading
For additional guidance on finishing and refinishing wooden projects, check out the following resources:
- Wood Magazine: Finishes
- This Old House: How to Refinish a Wooden Table
- Family Handyman: Tips for Refinishing Tables
By implementing these tips, you can ensure a beautiful finish that showcases the elegance of your wooden table. Remember that patience is key, as good things take time, and your efforts will definitely pay off with a stunning, long-lasting finish.
Unique Design Ideas for Custom Folding Tables to Suit Your Style
When it comes to furniture, folding tables are a versatile solution for various spaces. Their ability to adapt to different environments makes them an excellent choice for homeowners and event planners alike. With a unique design, a folding wooden table can serve both functional and aesthetic purposes. Here are some custom design ideas that can elevate the look of your space while meeting your needs.
Rustic Farmhouse Style
The rustic farmhouse style embraces natural materials, emphasizing simplicity and warmth. A folding wooden table designed in this style can incorporate reclaimed wood for a weathered look. This adds character and uniqueness that cannot be replicated with new materials. You might consider adding:
- Distressed finishes that highlight the wood’s grain.
- Integrated storage compartments for ease of use.
- Soft, rounded edges for a safer and more inviting feel.
To learn more about rustic designs, you can visit The Pioneer Woman.
Modern Minimalist Design
If you lean towards a more contemporary approach, a modern minimalist folding table may be just what you need. This type of table focuses on clean lines and functional design. Elements to consider include:
- Foldable legs with a sleek, geometric shape.
- A neutral color palette to blend seamlessly with your existing decor.
- Materials like plywood or engineered wood to maintain a lightweight structure.
For inspiration in modern design, check out Architectural Digest.
Creative Multi-functional Designs
Why settle for just a table when you can have multi-functional furniture? Custom folding tables can serve more than one purpose. Here are a few ideas:
- A table that doubles as a storage unit: Add drawers or shelves underneath to keep your living area tidy.
- Tables with adjustable heights that can convert from dining height to coffee table height.
- Built-in seating: Consider foldable benches that go along with your table’s design.
Colorful and Playful Options
Add a pop of color to your room with a vibrant folding table. Customizing your folding table with bold colors can make it a statement piece.
- Choose bright, fun colors that match your personality and style.
- Consider using stencils or patterns for an artistic approach.
- Integrate a chalkboard top for a fun and interactive surface.
For ideas on color and design, explore House Beautiful.
Eco-Friendly Designs
In today’s world, sustainability is a key consideration. Opting for eco-friendly materials and processes can make your folding wooden table a smart choice. Consider these elements:
- Use sustainably sourced wood.
- Incorporate non-toxic finishes to ensure a safe environment for your family.
- Design for disassembly to allow for recycling or repurposing in the future.
Learn more about eco-friendly furniture options at TreeHugger.
Unique Shapes and Sizes
Why stick with the traditional rectangular table? Think outside the box by customizing the shape of your table. Options include:
- Round tables for intimate gatherings.
- Hexagonal or octagonal designs for a modern twist.
- Extendable designs that can cater to various groups.
For additional shape inspirations, you can refer to Elle Decor.
Creating a folding wooden table that adds style and function to your space is an exciting project. By considering different designs, materials, and functions, you not only enhance your décor but also create a piece that reflects your personality. By implementing these unique design ideas, you can enjoy a custom folding table that is not only practical but also fits seamlessly into your home.
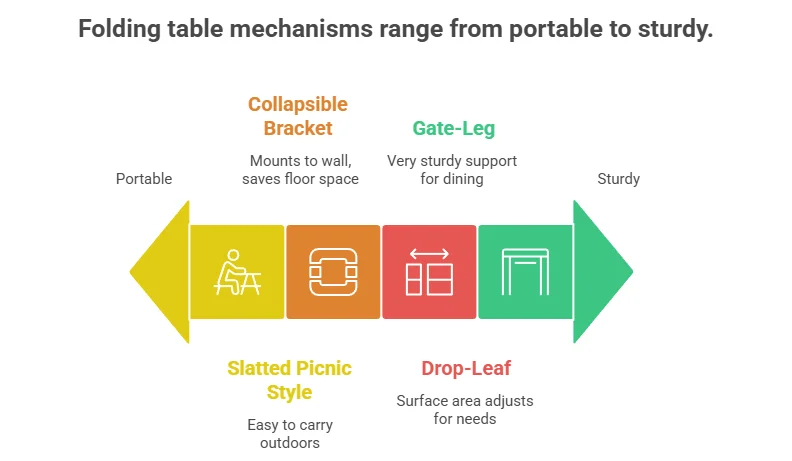
Comparison of Folding Mechanisms
| Mechanism Type | Best Use Case | Key Advantage |
|---|---|---|
| Drop-Leaf | Small Kitchens | Adjustable surface area |
| Gate-Leg | Dining Rooms | Very sturdy support |
| Collapsible Bracket | Wall-mounted desks | Saves maximum floor space |
| Slatted Picnic Style | Outdoor/Patio | Highly portable |
Conclusion
Creating your own folding wooden table can be a fulfilling project, especially for those who want to maximize their space with style. By exploring creative DIY Folding Wooden Table Plans, you can discover designs that fit snugly into your home while also reflecting your personal aesthetic. Armed with the essential tools and materials outlined earlier, you can confidently embark on your building journey.
Following a step-by-step guide ensures that your table not only looks great but is also sturdy and functional. Don’t hesitate to add your personal flair through unique design ideas tailored to your tastes; there’s plenty of room for innovation. Remember, each table you craft can be a reflection of your individual style, transformed through thoughtful details and choices.
Once you’ve built your table, finishing touches can elevate its appearance even further. Tips for finishing and refinishing your DIY wooden table will help give your piece a polished look that complements your interior design. Whether you prefer a natural wood finish or a bold color, the possibilities are endless.
By engaging with this DIY project, you not only gain a practical piece of furniture but also enrich your skill set and enjoy the process of creation. So, roll up your sleeves, gather your materials, and get started on crafting a beautiful folding wooden table that truly belongs in your home! Your creation will serve as a testament to your hard work and creativity.