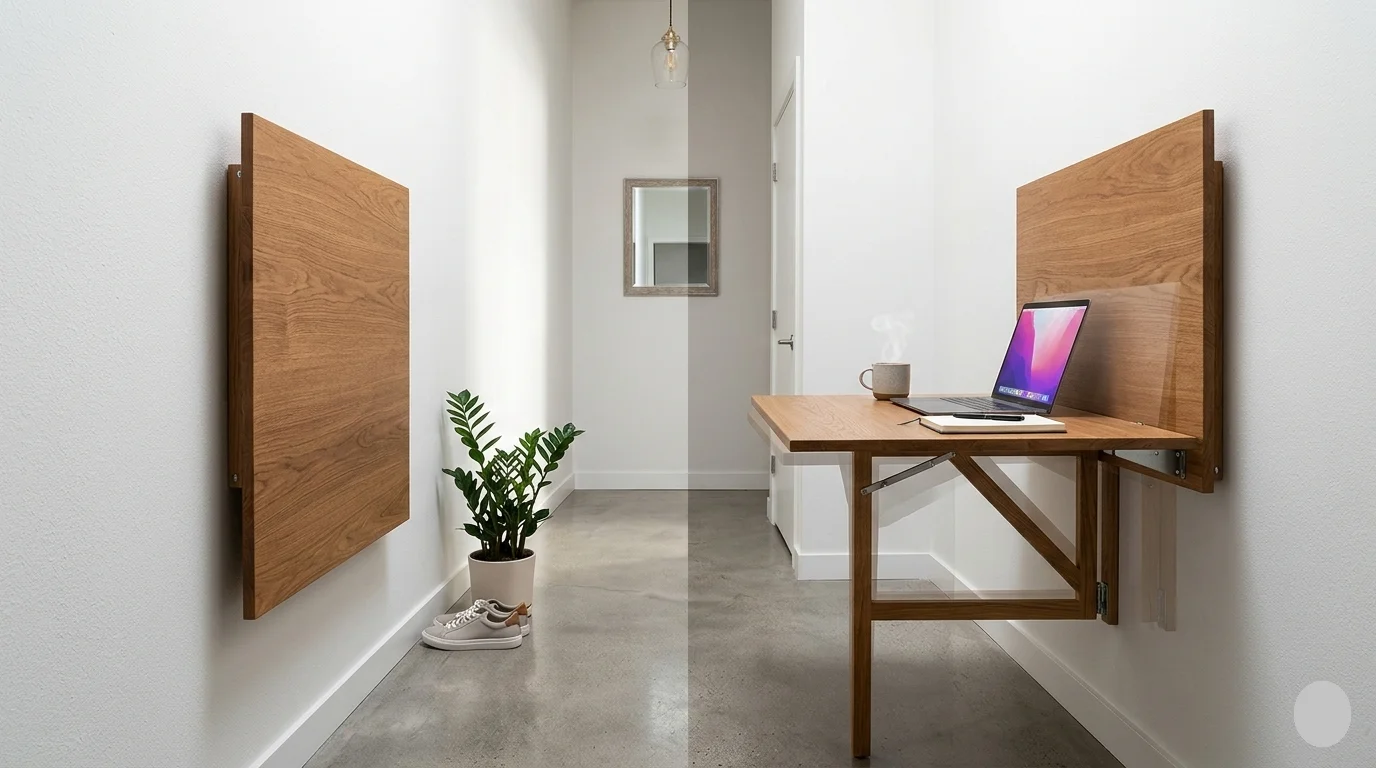
Creating a DIY Collapsible Wooden Table Plans is a rewarding project that combines creativity with practicality. Whether you need extra space for gatherings, a workspace, or camping trips, a collapsible table can easily fit in various settings. Here’s a step-by-step guide to help you make your own, ensuring you enjoy the process from start to finish.
Materials Needed
- Wood (Pine, plywood, or any sturdy type)
- Hinges (2-4 depending on design)
- Wood glue
- Wood screws
- Sandpaper (medium and fine grit)
- Wood finish or paint (optional)
- Tools: saw, drill, screwdriver, measuring tape, and clamps
Step 1: Planning Your Design
Start by sketching your table design on paper. Determine the dimensions you want for both the top and the legs. A standard size for tables is about 48 inches long by 24 inches wide, but customize this based on your needs. You can draw inspiration from various designs, available on sites like Lowe’s or Family Handyman.
Step 2: Gather and Prepare Your Materials
Once your design is ready, gather all your materials. For this project, consider using pine wood as it is affordable and easy to work with. Cut the wood to your desired dimensions. The tabletop should be one piece, while the legs can either be individual pieces or a pre-cut set. Ensure to sand the edges and surfaces thoroughly to eliminate any splinters.
Step 3: Constructing the Tabletop
Assemble the tabletop first. If you’re using multiple pieces, attach them side by side using wood glue and screws. Clamp the pieces together tightly and allow the glue to set completely. You can also add a thin layer of wood finish during this stage to enhance the wood’s appearance and protect it from wear in your DIY Collapsible Wooden Table Plans.
Step 4: Creating the Legs
The legs of your table can be made in a collapsible design using hinges. Cut the legs to your desired height, usually around 30 inches for dining tables. Attach each leg to the tabletop using hinges, ensuring they allow the legs to fold down tightly against the tabletop when not in use. Secure them with wood screws, double-checking that they can swing freely.
Step 5: Adding Stability
To enhance stability, consider adding cross supports between the legs. This prevents wobbling and makes the table sturdier. You can cut two additional pieces of wood and attach them in an “X” formation between the legs. Again, hinges will allow this part to collapse easily as part of your DIY Collapsible Wooden Table Plans.
Step 6: Final Assembly and Finishing Touches
Now that the legs are attached, ensure all parts are securely fastened. Test the folding mechanism by collapsing the legs and checking for any issues. If everything is functional, apply your chosen wood finish or paint to suit your style. Allow it to dry fully before testing out your new table.
Helpful Tips for Success
- Measure twice, cut once—it’s a golden rule in woodworking.
- Ensure your workspace is well-lit and organized to avoid accidents.
- Don’t rush through the sanding and finishing stages; they contribute to the final look.
Essential Tools and Materials for Building Your Own Table
Building your own table can be a rewarding project, blending creativity with functionality. However, embarking on this venture requires the right tools and materials to ensure your success. Having the essential equipment will not only make the building process easier but also produce high-quality results. Here’s a detailed guide to the tools and materials you’ll need for your DIY Collapsible Wooden Table Plans.
Basic Tools for Table Construction
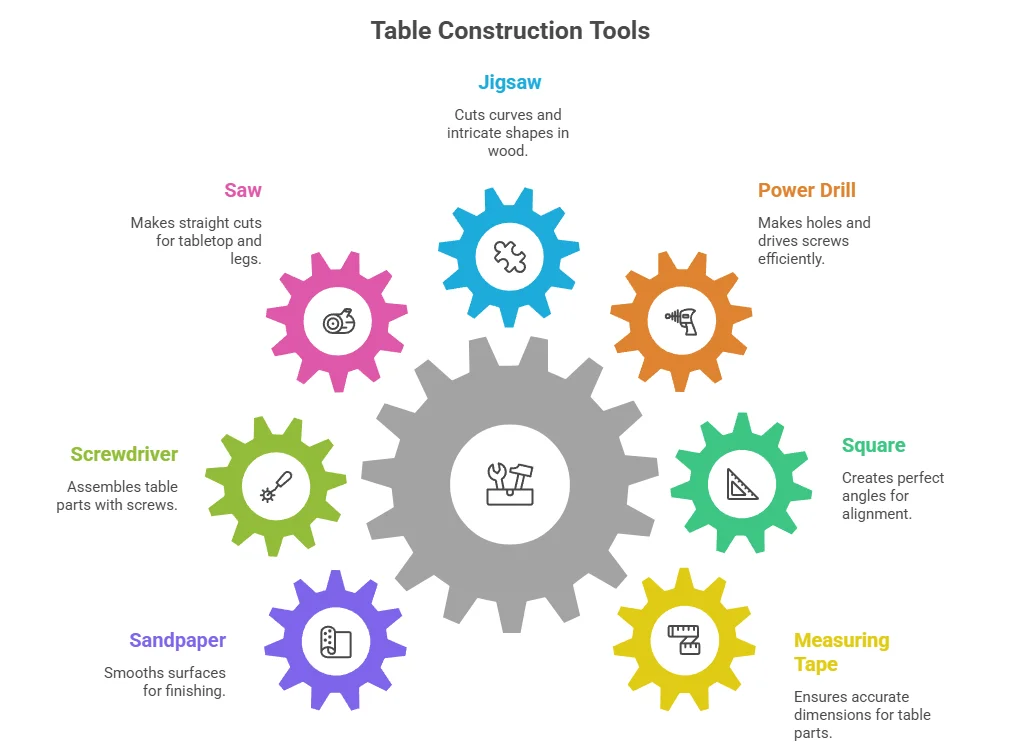
- Measuring Tape: Accurate measurements are key. A good measuring tape will help you get the dimensions just right.
- Square: This tool helps in making precise angles, ensuring that your table legs and top are perfectly aligned.
- Power Drill: A power drill is necessary for making holes and driving screws. Choose one with variable speed settings for better control.
- Jigsaw: If you need to cut curves or intricate shapes, a jigsaw is the perfect tool for the job. It can easily cut through wood and provide the desired finish.
- Saw: A circular saw or a miter saw is essential for making straight cuts. This will help in cutting the tabletop and legs to the required dimensions.
- Screwdriver: A hand screwdriver or an electric screwdriver will be needed for assembling parts of the table.
- Sandpaper: This will be used to smooth the surface of your table and prepare it for finishing.
Materials Required
After you have your tools ready, gathering the right materials is the next step. Here’s a list of materials typically required to build your own table:
- Wood: Choose the type of wood based on your preference and budget. Popular options include pine, plywood, oak, or walnut. Each type comes with its own characteristics and finishes.
- Wood Glue: This is essential for bonding pieces of wood securely, helping in assembly.
- Screws: Use wood screws to assemble the different parts of your table. Make sure they are of the appropriate length and thickness.
- Finish: Whether you want to paint, stain, or use a clear coat, having the right finish can enhance the look of your table and protect it from wear.
- Brackets or Hardware: Depending on your design, you may need mounting hardware or brackets for extra support and stability.
Safety Gear
Safety should never be overlooked. Ensure you have the following protective gear:
- Safety Glasses: Protect your eyes from dust and flying debris.
- Ear Protection: If you’re using power tools, ear protection is vital to guard against noise damage.
- Dust Mask: Wearing a dust mask can help you avoid inhaling harmful particles, especially while sanding.
Before you start building, it’s also beneficial to have a safe, dedicated workspace where you can lay out your tools and materials. Make sure it’s well-lit and free from any hazards.
Recommended Resources
If you’re looking for detailed plans or more information on table design ideas, consider visiting the following resources:
- Wood Magazine
- Home Depot DIY Projects
- Ana White – a community website with plenty of free plans for building tables and other furniture.
Having the right tools and materials is the first step to successfully building your own table. With proper planning, a safe workspace, and the right equipment, you can create a functional and beautiful piece that enhances your home. Remember that practice and patience are key, so take your time to ensure each step is performed with care in your DIY Collapsible Wooden Table Plans.
Creative Design Ideas for Customizing Your Collapsible Table
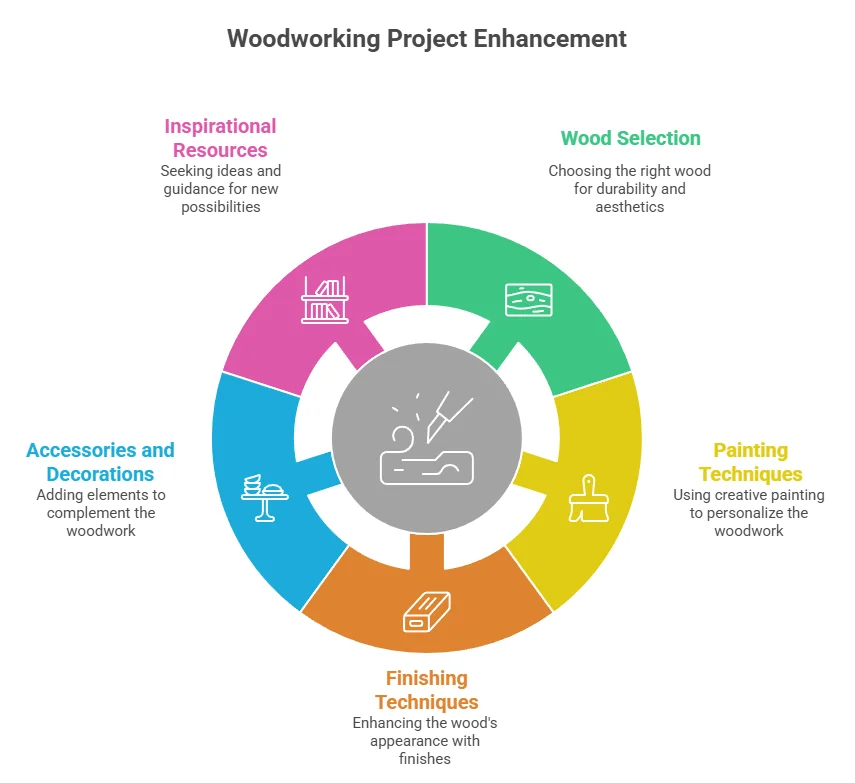
Customizing your collapsible table can transform it from a simple piece of furniture into a showcase of your creativity and personal style. Whether you are looking to add functionality, enhance aesthetics, or personalize it to suit your needs, there are many design ideas to explore for your DIY Collapsible Wooden Table Plans.
Choosing the Right Wood
The first step in customizing your collapsible wooden table is selecting the right type of wood. Different woods add unique textures and colors to your table. Here are some options:
- Pine: This is a budget-friendly option, known for its light color and softness, which makes it easy to work with.
- Oak: A durable choice with a beautiful grain texture, oak adds elegance to any table.
- Walnut: This dark wood offers a rich, luxurious look and is perfect for creating a striking centerpiece.
- Birch: Lightweight yet strong, birch is ideal for functional designs as it can withstand daily use.
Unique Features
To make your collapsible table truly unique, consider incorporating special features that enhance both functionality and aesthetics:
- Storage Compartments: Add hidden compartments beneath the tabletop for storing tools or items. This will keep your space tidy.
- Built-in Seating: Design your table with attached benches or folding chairs that can be stored away when not in use.
- Folding Mechanism: A well-designed folding mechanism not only makes setting up easier but can also add character to your table’s silhouette.
- Adjustable Height: Consider a design that allows the table height to be adjusted for different activities, such as dining or working.
Creative Painting and Finishing Techniques
Your collapsible table doesn’t have to be just bare wood. Creative painting and finishing techniques can elevate its look significantly:
- Staining: Applying wood stain enhances the natural grain and provides a rich color without hiding the wood’s beauty.
- Painting: Bright, bold colors can give your table a playful feel, while soft pastels can create a calm atmosphere.
- Decoupage: Use decoupage techniques to apply decorative paper, fabric, or photographs to the surface for a personal touch.
- Sealants: To make your table resistant to spills and stains, don’t forget to apply a clear sealant for protection.
Adding Accessories and Decorations
Accessories can enhance your collapsible table without much effort. Here are some ideas for accessorizing:
- Tablecloths: Use vibrant or patterned tablecloths to match decor themes or seasonal changes.
- Candles or Centerpieces: Simple centerpieces or clusters of candles can create a cozy atmosphere for gatherings.
- Storage Bins: Elegant bins can be placed underneath the table to store miscellaneous items, adding both style and organization.
Inspirational Resources
For more design ideas and DIY plans, you can explore several websites that specialize in woodworking and furniture design. A few resources include:
Benefits of a DIY Approach to Furniture Making
Crafting your own furniture can be a rewarding and fulfilling experience. One of the principal benefits of a DIY approach to furniture making is the ability to create pieces that perfectly match your style and needs. When you design and build furniture yourself, there are no limits to creativity. You can choose materials, colors, and shapes that resonate with your personal taste, ensuring that your home reflects who you are through your DIY Collapsible Wooden Table Plans.
Another major advantage is the quality of the final product. Often, mass-produced furniture comes with hidden flaws and uses inferior materials to cut costs. With DIY, you have full control over the quality of the materials you use. Whether you opt for solid wood, sustainable options, or stunning finishes, your furniture will stand the test of time both in appearance and function.
Additionally, creating your own furniture can enhance your skill set. Even if you’re a beginner, each project teaches new techniques and exposes you to various tools. You might start with basic furniture plans and gradually work towards more complex designs. Each new skill you acquire builds your confidence and opens the door to even bigger projects down the line.
Cost savings are also a significant factor. While some DIY projects might require an initial investment in tools and materials, often these costs are considerably lower than purchasing high-end furniture. You can choose quality materials while still saving money, especially if you focus on repurposing or upcycling old furniture. This approach not only saves money but is also eco-friendly.
Flexibility is a key advantage. When you choose a DIY furniture-making path, you can change your plans on the fly. If you encounter a design flaw or discover a better way to achieve your vision, you have the freedom to adjust your project as needed. This adaptability means that you can create exactly what you want without the constraints imposed by a store-bought option.
Furthermore, engaging in a DIY project can foster a sense of accomplishment. Watching your ideas come to life and seeing how your hard work results in a beautiful, functional piece is incredibly satisfying. This sense of achievement can lead to newfound passion and interest in further DIY projects.
Another hidden benefit is the opportunity to create memories with family and friends. Involving others in your DIY endeavors can turn furniture making into a bonding experience. Whether it’s assembling, painting, or designing together, these moments can strengthen relationships and create lasting memories.
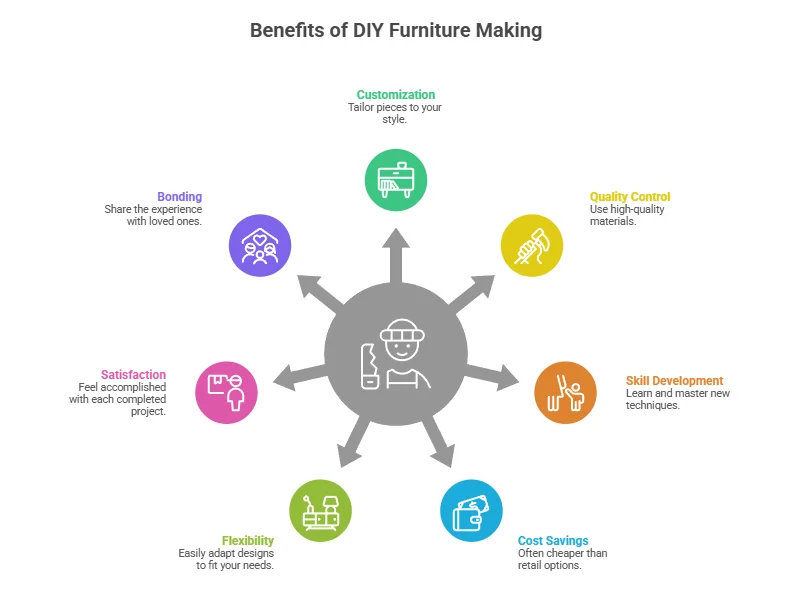
Here are some benefits of DIY furniture making:
| Benefit | Description |
|---|---|
| Customization | Tailor pieces to your style. |
| Quality Control | Use high-quality materials. |
| Skill Development | Learn and master new techniques. |
| Cost Savings | Often cheaper than retail options. |
| Flexibility | Easily adapt designs to fit your needs. |
| Satisfaction | Feel accomplished with each completed project. |
| Bonding | Share the experience with loved ones. |
If you’re looking for some fantastic resources and plans for DIY furniture projects, you’ll find numerous websites dedicated to this art. For instance, Ana White offers free plans with step-by-step instructions. Another excellent resource is Wood Magazine, which provides tips and tricks for furniture making, along with project ideas. You can also find creative designs on Houzz, where users share their DIY successes. The benefits of a DIY approach to furniture making are numerous. From cost savings to the satisfaction of creating something with your own hands, you’ll find that DIY is not only practical but also enjoyable.
Tips for Maintaining and Repairing Your Wooden Table Over Time
Owning a wooden table can add elegance and warmth to any space in your home. To ensure its longevity, it’s vital to maintain and repair it regularly. Here are some practical tips to help you keep your wooden table in tip-top shape over the years after completing your DIY Collapsible Wooden Table Plans.
Regular Cleaning
Cleaning your wooden table is crucial to prevent dirt buildup and stain formation. Use a soft cloth or microfiber cloth to gently wipe down the surface. Here’s how you can clean effectively:
- Dust Regularly: Regularly dusting your table helps to avoid scratches that can occur from dirt particles.
- Use Mild Detergents: When spills occur, use a mild soap mixed with water. Avoid harsh chemicals, as they can damage the finish.
- Dry Immediately: After cleaning, always dry the surface immediately to prevent moisture absorption.
Avoid Direct Sunlight
Direct sunlight can fade and damage the finish of your wooden table. It can also cause the wood to crack over time. To protect your table, consider these steps:
- Use Tablecloths: When not in use, cover your table with a cloth or decorative table runner.
- Move Away from Windows: Position your table away from direct sunlight when possible.
Use Coasters and Placemats
Using coasters and placemats can significantly reduce the risk of water rings and heat damage. Here are some options:
- Coasters: Always place coasters under drinks to prevent moisture stains.
- Placemats: Use placemats during meals to protect the wood from hot dishes or cutlery.
Periodic Polishing
Polishing your wooden table can rejuvenate its finish and enhance its luster. Aim to polish it every 3 to 6 months using a suitable wax or furniture polish. Here’s how:
- Clean First: Always clean the surface before applying polish.
- Apply Wax or Polish: Use a soft cloth to apply a thin layer of wax or polish, buffing it until you achieve a nice shine.
- Buff Regularly: Regular buffing can help maintain the protective layer on the wood.
Addressing Scratches and Dents

Scratches and dents are inevitable, but they can often be fixed easily. Here are some methods to consider:
- Use a Wood Marker: For minor scratches, a wood marker that matches your table’s stain can work wonders.
- Fill Dents with Heat: Place a damp cloth over the dent and use a hot iron to apply heat, which can help the wood swell back into shape.
- Wood Filler: For deeper scratches, consider using a wood filler that matches the wood color to fill in gaps and smooth surfaces.
Protecting Against Humidity
Wood is sensitive to humidity fluctuations. If the air is too dry, the wood may crack, while excessive moisture can lead to warping. To maintain the balance, consider these tips:
- Use a Humidifier: During dry seasons, a humidifier can help maintain moisture levels.
- Avoid Wet Items: Never place wet items directly on the table to prevent damage.
Re-evaluating the Finish
Over time, the finish may wear down, and it may be necessary to reapply or refinish it entirely. Consider these options:
- Sand and Refinish: If the surface has become dull or scratched, consider sanding it down and applying a new finish.
- Professional Help: For a more complex repair, hiring a professional might be advisable.
By following these tips, you can enjoy your wooden table for many years to come. Whether you’re cleaning, polishing, or fixing minor damages, a little effort can make a significant difference. For more information on caring for wooden furniture, visit Wood Magazine or This Old House.
Conclusion
Creating your own DIY Collapsible Wooden Table Plans can be a rewarding project that combines functionality with creativity. By following the step-by-step guide provided, you can build a table that meets your specific needs, whether for outdoor gatherings or limited indoor space. Gathering the essential tools and materials is crucial, ensuring you have everything at hand before you start.
Additionally, customizing your table with creative design ideas not only enhances its aesthetic appeal but also adds a personal touch that store-bought versions often lack. This DIY approach not only saves money but also offers a unique opportunity to develop new skills and express your creativity. Maintaining and repairing your wooden table is vital for its longevity. Regular care will keep it looking great and functioning well for years to come. Simple practices, such as cleaning spills immediately and applying a protective finish, can make a big difference.
Embracing the DIY journey empowers you to create furniture tailored to your lifestyle, while also providing a sense of accomplishment. Whether you’re a novice or a seasoned woodworker, building a collapsible wooden table can enhance your home, offering both practicality and style. Now, it’s time to gather your tools, unleash your creativity, and start crafting your very own masterpiece!