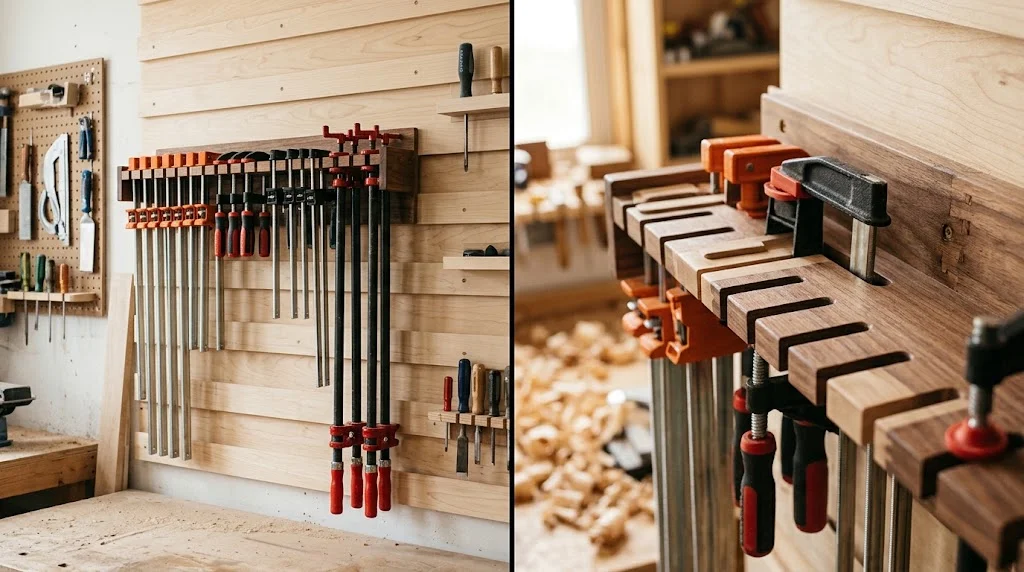
Constructing a clamp rack is a practical and rewarding project, perfect for anyone looking to organize their workshop. With a solid set of Clamp Rack Plans Step by Step as your guide, you can build a storage solution that keeps your clamps handy and in good condition. Below is a step-by-step guide that outlines what you need to create your very own clamp rack.
Gather Your Materials
Before starting your clamp rack project, you’ll need to collect the right materials. Here’s a list of what you should gather:
- 1×4 or 1×3 Lumber (approximately 6-8 feet long)
- Wood screws (1 1/4 inch)
- Wood glue
- Sandpaper (medium and fine grit)
- Clamps (for holding the pieces together while assembling)
- Drill
- Saw (miter saw or circular saw)
- Measuring tape
- Pencil
Design Your Clamp Rack
Start by designing your rack. You can customize it according to the number of clamps you own and your workshop space. Here’s a simple plan:
- Decide on the dimensions: Width, height, and depth.
- Sketch your design: Include the number of rows for horizontal clamps and vertical clamps.
- Make sure to leave space for larger clamps if you own them.
Once your design is complete, you can easily translate it into actual measurements.
Cut Your Lumber
Next, transfer your measurements onto your lumber. Use a measuring tape and pencil to mark where you will cut. Carefully cut the lumber to size using your saw. Common sizes include:
| Clamp Size | Wood Length |
|---|---|
| Short clamps | 12-18 inches |
| Medium clamps | 24-30 inches |
| Long clamps | 36-48 inches |
Sanding and Preparing the Wood
Once your pieces are cut, it’s time to sand them. Use medium grit sandpaper first, followed by fine grit to ensure a smooth finish. This step is crucial as it prevents splinters and ensures that your clamps don’t get damaged while being stored.
Assembling Your Clamp Rack
Now that your lumber is ready, it’s time to assemble the clamp rack. Follow these steps:
- Begin with the back piece; attach it vertically to the wall or a solid base.
- Attach horizontal support pieces across the back using wood screws and wood glue.
- Space the horizontal pieces according to your clamp sizes, typically 6-12 inches apart.
- Secure both ends of the horizontal pieces for stability.
Finishing Touches
Once your rack is assembled, give it a final sanding if necessary. You may want to apply a wood finish or paint it to match your workshop decor. Make sure it’s completely dry before adding your clamps. Hang or place your clamp rack in a convenient location for easy access.
Maintenance Tips for Your Clamp Rack
To keep your rack functioning well, consider the following maintenance tips:
- Regularly check for loose screws and tighten them as needed.
- Keep the rack clean and free of dust to prolong its life.
- Inspect clamps for damage regularly and replace if necessary.
Building your own clamp rack is not only satisfying but also an effective way to ensure organization in your workspace. For more detailed Clamp Rack Plans Step by Step or additional woodworking tips, consider visiting Wood Magazine or Woodworkers Source.
Essential Tools for Building a Clamp Rack
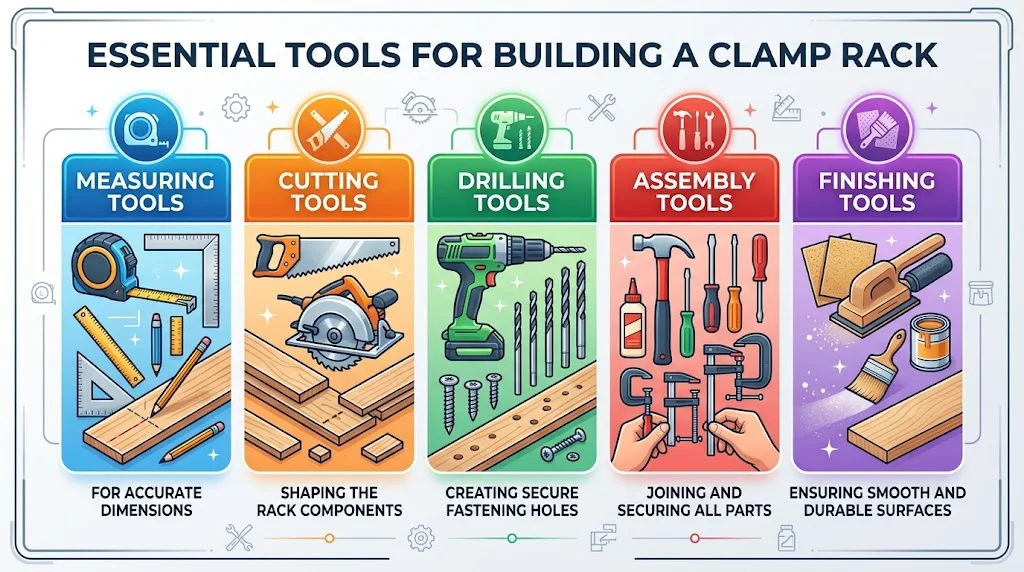
Building a clamp rack can make your workshop more organized and efficient. To get started, you need to gather essential tools that will help you create a sturdy and functional clamp rack. Below, you will find a detailed list of tools you should consider for this project, ensuring you have everything you need to get the job done right.
Measuring Tools
Accurate measurements are crucial for building your clamp rack. Here are the measuring tools you will need:
- Tape Measure: A good-quality tape measure will allow you to measure lengths accurately, helping you determine the size of your clamp rack.
- Square: A carpenter’s square or framing square helps in checking and marking right angles, ensuring that your rack is assembled correctly.
- Calipers: For more precise measurements, calipers can be used to measure the thickness of materials or the size of your clamps.
Cutting Tools
Next, you will need tools to cut your materials to size. Here are the essentials:
- Table Saw: Ideal for making straight cuts, a table saw is a foundational tool in any woodworker’s shop. It helps you create clean edges for your rack.
- Circular Saw: If you are working with larger sheets of wood, a circular saw is handy for cutting them down to size.
- Miter Saw: This tool is perfect for making angle cuts, which can be useful depending on your clamp rack design.
Drilling Tools
Drilling will be necessary to attach various components. These tools are essential:
- Power Drill: A battery-powered or corded power drill is essential for driving screws and drilling holes into your wood. Ensure you have the appropriate drill bits for this.
- Drill Bits: Keep a variety of drill bits handy, including those for wood, metal, and masonry (if needed). This ensures you can handle different materials as required.
Assembly Tools
Once your pieces are cut and ready, you’ll need tools for assembly:
- Screwdriver: A reliable screwdriver set will help you drive screws into your wood securely. Consider both flat and Phillips head types.
- Impact Driver: For tougher materials or when you are working with larger screws, an impact driver can speed up the process.
- Clamps: You may need extra clamps during the assembly process. They hold the pieces in place as the glue dries or while you fasten screws.
Finishing Tools
Once your clamp rack is assembled, finishing tools will enhance its appearance and function:
- Sander: Whether you choose a palm sander or a belt sander, smoothing out the edges will give your rack a professional look.
- Paintbrush or Roller: If you plan to stain or paint your rack, these tools will help you apply finishes evenly.
- Protective Gear: Safety goggles and a dust mask are crucial when working with power tools, ensuring your safety while you build.
Material Requirements
Aside from tools, you will need materials to construct your clamp rack. Here is a basic list:
| Material | Purpose |
|---|---|
| Plywood or MDF | Main body of the clamp rack |
| Wood screws | To assemble various parts |
| Wood stain or paint | To finish and protect your rack |
Benefits of Having a Customized Clamp Rack

Having a customized clamp rack can significantly enhance your workspace, whether you are a hobbyist woodworker or a professional contractor. A well-designed clamp rack not only optimizes your storage but also improves efficiency. Let’s explore the numerous benefits of having a tailored clamp rack.
Maximized Space Efficiency
A customized clamp rack can be designed to fit perfectly into your available space. By utilizing vertical space or specific configuration, you can store more clamps without overcrowding your workspace. This efficient use of space allows for:
- Reduced clutter on your workbench.
- Easy access to all clamps when needed.
- Flexibility to fit specific sizes and types of clamps.
Enhanced Organization
One of the most significant advantages of a tailored clamp rack is improved organization. With all clamps in designated spots, you can quickly identify what you have and where everything is located. This organization helps you:
- Work faster, reducing time spent searching for tools.
- Keep your workspace neat and tidy.
- Prevent damage to your clamps by storing them properly.
Customization to Your Needs
A customized rack allows you to design it according to your specific needs. Consider the following aspects:
- Size Variability: Depending on your clamp collection, you can tailor the dimensions of the rack to accommodate large bar clamps or smaller C-clamps.
- Material Choices: Choose durable materials based on your preference and weight requirements.
- Additional Features: Think about incorporating shelves or hooks for other tools related to your projects.
Improved Safety
When tools are stored on a cluttered workbench, accidents can happen. A customized clamp rack minimizes safety hazards by ensuring that tools are stored in a secure and designated area. Key safety improvements include:
- Reducing the chances of tripping over tools or materials.
- Decreasing the likelihood of injuries from misplaced tools.
- Ensuring that clamps and tools won’t fall off surfaces accidentally.
Longer Lifespan for Your Clamps
When clamps are stored improperly, they can become damaged over time. By using a customized clamp rack, you provide your tools with the right environment. This solution helps to:
- Protect your clamps from rust and corrosion.
- Prevent bending or misalignment caused by poor storage practices.
- Keep the moving parts functional by avoiding unnecessary stress.
Increased Productivity
When everything is organized and easily accessible, your productivity naturally increases. You are more likely to complete projects on time and move through tasks more efficiently when you don’t have to spend excessive time searching for clamps. Productivity benefits include:
- Less time spent on setup and breakdown.
- Simplified workflow during projects.
- Increased satisfaction from getting tasks done efficiently.
Cost-Effectiveness
Investing in a customized clamp rack can save you money in the long run. Instead of purchasing new clamps due to damage or loss, proper storage allows you to maintain your existing collection. Benefits here include:
- Minimized risk of replacing tools.
- Longer-lasting equipment saving you money over time.
- Reduced expenses from buying organizers that do not fit your needs.
Innovative Clamp Rack Ideas for Small Workshops
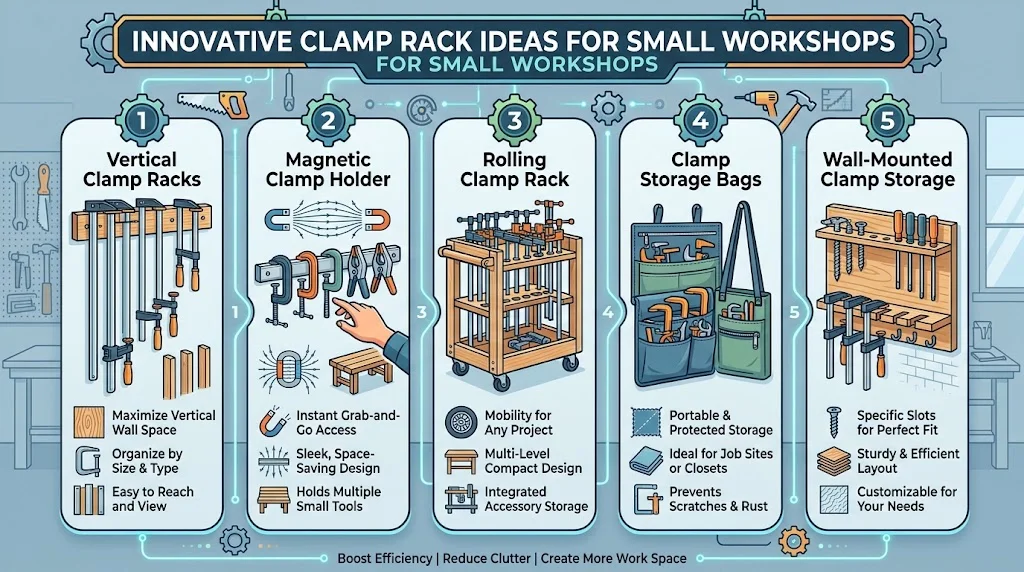
Creating an efficient workspace in a small workshop is essential for productivity. One of the best ways to maximize your space is by implementing innovative clamp rack ideas. These ideas not only help in organizing your tools but also make your workspace more effective. Let’s explore some great options for clamp racks that can transform your small workshop.
Vertical Clamp Racks
Vertical racks are perfect for small spaces because they utilize vertical space. Here’s how to make your own:
- Materials Required: Wood planks, screws, clamps, and a wall mounting kit.
- Steps:
- Measure the space on your workshop wall.
- Cut the wood planks to your desired length.
- Attach the planks vertically to the wall, ensuring they are parallel.
- Secure the clamps onto the wooden planks and organize them by size.
Magnetic Clamp Holder
If you’re looking for a truly innovative solution, consider a magnetic clamp holder. This approach allows for easy access and keeps your clamps at hand. Here’s how to create one:
- Materials Required: Strong magnets, a wooden base, and adhesive.
- Steps:
- Attach the magnets to the wooden base using adhesive.
- Mount the base to your workspace wall or side of your workbench.
- Stick your clamps to the magnets for easy access.
Rolling Clamp Rack
A rolling clamp rack is another fantastic option if you need mobility in your workshop. This design lets you move your clamps around as needed. Follow these steps:
- Materials Required: Plywood, caster wheels, screws, and clamps.
- Steps:
- Cut the plywood into a rectangular shape for the base.
- Attach the caster wheels to the bottom corners.
- Build vertical supports to hold your clamps and attach them to the base.
- Finish by adding a top shelf for additional storage of smaller tools.
Clamp Storage Bags
For those who prefer a soft storage solution, clamp storage bags can be an excellent option. These can be easily hung or stored without taking up too much space. Here’s how to implement this:
- Materials Required: Durable fabric, zippers, and measuring tools.
- Steps:
- Measure out the fabric to make bags that fit your clamps.
- Sew a zipper onto one side to create a secure closure.
- Hang the bags on hooks or store them in a drawer for easy access.
Wall-Mounted Clamp Storage
Using a simple wall-mounted clamp storage can significantly increase the organization in your workshop. It’s straightforward to build:
- Materials Required: Wall brackets, wooden dowels, and screws.
- Steps:
- Install the wall brackets securely on the wall.
- Insert wooden dowels into the brackets to hold your clamps.
- Organize your clamps based on size and usage for easy retrieval.
Implementing these innovative clamp rack ideas can greatly enhance your small workshop’s functionality. Consider the options that best suit your style and space. Additional resources and tools can be found at Wood Magazine and Ana White.
Common Mistakes to Avoid When Designing Clamp Racks
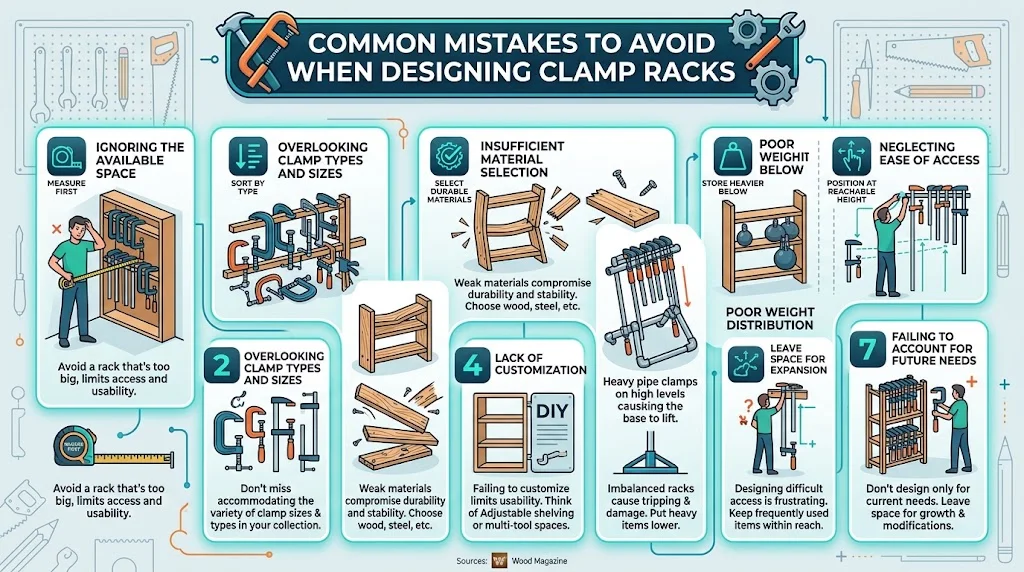
Designing clamp racks can be a rewarding project, but common mistakes often lead to frustration and inefficiency. By avoiding these pitfalls, you can create an effective and functional clamp rack that serves your needs perfectly. Here are several key mistakes to keep in mind.
Ignoring the Available Space
One of the first missteps many make is not considering the space where the clamp rack will reside. A common mistake is to design a clamp rack that is too large for the available area, limiting accessibility and usability. When you plan your design:
- Measure the allocated area carefully.
- Consider the height and width that the rack will occupy.
- Ensure that adequate clearance is available for retrieving or storing clamps.
Taking space into account will ensure that your clamp rack not only fits but also enhances the functionality of your workspace.
Overlooking Clamp Types and Sizes
Not all clamps are created equal. Depending on your specific projects, the types and sizes of clamps you use can vary significantly. Failing to design your rack according to these variations can lead to:
- Inadequate space for your clamps.
- Difficulty organizing different clamp sizes and types.
Consider categorizing your clamps by type, size, or usage frequency to maximize efficiency. It’s beneficial to have a detailed inventory of the clamps you own to accurately inform your design.
Insufficient Material Selection
Using inadequate materials is another common mistake. Some might opt for inexpensive materials to save costs, which may compromise the overall durability and stability of the clamp rack. To avoid this, ensure you:
- Choose materials that can withstand the weight of the clamps.
- Consider weather-resistant options if your clamp rack will be placed outdoors.
Wood, steel, and heavy-duty plastics are often excellent choices for building robust clamp racks.
Lack of Customization
A cookie-cutter approach to design may not suit everyone’s needs. Failing to customize your clamp rack can limit its usability. Instead, remember to:
- Incorporate adjustable shelving to accommodate different clamp sizes.
- Design features that fit your workflow and project types.
- Include spaces for additional tools to optimize your workspace.
Customizing your clamp rack ensures that it meets your unique requirements, enhancing its functionality.
Poor Weight Distribution
Another critical aspect often ignored is weight distribution. An imbalanced rack can tip over, causing damage and creating safety hazards. To avoid this, make sure to:
- Design the rack so that heavier clamps are stored lower.
- Use a stable base to support the weight.
- Regularly check the rack for even weight distribution.
Implementing these practices will provide a stable and safe environment for your clamps.
Neglecting Ease of Access
Designing a clamp rack that is difficult to access can be both frustrating and inefficient. To ensure that your clamps are easy to reach, follow these suggestions:
- Position frequently used clamps at waist height.
- Organize clamps by size and type for quick identification.
- Consider wheel mounts for easy mobility if space allows.
Easily accessible clamps can save you time and energy, making your projects more enjoyable.
Failing to Account for Future Needs
As your project scope evolves, so too may your clamp requirements. A common oversight is designing a rack that only meets current needs without any future-proofing. To be proactive:
- Think about potential additional clamps you might acquire.
- Leave space for expansion and modification.
By considering future needs, you can avoid the hassle of redesigning or building a new rack altogether. For inspiration and further guidance, check out some dedicated resources like Wood Magazine and Popular Woodworking. These sites provide valuable insights that can assist you in your clamp rack planning process. By steering clear of these common mistakes, you’ll be well on your way to a clamp rack design that is both functional and suited to your needs. With thoughtful planning and execution, your clamp rack can significantly enhance your workflow and organization.
Conclusion
Creating your own clamp rack can be a rewarding project that enhances your workshop’s efficiency and organization. By following the detailed step-by-step guide to crafting effective Clamp Rack Plans Step by Step, you’ve taken a crucial first step towards building a structure tailored to your specific needs. Remember, the essential tools needed for this build play a vital role in ensuring precision and durability, so having them ready will streamline your effort.
As you work on your clamp rack, keep in mind the common mistakes to avoid. These pitfalls can hinder your project’s success, but with careful planning and attention, you can bypass these issues effectively. The benefits of a customized clamp rack extend beyond merely storing clamps; it improves workflow and maximizes space, especially in smaller workshop environments.
Innovative clamp rack ideas can transform limited spaces into efficient work zones. Consider vertical storage solutions or wall-mounted racks to keep your clamps accessible without taking up precious floor space. Engaging with these creative options not only adds functionality but also personalizes your workshop.
By embracing the process of designing and building your own clamp rack, you’re investing in a tool that enhances your craftsmanship. With the right knowledge and creativity, you can create a clamp rack that suits your unique requirements, leading to a more organized and productive workspace. So, gather your materials, apply the insights you’ve learned, and enjoy the satisfaction that comes from building something tailored just for you.