 ATTENTION: World's Largest Collection of 16,000 Woodworking Plans!
Stop struggling with incomplete plans that waste your time and money!
Step-by-step instructions that make woodworking super easy, even for beginners
Detailed schematics, cutting lists, and materials lists for every project
Get new plans monthly for life - no recurring fees or hidden costs
Request custom plans for your unique projects at no extra charge
Get 4 valuable bonuses including woodworking guides and business tips
GET INSTANT ACCESS NOW!
ATTENTION: World's Largest Collection of 16,000 Woodworking Plans!
Stop struggling with incomplete plans that waste your time and money!
Step-by-step instructions that make woodworking super easy, even for beginners
Detailed schematics, cutting lists, and materials lists for every project
Get new plans monthly for life - no recurring fees or hidden costs
Request custom plans for your unique projects at no extra charge
Get 4 valuable bonuses including woodworking guides and business tips
GET INSTANT ACCESS NOW!
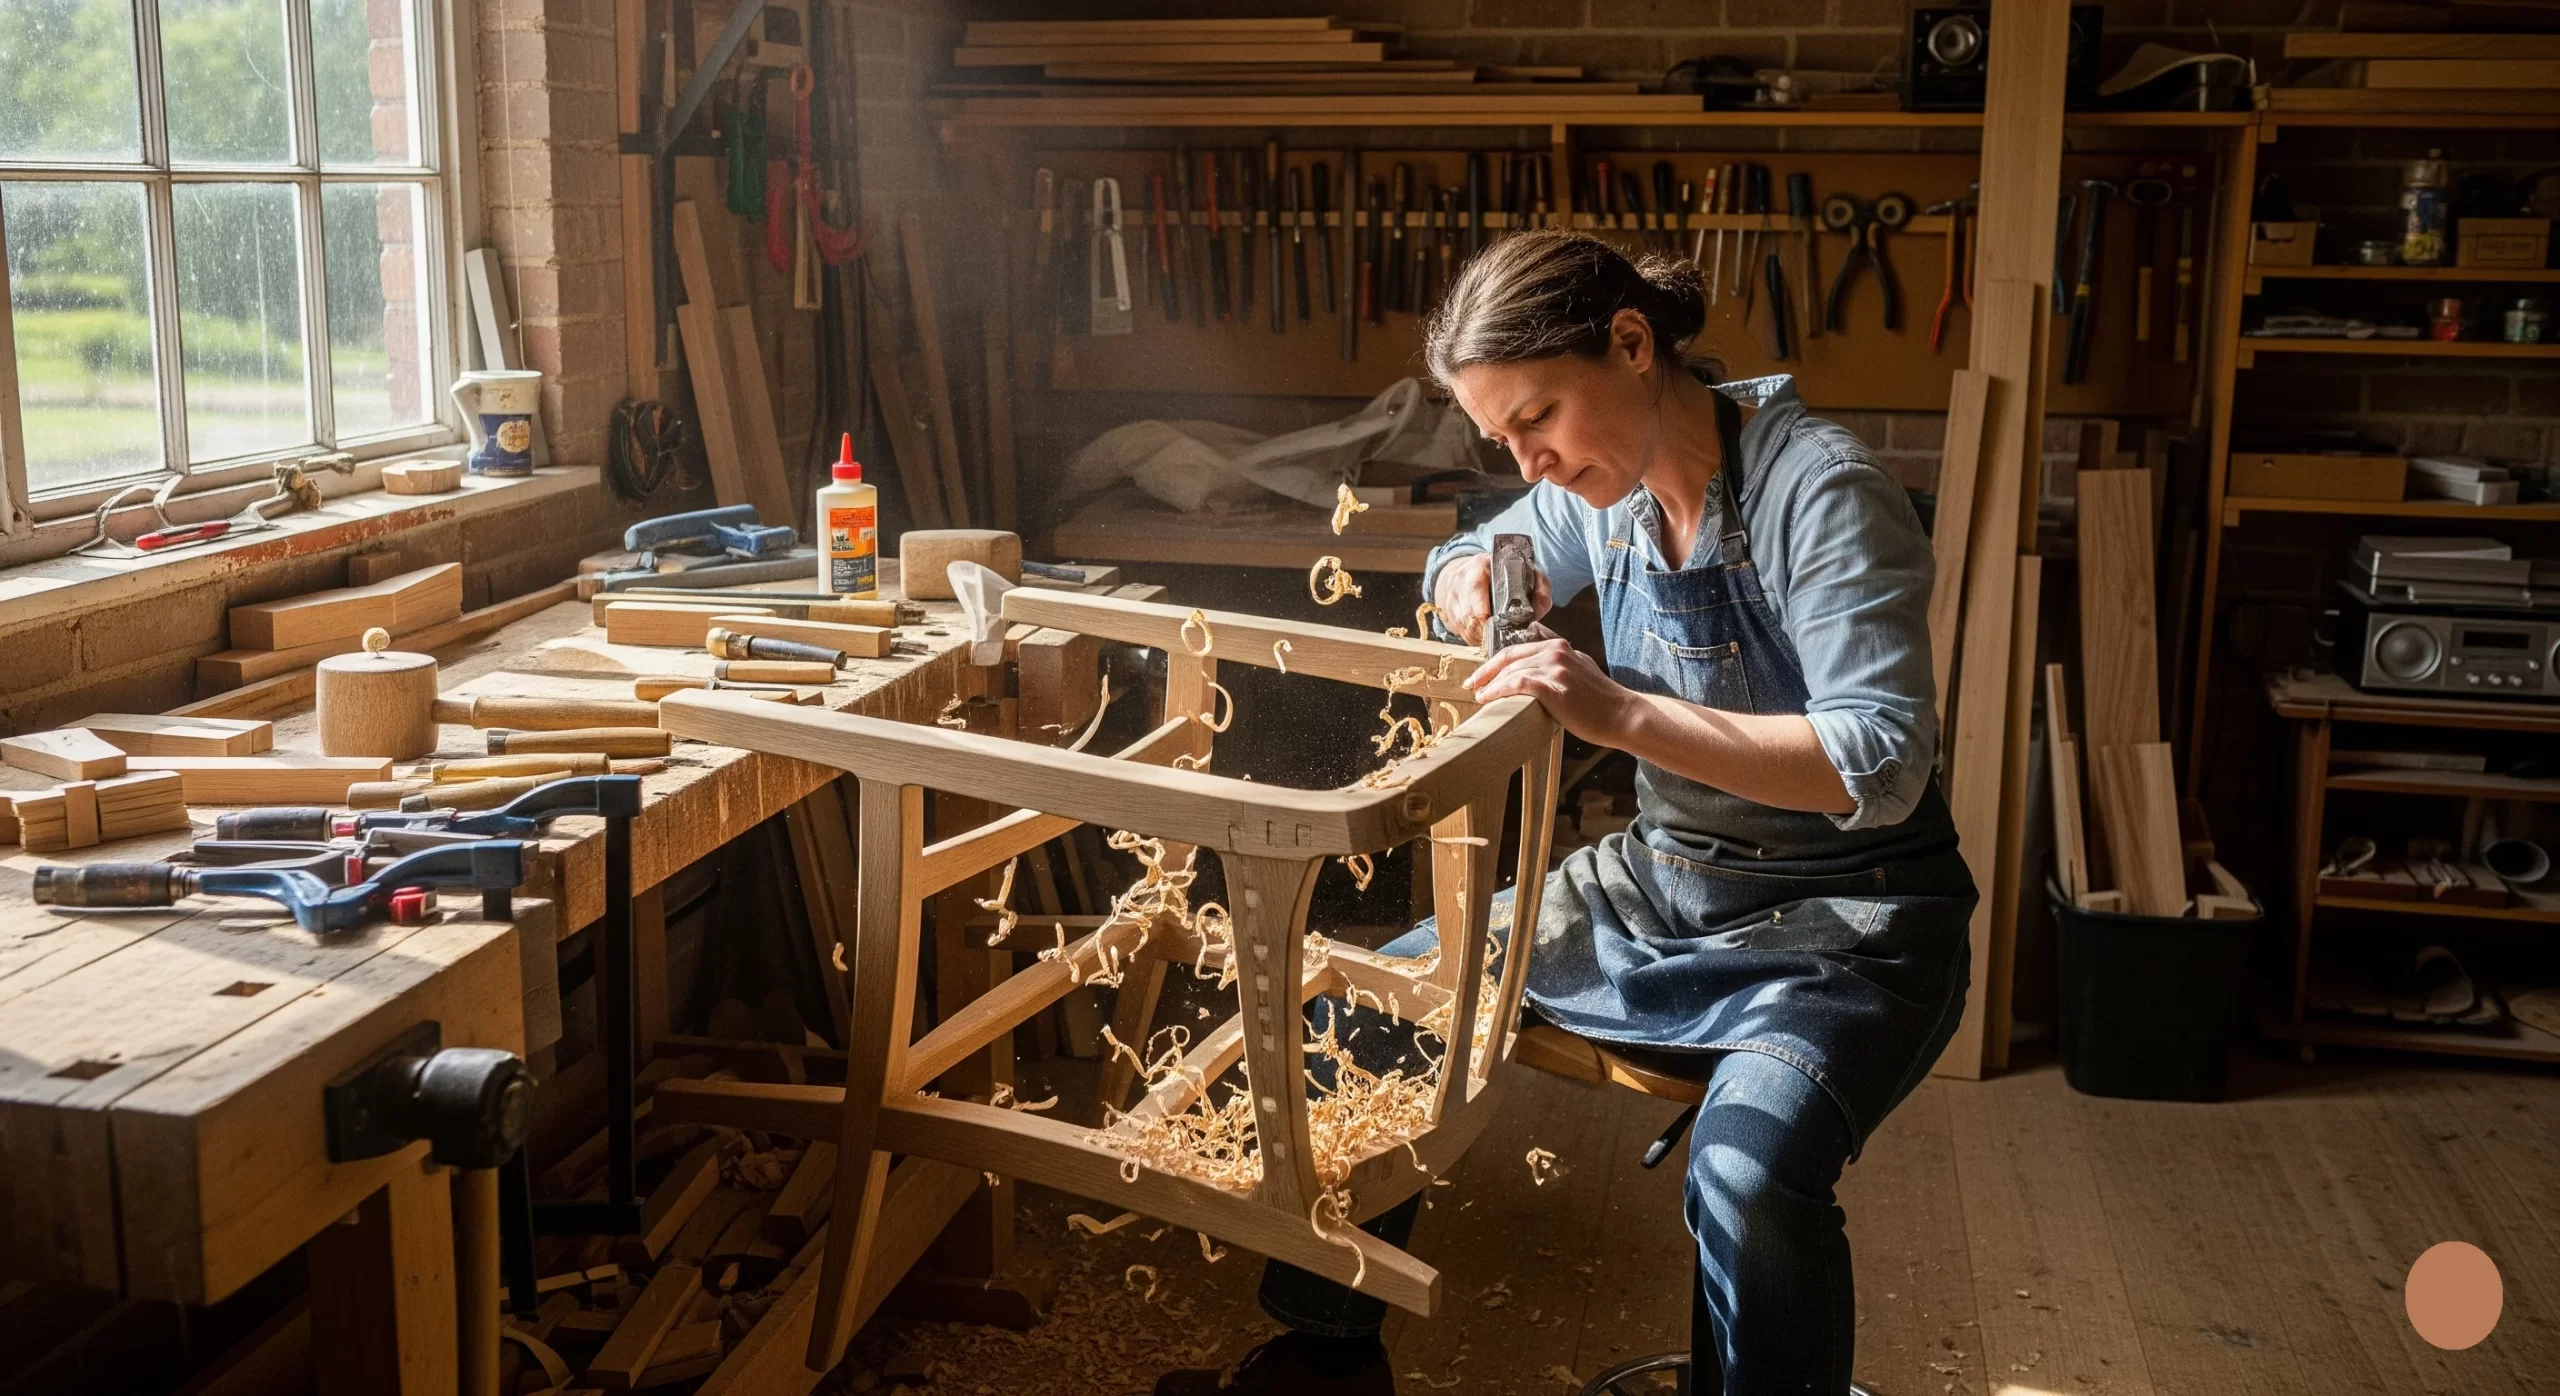
Creating your own chairs can be a rewarding venture, whether you’re a seasoned craftsman or just starting. With a variety of Chair Woodworking Plans available, you can find designs that cater to every skill level. Let’s explore some unique ideas to ignite your creativity and inspire you to build something incredible.
Beginners’ Plans: Simple Yet Stylish
If you’re new to woodworking, you might want to start with some simpler designs. Here are a few Chair Woodworking Plans that are perfect for beginners:
- Adirondack Chair: This classic outdoor chair is not only stylish but also relatively easy to build. The plans often include straightforward cuts and basic joinery.
- Folding Chair: A folding chair plan is a practical choice for beginners, requiring just a few materials and tools. It teaches essential techniques while being functional.
- Basic Dining Chair: Build a simple dining chair using basic joints. This can serve as a great introduction to chair construction, with minimal complexity.
Intermediate Plans: A Step Up in Complexity
Once you gain confidence, you can challenge yourself with some intermediate Chair Woodworking Plans. These designs often incorporate more intricate techniques and offer an opportunity to enhance your skills.
- Mid-Century Modern Chair: This design is popular for its sleek lines and angles. The plan usually details the use of lap joints, which can help you master this essential skill.
- Rocker Chair: Building a rocking chair involves more complex shapes and requires attention to rockers’ curvature. As an intermediate project, it helps improve your precision and finishing skills.
- Upholstered Armchair: An upholstered armchair plan might require additional materials like foam and fabric. This project teaches you about joinery while finishing techniques.
Advanced Plans: Master Your Craft
If you are looking to push your abilities, advanced Chair Woodworking provide an opportunity for mastery. Here are a few ideas:
- Caned Chair: This style combines woodworking with weaving, allowing for both aesthetic appeal and comfort. The plan guides you through the intricate caning process.
- Bar Stool: Building a bar stool involves advanced joinery and may require custom fitting, offering a great way to apply your knowledge and creativity.
- Windsor Chair: Known for its iconic design, the Windsor chair uses a combination of turning and assembly techniques, pushing your skills to the next level.
Finding the Right Plans Online
The internet is filled with resources for finding the best chair. Some reliable websites include:
- Wood Magazine: Offers tons of plans for all skill levels, including detailed instructions and materials lists.
- Ana White: Known for simple DIY projects, Ana’s site provides free plans and tutorials that suit various styles.
- Popular Woodworking: Great for those seeking inspiration and more advanced plans, featuring articles and detailed guides.
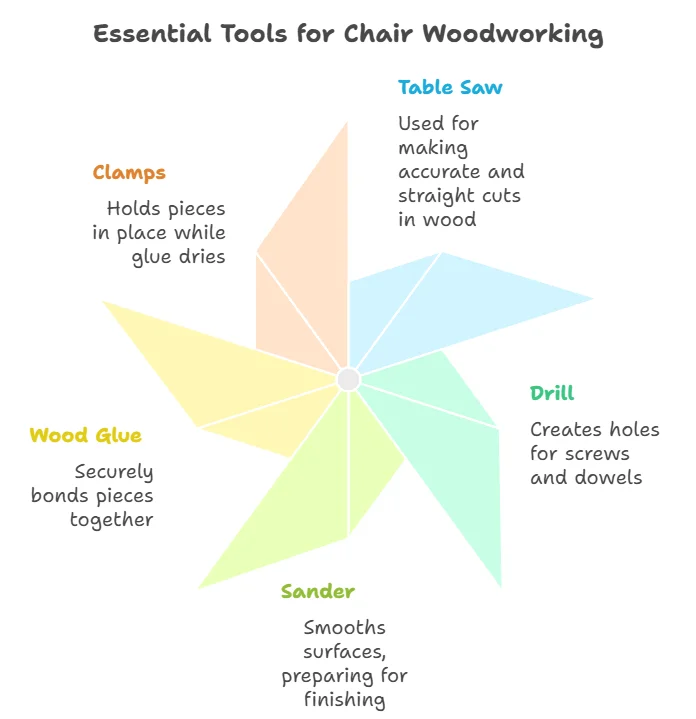
Essential Tools and Materials
Regardless of the plan you choose, having the right tools and materials is crucial to achieving the best results. Here’s a table displaying some essential items needed for chair woodworking projects:
| Tool/Material | Purpose |
|---|---|
| Table Saw | For making accurate and straight cuts in wood. |
| Drill | To create holes for screws and dowels. |
| Sander | For smoothing surfaces, preparing for finishing. |
| Wood Glue | To securely bond pieces together. |
| Clamps | To hold pieces in place while glue dries. |
Chair Woodworking Plans can open up a world of creativity for both novice and experienced woodworkers. Take your time to select a design that excites you and matches your skill level.
Essential Tools and Materials for Building Chairs
Building your own chair can be a rewarding project. To achieve the best results, understanding essential tools and materials is vital. This ensures you have everything necessary to build a sturdy, beautiful chair that meets your design expectations. Below are the key tools and materials you’ll need, broken down for your convenience.
Essential Tools for Chair Building
Before you begin your chair project, gather these essential tools:
- Measuring Tape: Accuracy is critical in woodworking. A measuring tape will help you take precise measurements of your materials and layout.
- Square: A framing square ensures that angles are square, which is important for the stability of the chair.
- Saw: A table saw or miter saw is ideal for making precise cuts. If you’re working with curves, a jigsaw will come in handy.
- Drill and Drill Bits: A power drill is necessary for making holes for screws or dowels. A set of drill bits in varying sizes is essential.
- Screwdriver: A good quality screwdriver will help you with assembling parts. You might want to consider a power screwdriver for efficiency.
- Sander: To achieve a smooth finish on your chair, use an electric sander. Start with a rough grit and move to finer grits for a polished look.
- Clamps: These help hold pieces together while glue dries or while you fasten screws. A variety of clamps will give you flexibility.
Essential Materials for Chair Building
In addition to tools, you’ll require specific materials to construct your chair:
- Wood: Choose high-quality wood like oak, maple, or pine. The choice of wood depends on your design and durability needs.
- Wood Glue: This is essential for reinforcing joints. Look for PVA glue or a polyurethane glue for stronger bonds.
- Screws: Use wood screws that are long enough to create strong joints without splitting the wood.
- Finishing Products: Stains, paints, or sealants protect your chair from wear and enhance its appearance.
- Upholstery Fabric (Optional): If your chair design includes cushions, choose durable fabric that complements your wood choice.
Budgeting for Your Project
Understanding the costs of tools and materials is crucial. Below is a simplified budget table to help you plan:
| Item | Estimated Cost |
|---|---|
| Measuring Tape | $10 |
| Saw | $150 |
| Drill | $100 |
| Wood | $50 |
| Glue and Finish | $30 |
| Total | $340 |

Where to Buy Tools and Materials
Finding the right tools and materials can be a challenge. Here are some reliable resources:
- Home Depot: A great place to find tools, wood, and dowels for your chair project.
- Lowe’s: Offers various materials and tools needed for woodworking projects.
- Woodcraft: Specializes in woodworking supplies and tools tailored to builders.
Building your own chair is a fulfilling project that allows for creativity while honing your woodworking skills. By equipping yourself with the right tools and materials, you set yourself up for success. Always remember to take your time with each step—proper measurements and careful execution lead to beautiful results.
Designing Ergonomically Friendly Chairs: Tips and Tricks
Creating chairs that are friendly to the body is crucial for comfort, especially when people spend extended periods sitting. There are several simple yet effective strategies you can employ to design ergonomically sound chairs that not only look good but also promote health and well-being. One of the first elements to consider is seat height. When designing a chair, ensure it provides a proper adjustment range to accommodate users of various heights. A standard seat height generally ranges between 16 to 21 inches from the ground, allowing your feet to rest flat on the floor.
Ensure the chair is adjustable so that users can elevate or lower the seat to their preference. Next, let’s talk about seat depth and width. An optimal seat depth typically measures between 15 and 18 inches. The depth should allow the user to sit back against the chair while leaving a few inches of space behind the knees. This space is vital to ensure blood circulation and reduce pressure points on the legs. Similarly, the seat width should range from 17 to 20 inches to provide enough space without being overly expansive, which can contribute to discomfort. Back support is essential for an ergonomic chair.
Design the backrest to provide lumbar support, as this curves toward the natural shape of the spine. Look for an angle between 90 and 100 degrees for the backrest, so it encourages good posture without straining the user’s back. A contoured backrest allows the body to remain supported at all times, which works wonders for preventing back pain and fatigue. Armrests, if included, should be adjustable.
They ought to allow the user to position them so their shoulders can relax and remain down. Additionally, the armrests should not be too wide or too narrow. Aim for an armrest being too far away can lead to shoulder strain, while a width that’s too narrow may not provide adequate support. The top of the armrest should align with the height of the desk or table to prevent straining the wrists when typing or working. Materials wisely while designing your chair can greatly influence comfort.
Look for breathable fabrics that promote airflow to avoid overheating. Foam cushioning should be supportive yet soft enough to provide comfort. Opt for high-density foam which can resist sagging over time, maintaining its shape for long-term use. Additionally, consider offering a variety of materials for different users’ preferences—some may prefer leather, while others might find fabric more comfortable.
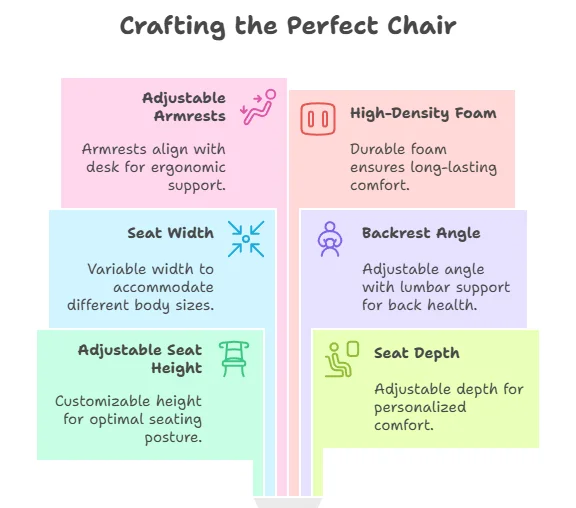
Here’s a quick checklist to guide you through your design process:
- Adjustable seat height between 16 to 21 inches
- Seat depth between 15 to 18 inches
- Seat width of 17 to 20 inches
- Backrest angle of 90 to 100 degrees with lumbar support
- Adjustable armrests that align with desk height
- High-density foam for comfort and durability
- Breathable materials for better air circulation
Testing your design is crucial. Allow users to try out the chair and gather feedback. Observe how they interact with the chair and whether they express any discomfort. Adjust accordingly based on their input. Every individual’s body is different, so continuous adjustments may be necessary to achieve the best ergonomic design possible.
Don’t forget to consult resources for more insights into ergonomic designs. Websites like Ergonomics.org or Workplace Options provide a wealth of information on ergonomics and how to apply these principles to your furniture designs. Considering these aspects will not only enhance the design of your chairs but also ensure that they meet the ergonomic standards required for prolonged comfort. Whether you design chairs for home use, offices, or public spaces, focusing on ergonomic principles makes all the difference in user satisfaction and overall health benefits.
The Importance of Choosing the Right Wood for Chair Projects
When diving into Chair Woodworking Plans, one of the most crucial decisions you will face is selecting the right kind of wood. The type of wood influences not just the aesthetic of your chair but also its durability, comfort, and ease of work. Understanding the significance of wood selection can enhance the quality of your finished piece, ensuring that it stands the test of time under regular use.
Types of Wood for Chair Projects
Different types of wood offer distinct advantages that can elevate your woodworking game. Here’s a breakdown of some popular wood choices you might consider:
- Hardwoods: Ideal for their strength and durability. Common choices include:
- Oak: Strong and resistant to wear.
- Maple: Has a fine grain and is shock-resistant.
- Cherry: Offers a warm color that deepens with age.
- Softwoods: Easier to work with but may not be as durable. Some options are:
- Pinus (Pine): Light and cost-effective but can dent easily.
- Cedar: Naturally resistant to insects and decay, perfect for outdoor chairs.
- Fir: Known for its stability and strength.
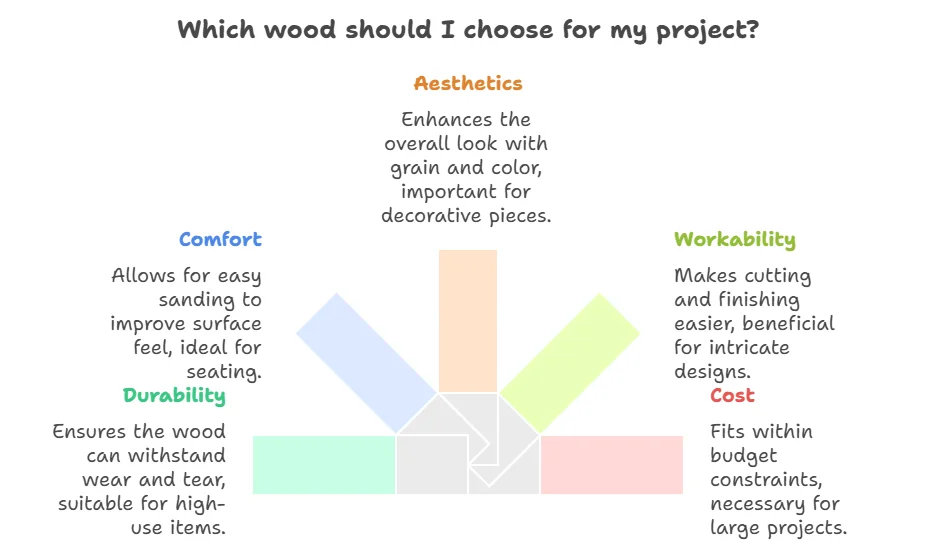
Factors to Consider When Choosing Wood
Choosing the right wood is not merely about preference; there are key factors to keep in mind:
| Factor | Detail |
|---|---|
| Durability | Select wood that can withstand everyday use and wear and tear. |
| Comfort | Some woods can be sanded down easily, helping improve surface comfort. |
| Aesthetics | The grain and color of the wood can enhance the overall look of the chair. |
| Workability | Consider how easy it is to cut, sand, and finish the wood of your choice. |
| Cost | Budget constraints may limit your selection; hardwoods generally cost more. |
Assessing Wood Quality
Once you’ve narrowed your choices down, assessing the quality of the wood becomes essential. Look for:
- No visible knots or cracks, as these can weaken the structure.
- A uniform color without discoloration, which can indicate damage or improper treatment.
- A straight grain that speaks to the wood’s integrity and stability.
Finishing Touches: Preparing Wood for Use
Even after selecting the perfect wood, remember that the finishing process is crucial. Properly preparing your wood involves:
- Sanding: Smooth surfaces are comfortable and visually appealing.
- Sealing: Protect your chair from moisture and damage by applying a quality sealant.
- Staining or Painting: Customize your finish to achieve the desired aesthetic, while ensuring it fits your home’s décor.
To put it into practice, armed with your Chair Woodworking Plans, select wood that meets your preferences and suits the purpose of your chair. Whether it’s for indoor use or outdoor relaxation, making the right choice ensures you create a stunning, functional, and durable piece. For those interested in delving deeper into woodworking, resources such as Wood Magazine offer a wealth of information and inspiration.
Additionally, Popular Woodworking provides expert advice and projects that can further enhance your skills. In essence, taking the time to choose the right wood for Chair Woodworking Plans is vital for achieving a successful project. Not only will it affect the craftsmanship, but it will also impact how your chair integrates into your living space for years to come.
Simple Finishing Techniques to Enhance Your Chair Creations
Creating a beautiful chair involves not just woodcrafting skills but also an understanding of finishing techniques that enhance the final piece. Proper finishing not only elevates the appearance of your chair but also protects it from wear and tear. Here are some simple techniques to consider when finishing your Chair Woodworking Plans projects.
Preparing the Surface
Before applying any finish, surface preparation is crucial. Start by sanding the wood to a smooth finish. Use progressively finer grits of sandpaper, beginning with a coarse grit (like 80) and advancing to a fine grit (220 or higher). This process helps remove any imperfections and opens up the wood’s pores for better finish absorption.
Choosing the Right Finish
There are various types of finishes you can choose from, and each has its unique properties:
- Varnish: Offers a hard, durable finish that’s resistant to moisture.
- Shellac: Provides a warm tone and excellent sealing properties, perfect for enhancing natural wood grain.
- Oil: Penetrates deeply, keeping the wood looking natural while enhancing the grain.
- Polyurethane: Extremely durable, perfect for high-usage items like chairs.
Applying the Finish
Once you’ve chosen your finish, it’s time for application. Here are steps to guide you through the process:
- Clean the Surface: Ensure there’s no dust or debris left from sanding.
- Apply with the Right Tools: Use a brush or rag suited for your chosen finish. For example, foam brushes work well with varnish, while lint-free cloths are great for oils.
- Go with the Grain: Always apply the finish in the direction of the wood grain to ensure a smooth application and fewer visible marks.
- Multiple Coats: For the best results, apply multiple thin coats instead of one thick coat. This helps to achieve a smoother finish and allows for better drying between applications.
- Sand Between Coats: Lightly sand between each coat once it’s dry to improve adhesion and create a finer surface.
Special Techniques for Enhanced Appearance
Here are some simple finishing techniques that can take your chair designs to the next level:
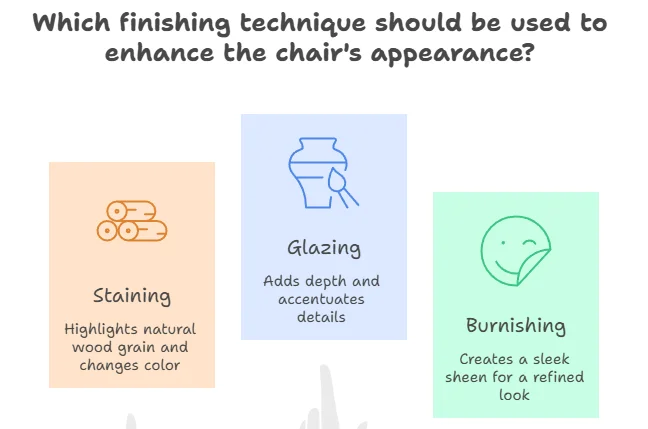
- Staining: Use a wood stain to change the color of the wood while still allowing the grain to show through. This can highlight the natural beauty of different wood species.
- Glazing: Applying a glaze adds depth and richness. It can accentuate carved or detailed areas while maintaining a fresh appearance.
- Burnishing: Rubbing a soft cloth along finished surfaces can create a sleek sheen, perfect for a refined chair look.
Protecting Your Finish
Once you’ve completed your chair, it’s important to protect your finish. Here are tips to ensure longevity:
By embracing these finishing techniques, your chair creations will not only look professional but will also stand the test of time. Don’t hesitate to experiment with different finishes to see what works best for your specific projects. For further insights on woodworking finishes, check out resources like Wood Magazine and Woodworker’s Source Blog.
These platforms offer a wealth of information on woodworking techniques and finishes that can help you refine your skills. With patience and practice, you’ll find that simple finishing techniques can transform your Chair Woodworking Plans projects into stunning pieces of art.
Conclusion
Building your own chair can be a rewarding journey, whether you’re just starting out or you’re an experienced woodworker. Creative Chair Woodworking Plans are available for every skill level, allowing you to embark on projects tailored to your experience and interests. Having the right tools and materials is essential; they not only make your work easier but also ensure your chairs are sturdy and beautiful. When designing ergonomically friendly chairs, it’s crucial to consider comfort alongside style.
Small adjustments in height, support, and angles can significantly enhance how your chair feels, making the final product not only visually appealing but also inviting to sit in. Additionally, choosing the right wood is not just about aesthetics; different types of wood can affect durability and comfort. Selecting high-quality lumber can lead to long-lasting chairs that you and your loved ones will enjoy for years.
Mastering simple finishing techniques can elevate the overall look of your creations. A well-applied finish not only enhances the wood’s natural beauty but also provides necessary protection. As you gear up to take on your next chair project, remember these essential tips. With the right approach, tools, and a commitment to quality, you can create stunning chairs that reflect your personal style and craftsmanship. Embrace the challenge and let your creativity shine through each piece you construct. Happy woodworking!