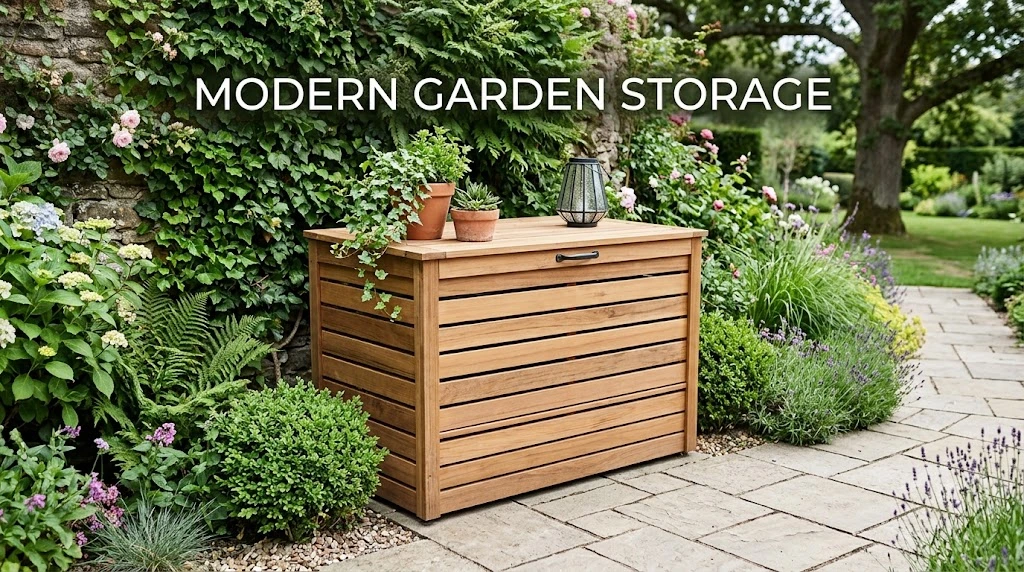
Creating a DIY Wooden Trash Bin Enclosure Outdoor for your outdoor space is both a practical and stylish solution for keeping your yard organized. This project allows you to hide away garbage bins, enhancing the aesthetic appeal of your garden while ensuring your outdoor area remains pristine. Here’s a guide to help you through the design and building process of your wooden trash bin enclosure.
Material Selection
The first step in designing your enclosure involves choosing the right materials. Here’s what you’ll need:
- Wood: Opt for weather-resistant wood like cedar or redwood. These woods not only resist rot but also withstand outdoor conditions.
- Hinges and Latches: Durable metal hinges and latches are essential for the doors to operate smoothly.
- Screws: Use exterior-grade screws for assembly to ensure durability.
- Stain or Paint: Adding a protective finish will enhance the enclosure’s lifespan and blend it with your landscape.
Design Considerations
Before you start building, think about the design of your wooden trash bin enclosure. Consider these elements:
- Size: Measure your trash bins to ensure the enclosure will accommodate them easily. Leave extra space for ventilation and accessibility.
- Ventilation: Proper airflow is crucial for preventing odors. Incorporate slats or gaps in the design to allow fresh air to circulate.
- Aesthetics: Choose a design that complements your home or garden style. A slatted design may suit a modern look, while a more rustic finish could work well in a traditional garden.
Building Your Enclosure
Once you have your materials and design ready, it’s time to start building:
- Foundation: Begin by building a solid foundation. You can use treated lumber to create a raised platform.
- Framework: Construct the frame using vertical and horizontal pieces of wood. Ensure it’s sturdy enough to support the weight of the walls and doors.
- Walls: Attach the wooden slats or panels to the framework, making sure they are properly spaced for ventilation.
- Doors: Build hinged doors that can swing open easily, allowing you to access the bins without hassle. Use a latch system to keep them securely closed.
- Finishing Touches: Don’t forget to sand down the edges and surfaces to prevent splinters. Apply your chosen stain or paint for protection and aesthetics.
Maintenance Tips
A DIY Wooden Trash Bin Enclosure Outdoor can last for years if maintained properly. Here are some helpful maintenance tips:
- Regular Inspections: Check the wood periodically for any signs of wear or rot.
- Reapply Finish: Every couple of years, reapply stain or paint to protect from moisture and UV damage.
- Cleanliness: Make sure to clean the interior and exterior regularly to prevent odors and pests.
Selecting the Right Materials for Durability and Aesthetics
Building a DIY Wooden Trash Bin Enclosure Outdoor for your outdoor space can be a rewarding project. Not only does it help organize your yard, but it also adds a visual touch to your landscape. To achieve a durable and aesthetically pleasing result, selecting the right materials is crucial. Let’s look at some key factors to consider when choosing materials for your wooden trash bin enclosure.
Wood Types for Your Enclosure
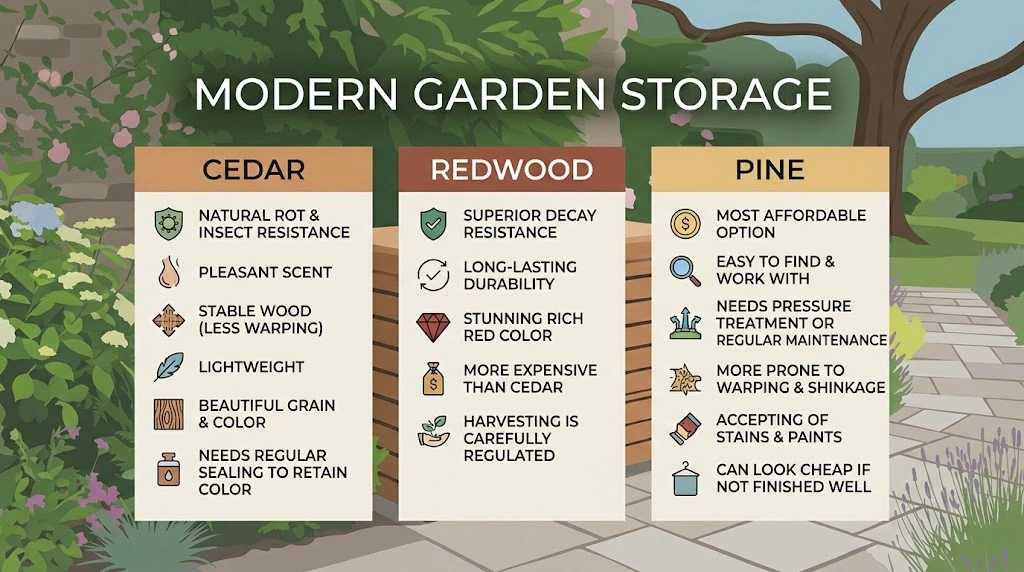
When it comes to building an outdoor trash bin enclosure, the type of wood you choose can greatly affect both durability and style. Here are some options:
- Cedar: This wood is naturally resistant to decay and insects, making it ideal for outdoor projects. Cedar’s rich color also adds a beautiful tone to your enclosure.
- Redwood: Like cedar, redwood is durable and offers an attractive appearance. It is often used for high-end projects due to its stunning grain and color variations.
- Pine: While it’s more affordable than cedar and redwood, untreated pine may not withstand weathering as well. If you choose pine, consider using a protective stain or sealant.
Finishes for Longevity
Once you’ve selected your wood, applying the right finish is essential to prolong its life. Here are some finishes to consider:
- Stains: A good stain not only enhances the wood’s natural beauty but also adds a protective layer against water and UV damage. Look for exterior-grade stains for optimum protection.
- Sealants: Sealants can be applied over stains or raw wood to create a waterproof barrier. They are particularly important in areas with high moisture levels.
- Paint: If you want a more vibrant look, consider painting your enclosure. Use exterior paint that can handle harsh weather conditions while preventing peels and blisters.
Structural Elements
For the structure of your trash bin enclosure, you need materials that can support the weight and withstand the elements. Here are some suggestions:
- Pressure-Treated Lumber: This type of lumber is treated to resist rot, making it a great choice for the framework.
- Concrete or Pavers: If your enclosure will sit on the ground, consider using concrete or paving stones for a strong, durable foundation.
- Hardware: Don’t forget about the fasteners! Stainless steel screws and hinges are ideal since they resist rust and corrosion.
Design Aesthetic
Your trash bin enclosure shouldn’t just be functional; it should complement your outdoor space as well. Consider these design elements:
- Color Schemes: Match your enclosure to the color of your home or landscape for a cohesive look.
- Style: Whether you prefer a modern or rustic aesthetic, choose materials and finishes that align with your vision.
- Landscaping: Incorporate plants or decorative stones around your enclosure to enhance its appearance and maintain a clean look.
Planning and considering these material options will yield a DIY Wooden Trash Bin Enclosure Outdoor that suits your home’s aesthetic while providing durability against outdoor elements. For those looking to dive deeper into DIY projects, check out great resources like Home Depot’s DIY Projects and Ideas or explore unique designs on Houzz.
By investing time and thought into your material choices, you can create a trash bin enclosure that not only serves its purpose but also adds charm to your outdoor area. Remember, the right combination of aesthetics and durability will ensure your project stands the test of time while maintaining its beauty.
Step-by-Step Guide to Building Your Own Trash Bin Enclosure
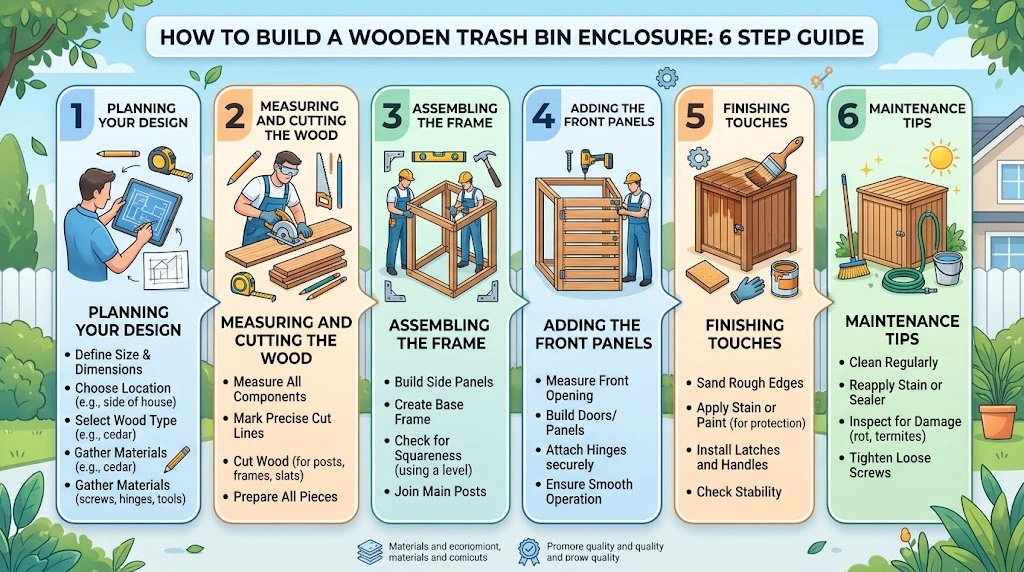
Building a DIY Wooden Trash Bin Enclosure Outdoor for your outdoor space can be a rewarding project. It not only makes your yard look tidier but also provides a functional storage solution for your trash bins. Follow these steps to create your own enclosure that will blend seamlessly with your landscaping.
Materials Needed
- Pressure-treated lumber (2x4s and 1x6s)
- Plywood for the back panel
- Hinges and latch
- Screws and wood glue
- Wood stain or outdoor paint
- Measuring tape
- Power saw
- Drill
Step 1: Planning Your Design
Before you start cutting wood, sketch out your design. Consider the following:
- Dimensions of your trash bins
- Available space in your backyard
- Style that matches your home or garden
Decide if you want an open-top or a lid for your trash bin enclosure. An open-top design provides easy access, while a lid can help keep out rain and wildlife.
Step 2: Measuring and Cutting the Wood
Measure the height, width, and depth required to accommodate your trash bins. Based on your design, cut the following pieces:
- 4 vertical posts (for the corners)
- 2 horizontal top pieces
- 2 horizontal bottom pieces
- Back panel (using plywood)
- Front panels (for access)
Using a power saw, cut the wood to size. Always wear safety gear when operating power tools.
Step 3: Assembling the Frame
Start by creating a rectangular frame with your first two horizontal pieces connected by the vertical posts. Use screws to secure your corners firmly. This structure will serve as the base of your enclosure.
Next, attach the back panel to provide stability. Make sure to leave enough space for your front opening.
Step 4: Adding the Front Panels
Cut two front panels that will allow access to your trash bins. Attach them using hinges so that they swing open easily. Install a latch to keep them secure when closed.
Step 5: Finishing Touches
Before you stain or paint your enclosure, ensure all screws are tight, and there are no rough edges. Apply a wood stain or outdoor paint to protect against weather damage. Choose colors that complement your home and surroundings.
Allow the finish to dry completely before placing your trash bins inside the enclosure.
Step 6: Maintenance Tips
To keep your DIY Wooden Trash Bin Enclosure Outdoor looking great and functioning well, consider the following maintenance tips:
- Check for any signs of wear or damage regularly.
- Reapply wood stain or sealant every few years.
- Clear out any debris or pests from inside the enclosure as needed.
Creating your own trash bin enclosure not only improves the aesthetics of your outdoor space but also helps you manage your waste more effectively. For more detailed instructions and helpful tips, consider visiting Home Depot or Lowe’s.
By following these steps, you can achieve a well-crafted, functional design that fits your needs and enhances the visual appeal of your garden.
Tips for Maintaining and Weatherproofing Your Wooden Enclosure
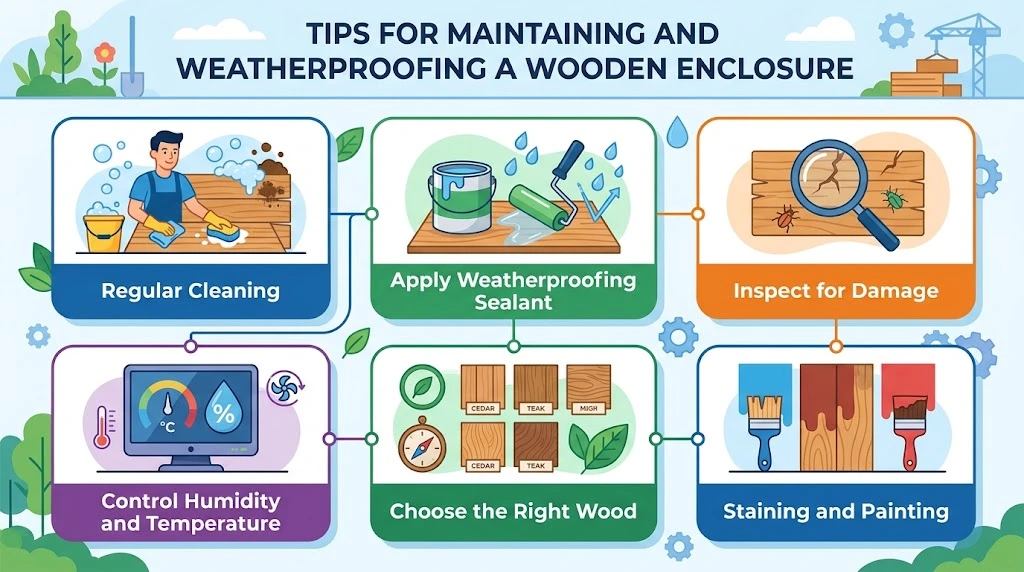
Creating a beautiful outdoor space goes beyond just picking the right furniture or plants. If you have a DIY Wooden Trash Bin Enclosure Outdoor, maintaining and weatherproofing it is essential to enhance its life and appearance. Here are some useful tips to keep your wooden enclosure in great shape.
Regular Cleaning
To maintain your wooden trash bin enclosure, start with regular cleaning. Dirt and debris can lead to mold and mildew growth. Here’s how to keep it clean:
- Use a soft brush and soapy water to scrub the surfaces.
- Rinse well with water and allow it to dry completely.
- Avoid using harsh chemicals that can damage the wood.
Apply Weatherproofing Sealant
A weatherproofing sealant is crucial for protecting your wooden enclosure against moisture, sun, and temperature changes. Follow these steps to apply the sealant:
- Choose a high-quality weatherproofing product suitable for outdoor wood.
- Ensure the wood is clean and dry before applying the sealant.
- Use a brush or roller for an even application.
- Apply at least two coats for maximum protection.
- Follow the manufacturer’s instructions for drying times before use.
Inspect for Damage
Regularly check your wooden enclosure for signs of wear or damage. Look for issues like:
- Cracks or splits in the wood.
- Loose fittings or hinges on doors.
- Signs of pest infestation, such as holes or frass (wood sawdust).
Address these issues promptly to prevent further damage. If necessary, replace sections of wood that are too damaged to repair. Visit Wood Magazine for some great repair advice.
Control Humidity and Temperature
Humidity can significantly affect wooden structures. Here are a few tips for controlling humidity and temperature around your trash bin enclosure:
- Position your enclosure in a well-ventilated area to promote airflow.
- Avoid placing it near large plants that can trap moisture.
- Use a dehumidifier in particularly damp climates.
You can find additional insights on humidity control at The Home Depot.
Choose the Right Wood
If you are building a new exterior, selecting durable wood is essential for longevity. Look for types that are naturally resistant to rot and insects, such as:
| Wood Type | Durability | Resistance to Insects |
|---|---|---|
| Cedar | High | Natural |
| Redwood | High | Natural |
| Treated Pine | Moderate | High (with treatment) |
This chart provides a quick view of excellent wood options for outdoor use. For more detailed comparisons, check out Wood Magazine.
Staining and Painting
Staining or painting your wooden trash bin enclosure can protect it against moisture and UV rays while also enhancing its aesthetics. Consider the following:
- Select a product that is specifically designed for outdoor use.
- Ensure the wood is clean and dry before application.
- Use a primer if painting for better adhesion.
- Apply at least two coats for longevity.
Creative Ways to Incorporate Landscaping Around Your Trash Bin Enclosure
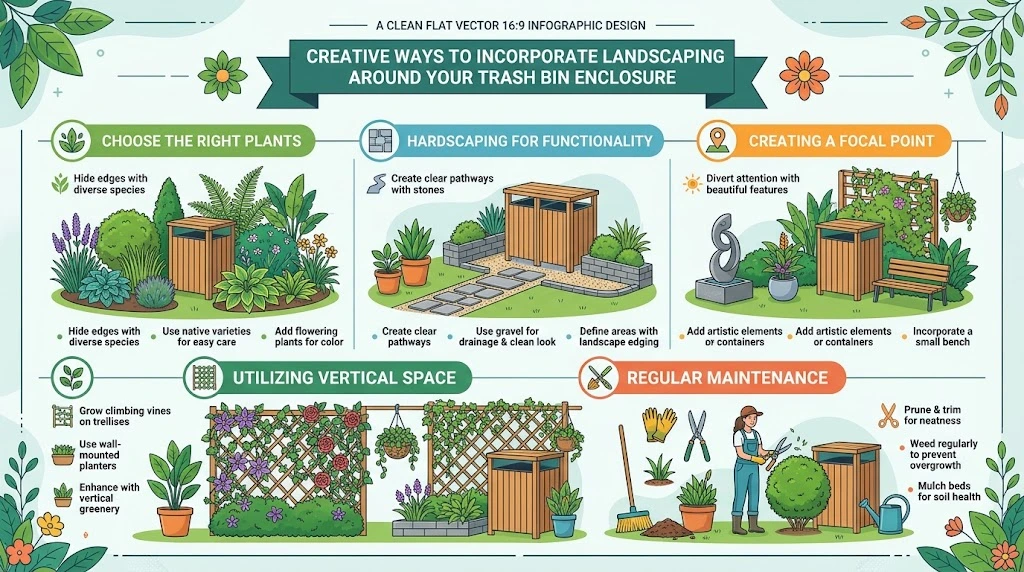
Creating a trash bin enclosure can be a functional yet stylish addition to your outdoor space. Not only does it hide unsightly garbage cans, but you can also elevate the aesthetics of your yard with effective landscaping. Here are some creative ways to make your trash bin area beautiful while keeping the focus on functionality.
Understanding the Importance of Landscaping Around Your Trash Bin Enclosure
Integrating landscaping in and around your trash bin enclosure can serve several purposes. You can improve the overall look of your yard while creating a barrier that uplifts your outdoor design. Some added benefits include:
- Concealing odors associated with garbage.
- Protecting the trash bins from weather elements.
- Enhancing the surrounding environment for a pleasing appearance.
- Providing a location for additional plants or decorative features.
Choose the Right Plants
Selecting the right plants can transform the area around your trash bin enclosure. Here are some ideal plants that can hide your trash bins while beautifying your space:
- Evergreen Shrubs: Plants like boxwood will grow densely and provide year-round greenery.
- Flowering Plants: Introducing colorful perennials like daylilies or coneflowers can add vibrancy to the corner.
- Perennials: Choose low-maintenance varieties that thrive in your climate.
- Climbing Vines: Using trellises with climbing plants such as jasmine can create a fragrant barrier.
Hardscaping for Functionality
Hardscaping elements can provide a beautiful contrast to the greenery surrounding your trash bin enclosure. Here are some options:
- Decorative Rocks: River rocks can create an appealing ground cover while allowing for drainage.
- Paver Stones: Laying down pavers can create a stable surface, preventing mud splashes during rainy seasons.
- Wooden Edging: Install timber or wood logs around your landscaping to demarcate the space clearly.
Creating a Focal Point
Adding one or two eye-catching elements can draw attention away from the trash bin itself. Consider these ideas:
- Garden Statues or Sculptures: A tasteful statue can make the enclosure feel more intentional.
- Water Feature: A small fountain or birdbath can create a joyful ambiance around the area.
- Artistic Bins: Opt for decorative trash bins that complement the overall theme of your landscaping.
Utilizing Vertical Space
If space is limited, you can use vertical landscaping techniques to enhance your trash bin enclosure. Here are a few options:
- Vertical Garden Planters: Attach planters to the sides of your enclosure for space-saving greenery.
- Wall Planters: Growing herbs or succulents on the sides can add a lively touch.
- Cascading Plants: Consider plants that can spill over the edges, softening the look of the enclosure.
Regular Maintenance
Keeping your landscaping tidy around the trash bin enclosure is essential for maintaining its appeal. Regularly check for:
- Weeds that might detract from the beauty of your space.
- Overgrown plants that could obscure access to the bins.
- Proper drainage to ensure no muddy patches form around the enclosure.
By implementing these landscaping ideas, you can successfully create a more inviting and functional outdoor space. Not only will your DIY Wooden Trash Bin Enclosure Outdoor be more visually appealing, but it will also serve practical purposes. If you’re looking for inspiration or further ideas, consider visiting helpful resources like Better Homes & Gardens for more insights.
Creating a beautiful trash bin enclosure is within your reach. With some creativity and thoughtful execution, you can enhance your outdoor area, elevating it from a functional necessity to an aesthetic feature!
Conclusion
Creating a DIY Wooden Trash Bin Enclosure Outdoor is an excellent way to boost the aesthetic appeal of your outdoor space while keeping your garbage neatly stored away. As you’ve learned throughout this guide, the design process is crucial. Whether you want something rustic or modern, consider how the enclosure will complement your home and garden.
Choosing the right materials not only affects the look of your enclosure but also its durability. Pressure-treated wood or cedar can stand the test of time against the elements, ensuring that your hard work pays off. Following a step-by-step building guide helps streamline the construction process, making it easier for you to achieve a professional look, even as a beginner.
Maintenance is key to longevity. Regular weatherproofing and a bit of care can keep your enclosure looking fresh and new, giving you peace of mind that you’re protecting your investment. Additionally, integrating landscaping elements around your enclosure can further enhance its charm. Think about planting flowers or adding decorative stones. These creative touches not only disguise the bin but also harmonize it with your yard.
With thoughtful design, proper materials, and consistent maintenance, your DIY Wooden Trash Bin Enclosure Outdoor will serve you well for years. Not only will you appreciate a cleaner and more organized outdoor space, but you’ll also enjoy the satisfaction of having built something functional and beautiful with your own hands. Engage with your project, involve your family, and let your creativity shine!