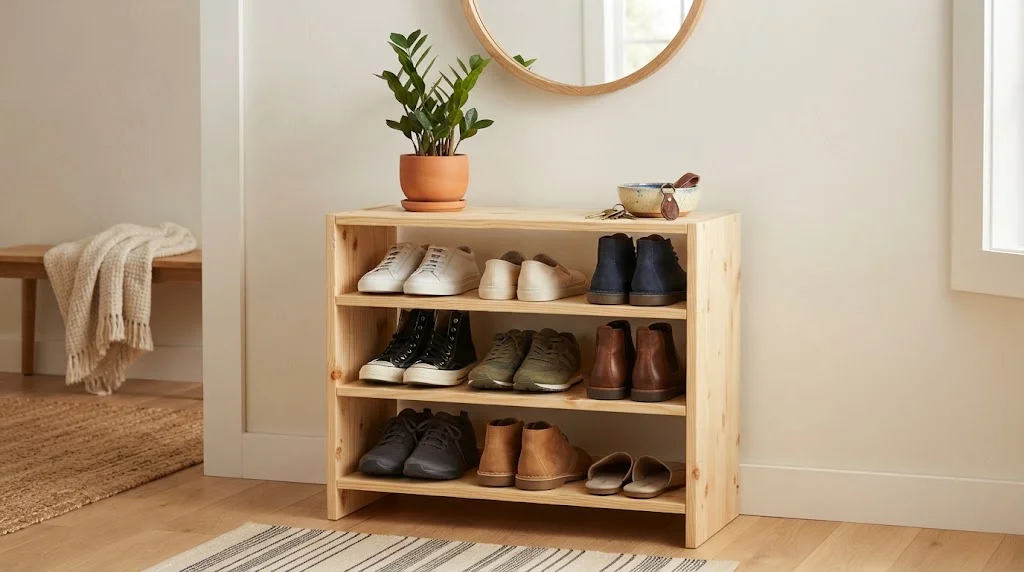
Creating a DIY wooden shoe rack for your entryway is a rewarding project that not only declutters your space but also adds a personal touch to your home decor. With just a few materials and some basic tools, you can craft a functional and stylish shoe storage solution that fits your needs perfectly. This guide will walk you through everything you need to know about building a DIY Wooden Shoe Rack for Entryway, from materials to assembly.
Before diving into the project, take a moment to consider the dimensions of your entryway and the number of shoes you want to store. Do you foresee needing space for boots, sneakers, sandals, or perhaps a combination of all? Sketch out a design that includes separate compartments, allowing you to accommodate different types of footwear.
Materials Needed
- Wood boards (1×4 or 1×6 inches, depending on your desired size)
- Screws and wood glue
- Sanding paper
- Wood finish or paint (optional)
- Drill
- Saw (hand saw or circular saw)
- Measuring tape
- Level
Step-by-Step Guide to Building Your Shoe Rack
1. Measure and Cut the Wood
Start by measuring the available space in your entryway. A common width for a shoe rack is between 30 to 40 inches, and the height can range from 18 to 30 inches. Cut your wood boards according to these measurements. You’ll need pieces for the top, bottom, sides, and shelves. For a typical design, a simple rectangular structure with three shelves should work well.
2. Assemble the Frame
Begin assembling the frame by attaching the side pieces to the top and bottom. Use your drill to create pilot holes for screws to prevent the wood from splitting. Make sure everything is level using your level tool. Once the frame is secure, proceed to attach the shelves.
3. Attach the Shelves
Decide on the spacing for each shelf based on your shoe sizes. A good height for shelves is typically 8 to 10 inches apart for regular shoes. Secure the shelves in place using screws or wood glue, ensuring they are firmly attached and can adequately support the weight of the shoes.
4. Sand and Finish
Once your wooden shoe rack is assembled, it’s time to sand down the surfaces. This will create a smooth finish and eliminate any splinters. If you’re interested in adding some flair, you can opt to stain or paint your rack. Choose a wood finish that complements the rest of your entryway decor.
5. Place Your Shoe Rack
After the finish has dried, move your new shoe rack into the desired space in your entryway. Ensure it’s stable and level. You can anchor it to the wall if you’re concerned about stability, especially if you have children or pets around.
Tips for Maintaining Your Shoe Rack
To keep your DIY Wooden Shoe Rack for Entryway in top condition, follow these helpful tips:
- Regularly clean the surfaces with a damp cloth to remove dust and dirt.
- Occasionally check the screws to ensure they’re not loosening over time.
- If you used paint or wood finish, reapply as needed for protection and aesthetic appeal.
Essential Tools and Materials for Your Shoe Rack Project
Building a DIY Wooden Shoe Rack for Entryway can be both a fun project and a practical solution to declutter your space. To effectively pull off this project, you need to gather the essential tools and materials. Here’s a handy guide to what you’ll require.
Tools You Will Need
Before diving into the construction of your shoe rack, it’s crucial to have the right tools on hand. Here’s a list of basic tools you might need:
- Tape Measure: To measure your space and materials accurately.
- Square: To ensure your angles are precise and the rack is sturdy.
- Drill: For making holes and driving screws; an electric drill speeds up the process.
- Saw: A circular saw or a miter saw will work best for cutting your boards to size.
- Screwdriver: Needed for assembling the shoe rack components, especially if you are not using a drill.
- Sandpaper: To smooth out the edges of your wooden pieces for a clean finish.
- Pencil: For marking measurements on wood.
- Clamps: To hold pieces together while you work.
Materials Required
Once you have your tools ready, it’s time to gather the necessary materials. The materials you choose can affect the look and durability of your shoe rack.
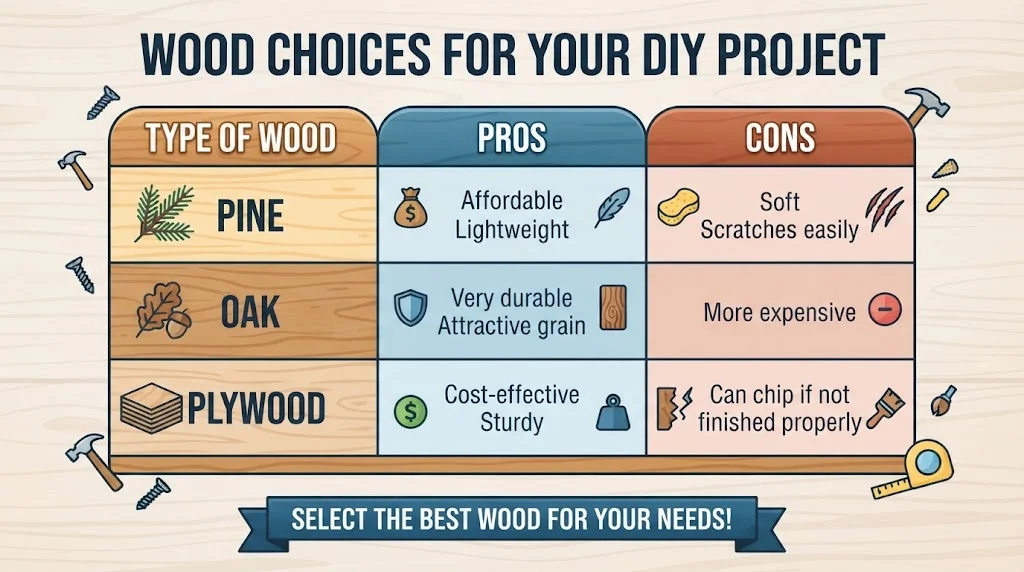
Wood: Opt for a sturdy type, such as pine, oak, or plywood. Ensure that the wood is free from defects. Here’s a quick look at the types you might consider:
| Type of Wood | Pros | Cons |
|---|---|---|
| Pine | Affordable, lightweight | Soft, scratches easily |
| Oak | Very durable, attractive grain | More expensive |
| Plywood | Cost-effective, sturdy | Can chip if not finished properly |
Screws: Make sure to pick wood screws appropriate for the thickness of your plywood or boards. They will help you secure different parts of the rack together.
Wood Glue: A strong adhesive can provide added stability, especially for joints.
Finish: This could be paint, stain, or sealant to protect the wood and enhance its appearance. Choose a color that matches your entryway.
Optional Accessories
If you want to add flair or extra function to your DIY Wooden Shoe Rack for Entryway, consider these optional accessories:
- Hooks: For hanging shoes or other accessories.
- Feets: To elevate your shoe rack off the ground and protect the wood from dampness.
- Rug or mat: To place under the rack will catch dirt and protect your floor.
Don’t forget safety gear. Safety glasses and a dust mask can protect you from wood dust and splinters while you work.
When you gather all these tools and materials, you’re setting yourself up for a successful DIY Wooden Shoe Rack for Entryway project for your entryway. For additional guidance and inspiration, you can check out Wood Magazine and Home Depot’s Ideas. These resources provide great tips and project ideas that can help enhance your crafting experience.
Now that you know what tools and materials you need, you are ready to create a practical and stylish addition to your home. Happy building!
Creative Designs and Styles for Wooden Shoe Racks
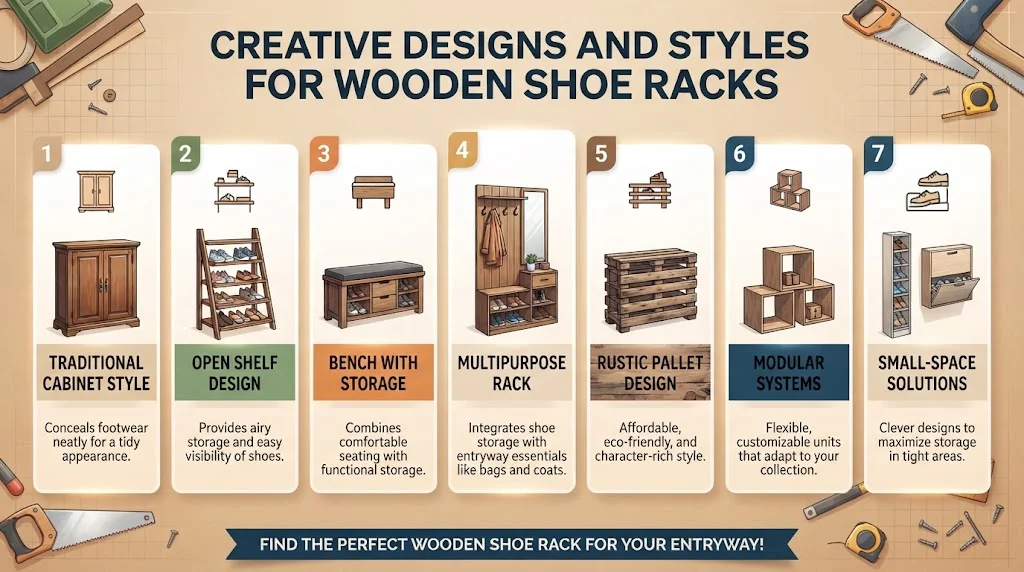
Wooden shoe racks can add a rustic charm and practical storage solution to your entryway. With various designs available, it’s easy to find a style that fits your taste and needs. Here are some inspiring ideas to create your own wooden shoe rack.
Traditional Cabinet Style
A traditional cabinet-style shoe rack is perfect for those who appreciate classic designs. These racks often feature closed doors with shelves inside, providing a clean look. This style works well in homes with a formal entryway and can be painted or stained to match the decor. You can enhance functionality by adding a cushion on the top for extra seating while you put on your shoes.
Open Shelf Design
If you prefer an airy feel, consider an open shelf design. This style showcases your shoe collection and makes it easy to grab a pair as you head out. Open shelves can be layered or staggered and painted in bold colors for a playful touch. Think about using a combination of different wood finishes to create visual interest and dimension.
Bench with Storage
A bench with built-in shoe storage is a practical choice, especially for small spaces. You can build a long, sturdy bench that doubles as a seat and shoe storage. Here’s a simple way to design it:
- Materials Needed: Plywood for the top, wooden boards for the sides, and shelves for inside.
- Construction Steps: Cut the wood to size, assemble the sides and back, then add the shelves inside. Secure the bench top.
- Finishing Touches: Sand the wood and add a varnish or paint that fits your style.
Multipurpose Rack
A multipurpose wooden shoe rack offers more than just a place for your shoes. This design can include hooks for bags or hats and even provide space for decorative items. Build a tall, slim structure with sections for shoes and areas for organization. A creative layout with cubbies and shelves will keep everything tidy and accessible.
Rustic Pallet Design
For those who enjoy a DIY challenge, consider creating a shoe rack from reclaimed wood, such as pallets. The rustic look brings warmth to any entryway, and using recycled materials is an eco-friendly choice. Simply disassemble the pallets, sand the pieces down, and assemble them to your desired shape. You can create a tiered design or a simple horizontal rack.
Modular Systems
Modular shoe racks provide flexibility in design. You can create a system that adapts as your needs change. Multiple interlocking cubes can be a fun way to personalize your space. Each cube can be used for shoes or other items like accessories. You can build these modules to different heights and widths to fit your entryway perfectly.
Small-Space Solutions
If space is limited in your entryway, look for vertical shoe racks that maximize storage. Tall, narrow designs fit into tight corners and can hold several pairs without taking up too much floor area. Hanging shoe organizers can also be attached to the wall, allowing each pair easy access while keeping the floor clear.
Tips for Organizing and Maintaining Your Entryway Shoes
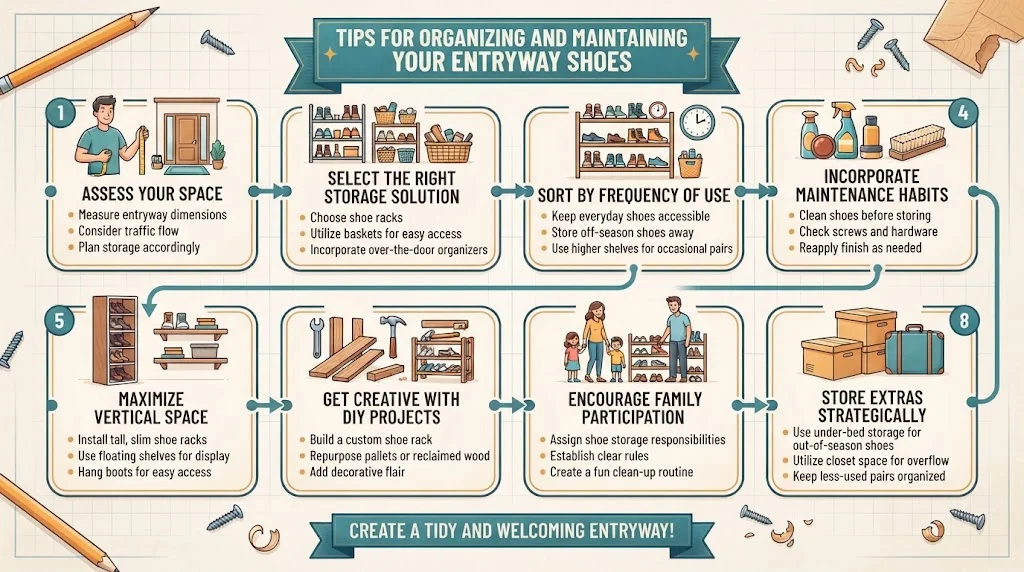
Keeping your entryway organized can feel overwhelming, especially when it comes to managing shoes. With a little planning and creativity, you can create a tidy and welcoming space for family and guests. Here are some effective tips to help you organize and maintain your entryway shoes, ensuring that they stay neatly stored and easy to find.
Assess Your Space
Before diving into organization, it’s crucial to evaluate your available space. Consider the following:
- Size: Measure your entryway to understand how much room you have for shoe storage.
- Traffic: Determine how many people regularly use the entrance and how many pairs of shoes are typically present.
- Style: Think about your home’s decor and choose storage solutions that complement it.
Select the Right Storage Solution
Choosing the right storage solution is key to maintaining order in your entryway. Here are some options:
- Shoe Racks: A simple DIY Wooden Shoe Rack for Entryway is an excellent choice. You can customize the size and style to fit your space perfectly. Check out Wood Magazine for detailed plans.
- Baskets: Use decorative baskets to store shoes, keeping them hidden but accessible.
- Over-the-Door Organizers: Perfect for limited space, these allow you to utilize vertical areas for shoe storage.
Sort by Frequency of Use
When organizing your shoes, it’s helpful to arrange them by how often you wear them:
- Everyday Shoes: Place your everyday footwear in the most accessible spot.
- Seasonal Shoes: Store out-of-season shoes in a less prominent area to minimize clutter.
- Occasional Use: Keep special occasion shoes in a designated storage box or a higher shelf.
Incorporate Maintenance Habits
To keep your entryway shoes looking their best, consider these maintenance practices:
- Regular Cleaning: Make it a habit to clean shoes before putting them away. This can prevent dirt from transferring to your entryway.
- Repair Supplies: Keep shoe repair items handy, such as glue and polish, so you’re prepared to maintain your favorite pairs.
- Rotation: Rotate your shoes regularly to avoid excessive wear on the same pairs.
Maximize Vertical Space
If your entryway lacks width, think vertical! Here are a few ways to use wall space creatively:
- Floating Shelves: Install floating shelves to hold shoes off the ground.
- Hooks and Racks: Use hooks for shoes, particularly boots, which can be hung for display.
Get Creative with DIY Projects
For those who love handiwork, creating a DIY Wooden Shoe Rack for Entryway can be both practical and decorative. Here’s a simple guide:
- Materials Needed: Wooden boards, screws, glue, sandpaper, and paint or stain.
- Steps: Measure your desired size, cut the wooden boards according to your measurements, assemble the rack using screws and glue for stability, sand down edges to avoid splinters, and finish with paint or stain matching your decor.
- Resources for Plans: Explore Ana White’s website for free plans and inspiration.
Encourage Family Participation
To ensure that your entryway remains organized, involve your family in the maintenance process:
- Set Rules: Have a clear rule for shoe storage, such as always placing shoes on the rack.
- Weekly Clean-Up: Establish a routine to check for misplaced shoes and give them a clean when necessary.
Store Extras Strategically
If you have extra shoes, such as sandals, hiking boots, or sports shoes, consider an off-season storage solution:
- Under-Bed Storage: Use boxes or bins for storing shoes under beds.
- Closet Space: Designate a small area in your closet for those less frequently used pairs.
With these organization strategies, your entryway can become a functional and attractive first impression for guests. Remember that a well-organized entryway is easier to maintain with a little effort and creativity!
Enhancing Your Entryway Aesthetic with Custom Woodwork
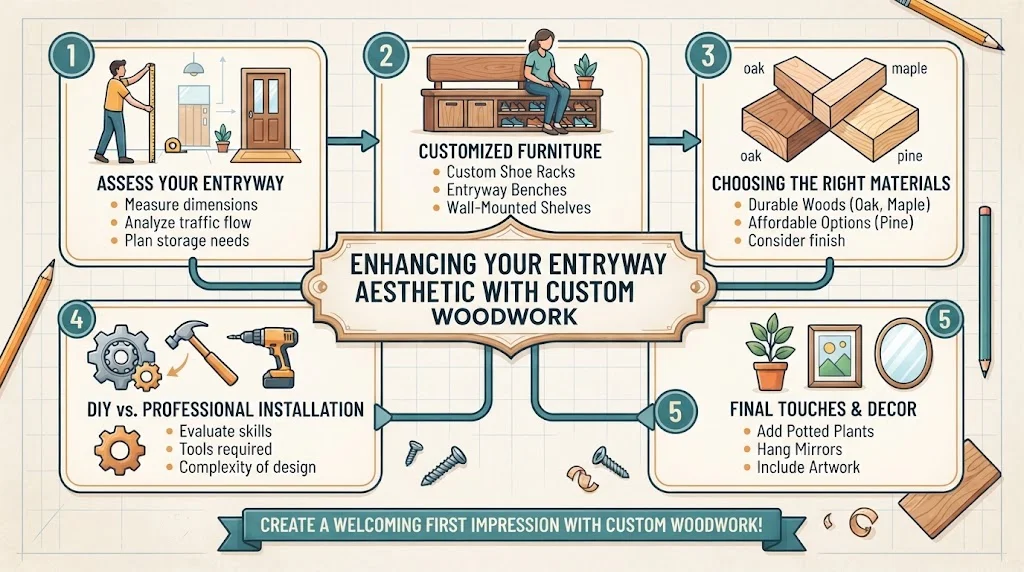
Transforming your entryway with custom woodwork can significantly enhance its aesthetic appeal. With a carefully designed approach, you can quickly elevate the overall look of this space in your home. Custom woodwork not only provides functionality but also adds a warm and inviting touch that impresses guests from the moment they walk in. Whether through shelves, shoe racks, or benches, wooden elements can make a striking difference.
Customized Furniture
One of the easiest ways to add custom woodwork to your entryway is through the incorporation of tailored furniture. Consider adding:
- Custom Shoe Racks: A DIY Wooden Shoe Rack for Entryway can neatly organize footwear while maintaining a sleek look. This keeps your entryway tidy and can be designed to fit your specific needs.
- Wooden Benches: A bench adds both seating and storage. You can design an entryway bench with hidden compartments for shoes or outdoor items.
- Wall-Mounted Shelves: Utilize vertical space by installing wooden shelves. They can hold decorative items, hats, or keys, offering functionality while enhancing the décor.
Choosing the Right Materials
When it comes to custom woodwork in the entryway, the choice of materials is essential. Opt for durable woods like oak, maple, or pine, which can withstand wear and tear while providing a classic appearance.
Each type of wood brings its unique beauty and character:
| Type of Wood | Characteristics |
|---|---|
| Oak | Strong and sturdy with visible grain patterns. |
| Maple | Light-colored and fine-grained; ideal for a modern look. |
| Pine | Softwood that’s affordable and easy to work with. |
Design Considerations
When planning your woodwork design, consider both functionality and aesthetics. Here are some pointers to keep in mind:
- Space Optimization: Measure your entryway to ensure your custom piece fits well without crowding the area. Utilize corners or vertical space for shelving or storage.
- Color Palette: Choose a wood finish that complements your existing decor. Lighter woods can brighten a small space, while darker woods can add warmth.
- Style Alignment: Ensure your woodwork’s style matches the overall theme of your home. Whether modern, rustic, or traditional, consistency is key.
DIY vs. Professional Installation
Deciding whether to take on a DIY project or hire professionals is crucial. Consider your skills, tools, and the complexity of your desired piece. A custom wooden shoe rack for entryways can be a straightforward project for those with basic carpentry skills. However, if you require intricate designs or specialized techniques, hiring a professional may be your best option.
For DIY enthusiasts, there are many resources available online. Websites like Ana White offer great plans and tutorials for creating wooden furniture.
Final Touches
Once you have your custom woodwork installed, adding decorative elements can significantly enhance the visual appeal of your entryway. Consider placing:
- Potted Plants: They add a natural element.
- Mirrors: These can help make the space feel larger.
- Artwork: Personal touches reflect your style and make it feel more inviting.
Enhancing your entryway with custom woodwork can offer both aesthetic and practical benefits. Whether you opt for a simple shoe rack or a multifunctional bench, these wooden elements can create a welcoming atmosphere. Start planning your project today and enjoy the transformation of your space.
Online Resources for Inspiration
Need more ideas to fuel your creativity? Here are some websites that offer fantastic designs and tips on building your own wooden shoe rack:
- Houzz – A treasure trove of design ideas, including shoe storage solutions.
- DIY Network – Great guides for building your own furniture.
- Pinterest – Visual inspiration for woodworking projects, including shoe racks.
Building your own wooden shoe rack opens the door to creativity and functionality. With endless designs to consider, you can choose one that suits your style and offers the perfect storage solution for your entryway.
Conclusion
Creating a DIY Wooden Shoe Rack for Entryway is not just about functionality; it’s also an opportunity to inject your personal style into a frequently used space. With the right essential tools and materials, you can embark on this rewarding project confidently. Remember, the choice of design and style can greatly enhance not just the utility of your shoe rack but also the overall aesthetic of your entryway. Whether you prefer a sleek modern design or a rustic look, tailoring the rack to fit your taste adds a unique charm to your home.
Once your beautifully crafted wooden shoe rack is in place, the journey doesn’t end there. Keep your entryway organized by sorting shoes by type or season, helping you maintain a clutter-free space. Regular upkeep will ensure that your shoe rack remains a stunning focal point and functions well for years to come.
Moreover, custom woodwork can further elevate your entryway’s ambiance. This touches upon the notion that practicality and style can coexist beautifully. The personalized touch of a DIY project not only makes your home more inviting, but it also tells a story of creativity and effort. So gather your tools, sketch out your design, and bring your wooden shoe rack vision to life. Your entryway will transform into a functional yet stylish area that welcomes you home every day.