Why This Build Works on Such a Tight Budget
Solid walnut lumber is genuinely expensive — often $8 to $12 per board foot — which makes an all-solid-walnut desk completely unrealistic at this price point. The trick to this build is understanding where to spend and where to save:
- Walnut-veneer plywood delivers the same rich, dramatic grain look as solid walnut at a fraction of the material cost, since you’re only paying for a thin real-wood layer rather than solid stock all the way through.
- Modern desk design leans on simplicity, which naturally uses less material and fewer complex joints than a traditional, ornately built desk.
- Hairpin or simple metal legs replace expensive, labor-intensive wood leg construction, giving the desk an instantly modern look without the cost or skill of traditional leg joinery.
- The right finish does most of the visual heavy lifting, deepening the grain and adding a warmth that makes the desk look custom-built rather than budget-built.
Put those four principles together, and you get a desk that reads as high-end furniture while your wallet barely notices.
The Look You’re Going For
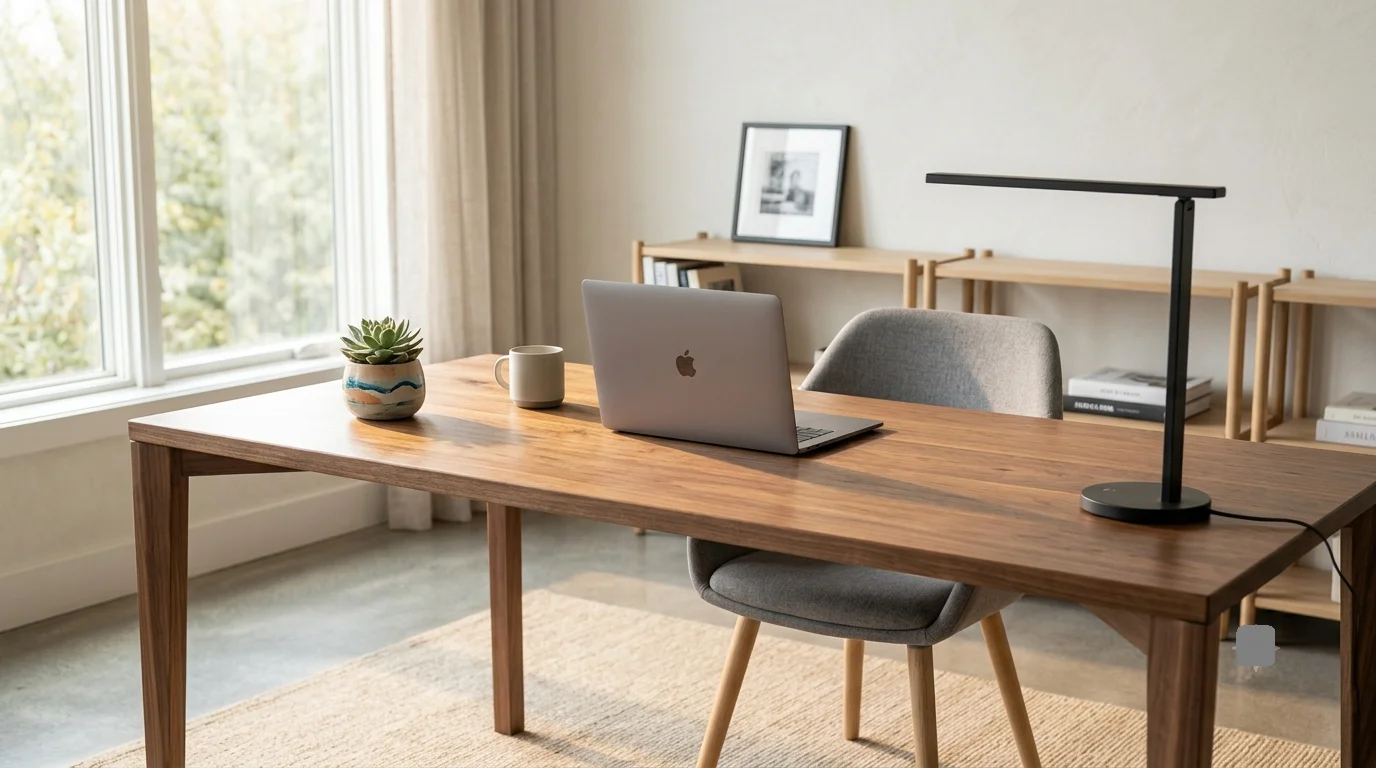
Before buying a single board, it helps to have a clear picture of the finished piece. This build focuses on a clean, floating-style desktop paired with slim metal legs — the kind of minimalist silhouette you’d see in a modern home office or a boutique co-working space.
- A single rectangular desktop, roughly 48 inches wide by 24 inches deep, with crisp, slightly rounded edges.
- Rich, dark walnut grain running the length of the desk for maximum visual drama.
- Thin, angled metal hairpin legs that keep the overall silhouette light and airy rather than bulky.
- A matte or satin finish that highlights the wood grain without looking glossy or plastic.
Feel free to adjust the dimensions to fit your space, but this size works beautifully for a standard home office setup without overwhelming a smaller room.
What You’ll Actually Need
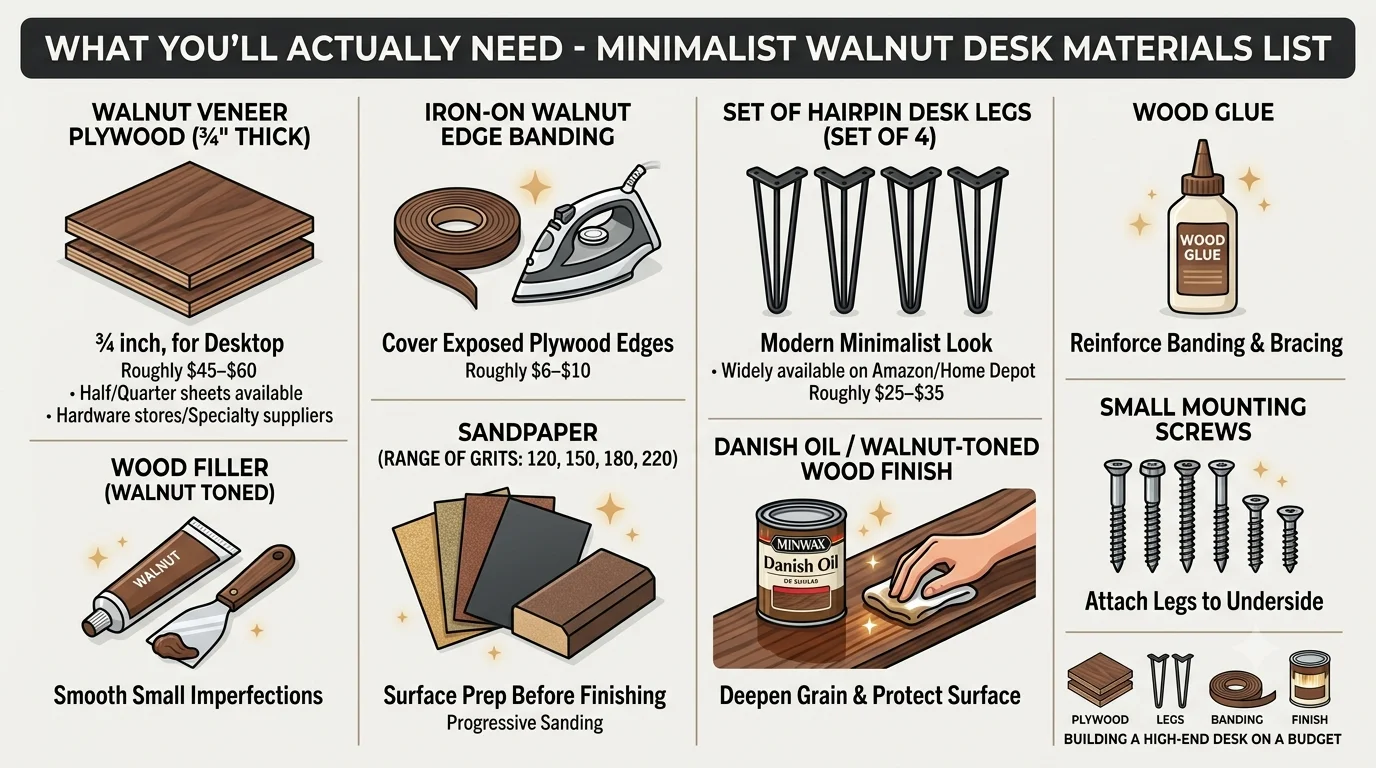
Here’s the full materials list for a desk built at the dimensions above.
- One sheet of walnut veneer plywood, ¾ inch thick, cut down to your desktop size (roughly $45–$60 for a project this size, often available in half or quarter sheets at hardware stores or specialty suppliers like Rockler).
- Iron-on walnut edge banding to cover the exposed plywood edges and hide the veneer layers (roughly $6–$10 for enough to wrap the entire desktop).
- A set of hairpin or angled metal desk legs, typically sold in sets of four (widely available for $25–$35 on Amazon or through Home Depot).
- Wood glue for reinforcing the edge banding and any additional bracing.
- Wood filler matched to walnut tones, for smoothing any small imperfections before finishing.
- Sandpaper in a range of grits, from 120 to 220, for prepping the surface before finish.
- Danish oil or a walnut-toned wood finish, such as Minwax, to deepen the grain and protect the surface.
- Small mounting screws to attach the legs securely to the underside of the desktop.
If you’re resourceful about sourcing your plywood and legs during a sale, most builders land comfortably between $80 and $95 total.
Choosing the Right Sheet of Plywood
This decision matters more than almost anything else in the build, since the plywood is the star of the entire piece.
- Look for tight, straight grain patterns if you want a clean, contemporary look, or bold, wavy grain if you’re going for something with more visual drama.
- Inspect the sheet in person whenever possible rather than ordering sight unseen, since veneer grain patterns vary significantly from sheet to sheet.
- Check for a smooth, unblemished veneer surface free of chips, bubbles, or sanding-through spots that would expose the plywood core underneath.
- Buy a slightly larger sheet than you need if your budget allows, giving yourself room to choose the most attractive section for your final cut.
Cutting Your Desktop to Size
Once you’ve selected your sheet, cutting it down to your desired dimensions is refreshingly simple thanks to the minimalist, single-slab design.
- Measure and mark your desktop dimensions carefully, double-checking every measurement before making a single cut.
- Use a fine-tooth blade on your circular saw or table saw to minimize splintering along the veneer surface.
- Score your cut line with a utility knife first along the top veneer layer, which dramatically reduces chip-out as the saw blade passes through.
- Sand the cut edges smooth before moving on to the edge banding step.
If you don’t own a table saw, most hardware stores will make a limited number of straight cuts for you, often for free or for a small per-cut fee, which is worth taking advantage of if precision cutting feels intimidating.
Covering the Edges So Nothing Looks Unfinished
Exposed plywood edges are the single fastest way to make a project look cheap and unfinished, which is exactly why edge banding matters so much on this build.
- Cut your iron-on walnut edge banding slightly longer than each edge of the desktop, trimming the excess after application.
- Apply the banding using a household iron on a medium heat setting, pressing firmly and moving steadily along the entire edge.
- Trim the overhanging edges with a sharp utility knife or edge-banding trimmer once the adhesive has cooled.
- Lightly sand the banded edges to blend them seamlessly with the surrounding veneer surface.
Done well, this step is nearly invisible — the desktop will look and feel like a single, solid slab of walnut rather than a sheet of veneered plywood.
Rounding and Softening the Edges for a Modern Feel
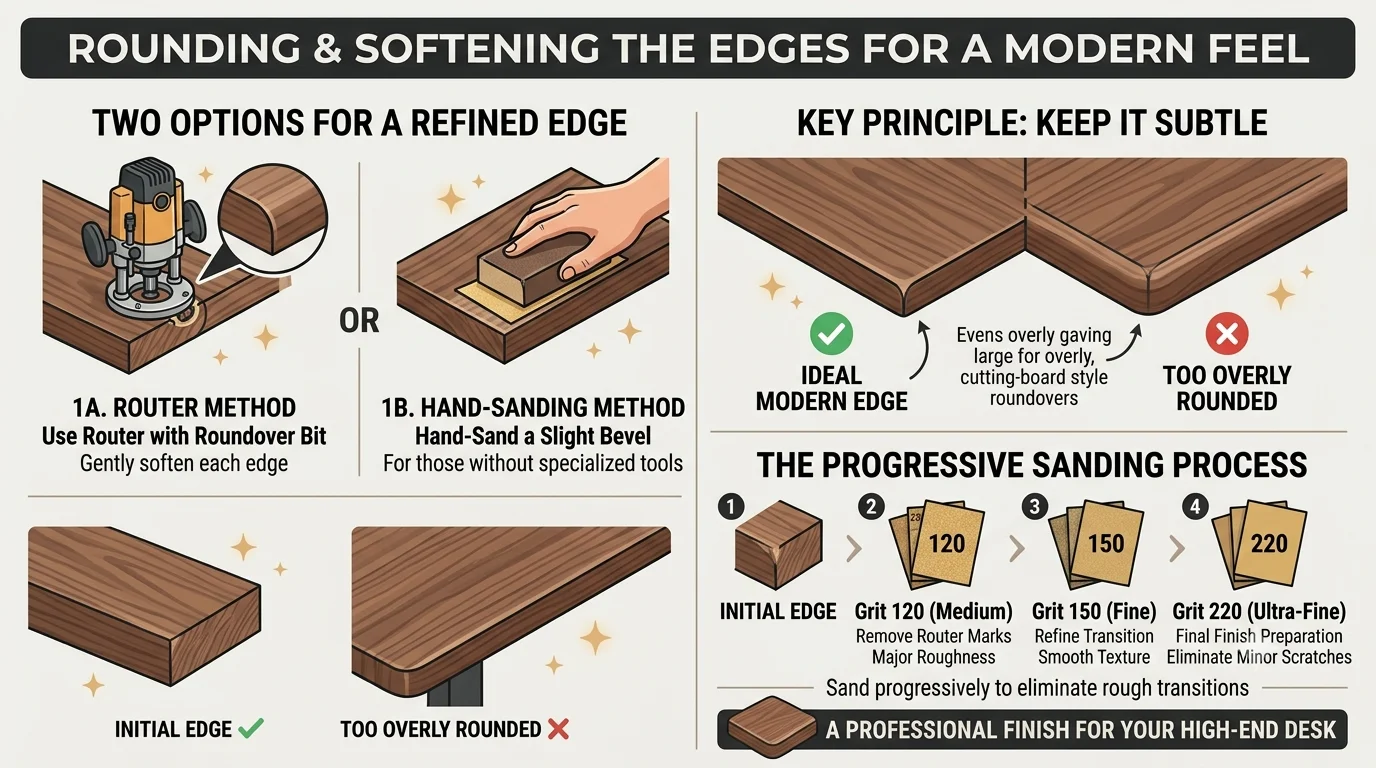
Sharp, hard 90-degree edges tend to look more like a basic tabletop than an intentional piece of furniture. A few extra minutes here elevates the entire look.
- Use a router with a roundover bit to gently soften each edge, or hand-sand a slight bevel if you don’t own a router.
- Keep the roundover subtle — a slight softening reads as modern and refined, while an overly rounded edge starts to look more like a cutting board than a desk.
- Sand progressively through 120, 150, and 220 grit sandpaper to eliminate any router marks or rough transitions.
Attaching the Legs for That Signature Modern Look
This is where the desk transforms from “a nice piece of wood” into “a piece of furniture,” and it’s remarkably simple thanks to modern hairpin leg hardware.
- Flip your finished desktop upside down on a soft blanket or towel to avoid scratching the surface.
- Measure and mark leg placement a few inches in from each corner, keeping the layout symmetrical on both ends.
- Pre-drill pilot holes before driving screws, which prevents splitting and keeps the mounting plates perfectly aligned.
- Attach each leg’s mounting plate securely using the provided screws, double-checking that all four legs sit level once flipped upright.
Hairpin legs in a matte black or brass finish tend to pair beautifully with walnut tones, reinforcing that clean, modern aesthetic without competing with the wood grain for attention.
The Finish That Makes Everyone Assume You Paid More
This step matters as much as every other step combined. A gorgeous piece of veneer plywood can still look flat and lifeless without the right finish, and a mediocre piece of plywood can look genuinely luxurious with the right one applied properly.
- Sand the entire surface one final time with 220-grit sandpaper, wiping away all dust with a clean, slightly damp cloth afterward.
- Apply a Danish oil or walnut-toned finish using a lint-free cloth, working in the direction of the grain.
- Let the first coat soak in for the recommended time, then wipe away any excess before it dries on the surface.
- Apply a second, and if needed a third coat, lightly sanding with fine-grit paper between coats for an ultra-smooth final texture.
- Finish with a protective topcoat, such as a matte polyurethane or wax, to guard against water rings, scratches, and everyday desk wear.
This layered approach deepens the walnut tones dramatically, adding the kind of rich, almost glowing depth you typically only see in furniture store showpieces costing several times as much.
Keeping the Total Build Under $100
Here’s a realistic cost breakdown for this exact build:
- Walnut veneer plywood: $45–$60
- Edge banding: $6–$10
- Hairpin legs: $25–$35
- Finish and sandpaper: $10–$15
- Screws and small hardware: $3–$5
Add it up, and most builders land between $89 and $100 depending on where they shop and whether they already own basic sanding and finishing supplies from a previous project.
Smart Ways to Stretch Your Budget Even Further
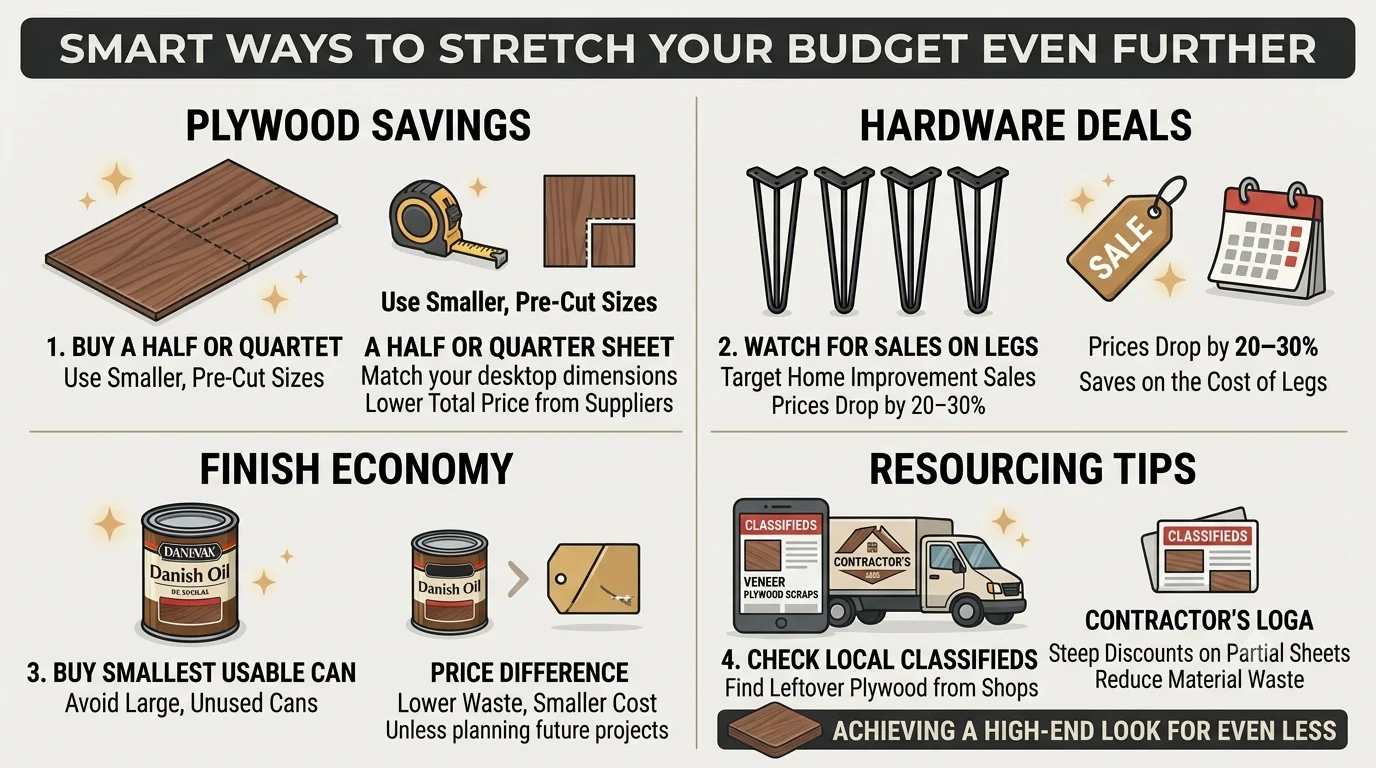
- Buy a half or quarter sheet of plywood instead of a full sheet if your desktop dimensions allow it, since many suppliers offer pre-cut smaller sizes at a lower total price.
- Watch for sales on hairpin legs, particularly around home improvement seasonal sales events, when prices frequently drop by 20 to 30 percent.
- Buy finish in the smallest usable size rather than a large can you’ll only use once, unless you’re planning future projects that will use the rest.
- Check local classifieds for leftover veneer plywood from cabinet shops or contractors, who often sell partial sheets at a steep discount rather than storing them indefinitely.
Mistakes That Quietly Undercut an Otherwise Beautiful Build
- Skipping the edge banding step. Raw plywood edges instantly signal a budget build, no matter how nice the top surface looks.
- Rushing the finish. A single quick coat of oil looks noticeably flatter and less rich than two or three patient, properly wiped coats.
- Choosing legs that clash with the wood tone. Cheap, shiny chrome legs can undercut an otherwise warm, elegant walnut look — matte black or brushed brass tends to pair far better.
- Overcomplicating the design. Adding drawers, shelves, or extra joinery increases both cost and complexity dramatically. The minimalist, single-slab approach is what keeps this build affordable and achievable.
- Not double-checking leg placement before drilling. A crooked or uneven leg placement is difficult to fix after the holes are drilled, so measure twice before committing.
Design Variations Worth Considering
The single-slab, hairpin-leg approach is the fastest and most budget-friendly path to a modern walnut desk, but a few simple variations can help you tailor the build to your space and style.
- Floating wall-mounted desk. Skip legs entirely and mount your finished walnut slab directly to wall studs using heavy-duty floating shelf brackets, freeing up floor space in a small home office and creating an even more minimalist look.
- Corner desk configuration. Cut two smaller plywood sections at complementary angles instead of one long rectangle, joining them with a discreet support bracket underneath to fit snugly into a corner without wasting space.
- Two-tone leg pairing. Instead of standard black hairpin legs, look for brushed brass or copper-toned options, which create a warmer, slightly more upscale contrast against the dark walnut grain.
- Waterfall edge detail. For a slightly more advanced build, wrap a matching strip of veneer plywood down one side of the desk to mimic the look of a waterfall-edge table, adding visual interest without significantly increasing material cost.
Whichever variation you choose, the core principles from this guide stay exactly the same: a quality veneer sheet, clean edge work, a design that keeps joinery simple, and a finish that lets the grain shine.
Styling and Placing Your Finished Desk
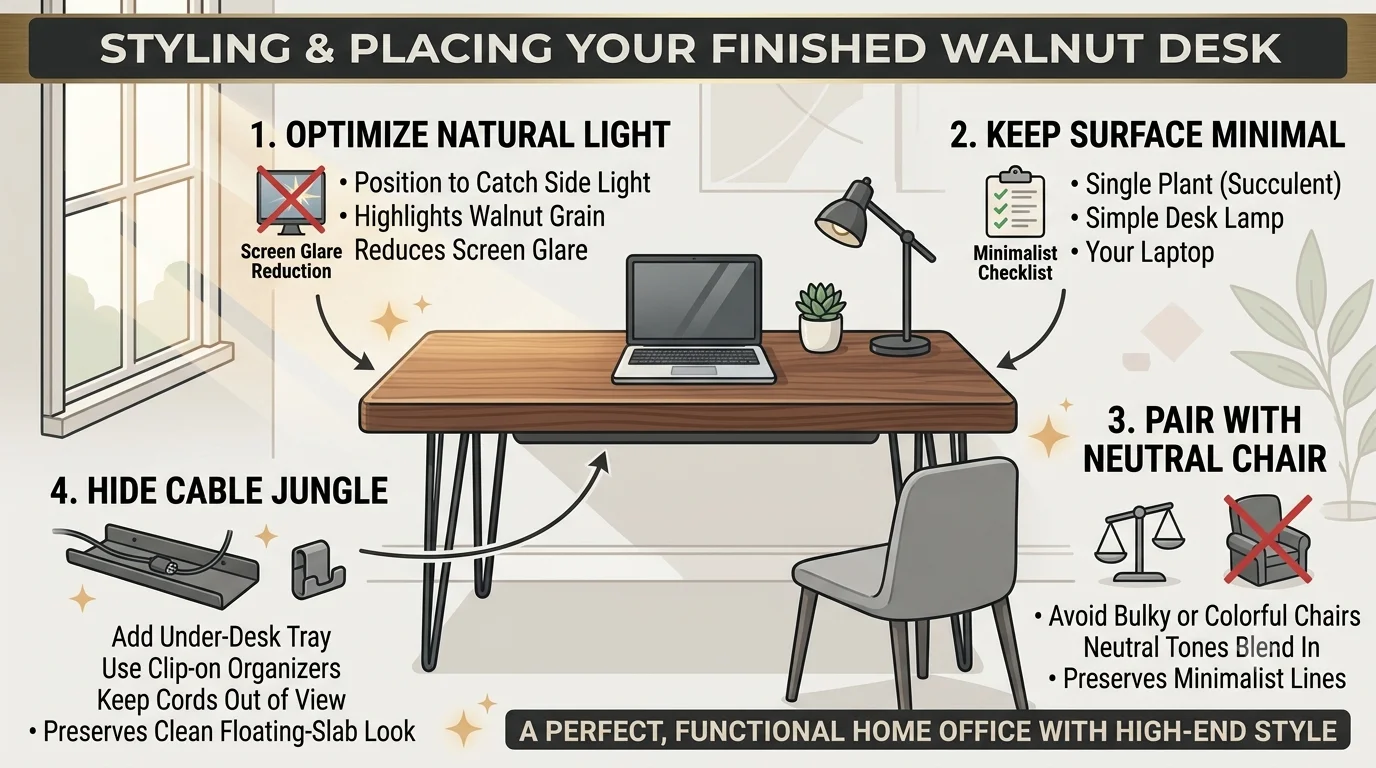
Once your desk is built and finished, a few thoughtful styling choices can help it look even more like an intentional, designer piece rather than a weekend project.
- Position it to catch natural light from the side rather than directly behind you, which highlights the walnut grain beautifully throughout the day while reducing screen glare.
- Keep the surface intentionally minimal — a single plant, a simple desk lamp, and your laptop go a long way toward reinforcing that clean, modern aesthetic you built the desk around.
- Pair it with a simple, low-profile chair in a neutral tone, since an overly bulky or brightly colored chair can visually compete with the desk’s minimalist lines.
- Add a slim cable management tray or clip-on organizer underneath to keep cords out of view, preserving that clean floating-slab look from every angle.
Small styling choices like these are exactly what separates a good DIY build from one that looks like it belongs in a design magazine, and none of them require any additional woodworking skill.
The Tools That Make This Build Painless
You don’t need a fully outfitted workshop to pull this project off, but having the right basic tools on hand makes every stage go faster and look more polished.
- A circular saw or table saw with a fine-tooth blade for clean, splinter-free cuts through the veneer plywood.
- A household clothing iron, which doubles perfectly as your edge-banding application tool — no specialty equipment required.
- A power drill for pre-drilling pilot holes and driving the mounting screws for your legs.
- An orbital sander or simple sanding block to work through your grits efficiently, especially across a full desktop surface.
- A router with a roundover bit, if you have access to one, though hand-sanding remains a perfectly good substitute.
- Clamps to hold the desktop steady while cutting, sanding, or attaching hardware.
If you’re missing one or two of these tools, many hardware stores, including Home Depot and Lowe’s, offer short-term tool rentals for a small fee, which is often far cheaper than buying a tool you’ll only use once or twice.
Why This Build Makes Such a Great First Furniture Project
If you’ve never built a piece of furniture from scratch before, this desk is an unusually forgiving place to start. There’s no complex joinery to master, no need to glue up multiple boards into a single panel, and no risk of visible seams giving away a beginner’s mistake. The entire structural challenge boils down to a handful of straightforward tasks: cutting a single panel accurately, applying edge banding neatly, and attaching pre-made legs securely.
That simplicity is exactly what makes the finish such an important focus. Because the construction itself is so approachable, this project gives first-time builders a chance to really slow down and practice sanding technique, oil application, and grain-following finishing work — skills that transfer directly to every future woodworking project, whether that’s a bookshelf, a coffee table, or eventually a full custom commission piece.
Frequently Asked Questions About Building a Walnut Desk on a Budget
Will veneer plywood actually look like real solid walnut?
Yes, when chosen carefully and finished properly. The visible surface is genuine walnut wood, just applied as a thin layer over a stable plywood core rather than solid stock all the way through. Once finished, it’s visually indistinguishable from solid walnut to almost anyone who isn’t specifically looking for the seam at the edge.
Can I build this without a router?
Absolutely. A router makes the edge-rounding step faster and more consistent, but hand-sanding a gentle bevel with progressively finer sandpaper achieves a very similar softened, modern edge with a bit more elbow grease.
How sturdy are hairpin legs for everyday desk use?
Quality hairpin legs rated for desk or table use comfortably support typical desk loads, including monitors, laptops, and everyday office equipment. Just make sure to choose a set rated for the weight and size of your specific desktop, and mount them with properly pre-drilled, secure screws.
What if I want a larger desk than the dimensions listed here?
Simply scale up your plywood sheet size and adjust your leg spacing accordingly, keeping in mind that a larger, unsupported span may benefit from a center support leg or a thicker plywood core to prevent any flex over time.
How long does this build take from start to finish?
Most builders can complete the cutting, edge banding, and leg attachment in a single afternoon. The finishing process takes a bit longer since each coat needs adequate drying time, so plan for the full build, including finish curing, to span a weekend.
A Desk Worth Bragging About
The best part of this build isn’t just the money you’ll save — it’s the moment someone asks where you bought your desk, and you get to say you built it yourself for under $100. A modern walnut desk doesn’t require rare, expensive lumber or advanced woodworking skills. It requires smart material choices, patience during the finishing process, and a design that lets the wood grain do most of the talking.
Clear a Saturday afternoon, grab your materials list, and build the piece that’s going to anchor your home office for years to come.