If you’re looking to bring a touch of nature into your home, a DIY Wooden Living Wall Planter Ideas is a fantastic option. Not only do they maximize your gardening space, but they also add a unique aesthetic to any room. Below are some creative ideas to help you design and build your very own wooden living wall planters.
Vertical Wooden Planter Boxes
Vertical planter boxes are easy to make and can be customized to fit any space. You can create a series of small boxes stacked vertically or even design a larger box that can hold multiple plants. Here’s how you can create them:
- Materials Needed: Wooden boards, screws, wood glue, sandpaper, and a drill.
- Building Steps:
- Cut the wood into the desired sizes for your boxes.
- Assemble the boxes using screws and wood glue for extra sturdiness.
- Sand the edges to create smooth surfaces.
- Mount the boxes onto a wall using sturdy brackets.
Hanging Wooden Planters
Hanging planters are a breathtaking solution for small spaces. These can be designed to hang from a wall or ceiling, adding an enchanting layer of greenery to your living wall.
- Materials Needed: Wooden pallets, rope, hooks, and plant pots.
- Building Steps:
- Cut the pallet into sections suitable for planting.
- Attach hooks to the ceiling or wall.
- Fill plant pots with soil and place them into the pallet slots.
- Use rope to secure the pallet at desired heights.
Wooden Ladder Planters
Transform an old wooden ladder into a charming living wall planter. This approach is not only creative but also economical. Here’s how to do it:
- Materials Needed: An old wooden ladder, wood stain (optional), and pots or planter boxes.
- Building Steps:
- Clean the ladder and apply wood stain if desired.
- Place pots or attached planter boxes on the rungs of the ladder.
- Lean the ladder against a wall or set it as a free-standing piece.
Tiered Wooden Planters
Tiered planters are visually appealing and functional. This design allows plants to grow at different levels, making the best use of space.
- Materials Needed: Wooden boards, screws, nails, and paint (if you wish to color it).
- Building Steps:
- Cut the boards into equal lengths for each tier.
- Create a frame to hold each tier vertically.
- Screw the boards into place, ensuring stability.
- Fill each tier with soil and plant your favorite flowers or herbs.
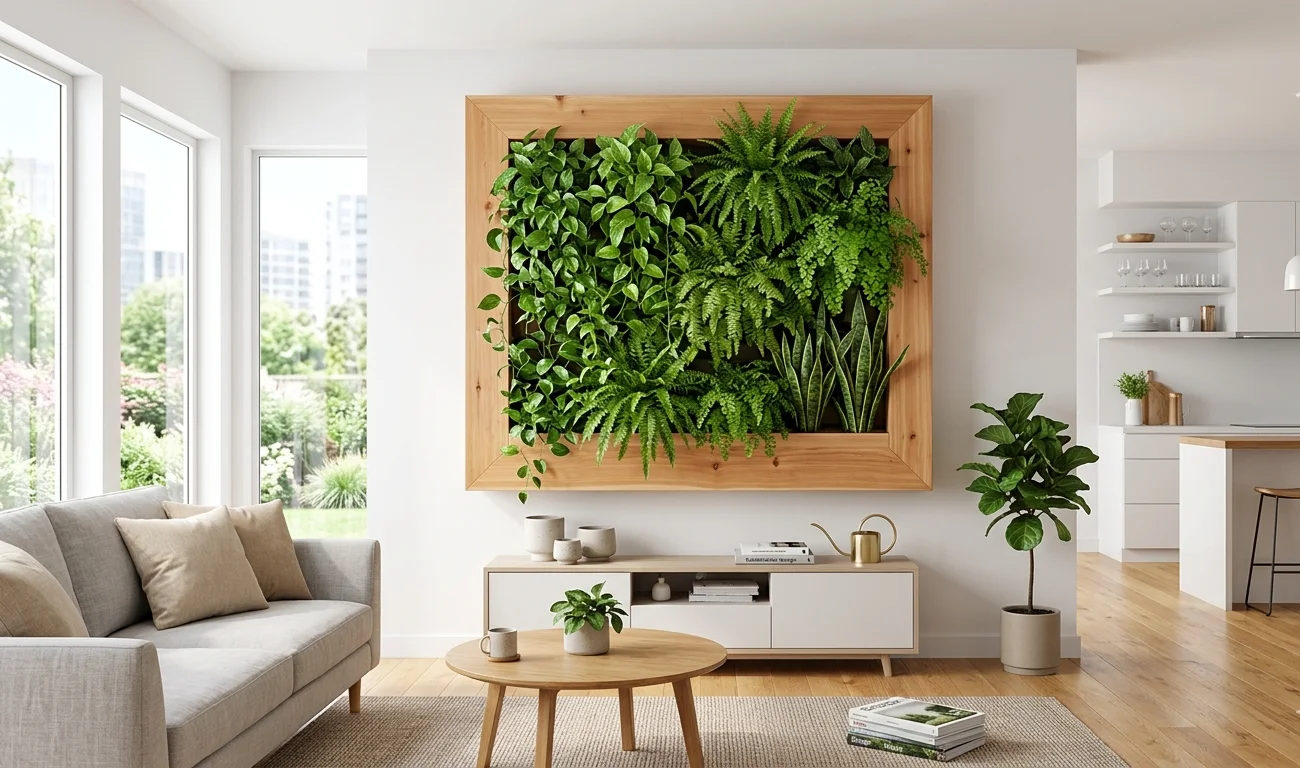
Wall-Mounted Planter Frames
Wall-mounted planter frames serve as stunning wall art while providing space for your plants. This approach is perfect for decorative walls.
- Materials Needed: Wooden frames, mesh or lattice, and pots.
- Building Steps:
- Build a wooden frame that fits your desired wall space.
- Attach mesh or lattice to the frame to support plants.
- Mount the frame on the wall and arrange pots or plants into the mesh.
With these DIY Wooden Living Wall Planter Ideas, you can personalize your indoor or outdoor space. Take a look at Family Handyman for tips and more DIY projects. Additionally, explore Pinterest for visual inspiration and innovative designs. Each plan offers an opportunity to express your creativity while contributing to a greener environment.
Benefits of Vertical Gardening for Small Spaces
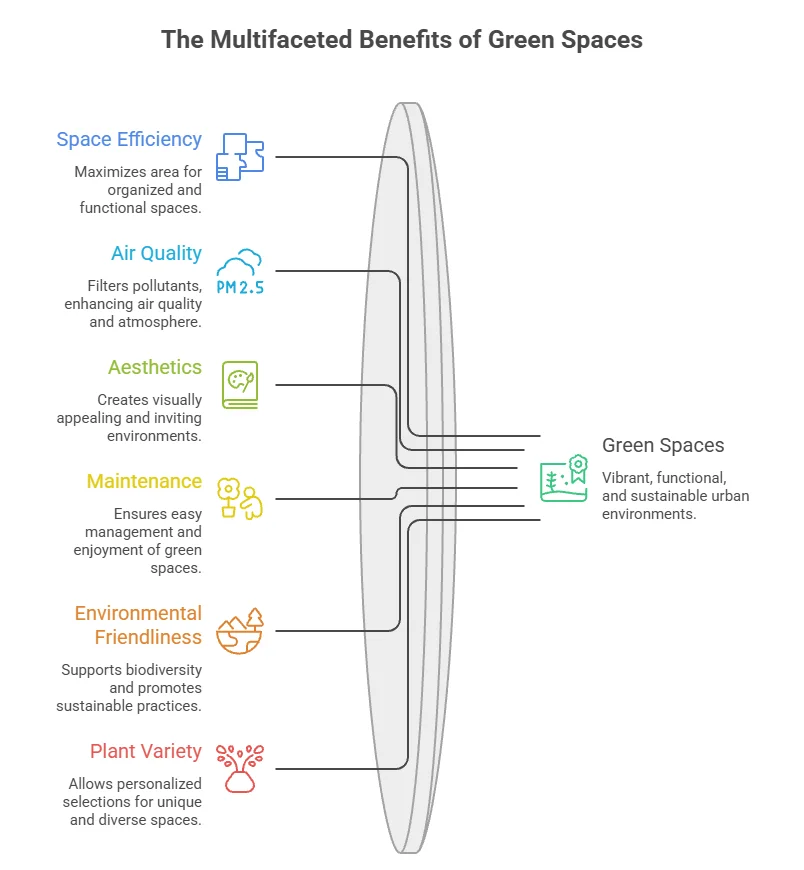
Are you looking to maximize your small living space while keeping it stylish and green? Vertical gardening is a perfect solution for those who want to bring nature indoors or create a lush environment in limited outdoor areas. By utilizing walls and vertical structures, you can cultivate plants in an efficient way. Here are some benefits of this trend that is changing how we think about gardening.
Space Efficiency
Vertical gardening allows you to take advantage of your vertical space. You can create gardens on walls, fences, or even inside your home. This is particularly beneficial if you have:
- Small balconies
- Compact yards
- Urban spaces
By growing plants upwards rather than outwards, you make use of every bit of available space. This is ideal for homeowners in urban areas where land is limited.
Improved Air Quality
Indoor vertical gardens can significantly enhance air quality. Plants naturally filter toxins and release oxygen. This can lead to a better living environment, especially in small apartments where fresh air may be hard to come by. Research shows that having indoor plants can:
- Reduce stress levels
- Improve concentration
- Boost mood
Consider using species like snake plants or pothos, which are known for their air-purifying capabilities.
Enhanced Aesthetics
A vertical garden can serve as a stunning visual focal point in your home or garden. Here’s why aesthetics matter:
- They can make any dull wall come alive.
- Use various plants to create beautiful patterns and colors.
When properly planned, a vertical garden can improve the overall look of your living space and indoors, inspiring creativity and calming vibes.
Ease of Maintenance
Contrary to popular belief, vertical gardens can be easier to maintain than traditional gardens. Here are a few reasons why:
- Less bending and kneeling: You can reach plants more easily.
- Easier to monitor for pests and diseases.
Using a drip irrigation system can also simplify watering, making it a low-maintenance option for busy individuals.
Environmentally Friendly
Vertical gardens contribute positively to the environment. Some benefits include:
- They reduce heat in urban areas, providing natural insulation.
- They can reduce noise pollution.
- They encourage biodiversity by attracting beneficial insects and birds.
This sustainable choice adds greenery and biodiversity to areas where traditional gardening may not be feasible.
Variety of Plant Choices
Vertical gardens offer the versatility to plant a wide range of flora. You can grow:
- Herbs like basil, mint, and thyme.
- Flowering plants for a dash of color.
- Vegetables such as tomatoes and peppers.
Vertical gardening is an innovative way to enjoy gardening even in small spaces. With space efficiency, improved air quality, aesthetic appeal, ease of maintenance, and environmental benefits, it’s a highly recommended choice for any plant lover. Whether you’re taking a small step with herbs in your kitchen or creating a stunning wall of green in your living room, vertical gardening can transform your space.
Tips for Selecting the Right Plants for Your Wooden Planter
Creating a wooden planter is a fantastic way to bring greenery into your space. However, choosing the right plants for your wooden planter is essential to ensure your garden thrives and remains visually appealing. To help you make the right choices and enjoy a flourishing living wall or planter, consider the following tips.
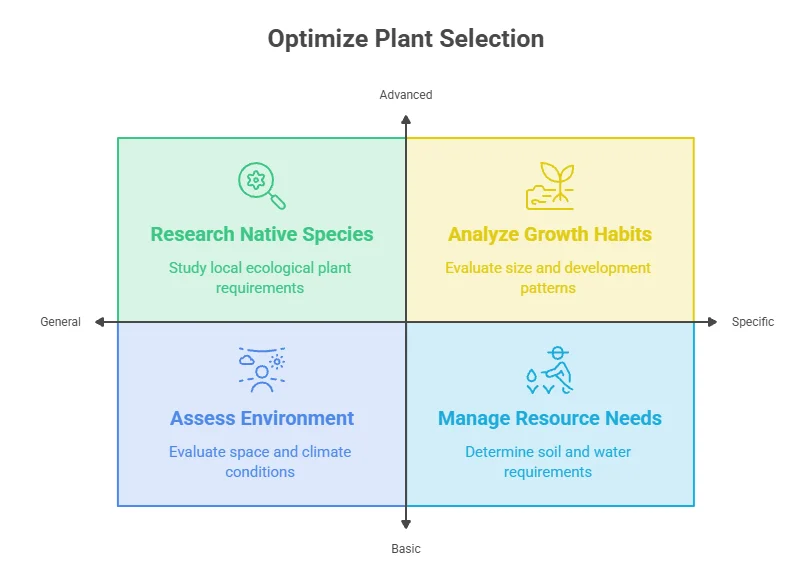
Consider Your Space and Climate
The first step in selecting plants is assessing your available space and the climate. Consider if your planter is indoor or outdoor and how much sunlight it will receive. Different plants have varying sunlight requirements:
- Full Sun: Requires 6-8 hours of direct sunlight.
- Partial Sun: Needs 4-6 hours of sunlight, preferably in the morning.
- Shade: Thrives in areas with less than 4 hours of direct sunlight.
Understanding your microclimate will guide you to plants that will flourish in your wooden planter.
Choose the Right Plants by Category
When selecting plants, consider dividing them into categories based on their characteristics:
Edible Plants
Growing herbs and vegetables in your wooden planter can be rewarding. Some excellent choices include:
- Basil
- Mint
- Cherry tomatoes
- Oregano
These plants not only provide fresh ingredients but also add a pleasant aroma to your living space.
Flowering Plants
Adding flowering plants can provide vibrant colors and visual interest. Consider these options:
- Petunias
- Geraniums
- Marigolds
- Pansies
These flowers can enhance the beauty of any wooden planter, creating a charming display.
Foliage Plants
Foliage plants bring lush greenery, making them a great addition for indoors or shaded areas. Suitable ones include:
- Ferns
- Snake plants (Sansevieria)
- Philodendrons
- Pothos
These plants are typically low-maintenance and can survive in less-than-ideal lighting conditions.
Assess Plant Size and Growth Habit
When picking plants, ensure that you consider their final size and growth habit. Some plants may require more space as they mature; others may trail or spread. To create a balanced look, consider:
- Layering taller plants at the back or center and shorter ones in the front.
- Mixing trailing plants with upright varieties for visual interest.
- Group plants with similar growth rates together to keep care consistent.
Soil and Water Requirements
Different plants have varying soil and water needs. Choose plants that share similar requirements to simplify your care routine. For example:
| Plant Type | Soil Type | Water Needs |
|---|---|---|
| Succulents | Well-draining soil | Low |
| Herbs | Loamy soil | Moderate |
| Ferns | Moist, rich soil | High |
Understanding these factors will help you maintain a healthy garden.
Group Plants Wisely
Plant grouping is key to creating a thriving wooden living wall. Here are some tips for grouping:
- Group plants with similar watering and soil preferences to make care easier.
- Mix plants with contrasting textures and colors for a visually appealing setup.
- Consider seasonal changes; plant perennials with annuals for year-round interest.
Research Native Plants
Researching native plants can be beneficial. These plants are well-adapted to your local climate and typically require less maintenance. Check out resources such as PlantNative for guidance on native species in your area.
By using these guidelines, you can confidently select the best plants for your DIY Wooden Living Wall Planter Ideas. Remember to consider plant heights, colors, and growth habits for the best aesthetic results while ensuring they thrive in your unique environment.
Step-by-Step Guide to Building Your Wooden Living Wall Planter
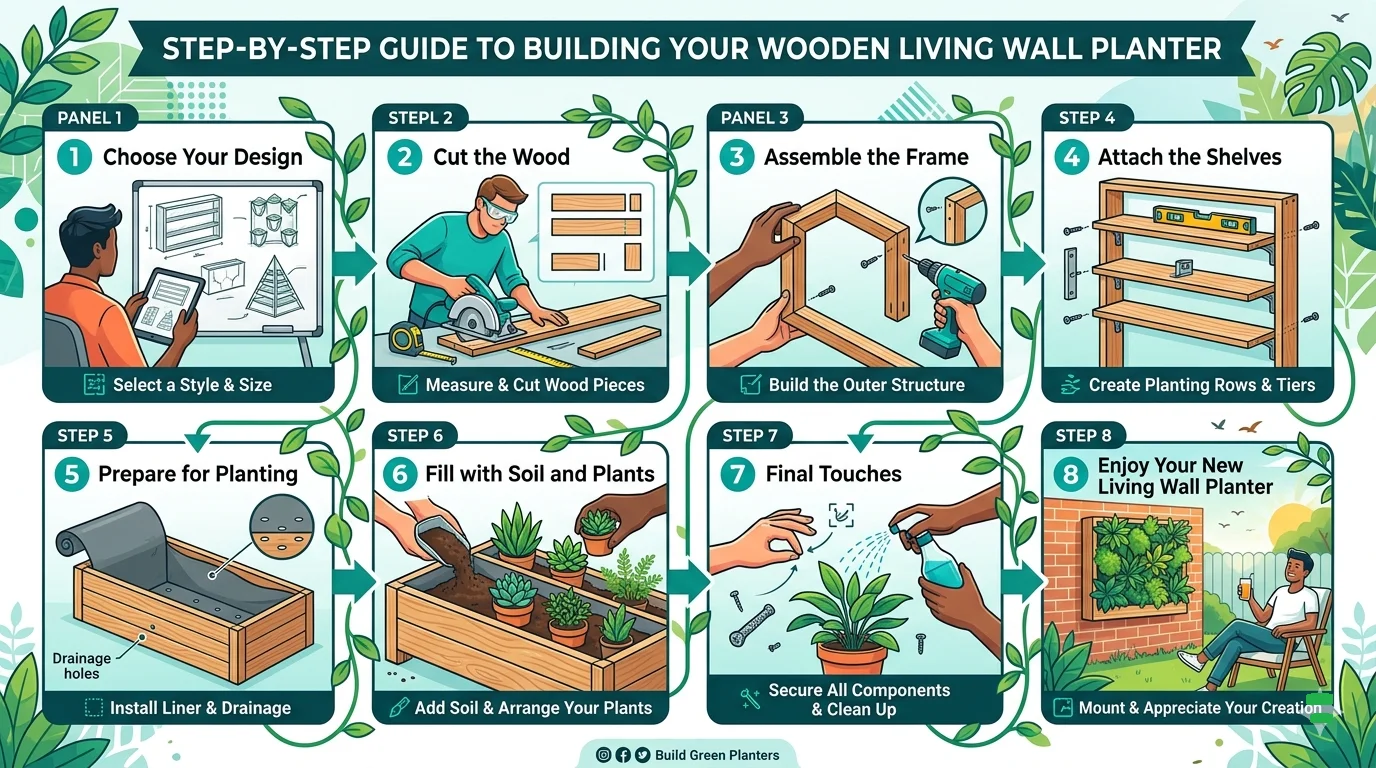
Creating a wooden living wall planter is not only a fun DIY project but also a unique way to add greenery to your home or garden. This step-by-step guide will help you craft a stunning vertical planter that can house your favorite plants. Follow along to learn how to build your own stylish wooden living wall planter.
Materials Needed
- Wood planks (e.g., cedar or redwood)
- Wood screws
- Wood glue
- Landscape fabric
- Stapler
- Drill
- Saw (hand saw or power saw)
- Sandpaper
- Paint or wood sealant (optional)
- Plants (herbs, succulents, or flowers)
Step 1: Choose Your Design
Before you get started, think about the design of your living wall planter. Consider how many rows and columns you want and the size of the wooden structure. It’s crucial to visualize how the finished product will fit into your space. You can find inspiration on sites like Better Homes & Gardens or HGTV.
Step 2: Cut the Wood
Using your saw, cut the wood planks into the desired lengths for your planter. Make sure you have enough pieces to create the frame and shelves for the plants. Typically, you will need:
| Part | Dimensions |
|---|---|
| Vertical side panels | 3 feet (H) x 1.5 feet (W) |
| Horizontal shelves | 2 feet (L) x 6 inches (W) |
| Back support | 3 feet (H) x 2 feet (W) |
Step 3: Assemble the Frame
Start assembling your frame by attaching the vertical side panels to the back support piece. Use wood screws to secure them firmly. You can use wood glue as an additional hold.
Step 4: Attach the Shelves
Next, attach the horizontal shelves to your frame. Space them evenly apart, depending on the plants you plan to use. For example, if you are using taller plants, consider leaving more space between the shelves. Use your drill and screws to secure them firmly to the frame.
Step 5: Prepare for Planting
Now, it’s time to line the inside of the planter with landscape fabric. This helps keep the soil in place while allowing for drainage. Cut pieces of fabric to fit the back and the shelves, and attach them using a stapler. Make sure there’s a little extra fabric hanging over the edges for a neat finish.
Step 6: Fill with Soil and Plants
Once everything is assembled and lined, fill each shelf with potting soil. Be sure to choose the right soil mix for the plants you plan to use. After filling with soil, plant your desired herbs, succulents, or flowers. Consider using a mix of plants for visual interest.
Step 7: Final Touches
If you wish, apply a coat of outdoor paint or wood sealant to protect your planter from weather elements. Allow it to dry completely before placing your planter in its final location.
Step 8: Enjoy Your New Living Wall Planter
Your wooden living wall planter is now ready! Hang it against a wall, or place it on a sturdy surface to showcase your beautiful plants. Don’t forget to water them regularly and enjoy your flourishing vertical garden.
Maintaining and Caring for Your DIY Vertical Garden
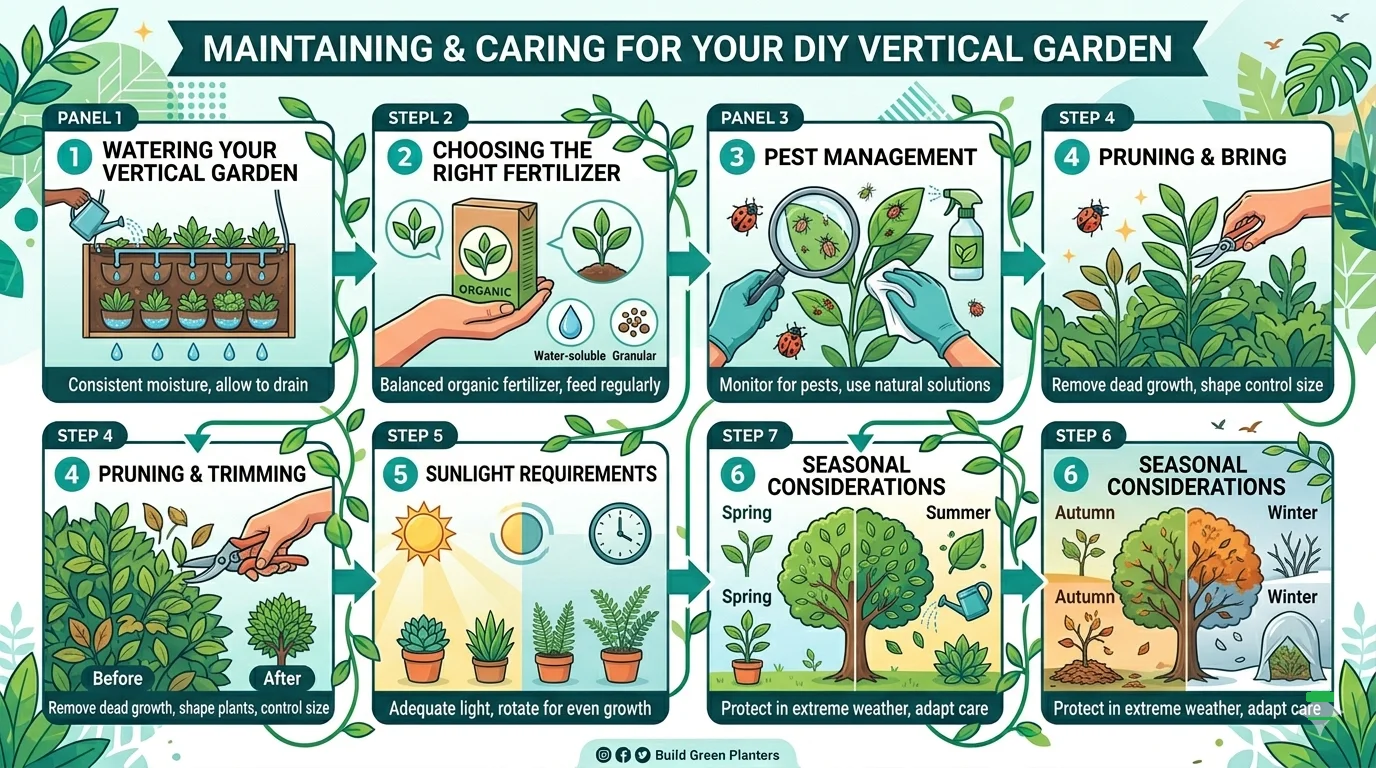
Creating a DIY vertical garden not only enhances the aesthetic of your living space but also brings a touch of nature indoors. However, once your DIY Wooden Living Wall Planter Ideas is set up, it’s essential to understand how to maintain and care for it effectively to ensure your plants thrive. Here are some key strategies to keep your DIY vertical garden in top shape.
Watering Your Vertical Garden
Watering is one of the most critical aspects of maintaining your vertical garden. Here’s a simple guide to ensure your plants receive the necessary moisture:
- Check Soil Moisture: Before watering, insert your finger about an inch into the soil. If it feels dry, it’s time to water.
- Water Thoroughly: When watering, do so until water drains out of the bottom. This ensures deep moisture for your plants.
- Watering Schedule: Weekly watering is usually sufficient, but adjust based on weather conditions. Plants may need more water in hot and dry periods.
Choosing the Right Fertilizer
A regular fertilization schedule can significantly enhance the growth of your plants. Consider the following:
- Use Organic Fertilizers: Opt for organic options like compost tea or fish emulsion, which promote healthy growth without harmful chemicals.
- Frequency: Fertilize every 4-6 weeks during the growing season for best results.
- Read Plant Labels: Different plants have varying nutrient needs; always check the specific requirements for your species.
Pest Management
Pests can cause significant damage to your vertical garden. Here are some effective ways to keep unwanted critters at bay:
- Regular Inspections: Examine your plants weekly for signs of pests or disease.
- Natural Remedies: Use neem oil or insecticidal soap as a safe alternative to chemical treatments.
- Diversity of Plants: Incorporate a variety of plants to attract beneficial insects that help control pest populations.
Pruning and Trimming
Regular pruning is vital for encouraging healthy growth and preventing disease. Consider these tips:
- Remove Dead Leaves: Cut away any dead or yellowing leaves to maintain plant health.
- Trim Overgrowth: For plants that become bushy, trim them back to promote better airflow and light penetration.
- Timing: Prune during the growing season when plants are actively producing new growth.
Sunlight Requirements
Ensure your vertical garden receives the right amount of sunlight for optimal growth. Follow these guidelines:
- Identify Light Needs: Research the light requirements for each plant. Some prefer full sun while others thrive in partial shade.
- Adjust Placement: If certain areas receive more or less sunlight than desired, consider rearranging your plants accordingly.
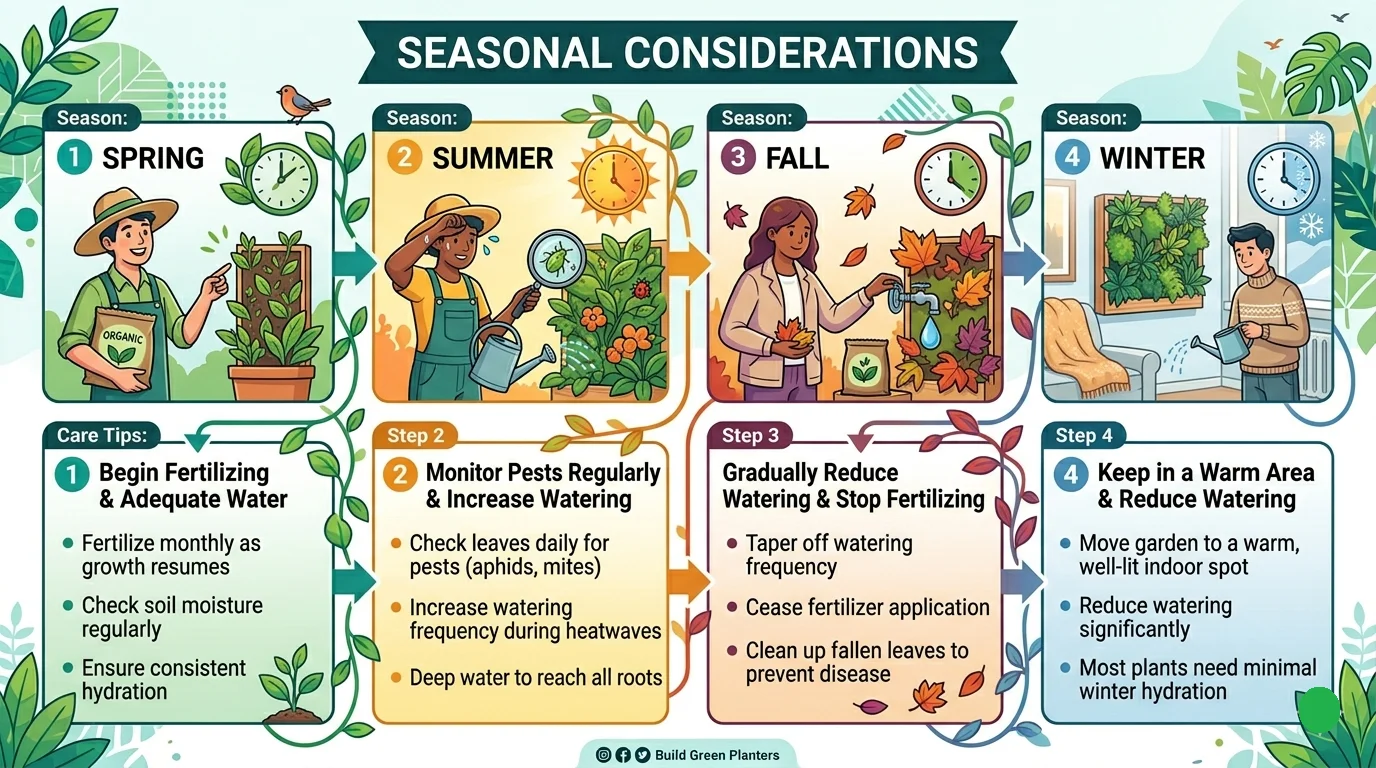
Seasonal Considerations
As seasons change, your care routine may need adjustments. Keep these points in mind:
| Season | Care Tips |
|---|---|
| Spring | Begin fertilizing and ensure plants have adequate water as growth resumes. |
| Summer | Monitor for pests regularly, and increase watering during hot spells. |
| Fall | Gradually reduce watering and stop fertilizing as plants prepare for dormancy. |
| Winter | Keep the garden in a warm area, and reduce watering—most plants need less during winter. |
By following these tips for maintaining and caring for your DIY vertical garden, you’ll create a thriving green space in your home. For more detailed guidance on vertical gardening techniques and maintenance, visit Vertical Gardening Tips and Gardener’s Supply Company. Remember, patience and consistency are key. Happy gardening!
Conclusion
Creating a DIY Wooden Living Wall Planter Ideas is not just a fun project, but it also opens up a world of benefits for your living space. By incorporating vertical gardening, you can maximize your small area and bring a touch of nature into your home. The ideas presented earlier offer inventive ways to customize your planter, allowing your personality to shine through your green space.
When selecting plants for your wooden planter, consider their light requirements, sizes, and growth habits. A well-thought-out plant selection can ensure that your vertical garden thrives and becomes a beautiful focal point in your home. Following the step-by-step guide makes building your planter an enjoyable experience, whether you’re a beginner or an experienced DIYer.
Maintaining your wooden living wall planter is key to its longevity. Regular care, including watering, pruning, and ensuring good drainage, will help your plants flourish. With a little effort and creativity, your DIY vertical garden can blossom into a vibrant green retreat.
Embracing this project not only enhances your décor but also serves as a reminder of the importance of nature in our lives. As you enjoy your new living wall, you’ll find that nurturing these plants brings tranquility and a sense of accomplishment. So gather your materials, choose your favorite plants, and embark on this rewarding journey of vertical gardening today!