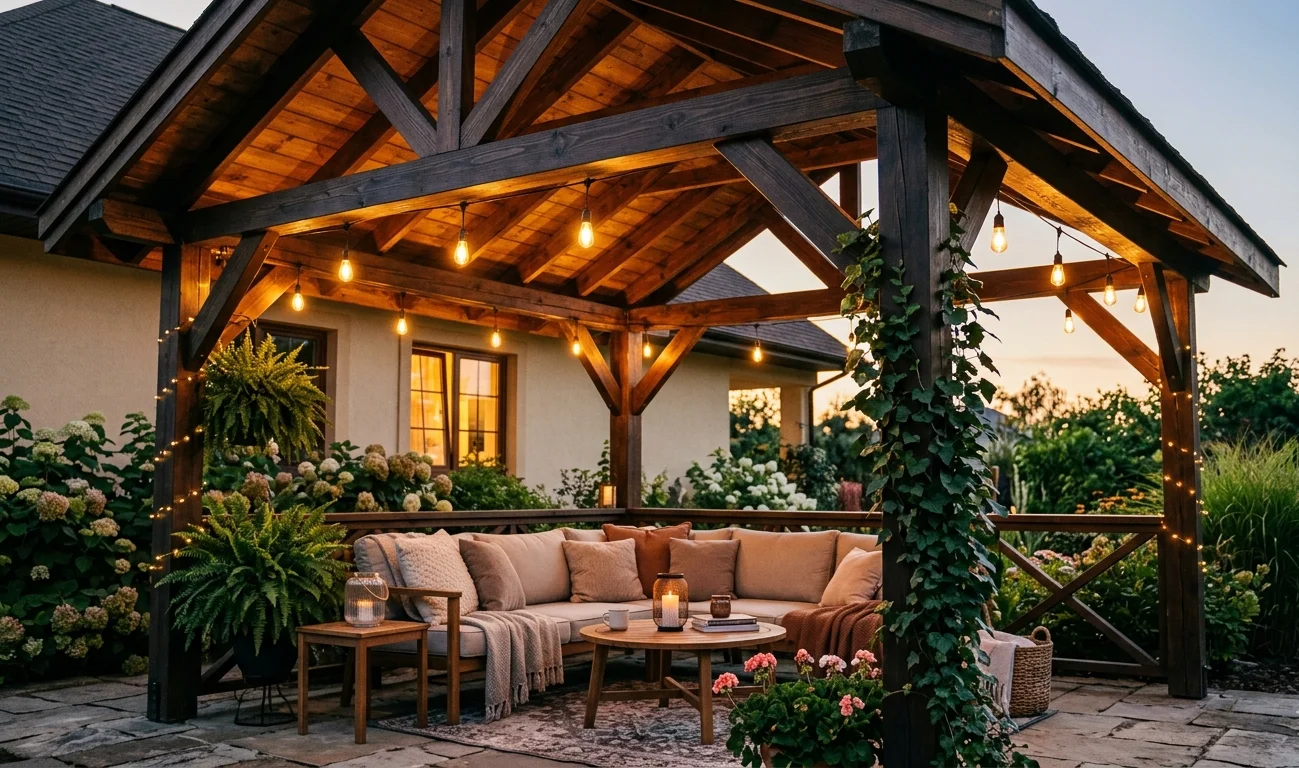
Creating a wooden roof canopy for your porch is a wonderful way to enhance your outdoor space. This structure not only provides shade but also adds an inviting aesthetic to your home. If you’re ready to embark on this DIY project, follow these steps to build a wooden roof canopy that is both functional and stylish.
Gather Your Materials
Before you start, you need to collect the necessary materials. Here’s a list to get you started:
- Pressure-treated lumber (for the frame)
- Wood for the canopy roof (plywood or decorative wood)
- Wood screws
- Metal brackets
- Exterior wood glue
- Wood sealant or paint (for protection)
- Measuring tape
- Level
- Saw (hand saw or circular saw)
- Drill
Plan Your Design
It’s important to have a clear design before you start building. Measure your porch area carefully to determine the ideal size for your canopy. Consider the following:
- How high you want the canopy to be?
- Do you prefer a flat or sloped roof?
- What style complements your home the best?
Sketch your design on paper, noting the dimensions and angles. Remember, accurate measurements will ensure a sturdy canopy.
Prepare the Area
Once you have your design, it’s time to prepare the area. Clear the space around your porch to make the construction easier. You may need to remove furniture or other obstacles. Additionally, check your local building regulations to ensure compliance, and acquire any necessary permits.
Build the Frame
The first step in building your wooden roof canopy is constructing the frame. Follow these steps:
- Cut the pressure-treated lumber according to your design.
- Assemble the frame using wood screws and metal brackets for added strength.
- Use a level to ensure the frame is straight and even. Adjust if necessary.
- Attach vertical posts to the corners to provide support for the canopy.
This frame will serve as the backbone of your structure, so make sure it is sturdy.
Add the Roof
Now it’s time to add the roof of your canopy. Depending on your design, you can use plywood or other decorative wood. Here’s how:
- Cut the roof panels to size based on your frame.
- Secure the roof panels to the frame using wood screws.
- If desired, create a slope in the roof to allow rainwater to drain off easily.
Remember to check for any gaps and fill them with wood glue for a better seal.
Finishing Touches
After the roof is in place, it’s time to add the finishing touches:
- Sand any rough edges to ensure a smooth finish.
- Apply wood sealant or paint to protect your canopy from the elements.
- Consider adding decorative elements, like lighting or climbing plants.
Once the finishing touches are complete, allow the sealant or paint to dry thoroughly before using your porch area.
Maintenance Tips
To keep your wooden roof canopy in good condition, regular maintenance is key. Here are some tips:
- Inspect the structure for signs of wear or damage periodically.
- Reapply sealant or paint every few years to protect the wood.
- Clear any debris from the roof and gutters to ensure proper drainage.
Essential Tools and Materials Needed for Porch Canopy Construction
Creating a beautiful wooden roof canopy for your porch requires careful planning and the right tools and materials. Knowing what you need before you start can make the construction process smoother and more enjoyable. This guide will walk you through the essential tools and materials to effectively build your porch canopy.
Tools Needed for Construction
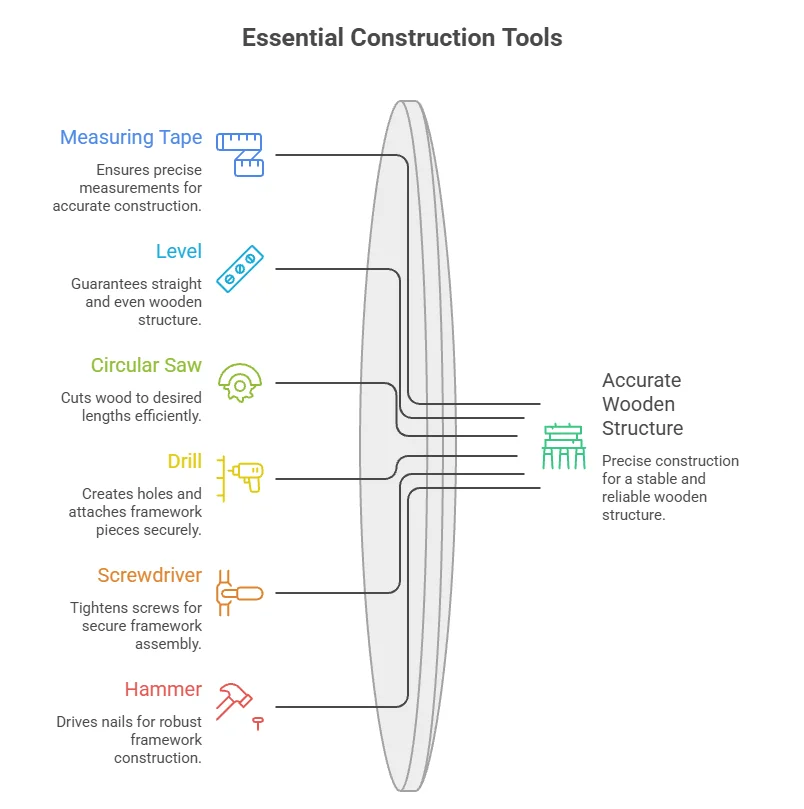
Having the right tools on hand is crucial. Here is a list of essential tools you’ll need:
- Measuring Tape: A reliable measuring tape is crucial to ensure accurate measurements.
- Level: A level will help ensure that your wooden structure is straight and even.
- Circular Saw: This is vital for cutting wood to the desired lengths.
- Drill: A quality drill will help you create holes for screws and attach framework pieces together.
- Screwdriver: Both manual and electric screwdrivers are useful for tightening screws.
- Hammer: A hammer is essential for driving nails into wood, especially for the framework.
- Square: A square helps in ensuring that your cuts are at 90-degree angles.
- Safety Gear: Don’t forget gloves, goggles, and a dust mask for protection during construction.
Materials Required for a Porch Canopy
Choosing quality materials is just as important as having the right tools. Consider the following essentials:
- Wood: For the framework, select durable wood like cedar or treated lumber. This will provide the necessary strength and weather resistance.
- Roofing Material: You can use plywood, shingles, or metal roofing, depending on your budget and desired look.
- Fasteners: Use appropriate screws and nails designed for outdoor use to ensure longevity.
- Wood Preservative: A wood preservative or sealant will help protect your structure from moisture and decay.
- Finishing Material: Stains or paints can enhance the appearance of your canopy and provide additional protection.
Planning Your Canopy
Before starting your project, careful planning can save you time and effort. Begin by measuring your porch area to decide how large you want your canopy to be. Ensure that your design allows for proper drainage to prevent water pooling on the roof.
After you have a design in mind, sketch it out. This sketch will serve as a reference throughout the building process and help you visualize the finished product.
Building the Canopy
Now that you have your tools and materials ready, you’ll want to follow these steps for building your porch canopy:
- Build the Frame: Start by constructing the frame using your chosen wood. Use the measurement of your porch to guide you. Make sure to check that everything is level.
- Attach the Roof: Once the frame is set, attach your roofing material securely. If using shingles, ensure they are properly overlapped to avoid leaks.
- Seal and Finish: Apply any wood preservative and finish with stains or paint to enhance durability.
With careful execution and attention to detail, your wooden roof canopy will not only beautify your porch but also provide a functional outdoor space to enjoy. For further guidance, you can explore helpful resources like Wood Magazine or Family Handyman for additional tips and detailed instructions on woodworking and home improvement projects.
Remember, this project is not just about having a new structure; it’s also about enhancing your living space and creating a cozy area to relax. Take your time, enjoy the process, and soon you’ll have a wonderful wooden roof canopy adorning your porch!
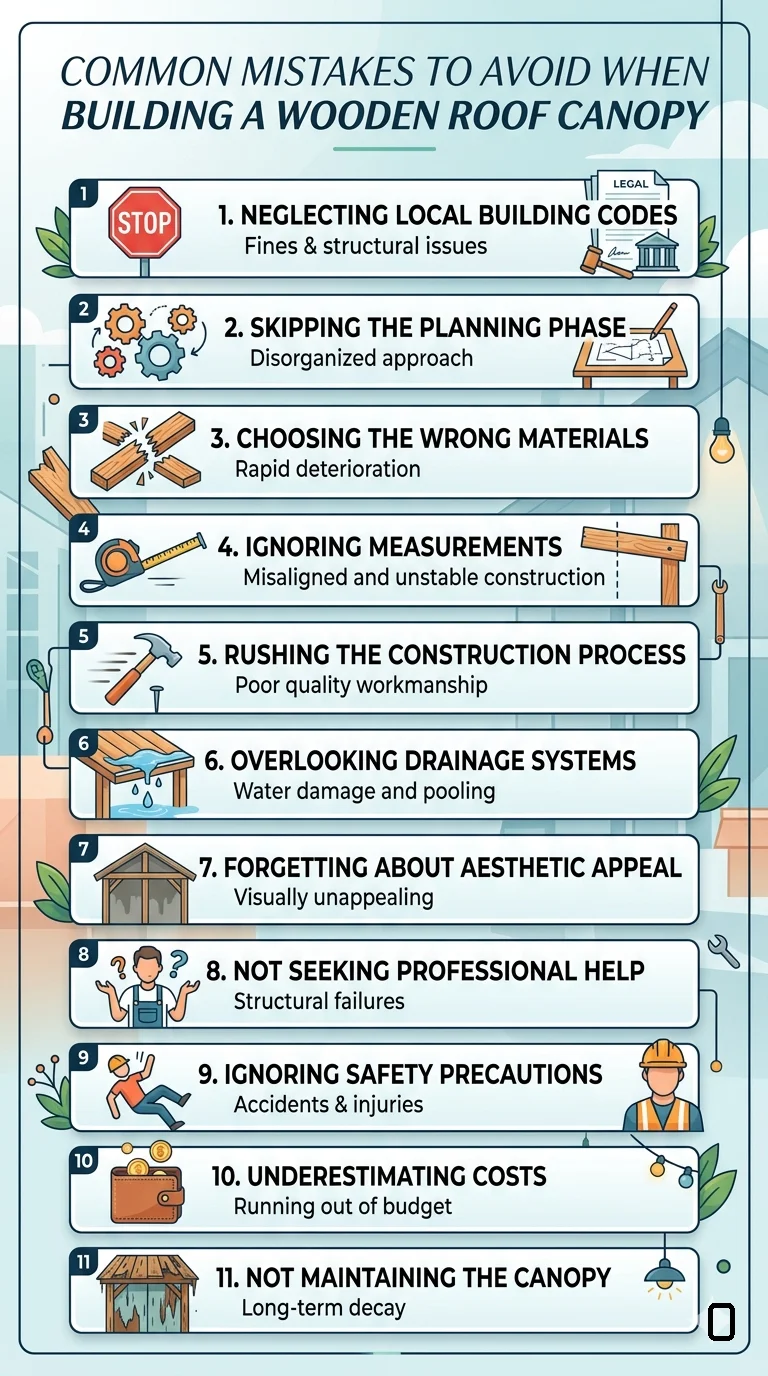
Common Mistakes to Avoid When Building a Wooden Roof Canopy
Building a wooden roof canopy for your porch is a great way to enhance your outdoor space. However, it’s important to approach the project with careful consideration to avoid common pitfalls. Here are some mistakes to watch out for when constructing your wooden roof canopy.
Neglecting Local Building Codes
One major mistake homeowners make is neglecting local building codes. Before starting your project, check with your local authorities to understand what regulations apply. You may need permits and specific materials to comply with safety standards.
Skipping the Planning Phase
A common error is jumping straight into construction without a solid plan. Spend time creating a blueprint that details dimensions, materials, and styles. This plan will serve as your roadmap, helping to avoid costly mistakes later on.
Choosing the Wrong Materials
Another mistake is using inadequate materials. When selecting wood, opt for pressure-treated lumber or naturally rot-resistant woods such as cedar or redwood. These options ensure your canopy withstands weather conditions, maintaining its integrity over time.
Ignoring Measurements
Poor measurements can lead to skewed structures or misfits. Always double-check your dimensions before cutting any wood. Use a reliable measuring tape and level to ensure everything aligns properly.
Essential Measurement Tips:
- Use a measuring tape longer than the area you’re measuring.
- Mark your cuts clearly on the wood.
- Employ a square to ensure corners are true right angles.
Rushing the Construction Process
Impatience can lead to sloppy work. Take your time during each phase of construction. Ensure that each piece is firmly secured before proceeding to the next stage. Rushing can lead to mistakes that might require costly repairs later.
Overlooking Drainage Systems
Not planning for drainage can lead to water pooling on your roof, causing wood rot. Incorporate a slight slope in your canopy design to direct rainwater away. Additionally, consider adding gutters for effective water management. This will extend the life of your canopy.
Forgetting About Aesthetic Appeal
While function is crucial, don’t disregard how the canopy looks. Select a design that complements your home’s style. Finishing touches, such as paint or stain, can enhance durability and add visual appeal. Make sure you choose colors and finishes that integrate beautifully with your home’s exterior.
Not Seeking Professional Help
DIY projects can be rewarding, but don’t shy away from asking for help if needed. If you’re unsure about specific aspects of the construction, consult a professional. Their expertise can save you from potential setbacks or safety issues.
Ignoring Safety Precautions
Your safety should always come first. Ensure you’re wearing protective gear such as goggles, gloves, and a mask when working with power tools. Always follow the manufacturer’s instructions for tools and materials to prevent accidents.
Underestimating Costs
Building a wooden roof canopy can come with unforeseen costs. Prepare a budget but add a contingency of 10-20% for any additional expenses. This will help you avoid financial strain as you work through the project.
Not Maintaining the Canopy
Many overlook the importance of maintenance after construction. Regularly inspect your canopy for signs of wear or damage. Simple tasks like cleaning, resealing, or repainting can add years to your structure’s life.
Building a wooden roof canopy can be a rewarding DIY project if you avoid these common mistakes. Remember that careful planning, choosing the right materials, and adhering to safety practices will lead to a beautiful and functional addition to your home.
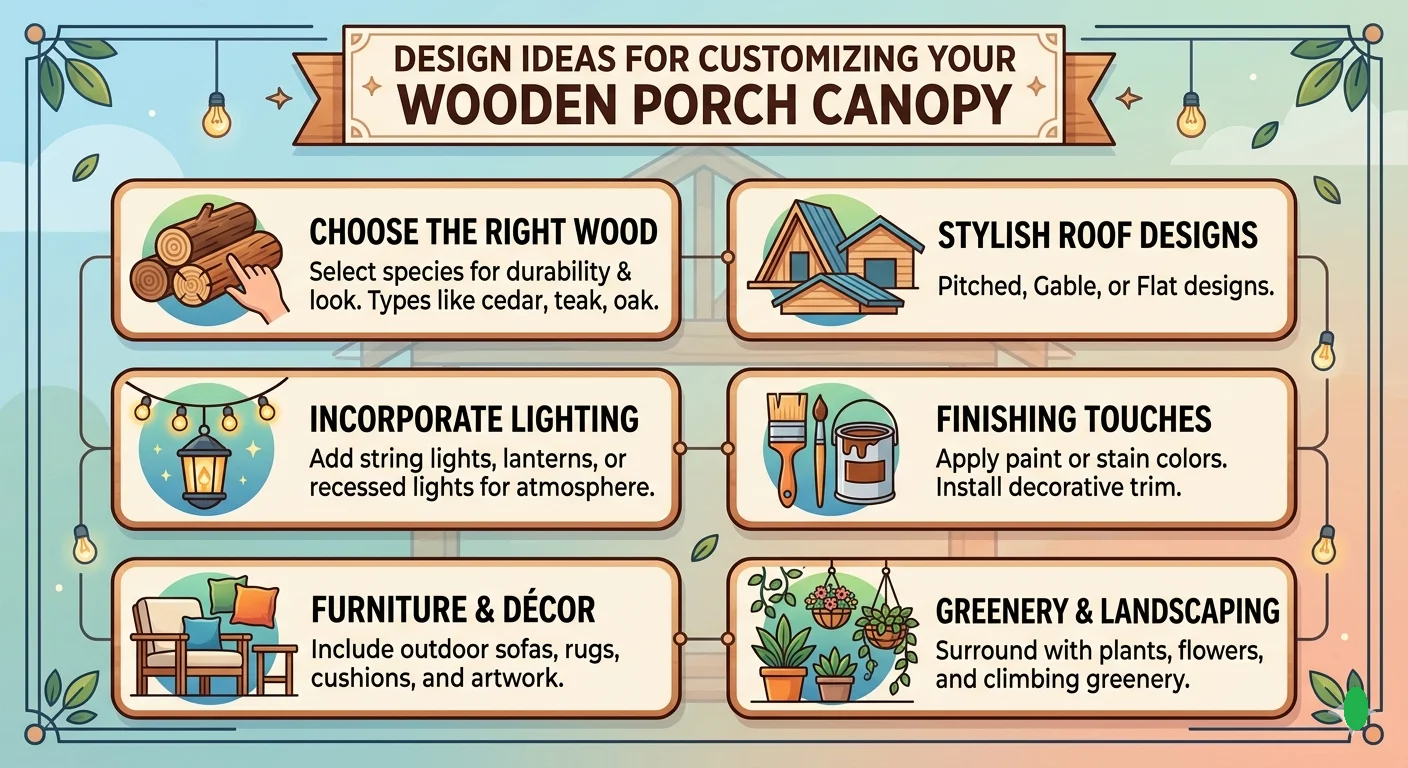
Design Ideas for Customizing Your Wooden Porch Canopy
Creating a beautiful wooden porch canopy goes beyond simply providing shelter; it can enhance the entire aesthetic of your outdoor space. By customizing your canopy, you can align it with your home’s design and personal style. Here are several design ideas that can transform your wooden porch canopy into a stunning focal point.
Choose the Right Wood
The type of wood you select plays a significant role in the overall look and durability of your canopy. Consider options such as:
- Cedar: Naturally resistant to rot and insects, cedar has a pleasant aroma and deep color.
- Redwood: Known for its durability and beauty, redwood tends to age beautifully over time.
- Pine: A more affordable option, pine can be stained or painted to match any decor.
Stylish Roof Designs
Choosing the right roof design can significantly affect the aesthetics of your porch canopy. Here are a few options to consider:
- Flat Roof: Offers a modern look and can be used as a deck space.
- Pitched Roof: Provides a traditional feel while allowing for better rain runoff.
- Arched Roof: Adds a touch of elegance and can make your space feel larger.
Incorporate Lighting
Adding lighting can dramatically change the ambiance of your porch canopy. Here are some ways to integrate lighting:
- Recessed Lighting: Installed into the ceiling for a clean and modern look.
- String Lights: Create a whimsical atmosphere; perfect for evening gatherings.
- Pendant Lights: Hang stylish fixtures for a focal point that enhances your decor.
Finishing Touches
Consider incorporating finishing touches to enhance the custom look of your porch canopy:
- Staining or Painting: Choose colors that complement your home’s exterior. Consider using outdoor-grade products for lasting effects.
- Add Railings or Screens: These can provide additional safety and comfort, especially in breezy areas.
- Decorative Trim: Smaller details like crown molding or bracing can elevate the overall style of the canopy.
Furniture and Decor
The right furniture can enhance your canopy’s visual appeal and usability. Consider adding:
- Outdoor Sofas: Comfortable seating invites relaxation.
- Tables: A small bistro table or a larger dining table can set the stage for outdoor meals.
- Cushions and Throws: Soft textiles add comfort and are available in various colors to match your style.
Greenery and Landscaping
Surrounding your canopy with plants can create a cozy, welcoming atmosphere. Here are some ideas:
- Potted Plants: Versatile and easily changeable accents can brighten up your space.
- Hanging Plants: Consider trailing vines or flowers that complement the canopy’s shape.
- Vertical Gardens: If space allows, a living wall can provide a unique and eye-catching backdrop.
Design Software Tools
If you are unsure of your design preferences or want to visualize changes, consider using design software. Programs like Home Design Software can help you draft various styles and layouts.
Customizing your wooden porch canopy doesn’t have to be overwhelming. By considering these design ideas, you can create an inviting and beautiful outdoor space. Invest in quality materials, choose design features that are functional and stylish, and don’t forget to add your personal touch to make it truly yours. For additional inspiration and tips, visit Wood Magazine and explore its design galleries.
Maintenance Tips to Keep Your Porch Canopy in Great Condition
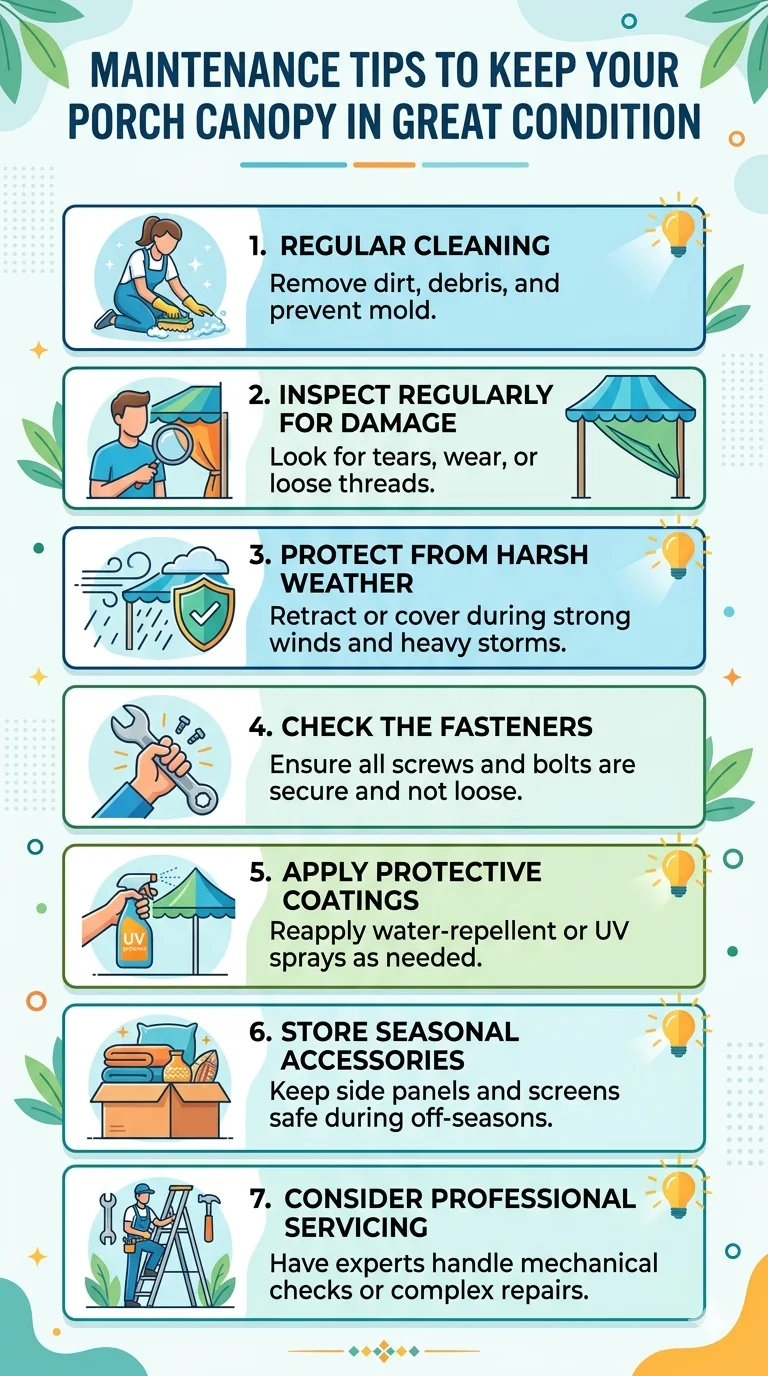
Your porch canopy is not just an aesthetic addition; it also provides comfort and protection from the elements. To ensure it remains in great condition, regular maintenance is essential. By following some simple steps, you can extend the life of your canopy and maintain its appearance. Here are several tips to keep your porch canopy looking its best.
Regular Cleaning
Cleaning your canopy regularly helps remove dirt, dust, and grime that can accumulate over time. Use a soft brush or cloth to wipe down the surface and prevent buildup. Here’s how to do it:
- Start with a gentle rinse using a garden hose.
- Mix warm water with a mild detergent.
- Use a soft sponge or brush to scrub the surface gently.
- Rinse thoroughly and allow it to dry completely.
For more detailed cleaning guides, visit Home Guides.
Inspect Regularly for Damage
Regular inspections will help identify any wear and tear early on. Look for:
- Tears or holes in the fabric or roofing material.
- Loose or rusted hardware.
- Water pooling on the roof, which could indicate drainage issues.
Address any damage immediately to prevent further deterioration. For more information on repair techniques, check BHG.
Protect from Harsh Weather
Extreme weather conditions can be tough on your porch canopy. Here’s how to protect it:
- Secure the canopy during strong winds. Consider using tie-downs or weights.
- Remove snow or large icicles to prevent heavy accumulation that could damage the structure.
- Use a waterproof treatment on fabric canopies to help repel water.
Refer to CertainTeed for more specific tips related to weather protection.
Check the Fasteners
The fasteners on your porch canopy can become loose over time. Regularly check screws and bolts and make adjustments as needed to ensure everything remains tightly secured. If you see rust on any metal parts, replace them promptly to avoid further damage.
Apply Protective Coatings
If your canopy is wooden, applying a sealant can enhance its longevity. Choose a quality exterior wood sealer and follow the manufacturer’s directions. This will not only protect against moisture but also against UV damage. Remember to reapply the sealant every couple of years, or as recommended by the product instructions.
Store Seasonal Accessories
If your porch canopy is equipped with seasonal accessories like curtains or removable shades, make sure to store them properly when not in use. Keep them clean and dry before storing to prevent mold and mildew. Use a breathable storage bag or container to protect against dust and moisture.
Consider Professional Servicing
When in doubt, or if your canopy needs extensive repairs, don’t hesitate to consult a professional. Some tasks, such as extensive repairs or cosmetic updates, are best handled by experts to ensure safety and quality workmanship. Investing in professional help can save you money in the long run by avoiding future problems.
By implementing these maintenance tips, you can keep your porch canopy in excellent condition, making it a comfortable and enjoyable space to relax or entertain.
Conclusion
Building a wooden roof canopy for your porch can enhance your outdoor living space while offering protection and style. By following the steps outlined, you can successfully craft a sturdy and beautiful addition to your home. Remember to gather essential tools and materials, as having the right items on hand is crucial for a smooth construction process.
Avoiding common mistakes such as incorrect measurements or insufficient support will save you time and effort. Take the opportunity to customize your design to reflect your personal style. From rustic finishes to modern looks, the right design can elevate your porch’s aesthetic.
Once your canopy is built, consistent maintenance will ensure it remains in excellent condition for years. Regular inspections, cleaning, and weatherproofing will help you enjoy your new structure without worry.
These elements makes building your wooden roof canopy not just a project but a rewarding experience that adds value to your home. With careful planning and execution, you can create a cozy retreat that you and your family will cherish for years to come. Embrace the journey of crafting a beautiful and functional outdoor space, and enjoy the many moments spent under your new porch canopy.