
Creating wall niches is an excellent way to incorporate shelving into your home décor. Not only does it serve a utility in storing and displaying items, but it also adds an artistic flair to your living space. With wood as your primary material, you have the opportunity to be creative and design unique spots that fit your style.
Planning Your Design
Before you start building, consider a few essential factors:
- Space: Measure the area where you want to build the niches. Ensure it’s suitable for the size of the shelves you envision.
- Style: Whether it’s minimalistic, rustic, or modern, determine a design that reflects your personal taste.
- Functionality: Decide what you’ll display. Will it be books, plants, or decorative items? This will influence the depth and height of your shelves.
Tools and Materials Needed
Gather all necessary tools and materials to streamline your building process:
- Wood: Plywood or solid wood for sturdy shelves.
- Tools: A saw, drill, measuring tape, level, sandpaper, and a stud finder are essential.
- Finishing Supplies: Wood stain, sealant, or paint to enhance the look of your wood.
Building Your Wood Wall Niches
Follow these steps to create your wooden wall niches:
- Mark the Area: Use a pencil to mark the desired location for the niches on your wall.
- Cut Openings: Carefully cut into the wall using a saw to create the niche openings. Ensure you follow your marked lines accurately.
- Frame the Niches: Use wood to build a frame around the openings you’ve created, ensuring they’re flush with the wall surface.
- Add Shelving Brackets: Install shelving brackets according to the weight requirements of your items.
- Cut and Install Shelves: Cut the shelves from your chosen wood and place them onto the brackets securely.
- Finish the Wood: Use wood stain or paint to finish the shelves, allowing them to match or contrast with your room décor.
Creative Ideas for Styling Niches
Once you’ve built your niches, let your creativity fly. Here are some styling ideas to try:
- Mixing Textures: Use a combination of wood, metal, and glass decor items on your shelves for a layered look.
- Lighting: Incorporate LED strip lights inside the niches to highlight your favorite items.
- Seasonal Decor: Change items according to seasons, showcasing flowers in spring or festive decor during the holidays.
- Personal Touch: Add photographs or souvenirs from travels to make the niches uniquely yours.
Benefits of Wood Wall Niches
Building wood wall niches can transform an ordinary wall into a stunning focal point. Additionally, they:
- Maximize vertical space.
- Provide a custom storage solution.
- Allow for personalization to reflect your style.
- Increase the value of your home through enhanced aesthetics.
Maintenance Tips for Wooden Niches
To keep your wood shelves looking beautiful, consider these maintenance tips:
- Regularly dust the shelves to prevent buildup.
- Wipe spills immediately with a damp cloth to avoid water damage.
- Inspect for any loose brackets or shelves and tighten as needed.
Building wood wall niches not only provides storage but also enhances your home’s aesthetic appeal. With your unique designs, functionality, and maintenance tips, you’ll enjoy these chic shelves for years to come.
Essential Tools and Materials for Your Shelving Project
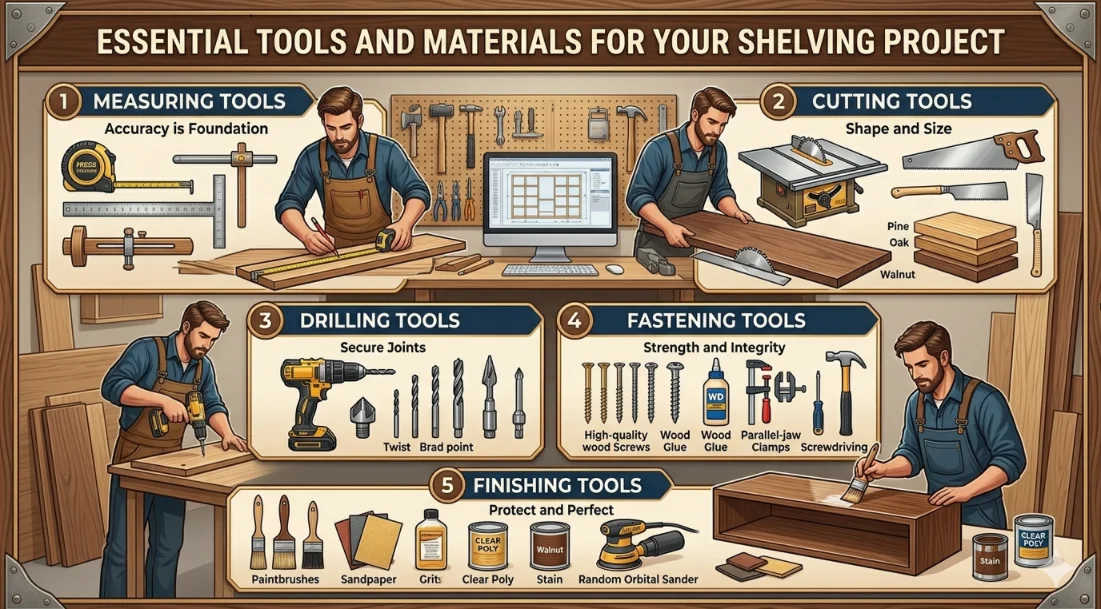
If you’re ready to dive into the world of building wood wall niches and shelving, you’ll want to equip yourself with the right tools and materials. Having the proper supplies on hand will make your project smoother and more enjoyable. Here’s a comprehensive list of must-have items to help you succeed in your shelving project.
Essential Tools
1. Measuring Tools
Accurate measurements are crucial. Use the following tools to ensure everything fits perfectly:
- Measuring Tape: Ideal for measuring longer distances.
- Square: Helps to mark right angles accurately.
- Level: Ensures your shelves are even and well-aligned.
2. Cutting Tools
Cutting wood requires precision. The right tools will make this task easier.
- Handsaw: Great for simple cuts if you prefer manual work.
- Circular Saw: Perfect for power cutting and can handle thicker boards.
- Jigsaw: Useful for making curved cuts or intricate designs.
3. Drilling Tools
To secure your shelves, drilling is an essential step:
- Electric Drill: Many tasks can be done using an electric drill. Choose a variable speed model for versatility.
- Drill Bits: Make sure to have a variety of sizes that are compatible with your screws.
4. Fastening Tools
Securing your shelves requires reliable fastening tools:
- Screws: Opt for wood screws that provide a strong hold.
- Nails: A hammer will help with securing lightweight wood.
- Screwdriver: A power screwdriver can save time and effort when dealing with multiple screws.
5. Finishing Tools
Give your shelves a clean and polished finish:
- Sander: For smooth edges and surfaces; a random orbital sander is a great choice.
- Paintbrush or Roller: Required for applying paint or stain if you’re personalizing your shelves.
- Wood Finish: Look for stains or sealants that protect and enhance the wood’s beauty.
Materials Needed
Selecting quality materials is just as important as having the right tools. Here are the essential materials you should gather:
1. Wood Selection
Your choice of wood affects the durability and aesthetics of your shelving. Consider these popular options:
- Pine: Affordable and lightweight, ideal for beginner projects.
- Oak: Durable and strong, it adds a touch of elegance.
- Plywood: Versatile and can be used for both shelves and backing.
2. Brackets and Supports
To hold your shelves securely, you’ll need good quality shelving brackets:
- Heavy-Duty Brackets: Perfect for holding heavy items.
- Floating Shelf Brackets: Ideal for a sleek, modern look.
3. Wall Anchors
If your shelves are going on drywall, don’t forget these essential items:
- Toggle Bolts: Offer strong support for shelves that hold considerable weight.
- Molly Bolts: Good for medium-weight shelves and easy to install.
Optional Accessories
These extras can enhance your project:
- Wood Glue: Strengthens joints for added structural integrity.
- Decorative Trim: Adds flair and can hide rough edges for a professional look.
- Sealants: Important for outdoor projects or kitchens to resist moisture.
Designing Shelving Niches: Aesthetic Considerations
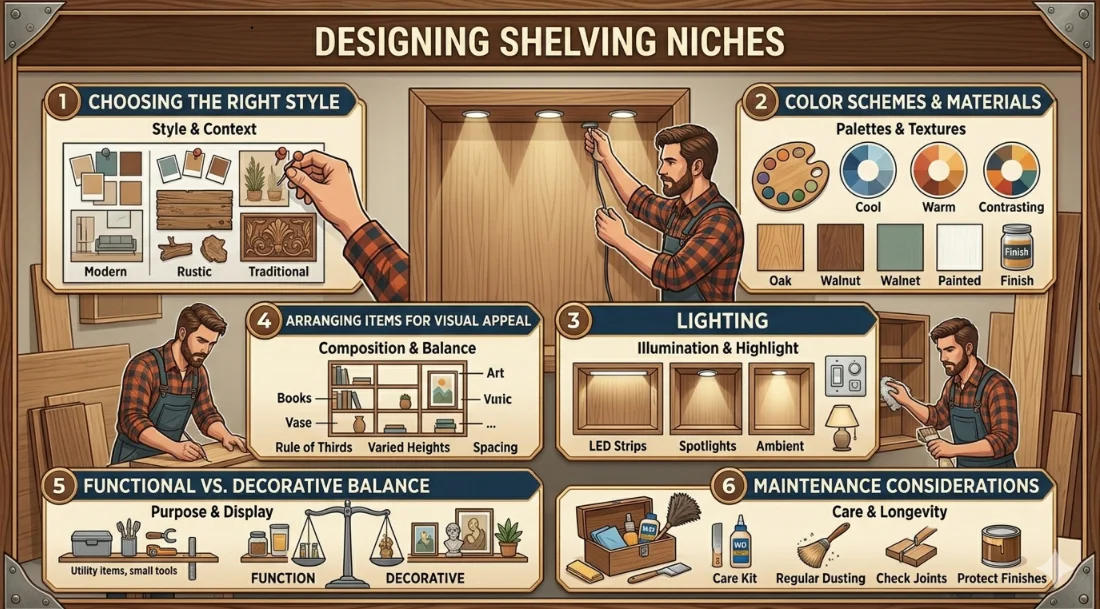
Understanding the Importance of Design in Shelving Niches
When planning your wood wall niches for shelving, aesthetic considerations play a critical role in achieving a cohesive look. Shelving niches can enhance the overall design of a room, making it feel more organized and visually appealing. Your shelving’s design should align with the style of the space, enhancing the aesthetics rather than competing with them.
Choosing the Right Style
Before diving into your shelving design, it’s essential to define the style you wish to achieve. There are several styles to consider that can impact your design choices:
- Modern: Clean lines and minimal decor are typical. Use simple wood finishes with a sleek look.
- Rustic: Embrace natural wood textures and finishes that showcase imperfections and unique grains.
- Industrial: Combine wood with metal for a raw, edgy feel. Use darker wood tones for a statement.
- Traditional: Classic wood finishes in rich tones offer a timeless appeal, adding elegance to your space.
Color Schemes and Materials
Your color choices and materials are pivotal in setting the tone of your shelving. Consider the following suggestions:
- Wood Type: Different woods such as oak, walnut, or pine have distinct appearances. Oak may lend a farmhouse charm, while walnut gives a more sophisticated tone.
- Finish: Stains can dramatically alter the wood’s appearance. Lighter stains can make a room feel airy, while darker stains offer warmth.
- Paint: If you choose to paint your shelves, consider a color that contrasts with the wall or blends for a seamless look.
Lighting
Good lighting is essential for emphasizing your shelving niches. Here are a few ideas:
- LED Strip Lights: Install LED strips along the edges of the shelves to create an ambient glow.
- Spotlights: Use small spotlights to highlight specific decor items or books.
- Natural Light: If possible, position shelves near windows to utilize natural light, enhancing the space during the day.
Arranging Items for Visual Appeal
Once your shelving niche is built, think about how you will arrange the items on display. Here are some great tips for a balanced arrangement:
- Vary Heights: Incorporate items of various heights to create visual interest. Stack books horizontally, and place tall vases alongside them.
- Group by Theme: Use a cohesive theme for sections of the shelf. For example, dedicate one area to travel souvenirs and another to books.
- Leave Space: Don’t overcrowd your shelves. Leave some empty space to avoid visual clutter.
Functional vs. Decorative Balance
It is crucial to achieve a balance between functional and decorative elements in your shelving niches. Ask yourself what the primary function of the shelves will be:
- If the shelves are primarily for storage, focus on practical items that are easy to access while maintaining a neat appearance.
- For decorative niches, you might prioritize aesthetic appeal, displaying art pieces or unique knick-knacks.
- Finding a blend of utility and beauty will give each shelf a purpose while also being visually pleasing.
Maintenance Considerations
After designing and building your shelving niches, they will need to be maintained to keep them looking great. Here are some tips:
- Dust Regularly: Make it a habit to dust your shelves and the items on them to keep them looking their best.
- Check for Damage: Periodically check for scratches or signs of wear, especially in high-traffic areas.
- Rearrange Periodically: Change up the layout occasionally to refresh the look and keep things interesting.
For more ideas and inspirations on shelving design, visit House Beautiful or explore Dwell for contemporary design insights.
Step-by-Step Guide to Installing Wood Wall Niches
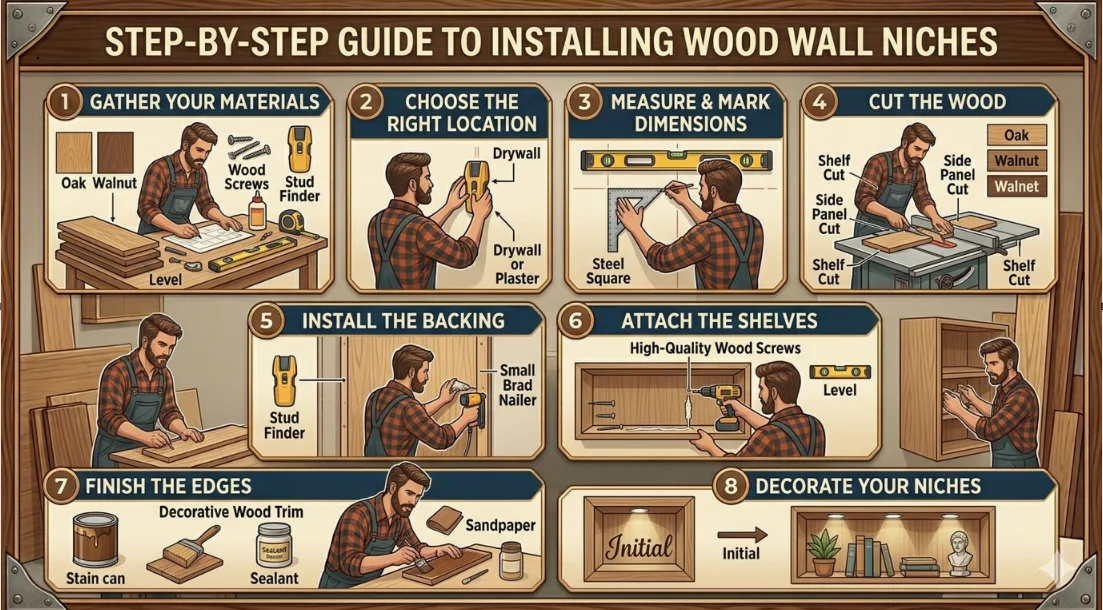
Creating beautiful wood wall niches can not only enhance the aesthetic appeal of your home but also offer practical shelving options. Installing these wood shelves isn’t as daunting as it may seem. Follow this step-by-step guide to bring your vision to life.
Gather Your Materials
Before you begin, ensure you have the necessary materials on hand. Here’s a list of essential items:
- Wood boards (choose a type that matches your decor)
- Wood screws
- Wood glue
- Stud finder
- Level
- Measuring tape
- Drill
- Sandpaper
- Primer and paint or wood stain
Choose the Right Location
Start by selecting a suitable wall for your niches. Consider areas where they will be most functional and visible, such as:
- Living room
- Hallways
- Bathrooms
- Bedrooms
Use a stud finder to locate the studs in your wall, ensuring stability when you install your shelves. Mark these spots lightly with a pencil.
Measure and Mark the Dimensions
Carefully measure how big you want each niche to be. Common dimensions can vary based on your needs, but a good size is typically:
| Niche Width | Niche Height | Niche Depth |
|---|---|---|
| 24 inches | 30 inches | 6 inches |
Once you’ve decided on dimensions, mark the outlines of each niche on the wall using a level to keep everything straight.
Cut the Wood
Using saws appropriate for your wall material, cut the wood to the dimensions you’ve marked. Sand the edges to prevent splinters and create a professional finish. You can opt for a natural wood finish or add a coat of primer and paint for a pop of color. Remember to let the paint or stain dry completely before moving the wood.
Install the Backing
Your niches will need a sturdy backing to hold them in place. Cut a piece of plywood to fit the back of your niche area. Secure it to the wall stud using screws for support. Ensure it is leveled for a uniform appearance.
Attach the Shelves
Using wood screws and glue, attach the shelves to the plywood backing. It’s good practice to pre-drill holes to avoid splitting the wood. Make sure the shelves are level before securing them in place.
Finish the Edges
To achieve a polished look, you can use wood trim around the edges of your niches. This step is optional but adds a nice detail. Simply measure, cut, and attach the trim using adhesive or nails.
Decorate Your Niches
Once your niches are secured and the finish has dried, it’s time to fill them with your favorite items. Here are some decorating tips:
- Use books, plants, or framed photos to personalize each space.
- Mix and match colors and textures for visual interest.
- Incorporate lighting if possible, to highlight decor.
The result will be a stunning display that enhances your home’s aesthetic. By following these steps, you can successfully install wood wall niches that are not only attractive but functional as well. If you would like to explore more about wood wall niches and additional creative ideas, check out Wood Magazine for inspiration.
Maintenance Tips for Long-lasting Wood Shelving Solutions
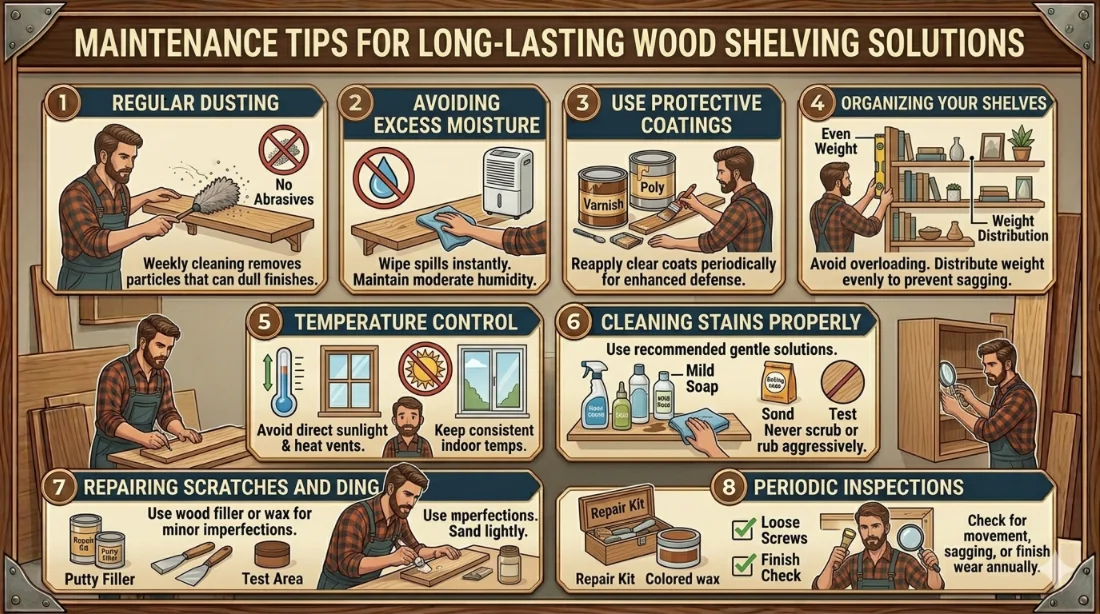
Proper maintenance of wood shelving is key to ensuring they last for years. Whether you have built-in shelves or standalone units, a timely maintenance routine will enhance the longevity and appearance of your wood shelves. Here are some essential tips to keep your wood shelving solutions in top shape.
Regular Dusting
Dust can accumulate quickly on wood surfaces, leading to scratches and a dull appearance. To keep your shelves looking fresh:
- Use a soft microfiber cloth to gently wipe down the shelves weekly.
- For hard-to-reach areas, consider using a dusting wand.
- Avoid using abrasive materials that can scratch the wood.
Avoiding Excess Moisture
Wood is susceptible to moisture damage, which can cause warping or mold growth. Here’s how to protect your shelves:
- Keep the shelves away from humid areas like bathrooms.
- If your kitchen is prone to spills, consider placing coasters under items.
- Run a dehumidifier in overly damp spaces to control moisture levels.
Use Protective Coatings
Applying a protective finish to your wood shelves can add an extra layer of defense:
- Consider using a high-quality varnish or polyurethane for added moisture resistance.
- Reapply these coatings every couple of years to maintain effectiveness.
- Ensure proper ventilation while applying finishes to avoid fumes.
Organizing Your Shelves
Proper organization can prevent unnecessary wear and tear on your wood shelves:
- Evenly distribute the weight of items, avoiding heavy loads on a single area.
- Utilize brackets for added support if shelves begin to sag.
- Store heavier items on lower shelves to ensure stability.
Temperature Control
Extreme temperatures can affect the integrity of wood. To help maintain optimal conditions:
- Avoid placing wood shelves near heating vents or windows that receive direct sunlight.
- Keep your home at a consistent temperature to reduce stress on the wood.
- Consider using curtains or blinds to protect shelves from sun exposure.
Cleaning Stains Properly
Spills happen, and it’s important to clean them up promptly:
- For liquid spills, blot the area immediately with a clean, dry cloth. Do not rub, as this can spread the stain.
- For sticky stains, use a mild soap and water solution, followed by a dry cloth.
- Always test cleaning solutions on a small, inconspicuous area first to ensure they won’t damage the finish.
Repairing Scratches and Dings
Over time, your wood shelves may acquire scratches and minor damage. Here’s how to repair them:
- Use a wood filler to fill in deep scratches and allow to dry as directed.
- For light scratches, consider using a matching wood stain or a crayon designed for wood repair.
- Always sand lightly after repairs, and reapply a protective finish if necessary.
Periodic Inspections
Regularly inspecting your shelving can help catch issues early:
- Check for signs of wear like movement or sagging.
- Look for loose screws or hardware and tighten them as needed.
- Assess the finish for signs of wear and consider refinishing if necessary.
For more detailed guidance on maintaining wood shelves, you can visit Wood Magazine’s Maintenance Guide or explore tips from Family Handyman. By following these maintenance tips, you’ll extend the life of your wood shelving. Not only will they continue to serve you well, but they’ll also maintain their beauty, enhancing the overall aesthetic of your space.
Conclusion
Building How to Build Wood Wall Niches Shelving is an exciting project that can transform your space while showcasing your style. By exploring creative ways to craft these shelves, you can add both functionality and personality to your home. Remember, the right tools and materials are crucial for achieving a strong and durable installation. Ensuring you have everything from wood planks to brackets will make the process smoother.
Designing your shelving niches involves thoughtful aesthetic considerations. The way your shelves look can dramatically influence the overall feel of a room, so take the time to select colors and shapes that complement your existing decor. Following the step-by-step guide for installation will help ensure that your shelves are both beautiful and secure, preventing any future mishaps.
Maintenance is key to keeping your wood shelving looking great over time. Regular dusting and occasional refinishing can keep the wood in top condition. Always be on the lookout for any signs of wear or damage so you can address issues before they become major problems.
With these insights, you’re well-equipped to embark on your wood wall niches shelving project. Embrace your creativity, plan thoroughly, and enjoy the journey of transforming your space with beautiful shelves that reflect your unique style and taste. Whether you choose to display books, plants, or cherished decor, these shelving niches can make a significant impact in any room. Happy building!