Achieving a smooth and professional finish in woodworking takes more than just skillful hands. The right Woodworking Finishing Supplies Guide can elevate your projects, providing elegance and protection. If you’re looking to refine your woodworking skills, having the essential finishing supplies on hand is a must. Here is what you need to know to select the best supplies for a polished look.
Types of Wood Finishes
Understanding the different types of finishes available is crucial for choosing the right Woodworking Finishing Supplies Guide. Here are the common types:
- Varnish: This finish is durable and water-resistant, perfect for tabletops and outdoor projects.
- Shellac: Best for interior use, shellac dries quickly and gives a warm tint to wood.
- Polyurethane: It offers excellent durability and is resistant to heat and chemicals, making it ideal for high-traffic areas.
- Oil Finishes: Penetrating oils such as tung or linseed oil enhance the wood’s natural beauty, providing a rich and deep finish.
- Lacquer: Known for its fast-drying properties, lacquer provides a hard finish suitable for decorative pieces.
Essential Finishing Supplies
Here are some must-have Woodworking Finishing Supplies Guide for achieving that professional look:
- Sandpaper: Different grits (from coarse to fine) are essential for smoothing surfaces. Start with a lower grit and finish with a higher grit for a perfectly smooth surface.
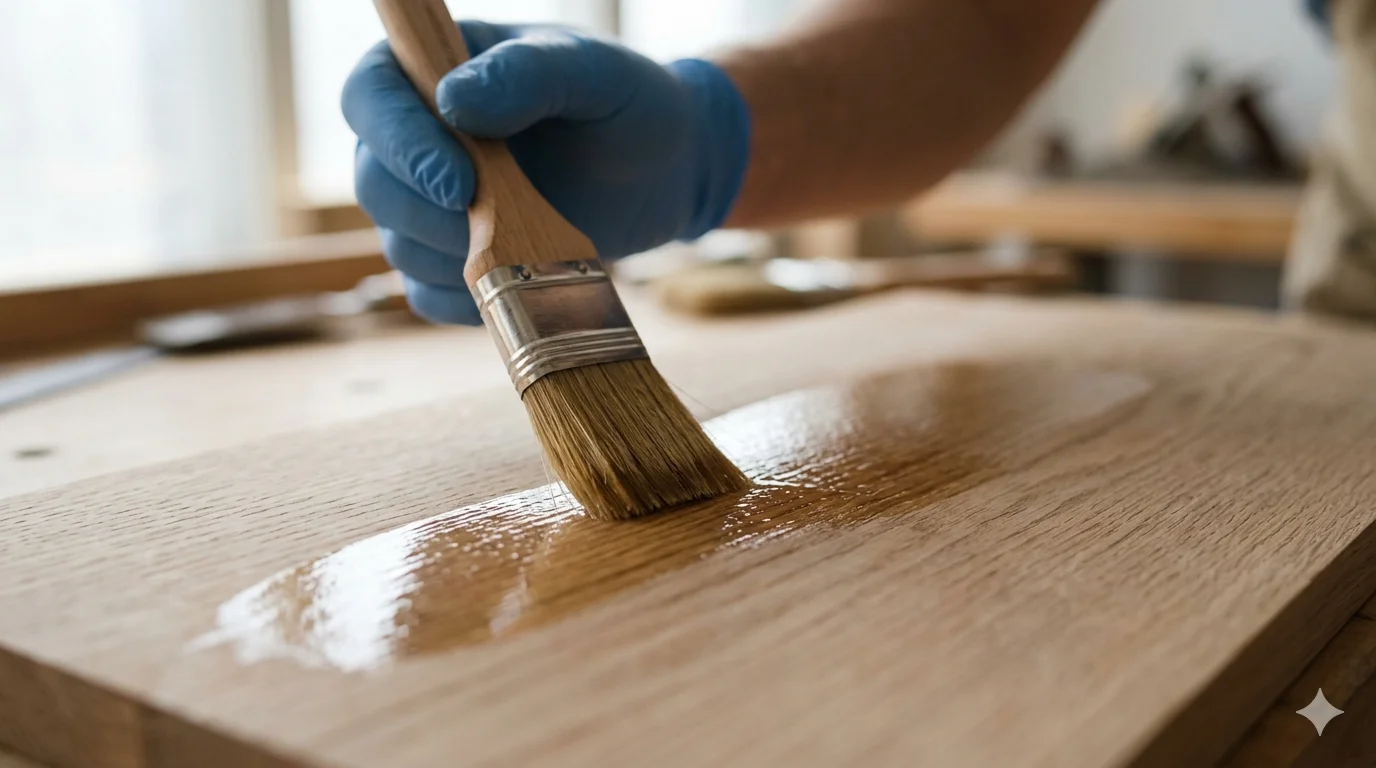
- Finishing Brushes: Quality brushes make a difference. Use natural bristle brushes for oil-based finishes and synthetic brushes for water-based products. This choice will improve the application and reduce brush marks.
- Rags and Towels: Use lint-free cloths when applying oil or wiping off excess finishes. Old t-shirts work well for oil finishes.
- Paint Thinner: Essential for thinning oil-based finishes and cleaning brushes. Make sure to use it in a well-ventilated area.
- Drop Cloths: Protect your workspace and surrounding areas from overspray or drips. These are a must to keep your area clean.
Application Techniques
Knowing how to apply your chosen finish is as important as the supplies you use. Here are some techniques to consider:
- Brushing: Applying with a brush is effective for many finishes. Make sure to apply in long, even strokes for a smooth appearance.
- Wiping: For oiled finishes, wiping the product onto the surface allows for even distribution and prevents buildup.
- Spraying: This technique can provide a uniform coat. Specialized spray equipment can help you achieve a fine mist and even application.
Protective Gear
When working with finishes, safety is essential. Here’s what you should wear:
- Dust Mask: To avoid inhaling dust and fumes.
- Safety Glasses: Protect your eyes while sanding or applying finishes.
- Gloves: Prevent skin contact with chemicals, particularly with oil-based products.
Where to Buy Wood Finishing Supplies
When you are ready to purchase Woodworking Finishing Supplies Guide, visit specialized stores or reliable online retailers. Some recommended sources include:
- Woodcraft – A large selection of woodworking tools and materials.
- Rockler – Known for quality supplies and innovation in woodworking.
- Lee Valley – Offers a variety of premium finishes suitable for any woodworking project.
Investing in high-quality Woodworking Finishing Supplies Guide will pay off in your projects. By selecting the right products and using appropriate application techniques, you can achieve the professional look you desire, ensuring your hard work shines through in every piece you create.
Comparing Different Types of Finishes: Oils, Stains, and Varnishes
When diving into woodworking, one of the most crucial steps is choosing the right finish for your project. Each type of finish—oils, stains, and varnishes—offers distinct advantages and can dramatically affect the final appearance and durability of your work. Understanding the differences between these finishes will help you make an informed decision on how to complete your woodworking project.
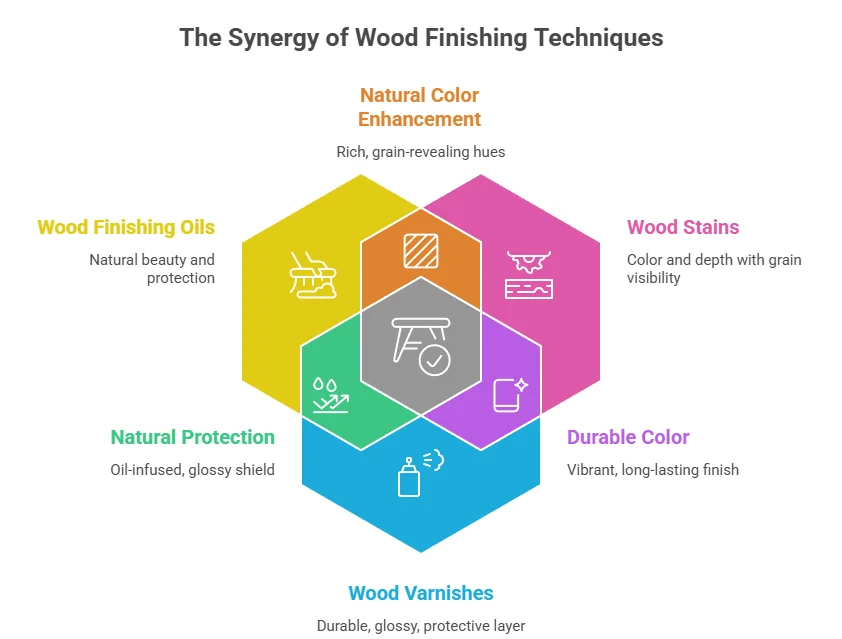
Wood Finishing Oils
Wood finishing oils are popular for their ease of use and natural look. They penetrate the wood, providing a rich, warm glow that enhances the grain pattern. Finishing oils tend to be flexible and can adapt to wood movement, making them a great choice for furniture that may experience seasonal changes in humidity.
- Mineral Oil: A food-safe option ideal for butcher blocks and cutting boards.
- Tung Oil: Renowned for its durability and water resistance, perfect for outdoor furniture.
- Linseed Oil: A slow drying option that is great for enhancing colors in wood but may require multiple coats.
While oils are easy to apply, they can require maintenance over time, especially for high-use items. You will need to reapply the finish periodically to maintain the beauty of your wood.
Wood Stains
Stains are used more to change the color of the wood than to protect it. They come in a variety of shades, allowing you to achieve a specific look that can match your décor. Stain is typically applied before sealing with a topcoat.
- Water-Based Stains: Quick-drying and easy to clean, making them ideal for indoor projects.
- Oil-Based Stains: Known for their deep penetration and rich colors; however, they take longer to dry.
- Gel Stains: Thicker consistency allows for better control and is excellent for vertical surfaces.
Keep in mind that stains do not provide significant protection. They should always be followed with a protective finish like varnish or polyurethane to safeguard your wood.
Wood Varnishes
Varnishes are durable finishes that provide a protective layer over the wood, making them an excellent option for surfaces that will see heavy use. Commonly used for floors and furniture, these finishes can be either oil-based or water-based.
- Oil-Based Varnish: Offers a warm tone and excellent durability, but is slow to dry and has a strong odor.
- Water-Based Varnish: Dries quickly and is low in VOCs, but may not impart as rich of a color.
- Polyurethane Varnish: Known for its toughness and resistance to wear and tear, perfect for high-traffic areas.
Applying varnish can require multiple coats and sanding between applications to achieve a smooth finish. However, once properly applied, varnish offers superior protection from scratches and moisture.
Key Differences
| Finish Type | Protection Level | Ease of Application | Best Use |
|---|---|---|---|
| Oils | Low to Moderate | Easy | Indoor furniture & items |
| Stains | None (requires topcoat) | Moderate | Enhancing color before sealing |
| Varnishes | High | Moderate to Difficult | High-use surfaces like floors |
Ultimately, the finish you choose should align with your project’s specific needs and aesthetics. If you’re uncertain, you might consider testing small samples on scrap pieces of wood to find the right balance between appearance and protection. For more in-depth resources on woodworking finishes, you can visit Wood Magazine or Woodworker’s Journal. These websites provide valuable insights and tutorials that are perfect to enhance your woodworking skills.
How to Choose the Right Application Tools for Wood Finishing

Choosing the right application tools for wood finishing can make a significant difference in the quality of your project. Whether you are a beginner or a seasoned woodworker, understanding the various tools available and how to use them effectively can enhance your finishing tasks. Here’s a guide to help you navigate through your options and select the best tools for your woodworking projects.
When it comes to wood finishing, there are several types of tools you can choose from, each serving a specific purpose. Here’s a brief overview of some common tools:
- Brushes: Ideal for applying stains and paints evenly. They come in various sizes and materials, including natural and synthetic bristles.
- Rollers: Perfect for covering larger surfaces quickly. Rollers can speed up the application process, especially with stains and sealers.
- Sprayers: Best for achieving a fine finish without brush marks. They can be airless or compressed air sprayers and are great for larger projects.
- Rags and Pads: Excellent for hand-applied finishes like oils and waxes. They allow you to control the amount of finish applied and ensure a smooth look.
- Sanding Blocks: Essential for preparing the surface before applying any finish. Proper sanding ensures better adhesion of the finish.
To help you choose the right tool for your wood finishing, consider the following factors:
1. Type of Finish
The type of finish you plan to use—such as oil, lacquer, or polyurethane—will influence your choice of application tools. Some finishes work better with specific tools. For instance, oil finishes can be nicely applied with a clean rag, while spray finishes are better suited for lacquer and polyurethane.
2. Size of the Project
Smaller projects may benefit from brushes for detailed work, while larger pieces might require rollers or spray guns to cover more area quickly. Consider how much time you want to spend on application and choose accordingly.
3. Skill Level
If you’re just starting and are still honing your skills, using brushes or rags may be more manageable than a spray gun. On the other hand, if you have experience and feel confident, investing in a quality sprayer can save time and deliver professional results.
4. Budget
Application tools come in a wide price range. While it may be tempting to opt for the cheapest option, investing in good quality tools can save you money in the long run. Look for tools that you can use for multiple projects rather than single-use items.
5. Cleanup and Maintenance
Different application tools require different levels of care. Sprayers need thorough cleaning after each use to avoid clogging, while brushes can be cleaned with solvent or soap and water, depending on the finish.
Popular Application Tool Choices
| Tool Type | Best For | Pros | Cons |
|---|---|---|---|
| Brushes | Stains, paints | Precision | Can leave brush marks |
| Rollers | Large flat surfaces | Fast application | Less control |
| Sprayers | Large areas, fine finishes | Even coat, No brush marks | Requires cleanup, More skill needed |
| Rags | Oils, waxes | Easy to control, Less waste | Can be messy |
It’s also a good idea to read reviews and get recommendations before purchasing tools. Websites like The Wood Whisperer and Wood Magazine offer a great deal of information on tool performance and user experiences. Ultimately, the right application tools for wood finishing depend on your specific needs and preferences. By selecting the right tools, you can improve your finishing projects, achieve professional results, and enjoy the process of woodworking even more.
Common Mistakes to Avoid When Finishing Your Wood Projects
When it comes to finishing your woodworking projects, even the smallest mistake can lead to disappointing results. As you dive into the world of woodworking finishes, it’s essential to be aware of common pitfalls that can sabotage your hard work. Here are some mistakes to steer clear of, ensuring that your projects shine with perfection.
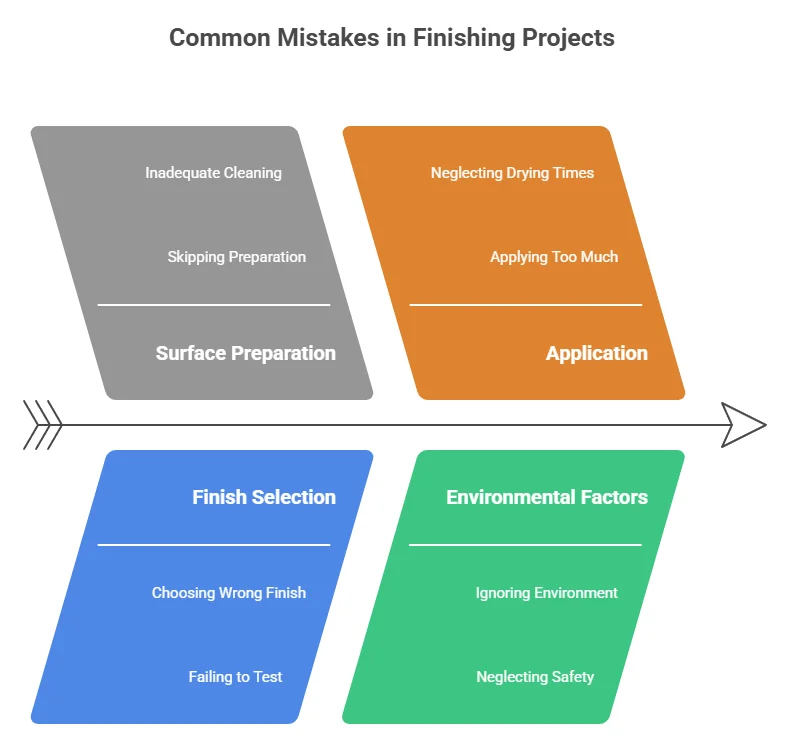
Skipping Surface Preparation
One of the most significant mistakes a woodworker can make is to skip thorough surface preparation. Before applying any finish, take the time to sand your wood surfaces properly. Starting with a coarser grit and working your way to a finer one will create a smooth foundation for your finish. If you skip this step, you might end up with a finish that looks uneven or lumpy, which can ruin the entire project.
Choosing the Wrong Finish
Not all finishes are suitable for every type of project. When selecting your finishing supplies, consider the type of wood you are using and the intended use of the final product. For example, oil-based finishes tend to enhance the wood’s natural color but take longer to dry, whereas water-based finishes dry quickly and are more environmentally friendly but may not provide the same depth of color. Researching different finishes will help you choose appropriately. Visit Wood Magazine for detailed guidance on various finishing options.
Applying Too Much Finish
It’s tempting to apply a thick layer of finish to achieve a high-gloss look, but this can backfire. Too much finish can result in a sticky, uneven surface. Instead, opt for multiple thin coats. Allow each coat to dry according to the manufacturer’s instructions before applying the next. This approach not only looks better but also ensures durability.
Neglecting Drying Times
Different finishes have varying drying times. Rushing this process can lead to smudges or improper bonding between layers. Always check the drying time specified on the product label before proceeding with additional coats. For optimal results, it’s wise to let the finish cure for a few days after applying the final coat.
Ignoring the Environment
Your working environment plays a crucial role in the finishing process. Dust, humidity, and temperature can all affect your finish. Make sure you are working in a clean, dust-free area with stable temperature and humidity levels. Ideal conditions are typically between 65°F to 75°F with low humidity. If you are unsure about the conditions, using a hygrometer can be helpful. More information on optimal wood finishing conditions can be found at Woodworker’s Source.
Neglecting Safety Precautions
Finishing products often contain chemicals that can be harmful if inhaled or absorbed through the skin. Always wear appropriate safety gear, including gloves, a mask, and goggles, when handling these materials. Ensure your workspace is well-ventilated to avoid inhaling fumes.
Failing to Test Finishes
Before applying a finish to your entire project, it’s crucial to test it on a scrap piece of wood from the same project. This allows you to see how the finish will interact with the wood grain and color. Testing helps prevent disappointments, ensuring that the final look meets your expectations.
Overlooking Cleaning After Finishing
After finishing your project, many tend to overlook the cleaning process. Brushes, rags, and containers that held finishing products can become hazardous if not disposed of properly. Make sure to clean brushes according to the type of finish used, and store your materials in a safe environment. For disposal, familiarize yourself with local regulations regarding hazardous materials.
Not Seeking Resources
If you’re ever in doubt, don’t hesitate to seek out resources and communities dedicated to woodworking. Many websites offer extensive advice and forums where seasoned woodworkers share their experiences. Joining these communities can provide valuable insights and troubleshooting tips. Explore resources like Popular Woodworking for articles, videos, and expert advice.
By avoiding these common mistakes, you set yourself up for woodworking success. Finishing can be one of the most enjoyable parts of the woodworking journey; every coat is an opportunity to enhance your project’s beauty. Remember to take your time, pay attention to detail, and always aim for quality over speed.
Tips for Caring for and Maintaining Your Wood Finishes
Caring for your wood finishes is essential to ensure their longevity and maintain their beauty. Whether you have a stained wood table, a lacquered dresser, or an oiled countertop, proper maintenance can keep your finishes looking fresh for years. Here are some effective tips to help you care for and maintain your wood finishes.
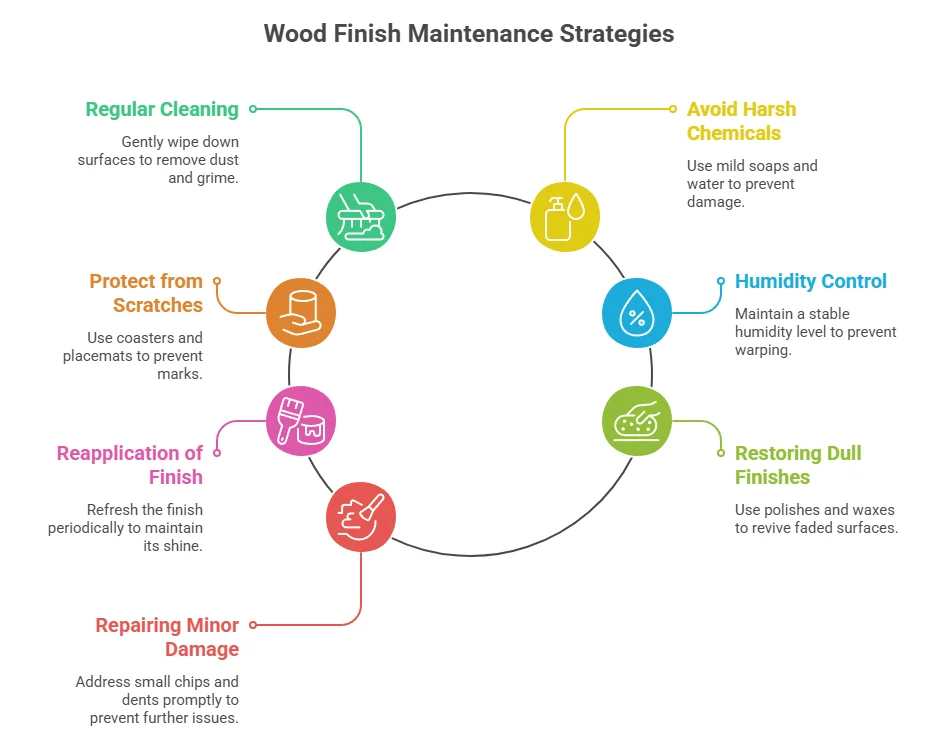
Regular Cleaning
Keeping your wood surfaces clean is the first step in maintaining their finish. Use a soft, dry cloth to dust regularly. For deeper cleaning, follow these steps:
- Use a damp cloth with a mild dish soap solution. Avoid using excessive water, as moisture can damage wood.
- Wipe in the direction of the grain to prevent scratches.
- Dry the surface immediately with a clean, soft cloth to remove any moisture.
Avoid Harsh Chemicals
Many common household cleaners contain harsh chemicals that can strip away the finish of your wood surfaces. Always opt for pH-neutral cleaners that are safe for use on wood. If you’re unsure, test the cleaner on a small, inconspicuous area first.
Protect from Scratches
Wood finishes can easily get scratched. Here are some tips to protect them:
- Use coasters under drinks to prevent rings.
- Place felt pads under furniture legs to minimize scratches when moving items.
- Always use cutting boards when preparing food to avoid knife marks.
Humidity Control
Wood is sensitive to humidity changes. Too much moisture can cause wood to swell, while too little can make it dry and crack. Aim to keep the humidity level between 30% to 50%. You can use humidifiers or dehumidifiers, depending on the conditions in your home.
Reapplication of Finish
Over time, your wood finishes may lose their luster. Here’s how to deal with reapplication: For porous finishes like oils or wax, consider reapplying them once or twice a year. For varnished surfaces, inspect them every couple of years to see if they need refreshing. Here’s a simple reapplication process for oil finishes:
- Clean the surface thoroughly.
- Apply a thin layer of the chosen oil using a clean cloth.
- Allow it to soak for about 15 minutes.
- Wipe off the excess oil to prevent a sticky finish.
Restoring Dull Finishes
If your wood finish appears dull, you can restore its shine using the following methods:
- Furniture Polish: Use a good quality furniture polish suitable for your finish. Apply it with a soft cloth, moving in the direction of the grain.
- Buffing: A light buffing with a microfiber cloth can often bring back the shine.
Repairing Minor Damage
Small scratches and nicks can often be repaired easily. Consider using a wood filler or a crayon that matches your wood color. Here’s a simple process:
- Fill the scratch with wood filler.
- Allow it to dry and sand it lightly for a smooth surface.
- Apply a matching finish over the spot to blend it in.
Final Tips
Keep these final tips in mind for the best care of your wood finishes:
- Store wood items away from direct sunlight to prevent fading.
- Avoid placing hot items directly on wood surfaces.
- Rotate your furniture occasionally to ensure even exposure to light.
Proper care of your wood finishes can significantly extend their life and beauty. For more specific products and solutions, consider browsing Wood Magazine or Woodworker’s Journal for tips and supplies that can help in your woodworking journey.
Conclusion
Achieving a professional look for your woodworking projects hinges heavily on the finishing supplies and techniques you choose. By understanding the essential supplies, you’re equipped to create a beautiful finish that enhances the natural beauty of the wood. Whether you opt for oils, stains, or varnishes, knowing the differences between these finishes helps you select the best option for your specific project, ensuring lasting durability and aesthetic appeal.
Choosing the right application tools is just as vital. Brushes, rollers, or sprayers can greatly affect the outcome of your finish, so take time to pick tools that align with your skill level and project requirements. Avoiding common mistakes during the finishing process will save you time and potential frustration. Pay attention to surface preparation and drying times, as these factors can significantly impact the final result. Remember that the care and maintenance of your wood finishes are equally important. Regular cleaning and periodic reapplication of finish will keep your projects looking their best and extend their lifespan.
By following these guidelines, you set yourself up for success in woodworking finishing. Embrace the learning process, and don’t hesitate to experiment; each project can teach you something new about your style and preferences. With the right supplies and techniques, you’ll craft stunning wood pieces that you’ll be proud to showcase for years to come.