Building wooden stairs yourself can seem daunting, but with the right guide, tools, and materials, you can achieve a beautiful and sturdy staircase. Here’s a step-by-step guide that will help you create How to Build Wooden Stairs DIY-style, ensuring that you stay safe and efficient throughout the process.
Gather Your Materials
Before you start building, check that you have all the necessary materials. Here’s a list of what you’ll need:
- High-quality treated lumber (for treads, risers, and stringers)
- Screws and nails (galvanized for outdoor use)
- Wood glue
- Wood finish or paint (optional)
- Measuring tape
- Level
- Saw (miter, circular, or table saw)
- Drill
- Safety goggles and gloves
Measure and Plan
The first step in the process is to measure where the stairs will go. Here’s how to do it:
- Determine the height of the area where the staircase will lead.
- Decide on the width of the stairs. A common width is 36 inches.
- Calculate the total rise (vertical height) and total run (horizontal length) of the staircase.
- Using the rise and run, calculate the number of steps. The formula is: Number of Steps = Total Rise / Rise per Step (typically 7-8 inches).
- Plan the stringers. Stringers support the treads and risers. You generally need two stringers for standard stairs and three for wider stairs.
Cut the Stringers
Use your measurements to mark and cut your stringers. Follow these steps:
- Mark the rise and run on the lumber for stringers.
- Cut out notches where each step will go, making sure they are evenly spaced.
- Test fit the stringers in place to ensure they support the planned layout of the stairs.
Install the Stringers
Once you’ve cut the stringers, you’ll need to attach them to a solid base:
- Secure the top of the stringers to a solid structure, like a wall or deck frame.
- Use screws for stability and make sure they are level with each other.
Add the Treads and Risers
Now it’s time to add the treads (the part you step on) and risers (the vertical part between treads):
- Measure and cut the treads to the desired length. Make sure they overhang the risers slightly for better support.
- Attach the risers directly to the stringers using screws and wood glue for added strength.
- Attach the treads on top of the risers by screwing them down.
Finishing Touches
After your stairs are built, you can finish them to your liking:
- Sand the surfaces to make them smooth.
- Apply wood finish or paint to protect your stairs from wear and weather damage.
- Consider adding a railing for safety, especially if there is a significant height difference.
Safety Tips
Safety should always be your priority when handling tools. Remember to:
- Wear safety goggles and gloves.
- Ensure your work area is clear and well-lit.
- Keep tools in good working condition.
Building How to Build Wooden Stairs DIY is not just a rewarding project, but also a great way to add value to your home. This project may take a few days, but following each step carefully will help ensure that you achieve a structurally sound and beautiful staircase.
Essential Tools and Materials Needed for DIY Wooden Stairs
Building your own wooden stairs can be a rewarding project, but before you start, it’s essential to gather the right tools and materials. The process will be smoother, and your finished stairs will be sturdier and more visually appealing if you prepare adequately. Here’s a detailed list to guide you through the essentials you’ll need to get started.
Tools Required for DIY Wooden Stairs
To successfully create wooden stairs, having the right tools is crucial. Here are the tools you should consider:
- Measuring Tape: A reliable measuring tape is necessary to ensure accurate lengths and widths. Precision is key when cutting and assembling.
- Level: A leveling tool ensures that your stairs are evenly aligned, which is vital for safety and functionality.
- Square: A framing square helps you create right angles, ensuring your stair treads and risers fit together perfectly.
- Circular Saw: This tool cuts wood easily and accurately, making it a staple for any How to Build Wooden Stairs DIY project.
- Drill: A power drill is necessary for making pilot holes and driving screws into the wood securely.
- Chisel Set: Chisels will help you refine shapes and create smooth edges, especially where wood joints meet.
- Screwdriver: Both manual and power screwdrivers are useful for fastening screws quickly.
- Sandpaper or Electric Sander: To finish the stairs, sanding the wood is essential to create a smooth surface and prevent splinters.
- Pry Bar: If you need to make adjustments or remove any previous construction, a pry bar will help you leverage the materials.
- Safety Gear: Don’t forget safety goggles and gloves. Protecting yourself while working is paramount.
Materials Needed for Building Wooden Stairs
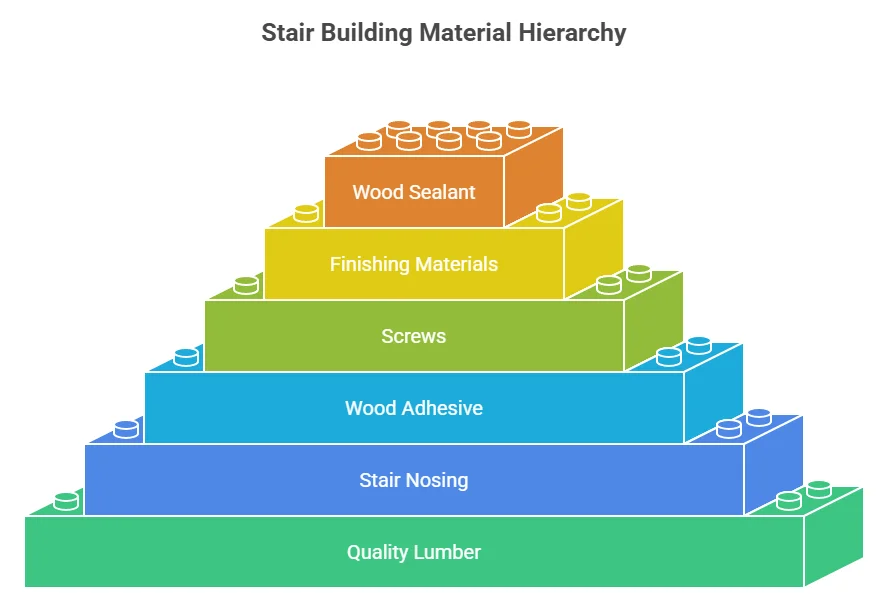
Even with the best tools, it’s important to select quality materials for your stair project. Here’s a list of essential materials:
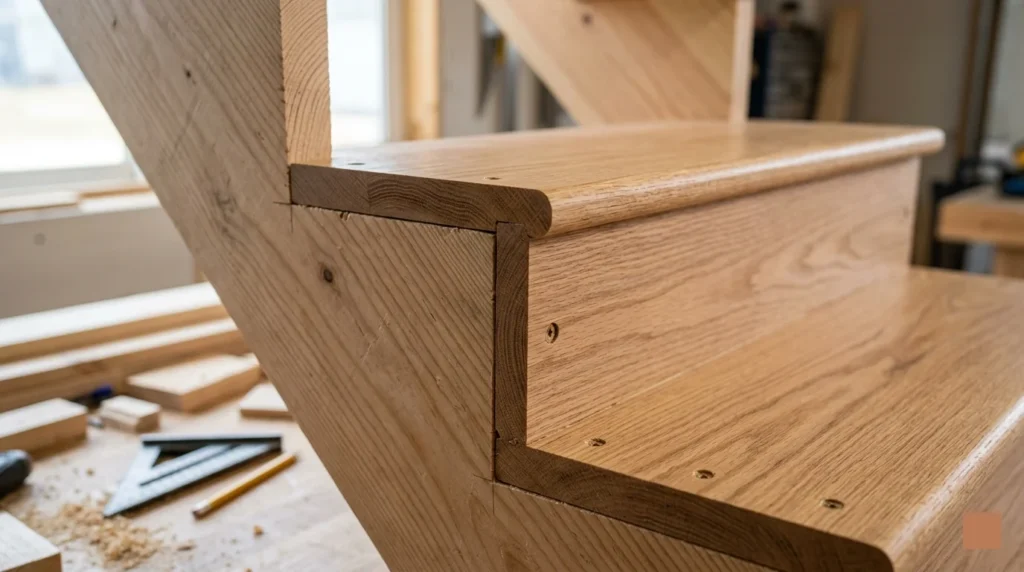
- Quality Lumber: Choose strong, durable wood like oak, pine, or maple for your treads and risers. Each type offers different aesthetics and strengths.
- Stair Nosing: This is the rounded edge that sits at the front of each tread. It protects the edge and offers a finished look.
- Wood Adhesive: A good quality wood glue helps keep your joints strong.
- Screws: Use wood screws that are suitable for your chosen lumber. They provide strength and ensure that your stairs are stable.
- Finishing Materials: Stains or paints that suit your design choice will enhance the wood’s appearance while protecting it over time.
- Wood Sealant: This protects the wood from moisture and increases the lifespan of your stairs.
When choosing materials, it’s wise to purchase from local suppliers or trusted online stores. Quality matters, and investing in durable materials will pay off in the long run by providing safety and longevity to your How to Build Wooden Stairs DIY.
Additional Considerations
Before starting your project, it’s also important to plan and design your stairs correctly. Check the building codes in your area for height and width regulations, ensuring safety and compliance with local laws. You might also want to create a rough sketch of your plan, including all measurements and specifications.
For more specialized information, you can visit The Family Handyman for step-by-step guides on building wooden stairs or check out Wood Magazine for tips on selecting wood.
Consider your skill level and the complexity of your design. If you are a beginner, it might be wise to start with a simple design and gradually learn more advanced techniques as you grow more confident in your carpentry skills. By assembling the right tools and materials, you can embark on your How to Build Wooden Stairs DIY project with confidence, leading to a successful build that adds both function and beauty to your home.
Common Mistakes to Avoid When Building Wooden Stairs
Building wooden stairs can be a rewarding DIY project, offering both practical functionality and aesthetic appeal to your home. However, it’s easy to make mistakes that can lead to safety hazards or expensive rework. Here are some common pitfalls to watch out for when embarking on your wooden stair construction journey.
Inaccurate Measurements
One of the most frequent mistakes is taking inaccurate measurements. Proper measurements are crucial for ensuring the stairs are safe and comfortable to use. A slight error in the rise or run (the height of each step and the depth of the tread) can lead to dangerous stairs that might be hard to climb or descend. Use a reliable measuring tape and double-check your dimensions before cutting the wood.
Ignoring Local Building Codes
Before you start building, it’s essential to research local building codes. Many areas have specific regulations regarding the size, shape, and strength of stairs. These codes are designed to ensure safety in construction. Ignoring them can not only lead to unsafe stairs but may also result in fines or the need to redo the project. Always consult your local codes before making any plans.
Choosing the Wrong Materials
The type of wood you select can significantly affect the durability and appearance of your stairs. Using softwoods like pine may save money initially, but they are often less durable than hardwoods such as oak or maple. Consider the traffic your stairs will see and choose a wood that can withstand wear and tear. Here’s a brief overview of common wood types:
| Wood Type | Durability | Cost |
|---|---|---|
| Pine | Low | Low |
| Oak | High | Medium |
| Maple | High | Medium |
| Mahogany | Very High | High |

Skipping the Design Phase
A clear design plan is essential before you begin construction. Sketching out the design, including the angles, rises, and runs, can help visualize the finished stairs. Additionally, using software tools such as SketchUp can aid in creating a 3D model of your stairs. Proper design helps prevent costly mistakes during construction.
Overlooking Proper Support
Wooden stairs must have adequate support to ensure safety. Many DIY builders neglect to install the necessary stringers, which are the diagonal pieces of wood that support the treads. A general rule of thumb is to install at least three stringers for standard stairs. Skipping this step can lead to unstable and unsafe stairs.
Not Using the Right Tools
Using the correct tools can make a significant difference in the quality of your stairs. Essential tools include a circular saw, level, measuring tape, and drill. If you don’t have these tools, consider borrowing or renting them. Using improvised tools can lead to inaccuracies and sloppy results.
Neglecting the Finish
A good finish is vital for protecting your wooden stairs from wear and enhancing their appearance. Some DIY builders forget to sand and treat the wood before installation. Always take the time to sand the stairs and apply a suitable finish, such as varnish or polyurethane, to protect the wood from moisture and foot traffic.
Overcomplicating the Design
While it might be tempting to go for elaborate designs, simplicity often yields the best results in DIY projects. Complex railings or extra features can lead to confusion during construction and create additional safety concerns. Stick to straightforward designs, especially if this is your first project, to ensure a successful build.
For more comprehensive guides and resources on building wooden stairs, check out Wood Magazine and Family Handyman.
By avoiding these common mistakes and planning accordingly, you can create a beautiful and functional set of wooden stairs that not only enhances your home’s interior but also stands the test of time. Happy building!
Safety Tips for DIY Wooden Stair Construction

Building wooden stairs can be an exciting and rewarding DIY project. However, it is crucial to prioritize safety to ensure a successful build and avoid any accidents. When engaging in this type of construction, keep in mind the following tips that will help you stay safe throughout the process.
Wear Protective Gear
Your safety should always come first. When building wooden stairs, wearing the proper protective gear is essential. Make sure you have:
- Safety goggles: Protect your eyes from wood dust and flying debris.
- Gloves: Keep your hands safe from splinters and sharp tools.
- Dust mask: Prevent inhalation of harmful dust particles.
- Ear protection: Use earmuffs or earplugs when operating loud power tools.
Use Quality Tools
Investing in high-quality tools can significantly enhance not only your efficiency but also your safety. Ensure that you use:
- Sharp blades: Dull blades can slip or cause accidents.
- Power tools: Always inspect power tools for defects or wear before use.
- Measuring tools: Accurate measurements prevent costly mistakes and potential hazards.
Prepare Your Workspace
A well-organized workspace promotes safety and efficiency. Here are some tips for preparing your work area:
- Clear the area: Make sure the floor is free of obstructions and clutter.
- Good lighting: Ensure your workspace is well-lit so you can see clearly when cutting and assembling.
- Ventilation: Work in a space with good airflow, especially when sanding or using adhesives.
Follow Proper Techniques
Employing proper building techniques is vital for safety and structural integrity. Keep the following in mind:
- Measure twice, cut once: Double-check your measurements to avoid mistakes.
- Secure the wood: Use clamps to hold your materials in place when cutting or drilling.
- Check for level: Ensure that each step and railing is level for stability.
Consider Weight Limits
It is essential to adhere to weight limits when constructing wooden stairs. Ensure each step can bear the load of people and items frequently using it. A fixed table layout can help you monitor the load capabilities:
| Step Type | Weight Capacity (Lbs) |
|---|---|
| Standard Wooden Steps | 300 |
| Reinforced Steps | 500 |
| Outdoor Deck Stairs | 350 |
Plan for Emergencies
No matter how careful you are, accidents can happen. Have a plan in place. Here’s what you can do:
- First aid kit: Always keep a first aid kit nearby for minor injuries.
- Emergency contacts: Make sure that you have emergency contacts easily accessible.
- Safety exits: Know the quickest way to exit in case of an accident.
Learning How to Build Wooden Stairs DIY can be an enjoyable endeavor, but prioritizing safety can’t be overlooked. By following these safety tips and using quality materials and tools, you can ensure that your project will be successful and safe. Remember, the quality of your work will reflect not just in the final product but also in the safety measures you maintain throughout the process. For more detailed information on woodworking projects and safety tips, consider visiting resources like Wood Magazine or Woodworkers Source. Your safety and the success of your project depend on it!
Design Ideas for Custom Wooden Stairs in Your Home

Transforming your home with custom wooden stairs can add both beauty and functionality. Wooden stairs not only provide a sturdy element for your home but also serve as a centerpiece that enhances the overall aesthetic. Here are some design ideas to consider when planning your custom wooden stairs.
Classic Wooden Staircase Designs
Classic wooden stairs boast timeless appeal and can blend well with various styles of home decor. Here are some classic design elements:
- Traditional Pine Stairs: Using pine for your stairs gives a warm, rustic feel. You can choose natural finishes or paint them to match your home’s color scheme.
- Maple for Elegance: Maple wood has a rich, smooth finish that can create an elegant staircase. You can enhance its beauty with a glossy sealant.
- Oak Stairs for Durability: Oak wood is extremely durable and ideal for high-traffic areas. It has beautiful grain patterns that add character to your stairs.
Modern and Minimalist Approaches
If you prefer a sleek and contemporary look, there are modern designs to consider:
- Floating Stairs: These stairs give the illusion of floating and can be achieved by having the treads secured to the wall with no visible support. This design creates an airy, open feel.
- Glass and Wood Combination: Pairing wood with glass railings is a trendy choice. This combination maintains visibility while adding a touch of luxury.
- Sleek Treads and Risers: Keep your stairs simple with flat treads and risers, using polished wood and clean lines.
Intricate and Artistic Elements
Add a splash of creativity with artistic additions:
- Curved Stairs: For a dramatic effect, consider designing a spiral or curved staircase. This design can serve as a grand entrance and is perfect for open spaces.
- Patterned Treads: Consider using tiles with patterns for the treads to create a unique look. This can work well with wooden risers for a striking contrast.
- Carved Wood Details: Adding carved details or panels on the sides of stairs can create a rich, historical vibe.
Functional Elements to Consider
When designing your staircase, functionality is as important as aesthetics:
- Storage Solutions: Consider integrating storage into the stairs. Built-in drawers or cabinets beneath the treads can be a great place to store shoes or other items.
- Lighting Options: Install LED lights along the edge of the stairs for a safe and stylish option. Up-lighting can also enhance the beauty of wooden stairs in the evenings.
- Non-Slip Finishes: For safety, use non-slip additives in your wood finish or consider rubber treads for added grip.
Custom Stained and Painted Finishes
The finish on your wooden stairs can dramatically change their appearance:
- Natural Stains: Highlight the wood’s natural beauty with a clear or lightly tinted stain that showcases the grain.
- Bold Colors: For a fun twist, consider painting your stairs in bold colors. You can also create patterns with multiple colors for a playful appeal.
- Whitewashed Look: A whitewashed finish provides a coastal, cottage feel, giving your wooden stairs an airy, spacious look.
Choosing the Right Materials
Selecting the right type of wood is crucial for the look and durability of your stairs:
| Wood Type | Properties | Best For |
|---|---|---|
| Pine | Soft, affordable, and easy to work with | Budget-friendly projects |
| Oak | Strong, durable, and elegant grain | High traffic areas |
| Maple | Smooth texture, resistant to scratches | Modern designs |
For more inspiration and tips on designing custom wooden stairs, check out Staircases.com. Furthermore, for detailed guides and tutorials on woodworking and staircase building, visit Woodworking HQ.
Creating custom wooden stairs allows you to add a unique touch to your home while enhancing its functionality. Whatever design you choose, make sure it reflects your style and meets your needs.
Conclusion
Building wooden stairs yourself can be a fulfilling project that enhances the beauty and functionality of your home. By following the step-by-step guide, you can confidently create sturdy stairs that suit your unique design ideas. Remember to gather all essential tools and materials before you start; this preparation will save you time and help you avoid frustration.
As you work, be mindful of common mistakes, such as incorrect measurements or inadequate support, which can compromise the safety and appearance of your stairs. By learning from those pitfalls, you set yourself up for success and ensure your project meets safety standards. Prioritizing safety throughout the building process is crucial, so always wear appropriate gear and follow best practices.
Exploring design ideas for your wooden stairs can lead to a stunning centerpiece for your home. Whether you opt for a traditional look or a modern flair, customizing your stairs adds personal value and enhances your home’s interior.
Undertaking this DIY project may seem daunting, but with the right knowledge and approach, you can create a beautiful staircase that not only serves its purpose but also elevates your living space. Embrace the journey of crafting your wooden stairs, and enjoy the satisfaction that comes from completing a project that reflects your style and effort. Enjoy your new stairs and the space they transform!