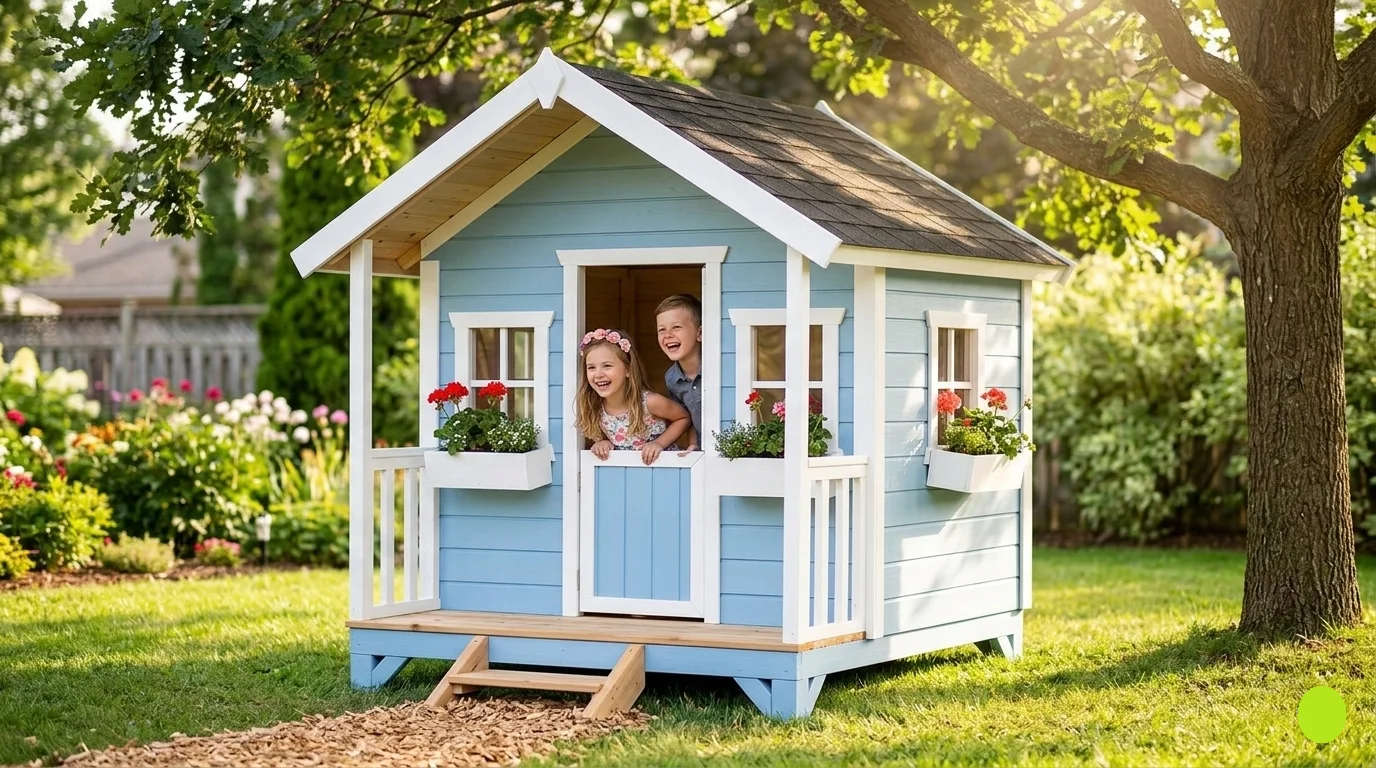
If you are ready to create a space where your little ones can play, a wooden playhouse is a fantastic project. Before you dive in, proper planning and preparation are essential. Here’s a detailed guide to help you get started on How to Build A Wooden Playhouse and make the process enjoyable and efficient.
Choose the Right Location
Finding the perfect spot is vital for your wooden playhouse. Look for an area that is level, away from hazards like falling branches or nearby roads, and has plenty of sun. Here are some factors to consider:
- Flat ground for stability
- Good drainage to keep it dry
- Sunlight for warmth and play
- Proximity to your house for supervision
Design Your Playhouse
Before gathering materials, visualize your playhouse’s design. You can draw a simple blueprint or use online design tools. Include elements like:
- Dimensions: How big do you want it?
- Windows: For light and observation
- Doors: A standard door or a fun-shaped entrance
- Additional features: A slide, sandpit, or porch
Make sure the design appeals to your kids and matches the theme of your yard as you plan How to Build A Wooden Playhouse.
Gather Materials and Tools
To build a sturdy playhouse, compile a list of materials you’ll need. Here’s a suggested list:
- Pressure-treated lumber for the structure
- Plywood for walls and roof
- Deck screws and nails for assembly
- Wood glue for added stability
- Roofing shingles or metal roofing
- Paint or wood stain for protection
Tools required include:
- Hammer
- Screwdriver
- Drill
- Saw (hand saw or power saw)
- Level
- Measuring tape
Check Local Regulations
Before starting your build, make sure to check any local building codes or regulations. Some areas require permits for structures like playhouses. It’s always better to comply with local laws to avoid issues later.
Prepare the Foundation
The foundation is critical for durability. You can opt for a few different types of foundations:
- Wooden beams placed on the ground
-
Concrete blocks for sturdiness
- Concrete slabs for a permanent structure
Ensure the foundation is level and secure. This stability will support the rest of your playhouse construction.
Begin Construction
Start by framing the base. Here’s a straightforward sequence to follow:
- Assemble the floor frame using pressure-treated lumber.
- Build the walls; make sure they align with your design.
- Install the roof; consider a sloped design to allow for rain drainage.
- Add windows and doors according to your plan.
- Finish up with siding, ensuring everything is properly sealed.
Finishing Touches
Once your main structure is in place, it’s time for the fun part! Painting or staining your wooden playhouse not only makes it visually appealing but also protects it from the elements. Consider using non-toxic paint safe for children. You can also decorate the interior with children’s artwork, adding their personal touch. Adding safety features like sand or soft mats beneath any climbing or play areas can help protect your kids while they play. Don’t forget to include fun embellishments like flags, flower boxes, or even a small mailbox!
Essential Materials and Tools for Your Wooden Playhouse Project
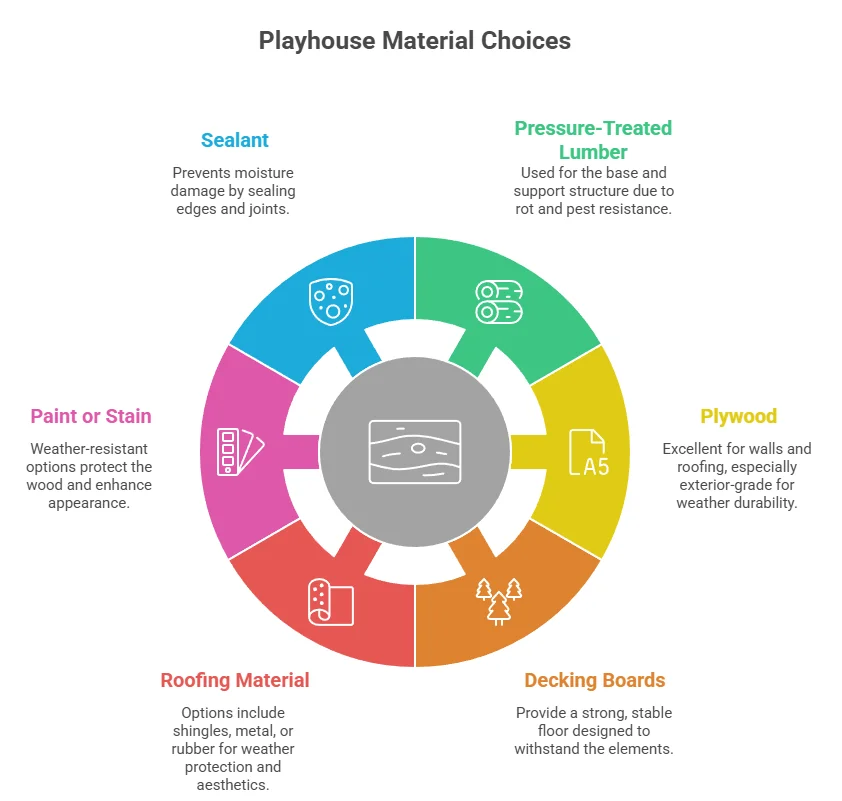
Building a wooden playhouse can be an exciting project for you and your children. Having the right materials is key to ensuring your playhouse is safe, durable, and enjoyable. Here’s a list of essential materials you’ll need for constructing a wooden playhouse.
- Pressure-treated lumber: Use this for the base and support structure. Pressure-treated wood is resistant to rot and pests, making it a long-lasting choice.
- Plywood: This material is excellent for walls and roofing. Choose exterior-grade plywood for better durability against weather conditions.
- Decking boards: For the floor of your playhouse, decking boards provide a strong, stable surface. They are designed to withstand the elements.
- Roofing material: You can use shingles, metal sheets, or even rubber roofing to cover the top of your playhouse. Choose a material that both complements your home and is easy to install.
- Paint or wood stain: Opt for weather-resistant paint or stain to protect the wood and finish the look of your playhouse. This not only enhances appearance but also extends longevity.
- Sealant: Apply sealant on the edges and joints to prevent moisture from getting in and causing damage.
Tools You’ll Need
In addition to materials, having the right tools is essential for your wooden playhouse project. Here’s a comprehensive list:
- Measuring tape: Attention to detail is crucial during the building process. A reliable measuring tape ensures precise cuts and measurements.
- Power saw: A circular saw or miter saw will help you cut the lumber quickly and accurately.
- Drill: An electric drill is necessary for making pilot holes and driving screws through the wood.
- Hammer: Don’t overlook the classic hammer for driving in nails and reinforcing structures.
- Level: This tool ensures that your playhouse is straight and even, which is important for safety and stability.
Extra Materials for Customization
Once you have the essential materials and tools, consider adding some extra elements to make your playhouse even more enjoyable.
- Windows: Adding windows creates more light and airflow. Use plexiglass for safety.
- Doors: Custom doors can personalize your playhouse. Use hinges and latches that children can easily operate.
- Decorations: Think about paint, stencils, or even a faux brick finish for a fun look.
- Furniture: Adding small tables or chairs can create a cozy space for kids to enjoy playtime.
Where to Buy Your Supplies
Finding good quality materials is vital for your wooden playhouse project. Local hardware stores or home improvement chains can be a great starting point. You can also consider browsing online to compare prices and check availability. Here are some recommended sites:
- Home Depot – A comprehensive range of materials and tools for your project.
- Lowe’s – Offers a variety of lumber and building supplies specifically for playhouses.
- Ace Hardware – Stock various building materials and tools for your convenience.
Safety Precautions
Before you begin building, remember to take some safety precautions. Always wear safety goggles when using power tools, and ensure that children are kept at a safe distance during the construction process. It’s also a good idea to review the recommended weight limit for your playhouse, to ensure it accommodates your children safely. With the right materials and tools ready, you are now set to create a wonderful space for your kids that promotes creativity and outdoor play. Each step in the construction brings you one step closer to building a dream playhouse that your children will cherish.
Step-by-Step Guide to Constructing Your Playhouse
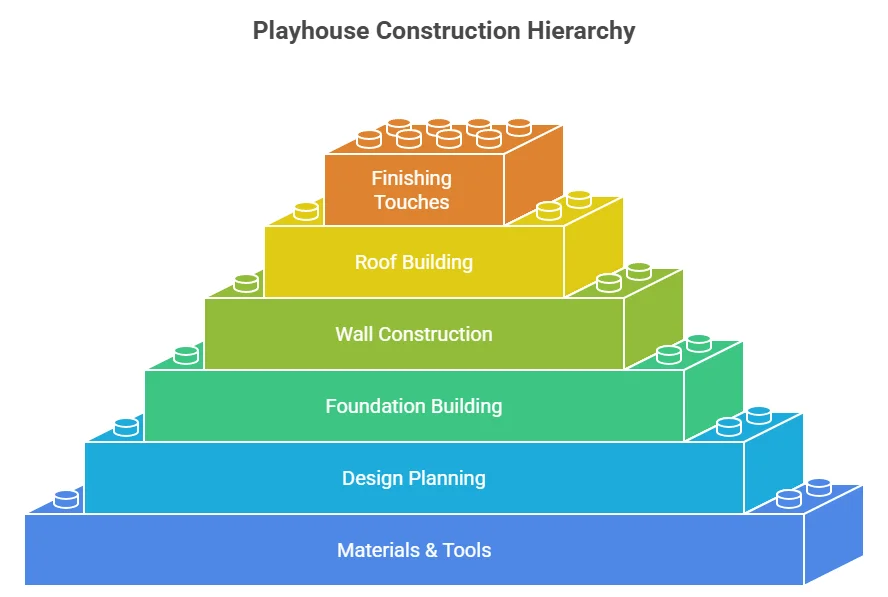
Building a wooden playhouse for your children is a wonderful project that can create lasting memories and a safe space for imaginative play. With a clear step-by-step guide, you can construct a playhouse that suits your backyard and meets the needs of your family. Let’s dive into the process!
Gather Your Materials and Tools
Before you start construction, it’s crucial to gather all necessary materials and tools. Here’s what you’ll need:
Materials:
- Pressure-treated wood for the foundation and frame
- Plywood sheets for walls and roof
- Wood screws and nails
- Wood stain or paint for finishing
- Roofing materials, such as shingles
- Windows and door hinges
Tools:
- Measuring tape
- Power drill
- Saw (circular or miter)
- Level
- Hammer
- Paintbrush/roller for finishing touches
Planning Your Playhouse Design
Design is key, and a detailed plan will save you a lot of hassle later. Consider these design elements:
- Size: Determine how big you want your playhouse. A standard size is around 6×6 feet, but adjust according to your space.
- Style: Choose between simple structures or more complex designs, such as incorporating a slide or climbing wall.
- Features: Think about whether you want windows, ventilation, or a front porch.
Building the Foundation
The first step in construction is laying the foundation. Follow these steps:
- Select a flat area in your yard.
- Use wooden beams to create a frame that outlines the base of your playhouse.
- Ensure the frame is level using the level tool.
- Fill the frame with gravel to create a sturdy base and prevent moisture damage.
Constructing the Walls
Once the foundation is set, it’s time to build the walls:
- Cut the plywood to the desired height for the walls.
- Attach framed sections together using wood screws.
- Install the windows now or leave spaces for windows to be added later.
- Raise the walls and secure them to the foundation.
Building the Roof
The roof is essential for protecting the interior. Here’s how to build it:
- Cut two triangle-shaped pieces for the peak of the roof.
- Create a sloped design by attaching these triangles to the walls.
- Cover the top with plywood sheets and secure using screws.
- Add roofing material, such as shingles, for weatherproofing.
Finishing Touches
Now that the structure is complete, it’s time for the fun part—adding finishing touches:
- Paint or stain the wood to protect it from the elements and make it visually appealing.
- Install a door using hinges for easy access.
- Add personal touches like decorations or furniture inside the playhouse.
Your wooden playhouse is now ready for use! Encourage your kids to use their creativity, and watch as they enjoy their new space.
Additional Resources
For more detailed plans and tips, you can visit:
Building a wooden playhouse may seem daunting, but with this step-by-step guide, you can create a joyful space that your children will cherish for years. Happy building!
Creative Design Ideas for a Wooden Playhouse
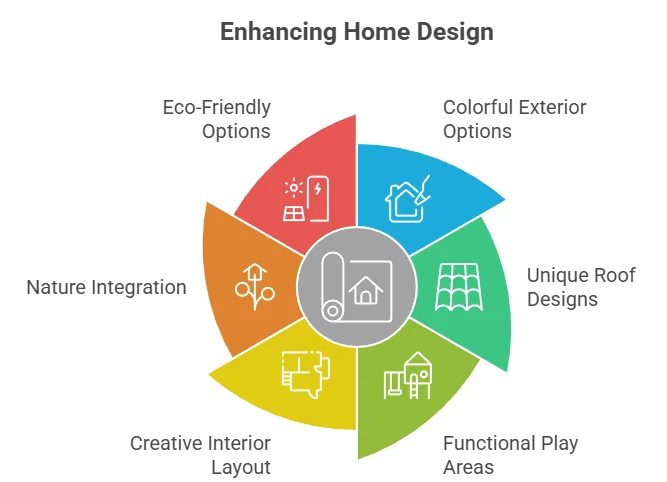
Building a wooden playhouse can be a rewarding project that allows you to express your creativity while providing a delightful play area for kids. Here are some creative design ideas to inspire your own wooden playhouse project.
Colorful Exterior Options
One of the easiest ways to make your playhouse stand out is through vibrant colors. Consider the following ideas:
- Bright Paints: Choose cheerful hues like sky blue, sunshine yellow, or grassy green.
- Stencils and Murals: Add fun shapes, animals, or characters to the walls with stencils or hand-painted murals.
- Natural Wood Finishes: Keep it rustic with a clear varnish that highlights the natural grains of the wood.
Unique Roof Designs
The roof is a prominent feature of any playhouse and can add charm and character. Here are some ideas:
- Gabled Roof: This traditional design not only looks appealing but also provides more headroom.
- Curved Roof: A rounded or arching roof can give your playhouse a magical, fairy-tale look.
- Green Roof: Consider a roof adorned with grass or small plants; it’s eco-friendly and unique!
Functional Play Areas
Integrating various play stations can enhance the fun. Here are suggestions on what you can include:
- Sandbox: A small sandbox can be a perfect addition right outside the playhouse for extra fun.
- Slide: Add a slide leading down from a deck or loft area to accommodate adventurous kids.
- Balcony or Porch: Creating a small exterior area can serve as a space for dolls or tea parties.
Creative Interior Layout
The inside of the playhouse can also reflect the creative design. Here are some ideas for interior elements:
- Smart Storage Solutions: Use built-in benches with storage underneath for toys and games.
- Mini Furniture: Include tables and chairs suited to small sizes which can be used for crafting, reading, or playing cards.
- Decorative Touches: You can use strings of fairy lights or soft cushions to create a cozy atmosphere.
Nature
Using natural elements can enhance your wooden playhouse. Consider these features:
- Natural Toys: Include wooden blocks, stones, or pieces of driftwood inside the playhouse for unique play options.
- Plants: Add potted plants around the playhouse to connect it with the garden.
- Outdoor Features: Consider creating a small path from your house to the playhouse lined with stones or flowers.
Eco-Friendly Options
If you’re environmentally conscious, you can integrate eco-friendly choices into your design:
- Recycled Materials: Use reclaimed wood or materials from other projects to lessen waste.
- Solar Lights: Incorporate solar-powered lights to illuminate the space while saving energy.
- Rainwater Collection: Set up a rain barrel to collect water for nearby plants.
These creative ideas can transform a simple wooden playhouse into a magical retreat. Whether you’re going for colorful and whimsical or serene and natural, the design possibilities are endless.
Maintenance Tips for Keeping Your Playhouse Safe and Fun
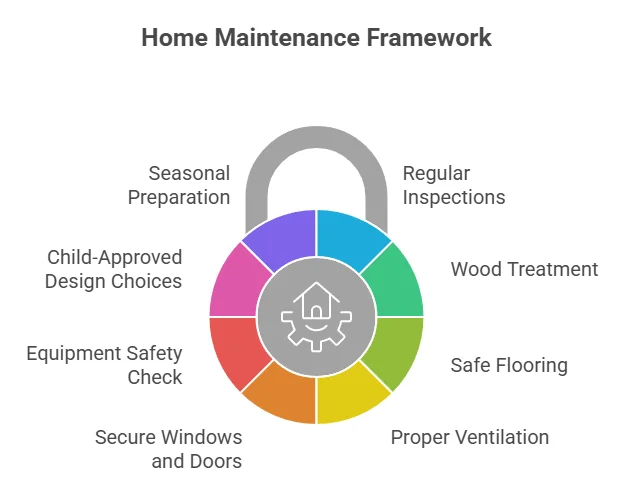
Building a playhouse is an exciting venture for parents and children alike. However, keeping it safe and fun requires regular maintenance. Here are some practical tips to ensure your beloved playhouse remains a safe haven for your little ones.
Regular Inspections
Set a schedule to check your playhouse monthly. Look for any signs of wear and tear, such as splintered wood, rusting nails, or fading paint. A quick inspection can save you from more significant problems later. Make sure to:
- Examine the foundation for stability.
- Check for any pests or insect damage.
- Look for water damage or mold.
Wood Treatment
Keep the wood in good condition by applying a protective sealant or stain. This not only enhances its appearance but also protects it from moisture, pests, and UV rays. Here are some steps you can follow:
- Choose a high-quality wood sealant suitable for outdoor use.
- Clean the wood surface to remove dirt and debris.
- Apply the sealant with a brush or sprayer, following the product instructions.
- Reapply every few years to ensure ongoing protection.
Safe Flooring
The flooring of your playhouse is essential for safety. Ensure it is even, secured, and free from hazards. If you notice any loose boards, fix them immediately to avoid tripping. Consider adding soft flooring options, like rubber mats or outdoor carpets, for a cushioned place where kids can play. This not only adds comfort but also minimizes injury in case of falls.
Proper Ventilation
To keep the playhouse feeling fresh, ensure there is adequate airflow. If your playhouse has windows, check that they can open and close properly. If it doesn’t have windows, consider adding ventilation holes near the roof to enhance air circulation. This helps prevent mold and mildew, making the playhouse a healthier space for children.
Secure Windows and Doors
Windows and doors are crucial for safety. Make sure:
- All glass windows are made with shatterproof material.
- Doors fit well and do not have any sharp edges.
- Install latches that are easy for children to use but secure enough to prevent accidental opening.
Equipment Safety Check
If your playhouse includes climbing structures, swings, or slides, inspect them regularly. Check for:
- Loose bolts or screws that need tightening.
- Cuts or tears in any fabric components.
- General wear and tear due to weather conditions.
Address any safety issues immediately, so your children can continue to enjoy the playhouse without risks.
Child-Approved Design Choices
Make the playhouse a fun environment by adding child-friendly features. Consider:
- Bright colors and fun themes.
- Creative decorations that inspire imagination.
- Age-appropriate toys and furniture inside.
Seasonal Preparation
Prepare your playhouse for various weather conditions. Before the onset of winter, carry out these essential checks:
- Ensure the roof and gutters are clear to prevent water pooling.
- Remove any outdoor furniture or toys that may be damaged by snow or ice.
- Inspect for loose boards that could be further weakened by cold temperatures.
During the summer, ensure the playhouse has adequate shade and is kept dry to protect children’s skin from sunburn and prevent overheating. Regularly check the interior for unwanted critters that may seek shelter. For more insights on wooden playhouse maintenance, you can visit resources like The Spruce or Better Homes & Gardens.
These tips will help you keep your wooden playhouse safe and enjoyable for years to come. Regular checks and updates not only extend the life of the playhouse but also ensure a fun and safe environment for your children.
Conclusion
Building a wooden playhouse is an enjoyable project that not only boosts your child’s outdoor experience but also brings families together. By taking time to plan and prepare, you set a strong foundation for success. Ensuring you have the right materials and tools is crucial; investing in quality components will pay off in durability and beauty.
As you follow the step-by-step guide, remember that safety should always come first. Adequate preparations and careful construction will yield a sturdy playhouse that stands the test of time. Don’t shy away from infusing your creativity into the design process. Unique themes and personalized touches can turn a simple playhouse into an imaginative wonderland that will inspire countless adventures. Your guide on How to Build A Wooden Playhouse is just the beginning.
Maintaining your wooden playhouse is key to keeping it a safe haven for play. Regular checks and timely repairs will ensure it remains a fun space for your children. By applying these maintenance tips, you’re not just preserving a structure; you’re nurturing your child’s joy and imagination in their playtime. This project can be a fulfilling experience that blends craftsmanship with joy. Whether you’re a seasoned builder or a beginner, the excitement of constructing a wooden playhouse can lead to cherished family memories and endless hours of fun. So gather your materials, unleash your creativity, and start building a magical retreat for your kids today!