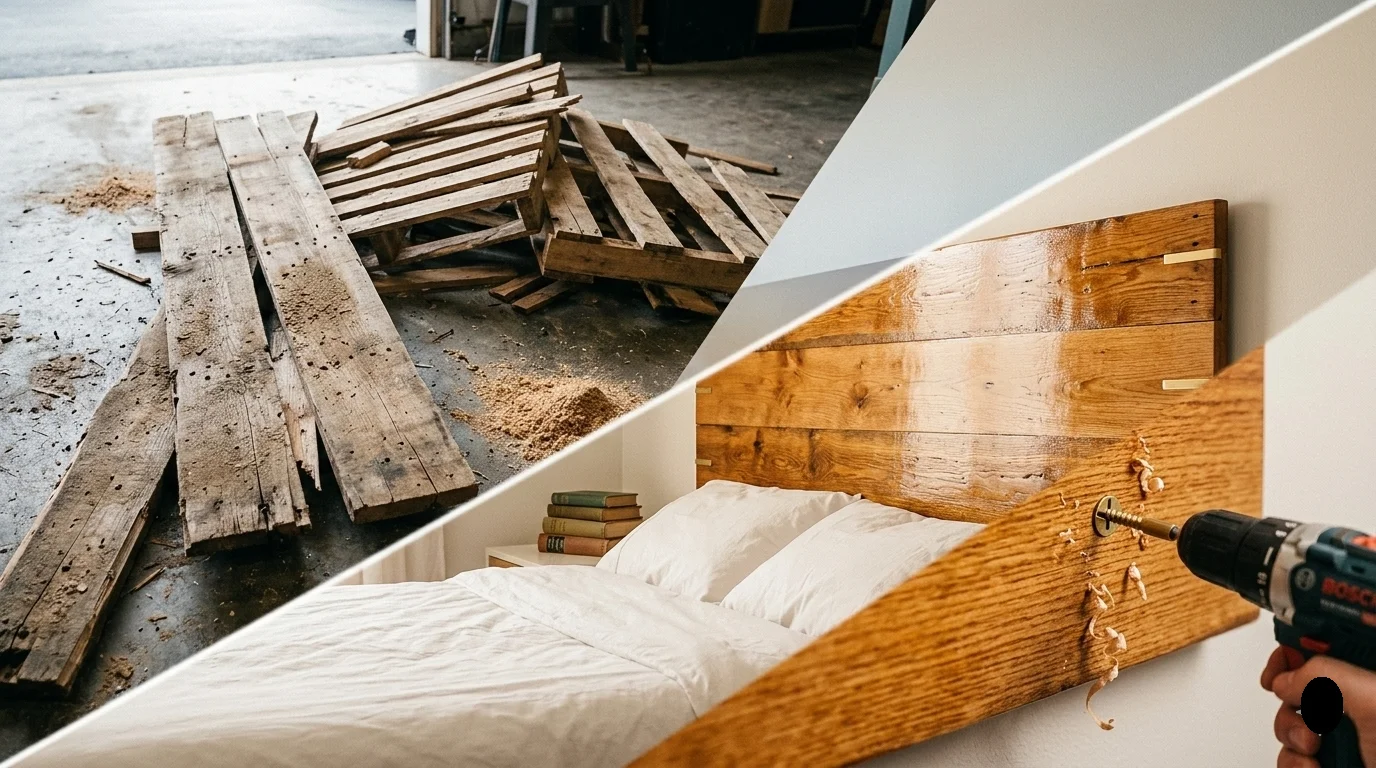
When it comes to designing your bedroom, a headboard can make all the difference. If you love the rustic charm of reclaimed wood, you’re in luck! DIY Reclaimed Wood Headboard Ideas projects can help you create a stunning focal point that fits almost any style. Let’s explore some creative ideas that you can easily take on, no matter your skill level.
Modern Minimalist Headboard
If you appreciate clean lines and simplicity, a modern minimalist reclaimed wood headboard may be your perfect choice. This design accentuates the natural beauty of the wood while providing a sleek, uncluttered look. Aim for a headboard made of smooth, reclaimed wood planks arranged vertically. Sand the wood down to a gentle finish, leaving its natural grains visible. You can paint it white or leave it in its natural state for that organic look.
Rustic Farmhouse Style
The rustic farmhouse trend continues to be popular for its charming and cozy vibe. A reclaimed wood headboard in this style often features a combination of various wood types and finishes. Here’s how you can create one:
- Gather different pieces of reclaimed wood, such as barn wood and pallets.
- Cut them to your desired headboard height and width.
- Use a mix of stained and natural boards to add character.
- Attach the planks with wood glue or screws for stability.
This style pairs brilliantly with soft, neutral bedding and vintage decor to complete the look.
Eclectic Art Piece Headboard
For those with a flair for creativity, consider turning your headboard into a unique art piece. You can use a canvas as a base and attach assorted reclaimed wood scraps in various colors and textures.
- Paint the canvas in a color that complements your room.
- Arrange the wood pieces in an aesthetically pleasing layout.
- Secure the pieces with nails or wood glue, creating a fun, artistic feel.
Industrial Chic Headboard
Combine industrial elements with reclaimed woods to make a bold statement in your space. Use darker, more aged wood, and incorporate metal accents like piping or brackets. This gives your headboard an edgy, urban look. For the assembly, you can:
- Use long planks of reclaimed wood to form the main structure.
- Add black or silver brackets to the corners to enhance the industrial aesthetic.
- Finish with a matte sealant to preserve the wood’s rugged charm.
Headboard with Built-In Shelves
Why not merge your headboard with practical storage? Build a reclaimed wood headboard that includes integrated shelves for books and decorative items. Here’s how to achieve this:
- Construct a basic headboard frame.
- Add two or three shelves at different heights along the top.
- Stain the wood to give it a polished finish or leave it raw for rustic vibes.
This functional design keeps your essentials at arm’s reach while adding personality to your bedroom.
Stained Glass and Wood Combo
If you want to take a whimsical approach, consider combining stained glass with reclaimed wood for your headboard. This project can blend colors and creativity beautifully.
- Choose a mix of reclaimed wood for the structure.
- Select various pieces of stained glass to be placed within the frame.
- Secure the glass with wooden dividers, which will also add texture.
This stunning headboard will serve as a piece of art, transforming your bedroom into an enchanting experience. DIY Reclaimed Wood Headboard Ideas allow for immense creativity and can be tailored to any decor style. Plus, engaging in a DIY project not only personalizes your space, but it also helps in understanding the materials you work with. You can check out more inspiration for your projects at Hometalk and Wood Magazine. Remember to take your time, plan your design, and enjoy the process of creating a statement piece for your bedroom.
Tips for Sourcing the Best Reclaimed Wood for Your Project
Finding the right reclaimed wood for your project can seem challenging, but it’s an opportunity for creativity and sustainability. Reclaimed wood offers a unique charm and history, making it a sought-after material for various DIY projects. To help you source the best reclaimed wood, here are some handy tips.
Know What You Need
Before you start looking for reclaimed wood, take some time to consider the specifics of your project. Think about the following:
- Type of Wood: Common types include oak, pine, and barn wood.
- Size and Thickness: Measure the dimensions you need for your project.
- Condition: Ensure it’s in good shape, free from mold or pests.
Explore Local Sources
Local sources are often the best place to find quality reclaimed wood. Here are some options to consider:
- Salvage Yards: Check out local building salvage yards. They often have a variety of reclaimed materials.
- Antique Shops: You might find beautiful wood at antique stores or flea markets.
- Local Woodworkers: Talk to craftsmen; they may have offcuts or scraps available.
Consider Online Options
Sometimes, the best wood is just a click away. Several websites specialize in reclaimed materials:
- Reclaimed Wood Exchange – A marketplace for various types of reclaimed wood.
- The Woodlands – Offers various reclaimed wood products.
- Treecycle – Specializes in reclaimed wood and sustainable materials.
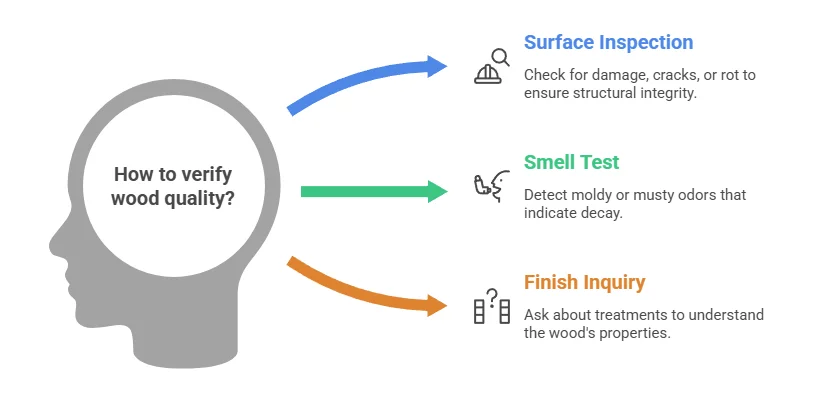
Verify Quality and Authenticity
Once you find potential wood sources, always verify the quality. Here’s what to check:
| Aspect | What to Look For |
|---|---|
| Surface | Look for damage, cracks, or rot. |
| Smell | Ensure there’s no moldy or musty odor. |
| Finish | Ask about any treatments or finishes applied. |
Know Where to Look for Deals
Reclaimed wood can be pricey, but being in the right place at the right time can yield great deals. Consider these options for affordable reclaimed wood:
- Local Facebook Marketplace: Check for individuals selling reclaimed wood near you.
- Craigslist: This is another site with individuals and companies often listing materials.
- Warehouse Sales: Sometimes, warehouses hold clearance sales that include reclaimed materials.
Build Relationships
Building relationships with local suppliers can lead to access to high-quality reclaimed wood. Here are some strategies:
- Visit local suppliers regularly to establish rapport.
- Attend workshops or events focused on reclaimed wood to network.
- Join local woodworker clubs or groups to share leads on sources.
Consider Shipping Costs
If you choose to buy wood online, factor in shipping costs. Here are some tips to save you money:
- Order in bulk to minimize shipping fees.
- Look for sellers that offer free shipping on large orders.
- Compare shipping costs between different online suppliers.
By using these tips, you can make your search for reclaimed wood much easier and productive. Not only will you find beautiful wood for your projects, but you’ll also support sustainability by reusing materials. With the right reclaimed wood, your DIY projects will stand out with their unique history and character.
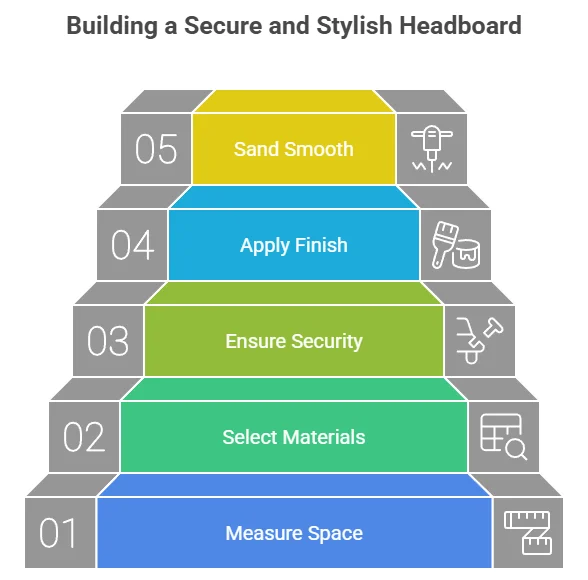
Step-by-Step Guide to Building a Reclaimed Wood Headboard
If you’re looking to add character and warmth to your bedroom, a reclaimed wood headboard is an excellent choice. This DIY project will not only save you money but also create a unique focal point in your space. Here’s a simple guide to building your own reclaimed wood headboard, perfect for beginners and seasoned DIYers alike.
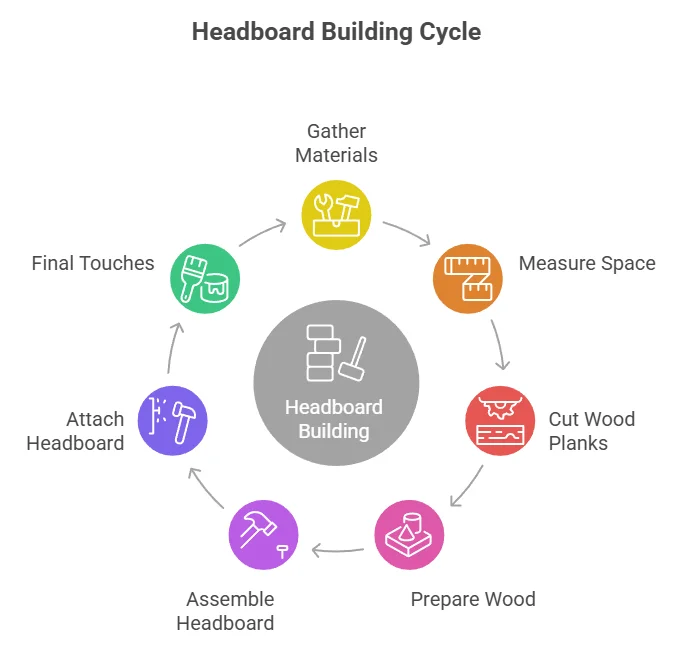
Gather Your Materials
Before you start, collect all the necessary materials to ensure a smooth building process. Here’s a list of what you will need:
- Reclaimed wood planks (1×6 inches is ideal)
- Wood screws
- Wood glue
- Sandpaper (medium and fine grit)
- Stain or sealant (optional)
- Measuring tape
- Power drill
- Saw (circular or miter saw)
- Clamps
Measure Your Space
The first step in making your reclaimed wood headboard is to measure the width of your bed. Most headboards align with the bed’s width, so use a measuring tape to determine the exact size you need.
Cut Your Wood Planks
Once you have your dimensions, it’s time to cut the reclaimed wood planks. Here are some key points:
- Mark the cut lines clearly on each plank.
- Using a circular saw, cut the planks to your desired length.
- For a more rustic look, you can vary the length of each plank.
Prepare the Wood
Now it’s time to prepare your wood for assembly. Follow these steps:
- Sand the edges and surfaces of the wood planks to smooth any rough spots.
- Start with medium grit sandpaper and finish with fine grit for a polished look.
- If desired, apply a wood stain or sealant to enhance the wood’s natural beauty and protect it. Allow it to dry completely.
Assemble the Headboard
Next, lay out your planks in the pattern you want. You can create a straight layout or a fun zigzag design. Here’s how to assemble:
- Using wood glue, apply a bead along the edge of the first plank and position it for attachment.
- Secure it with clamps while you drill wood screws through the plank into the support behind it. Make sure the screws are slightly recessed to prevent any sharp edges.
- Continue to add planks, repeating the process until you have your desired height.
Attach the Headboard to the Wall or Bed Frame
Now that your headboard is assembled, you need to secure it in place. Here’s how to do that:
- If you want a freestanding headboard, attach it directly to the bed frame. Drill screws through the bottom of the headboard into the bed frame for stability.
- For a wall-mounted approach, use a stud finder to locate the wall studs, then use heavy-duty screws to attach the headboard securely to the wall.
Final Touches
Inspect your headboard for any unfinished areas and go over them with sandpaper as needed. You can also add decorative elements such as lights or fabric if you wish. The final look should be something you’re proud of and that complements your room’s style.
Maintenance Tips
Reclaimed wood does require some upkeep. Here are a few tips:
- Regularly dust the headboard with a soft cloth.
- If you notice scratches, sand them lightly and apply some adjust stain.
- Avoid excessive water exposure to maintain the wood’s integrity.
Creating a reclaimed wood headboard is not just a fun project; it’s a way to personalize your space. For more ideas and inspiration, check out DIY and House Beautiful. Happy building!
Styling Your Bedroom Around a Reclaimed Wood Headboard
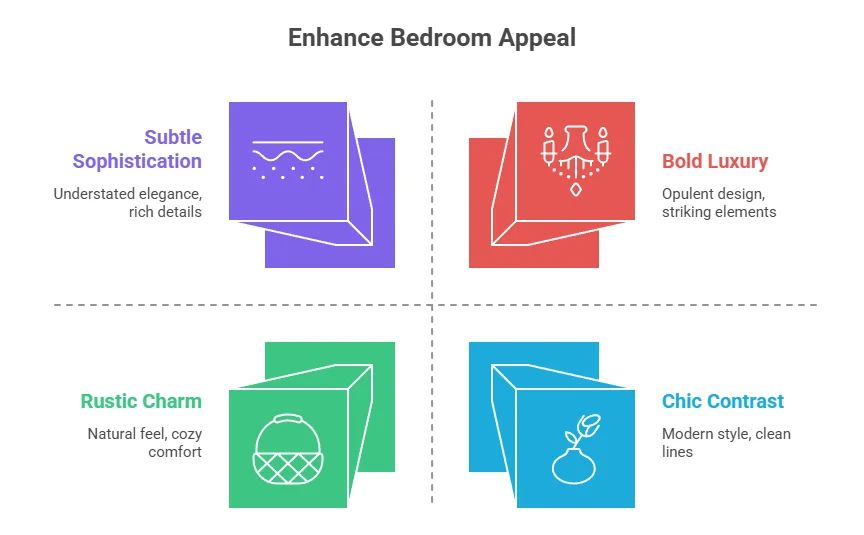
Creating a cozy, inviting bedroom begins with the right focal point, and a reclaimed wood headboard can be just that. This unique piece not only enhances the aesthetic of your space but also adds warmth and character. Here are some ideas on how to style your bedroom around a reclaimed wood headboard. First, consider your color palette. A reclaimed wood headboard often showcases beautiful, rich tones that can beautifully complement various colors. Here are some color combinations to enhance your space:
- Earth Tones: Greens, browns, and warm neutrals can create a seamless connection with the wood.
- Soft Pastels: Light blues or pale pinks can provide a lovely contrast, making the wood pop.
- Bold Jewel Tones: Deep colors like emerald or navy can accentuate the rustic feel of the headboard.
Next, think about your bedding. To make your reclaimed wood headboard stand out, you should choose linens that harmonize with it. A crisp white duvet can be a refreshing canvas, allowing the wood’s natural textures to shine. Alternatively, channel a bohemian vibe with patterned throw pillows in rich tones, echoing the headboard’s color. Mix soft textures—like velvet or knit—into your bedding for added depth. Light fixtures can also play a pivotal role in your bedroom’s overall style. Here are some tips for selecting the right lighting:
- Clustered Pendants: Hang pendant lights at varying heights above your headboard to add a cozy yet modern feel.
- Wall Sconces: Install sconces on either side of the headboard for symmetry and soft illumination.
- Table Lamps: Choose lamps that share a similar wood finish or a complementary color for balance.
Don’t overlook wall decor, as it can enhance the look of your reclaimed wood headboard. Here are a few ideas:
- Framed Artwork: Select pieces that reflect your personal style, perhaps with elements that mimic the wood’s texture.
- Mirrors: A large mirror or a series of smaller mirrors can brighten your space while adding visual interest.
- Gallery Wall: Create a gallery wall with photos or art that relate to your interests, making the space feel personalized.
Your choice of furniture also impacts the overall theme of your room. Pair your reclaimed wood headboard with minimalist furniture pieces or rustic accents to create balance. A distressed nightstand can tie the whole look together, while sleek modern furniture can provide a chic contrast. Consider furniture made from natural materials to keep the organic feel consistent. Incorporate textiles that complement your headboard’s rustic charm. Layering different fabrics can add depth to the room:
- Area Rugs: A soft, textured area rug can soften the hardwood floor and provide warmth underfoot.
- Throws: Adding a textured throw at the foot of your bed can introduce another layer of comfort.
- Curtains: Light, airy curtains can bring a breezy feel, while heavier drapes can create a more dramatic effect.
Accessorizing is crucial to create a well-rounded look. Incorporate personal touches like plants, books, or handmade decor. Plants not only purify the air but also bring life into your space. Succulents or a tall potted plant beside the headboard can enhance the organic vibe. For inspiration and DIY tips, consider visiting Better Homes & Gardens or HGTV. These sites provide countless ideas for incorporating reclaimed wood into your interior design positively. By integrating these elements into your bedroom, your reclaimed wood headboard will serve as a stunning centerpiece, reflecting your personal aesthetic while providing a warm and inviting atmosphere. Experiment with different combinations to discover what works best for your space, turning your bedroom into a sanctuary of comfort and style.
Common Mistakes to Avoid When Making a DIY Headboard
Creating a DIY headboard can be an exciting project that adds character to your bedroom. However, there are several common mistakes that can hinder your success. Avoid these missteps to ensure your headboard turns out beautifully and meets your needs. One of the most significant errors is not measuring your space correctly. Before you start gathering materials, take precise measurements of your bed and the wall where you plan to install the headboard. This will help you decide the height and width of your headboard. Ideally, it should be slightly wider than the bed for an appealing look.
If your headboard is too large, it could overpower the room; if it’s too small, it might look out of place. Another common mistake is neglecting the importance of selecting quality materials. While reclaimed wood offers a rustic charm, it’s essential to choose pieces that are sturdy and free of mold or insect damage. Thin or fragile wood may not withstand the test of time. Research local lumber yards or reclaimed wood suppliers, such as Reclaimed Wood Exchange, to find high-quality options. When planning your design, remember that simplicity often delivers the best results.
Overly intricate patterns can be challenging to execute and may not provide the visual impact you desire. Stick to designs that fit your skill level. A simple board or a panel with clean lines can give your bedroom a modern, streamlined look. Don’t hesitate to browse inspirational sites like Houzz for ideas that align with your ability. Additionally, many DIYers underestimate the importance of the finishing touches when it comes to reclaimed wood headboards. Polyurethane or varnish can protect the wood and enhance its color, so never skip this step.
The right finish not only adds sheen but also prevents moisture damage. Ensure you apply the finish in a well-ventilated area, allowing ample time for it to cure before the headboard makes its way back into your space. You can find a variety of wood finishes online at platforms like Woodcraft. Another frequent oversight is failing to securely attach the headboard to the wall or bed frame. To prevent it from toppling over, especially if it’s tall or heavy, it’s crucial to use sturdy brackets or anchors. Make the installation easier by having a partner help you hold it in place while you secure it.
Check the manufacturer’s instructions to ensure you’re using the correct hardware for your headboard. Mixing different wood types without a cohesive plan is another challenge. While reclaimed wood can offer a beautiful contrast, combining species without a clear vision can lead to a chaotic look. Stick to one or two types of wood that complement each other for a more harmonious design. Different grains and colors can still work, but they should blend intentionally rather than compete. It is equally important to prepare the wood before assembly. Sanding down rough edges and removing any paint or old finishes will ensure a smoother surface. Sanding not only adds a professional touch but also makes it safer to use, making sure there are no splinters or sharp edges. Invest in a good power sander to expedite this task, and always sand with the grain of the wood. Below is a checklist to follow when making your DIY headboard:
- Measure your bed and wall for the appropriate headboard size.
- Choose high-quality wood free from damage.
- Stick to a simple, manageable design.
- Apply a protective finish to the wood.
- Securely fasten the headboard to the wall or bed frame.
- Limit wood species to two for a cohesive look.
- Sand surfaces before assembly for safety and finish quality.
For more insights and tips on woodworking projects, check out Popular Woodworking or Wood Magazine. Taking the time to avoid these common mistakes will not only improve the outcome of your DIY headboard but also make the process more enjoyable. Happy building!
Conclusion
Embracing a DIY reclaimed wood headboard project offers not only a unique way to enhance your bedroom but also a chance to express your creativity and sustainable values. By exploring various design ideas, you can cater to any personal style, whether you prefer a rustic charm or a modern elegance. Remember, sourcing quality reclaimed wood is crucial, so take your time to find the perfect materials that truly resonate with your vision. Following a structured step-by-step guide to building your headboard ensures a smooth process. From measuring and cutting wood to assembling and finishing touches, each stage contributes to the overall success of your project. As you style your bedroom around your new headboard, consider complementary colors, textures, and accessories that unify the space, creating a cozy and inviting atmosphere.
Steering clear of common mistakes such as improper height or neglecting to sand the wood can elevate your final product. Through careful planning and attention to detail, you can craft a stunning focal point in your bedroom that showcases sustainability and personal flair. Your reclaimed wood headboard can be more than just a piece of furniture; it becomes a statement of your creativity, style, and commitment to the environment. Embark on this rewarding journey, and let your headboard be a testament to your craftsmanship.