Wood can be a beautiful and durable material in furniture and fixtures. However, when it warps, it can become an eyesore and affect its usability. If you’re wondering How To Fix Warped Wood, you’re not alone. Many homeowners face this issue. Fortunately, there are effective methods to help restore your warped wood and bring it back to its original shape.
Understanding Warped Wood
Warping occurs when wood experiences changes in moisture levels. When one side absorbs more moisture than the other, it expands and causes the wood to bend or twist. Common causes include humidity, heat, and improper storage. Understanding these factors is key to fixing the problem.
How to Fix Warped Wood: Methods to Try
1. Moisture and Heat Treatment
One effective method for fixing warped wood is using moisture and heat. Here’s how to do it:
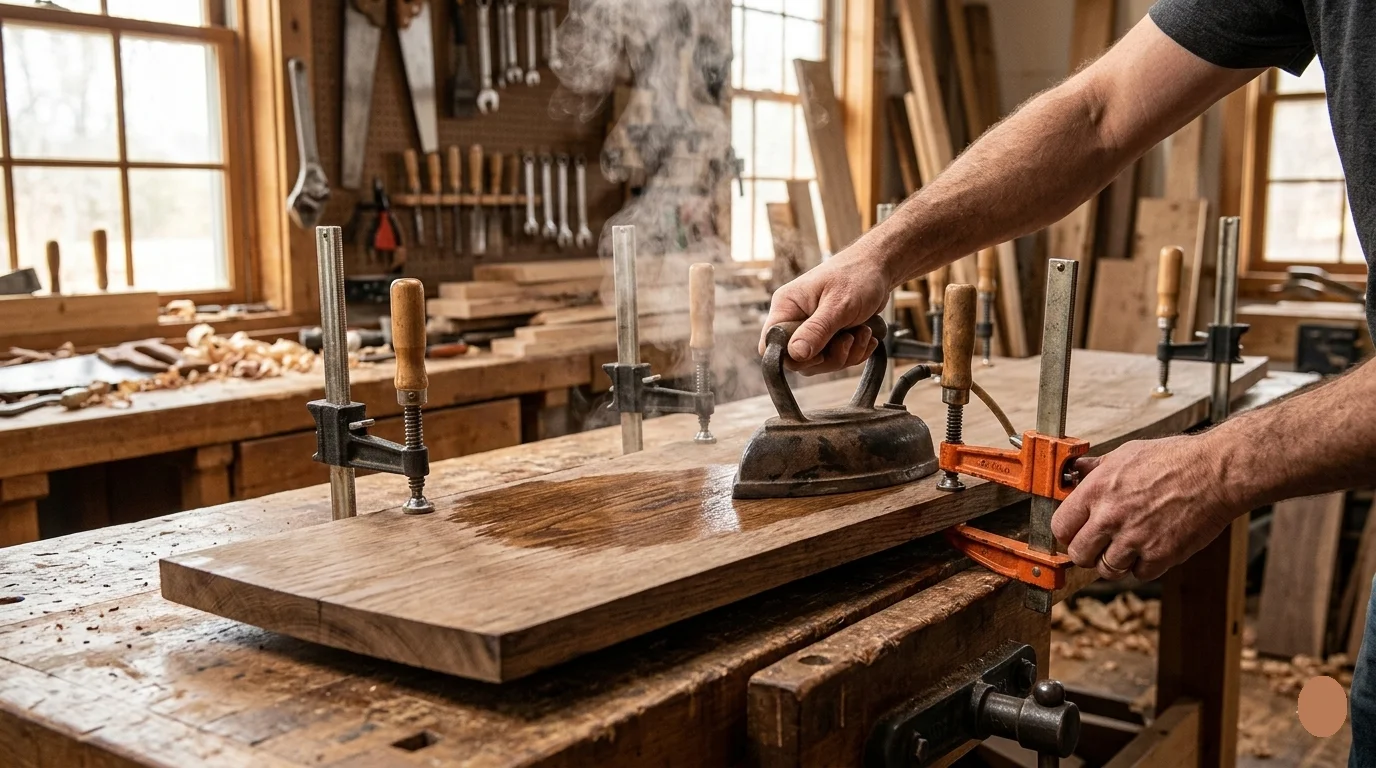
- Shower Method: Place the warped wood in a bathroom or use a steam iron to introduce moisture. The steam helps relax the fibers.
- Weight Technique: After the wood is moist, place a heavy object on it to encourage flattening as it dries.
2. Water and Flat Surface Method
If your warped wood is minor, this method is worth trying:
- Wet the warped area lightly with water.
- Place it on a flat surface and cover it with a damp cloth.
- Apply weight on top of the cloth and leave it for a few days to ensure it dries flat.
3. Clamping
Clamping offers an effective way to correct a warped board without excessive moisture:
- Soak the warped wood in water for a short time. Ensure it’s not overly soaked.
- Place the wood between two flat surfaces.
- Secure it with clamps or weights to hold its position while it dries.
4. The Oven Method
This method works best for smaller pieces of wood:
- Set your oven to a low temperature (around 200°F).
- Wrap the wood in aluminum foil to trap moisture.
- Place the wrapped wood in the oven for 30 minutes. Check regularly.
- Once you remove it, immediately clamp it to a flat surface while it cools.
5. Replacement of Parts
Sometimes, warped wood is beyond repair. If that’s the case, consider replacing the affected part. Here’s what to do:
- Measure the dimensions of the warped section.
- Purchase a similar piece from a hardware store.
- Install the new part carefully, ensuring it fits securely.
Maintaining Your Wood’s Shape
Preventing warping is just as important as knowing How To Fix Warped Wood. Here are some tips:
- Control Humidity: Use a dehumidifier in humid seasons to maintain stable moisture levels.
- Proper Storage: Store wood in a cool, dry place away from direct sunlight.
- Regular Checks: Inspect wooden structures regularly to catch warp early.
Understanding the Causes of Wood Warping
When working with wood, it’s crucial to understand the various factors that can cause it to warp. Wood warping refers to the deformation that occurs when the wood fibers absorb moisture unevenly, leading to twisting, bending, or curving. This common issue can jeopardize the integrity of your projects, whether it’s furniture, flooring, or any wooden structure. Let’s explore the primary causes behind wood warping to help you prevent it in your work.
Moisture Content
The primary cause of wood warping is changes in moisture content. Wood is a hygroscopic material, meaning it absorbs and releases moisture from its environment. When wood that is initially at a certain moisture level is exposed to high humidity, it absorbs water and expands. When it dries out again, particularly in a dry environment, it contracts. This cycle can create stress within the wood, leading to warping. To illustrate the impact of moisture, here’s a simple breakdown:
- High Humidity: Causes wood to swell, leading to bowing or cupping.
- Low Humidity: Causes wood to shrink, leading to cracking or splitting.
Temperature Changes
Temperature fluctuations can also contribute to wood warping. Warm air can carry more moisture than cooler air. Therefore, as the temperature rises, the wood can absorb more moisture and swell, whereas cooler temperatures can lead to drying. Keeping wood in a stable temperature environment is essential for maintaining its shape.
Wood Species
Different species of wood react to moisture changes in various ways. Some types, such as oak, are denser and less prone to warping compared to lighter woods like pine. Understanding the characteristics of the wood species you are working with can help you choose materials wisely and reduce the risk of warpage. Here’s a brief comparison:
| Wood Species | Warping Potential |
|---|---|
| Oak | Low |
| Pine | Moderate |
| Balsa | High |
Improper Storage
Storing wood improperly can also lead to warping. If wood is stacked tightly without proper spacing, it can trap moisture in certain areas, leading to uneven drying. This can result in bowing or twisting over time. To prevent this, always store your wood in a well-ventilated area and avoid direct contact with soil or concrete, which can add moisture.
Defective Cuts
When wood is cut, the grain can sometimes be split or damaged, which may lead to irregular drying and increased chances of warping. Ensure your cuts are clean and follow the grain. Using sharp tools and techniques minimizes damage and helps in maintaining the wood’s overall integrity.
Environmental Conditions
Your environment plays a crucial role in wood’s stability. Living in areas with extreme conditions or frequent climate shifts can make wood more susceptible to warping. For instance, coastal areas with high humidity levels or dry, arid regions can both affect how your wood behaves over time. Take the environmental factors into account when selecting wood and planning your projects.
Preventive Measures
Now that we’ve covered the causes, it’s important to know How To Fix Warped Wood and how to mitigate these risks. Here are some effective strategies:
- Store wood properly with good ventilation.
- Use sealants to protect against moisture.
- Acclimate wood to the environment before use.
- Choose appropriate wood species based on project needs.
Understanding the causes of wood warping equips you with the knowledge to prevent it effectively. By ensuring proper moisture levels, storage methods, and environmental conditions, you can maintain the stability of your wood for better craftsmanship. For further insights on wood preservation and maintenance, visit Wood Magazine or Fine Woodworking.
Essential Tools for Wood Repair Projects
When it comes to wood repair projects, having the right tools is essential for achieving a polished and durable finish. Whether you’re fixing furniture, installing cabinets, or tackling a DIY project at home, there are specific tools that will make your job easier and more efficient. Below, we’ll explore the must-have tools for any wood repair venture.
Hand Tools
Hand tools are fundamental for wood repairs, allowing for precise work without the reliance on electricity. Here are some of the key hand tools you should keep in your toolkit:
- Screwdriver Set: Both flathead and Phillips screwdrivers are essential for removing and tightening screws in wooden structures.
- Claw Hammer: An effective hammer for driving nails into wood or removing them. The claw side helps pull out nails, making this tool versatile.
- Chisels: A set of chisels with various widths is helpful for carving and refining edges, especially when fitting joints.
- Hand Saw: A good, sharp hand saw is necessary for making clean and accurate cuts. Keep a back saw for finer work.
- Measuring Tape: For ensuring accurate measurements, a measuring tape is vital in wood repair projects.
Power Tools
Power tools help expedite the wood repair process, especially with larger or more complicated tasks. Here’s a list of useful power tools:
- Drill/Driver: A cordless drill is invaluable for drilling holes and driving screws quickly and efficiently.
- Sander: A random orbit sander or belt sander is perfect for smoothing out surfaces and preparing wood for finishing.
- Jigsaw: This tool is ideal for making intricate cuts in wood, especially for curved shapes.
- Circular Saw: For straight cuts on larger pieces of wood, a circular saw is a time-saver. It provides clean edges quickly.
- Router: A router can add decorative edges or hollow out areas in the wood, making it a versatile tool for various projects.
Finishing Tools
Once the wood is repaired or shaped, finishing tools come into play to give the wood a polished look:
- Paintbrushes and Rollers: Choose high-quality brushes and rollers for applying wood stains, paint, or sealants smoothly.
- Putty Knife: Great for applying wood filler or putty to hide screws or imperfections on the surface.
- Sandpaper: Keep a selection of sandpaper (various grits) for smoothing surfaces before applying finish.
Safety Gear
Don’t forget about safety! Protect yourself when working on wood repair projects by having the following gear on hand:
- Safety Glasses: Always protect your eyes from sawdust and debris.
- Dust Mask: This will help prevent inhalation of dust, especially when sanding.
- Ear Protection: Use ear plugs or earmuffs when operating loud power tools to protect your hearing.
Additional Tips for Wood Repair
When you are ready to tackle wood repair, be sure to organize your tools. Having a clean workspace enhances efficiency. Before you begin, familiarize yourself with each tool’s operation for safety and effectiveness. Moreover, online resources such as Wood Magazine provide excellent tutorials and videos that can assist you in learning specific techniques.
Where to Find Tools
Finding the right tools for your wood repair projects has never been easier. Popular home improvement stores such as Home Depot and Lowe’s offer a wide variety of hand tools and power tools suitable for any level of woodworking.
Preventive Measures to Avoid Wood Warping
Wood warping is a common issue affecting various wooden structures, from furniture to flooring. Warping occurs due to changes in moisture levels or temperature, which can stress the wood fibers. Fortunately, there are several preventive measures you can take to minimize the risk of warping and extend the life of your wooden items.
Choose Quality Wood
The first step in preventing warping is selecting high-quality wood. Look for lumber that has been properly kiln-dried. This process reduces moisture content and makes the wood more stable. When buying furniture or wooden items, inquire about the material and its drying methods to ensure you are investing in durable products.
Store Wood Correctly
Proper storage of wood is crucial to avoid warping. Here are some guidelines to follow:
- Keep it Dry: Store wood in a climate-controlled environment to maintain consistent humidity levels.
- Avoid Direct Sunlight: Store wood away from direct sunlight to prevent uneven drying and temperature changes.
- Use Proper Support: When stacking, use stickers to separate the boards and allow air circulation.
Maintain Humidity Levels
A consistent humidity level in your home or workspace can help protect your wooden furniture and structures. Use a hygrometer to monitor humidity levels. Here’s how to manage it:
- If humidity is too high, consider using a dehumidifier.
- If humidity is low, consider a humidifier to add moisture back into the air.
Seal and Finish the Wood
Applying sealants or finishes can effectively protect wood from moisture. Consider these options:
- Varnish: Creates a hard shell that repels water.
- Wood Oils: Penetrates the wood and offers moisture resistance.
- Paint: Provides a protective layer to block moisture absorption.
Regular Maintenance
Routine maintenance can significantly reduce the risk of warping. Follow these tips to keep your wood in top condition:
- Inspect Regularly: Check for signs of moisture damage or warping and address issues immediately.
- Clean Properly: Use appropriate cleaning agents that are moisture-free to avoid swelling wood.
- Refinish as Needed: Apply new coats of finish periodically to maintain protective barriers.
Control Temperature Fluctuations
Extreme temperature changes can cause wood to expand and contract, leading to warping. Use these strategies to manage temperatures effectively:
- Avoid Heaters and Air Conditioners: Keep wooden items away from direct heat sources or cold drafts.
- Insulate Your Space: Proper insulation can help maintain a stable temperature.
What to Do if Warping Occurs
If you notice warping despite your best efforts, there are ways to correct it. Here are some suggested methods on How To Fix Warped Wood:
- Moisture Method: Lightly dampen the warped area with water and place a weight on it, allowing it to dry flat.
- Heat Method: Apply gentle heat using a heat gun to the warped area, then press it flat.
- Replacement: In severe cases, consider replacing the warped pieces to maintain the integrity of your wooden item.
By taking these preventive measures, you can effectively mitigate the risks associated with wood warping. Regular maintenance, optimal storage, and the right choice of materials are key to preserving the beauty and functionality of your wood products. For more insights on woodworking and proper maintenance practices, visit Wood Magazine and Woodworker’s Journal. Remember, a small investment in care today can save you from major repairs tomorrow.
Comparing DIY Fixes vs. Professional Solutions for Warped Wood
When it comes to fixing warped wood, homeowners often find themselves weighing the pros and cons of DIY methods versus hiring professionals. Understanding the differences can help you choose the best approach for your situation.
Understanding Warped Wood
Warped wood occurs when moisture levels are imbalanced, causing the wood to expand or contract unevenly. This can happen due to extreme temperature changes, humidity, or insufficient storage conditions. The good news is that both DIY fixes and professional solutions exist to address this issue.
DIY Fixes for Warped Wood
If you’re considering tackling this problem on your own, here are some effective DIY methods on How To Fix Warped Wood:
- Moisture Method: Lightly mist the warped area with water and place a weight on top. As the wood absorbs moisture, it may revert back to its original shape.
- Ironing Technique: Dampen a cloth and place it over the warped area. Then, run an iron over the cloth on a low setting. The heat and moisture can help realign the wood fibers.
- Clamping Method: Use clamps to hold the wood piece flat against a workbench. This can help reshape it, especially when combined with moisture techniques.
- Heat Application: When safe, apply gentle heat to the warped area using a heat gun to soften the wood and encourage it to straighten out.
Professional Solutions for Warped Wood
While DIY methods can be effective, sometimes professional help is the best route. Professional services can offer:
- Expert Assessment: Professionals can accurately assess the extent of the warping and provide targeted solutions.
- Advanced Techniques: They use specialized tools and methods, such as humidity control chambers, which might not be available for personal use.
- Quality Repairs: Professionals can guarantee high-quality, lasting repairs, especially for valuable or antique wooden pieces.
- Time Efficiency: Hiring a professional can save you time, allowing you to focus on other tasks.
Cost Considerations
Cost is often a deciding factor between choosing DIY or a professional service. Here’s a quick overview:
| Repair Type | Estimated Cost |
|---|---|
| DIY Fixes | $0 – $50 |
| Professional Repair | $100 – $300 |
While DIY repairs may be cheaper, consider how much your time is worth. If you lack experience, the DIY route could lead to further damage, costing more in the long run.
Which Option is Right for You?
Choosing between DIY fixes and professional solutions for warped wood depends on several factors:
- Your Skill Level: If you’re handy and have tools at your disposal, you might feel comfortable trying a DIY approach. However, if you lack experience, hiring a professional may save you stress and hassle.
- Valuable Items: For antique or expensive pieces, professional help is likely worth the investment to preserve the item’s value.
- Time Constraints: If time is of the essence, a professional can complete the job more efficiently than you might on your own.
Final Thoughts
Fixing warped wood can be approached as a DIY project or a professional service, depending on individual circumstances. Consider the severity of the warping and your own capabilities. If you need expert assistance, resources such as Wood Magazine offer a wealth of information, including How To Fix Warped Wood, how to prevent further warping and maintain your wood items. Understanding your options will help you make an informed decision that suits your needs.
Conclusion
Fixing warped wood can be a manageable task, provided you understand the methods available and the causes that lead to warping. From utilizing moisture to reshape wood to employing pressure techniques, various effective methods exist for restoring your wooden items to their original state. Recognizing factors like humidity, temperature changes, and improper storage can also help you prevent future warping.
Equipping yourself with essential tools would greatly enhance your ability to handle wood repair projects. Simple items like clamps, moisture meters, and wood glue are often key to executing both DIY fixes and more extensive professional solutions. When considering How To Fix Warped Wood, you must weigh the benefits of DIY approaches against the experience and skill of professionals. DIY solutions can save money and provide satisfaction, but sometimes, hiring an expert ensures a higher-quality restoration, especially for complex issues.
To further protect your wooden items, implementing preventive measures is crucial. Using proper finishing techniques and ensuring stable environmental conditions can significantly reduce the risk of future warping. By addressing the root causes and adopting these strategies, you can extend the life of your wooden furniture and projects.
Whether you choose to tackle the problem yourself or enlist the help of professionals, understanding How To Fix Warped Wood will empower you to maintain the beauty and integrity of your woodwork. With the right approach and tools, your wooden pieces can be restored and protected for years to come.