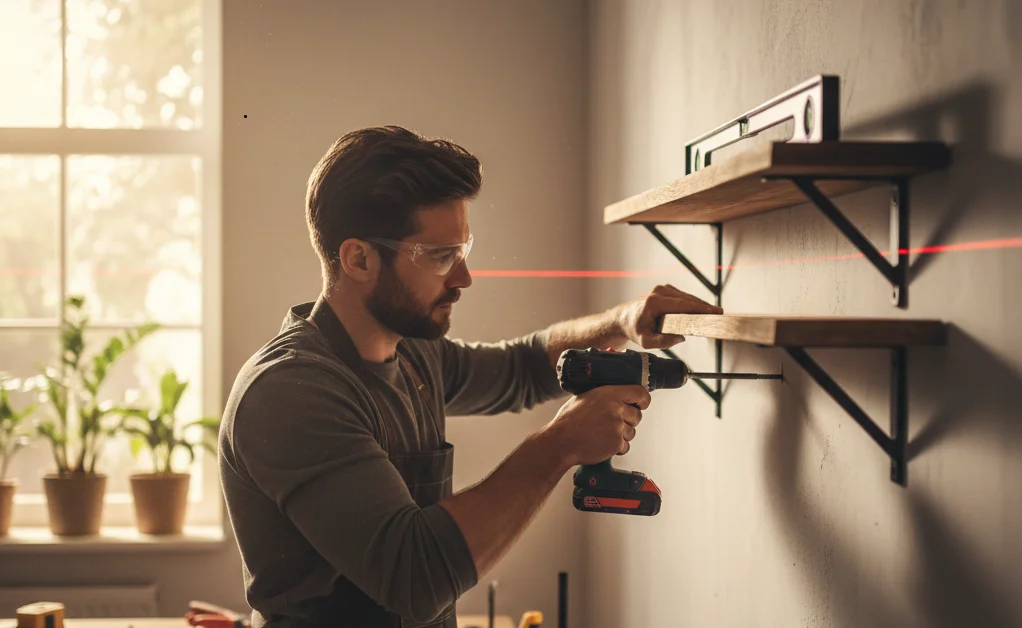
Installing wooden shelves can elevate the style and functionality of any room in your home. With a few tools and supplies, you can create a stunning display for your favorite items. Here’s a straightforward guide to help you successfully install wooden shelves in your space.
Gather Your Tools and Materials
Before you begin, make sure you have all the necessary tools and materials. Here’s what you’ll need:
- Wooden shelves
- Brackets (shelf supports)
- Drill and drill bits
- Screwdriver
- Screws
- Level
- Tape measure
- Pencil
- Sandpaper (if needed)
- Wood finish or paint (if desired)
Choose the Right Location
Deciding where to install your wooden shelves is crucial. Think about what you plan to store on the shelves and choose a location that fits your needs. Here are some tips:
- Ensure the wall can support the weight of the items.
- Avoid placing shelves in areas with heavy foot traffic.
- Consider natural light and accessibility.
Measure and Mark the Wall
Once you have chosen your location, use a tape measure to figure out how high you want your shelves. Mark the desired height lightly on the wall with a pencil. Then, use a level to draw a straight line where the shelf will be. This line is crucial to ensure your shelves are even.
Locate Wall Studs
Wooden shelves should be anchored into wall studs for maximum support. Use a stud finder to locate the studs in your wall.
- Studs are typically 16 to 24 inches apart.
- Mark these spots on your wall with pencil.
Install Brackets for Your Shelves
With your markings in place, it’s time to install the brackets. Follow these steps:
- Align the brackets with your marked line and the studs.
- Using a drill, screw the brackets into place, ensuring they are level.
Prepare the Shelves
Before placing the shelves, you may want to treat the wood. Sand the edges for a smooth finish, and apply paint or wood finish as desired. Allow the finish to dry completely before proceeding.
Place Your Shelves
Now it’s time to set your shelves onto the installed brackets. Carefully lift each shelf and place it securely on the brackets, ensuring each one is level. If the brackets have support screws, secure them to the underside of the shelves for added stability.
Decorate and Organize
Your wooden shelves are now ready for decoration! Arrange your items like books, plants, or collectibles to personalize your space. Consider weight distribution when placing heavier items to maintain balance and prevent tipping.
Maintenance Tips
To ensure your wooden shelves remain in excellent condition:
- Regularly dust the shelves to keep them clean.
- Avoid placing overly heavy items that could cause damage.
- Inspect brackets and screws periodically to ensure they are secure.
Ready to tackle this project? For more guidance and inspiration, check out resources like Home Depot and Lowe’s. Happy shelving!
Tools and Materials Needed for Installing Wooden Shelves
Installing wooden shelves can enhance any room, providing both beauty and utility. To achieve a successful installation, it’s important to gather the right tools and materials. Below is a detailed overview to help you prepare for your shelving project.
Essential Tools for Installing Wooden Shelves
With the proper tools, the installation becomes efficient and straightforward. Here are the key tools you will need:
- Drill: A power drill is essential for creating holes in the wall and for securing brackets or shelf supports.
- Level: This tool ensures that your shelves are perfectly horizontal, preventing any tilting or sliding of items.
- Tape Measure: Accurate measurements are crucial. A tape measure will help you determine where to place your shelves correctly.
- Screwdriver: Depending on your shelf installation hardware, a screwdriver will be necessary for tightening screws.
- Stud Finder: This tool helps locate wall studs, ensuring your shelves are anchored firmly.
- Chalk Line: If you need to mark a straight line on the wall for multiple shelves, a chalk line will provide a clear guideline.
- Safety Gear: Always wear safety glasses and gloves while working to protect yourself during the installation process.
Materials Needed for Shelving
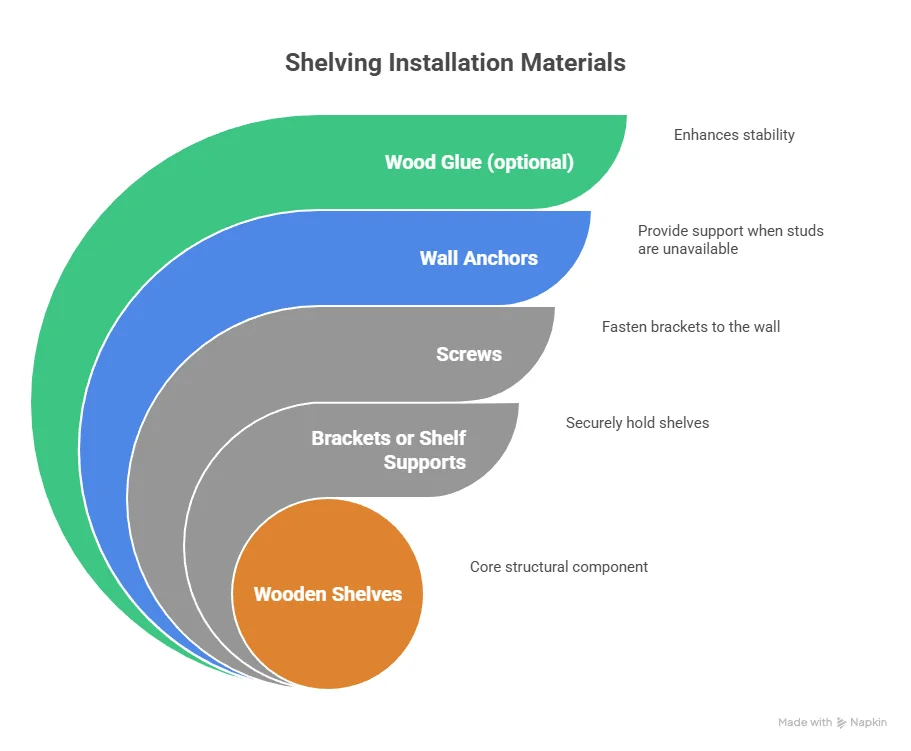
Once you have the tools ready, it’s time to gather the materials. Below is a list of materials you will likely need for the installation:
- Wooden Shelves: Choose shelves made from durable hardwoods or plywood that can bear the weight of your items.
- Brackets or Shelf Supports: These will securely hold your shelves in place. Choose based on the size and weight capacity you require.
- Screws: Choose screws that are compatible with your brackets and suitable for the wall type. For drywall, use drywall screws; for studs, use wood screws.
- Wall Anchors: If you can’t mount directly into a stud, wall anchors provide extra support for the screws.
- Wood Glue (optional): For added stability, consider using wood glue where applicable, especially for corner brackets.
Choosing the Right Shelves and Brackets
Selecting the right shelves and brackets is crucial for an effective installation. Consider the following:
- Weight Capacity: Ensure that the shelves and brackets can support the items you plan to place on them. Check the manufacturer’s specifications for load limits.
- Style: Choose materials and designs that complement your home decor. Whether you prefer rustic wood or sleek metal, the options are vast.
- Size: Measure the available space carefully to determine the best size for your shelves.
Additional Accessories
| Accessory | Purpose |
|---|---|
| Brackets with Hooks | For hanging additional items like tools or kitchen utensils. |
| End Caps | To prevent items from sliding off the ends of the shelves. |
| Decorative Supports | To add aesthetic appeal while providing support. |
By ensuring you have all the essential tools and materials, you can simplify the installation process of your wooden shelves. For more information and detailed guidance, visit Wood Magazine for expert tips. Once you’ve gathered everything ready, you can embark on your shelving project with confidence! Whether you’re creating storage in a closet, showcasing books in a living room, or enhancing your kitchen, well-installed wooden shelves can make a significant difference in your space. For additional support and resources on woodworking and installation techniques, check out Ana-White.com.
Creative Ideas for Decorating With Wooden Shelves

Wooden shelves are a versatile and stylish addition to any home. They not only serve a practical purpose but also allow for creative expression. Here are some inspiring ideas for decorating with wooden shelves to enhance your living space.
1. Create a Gallery Wall
Using wooden shelves, you can build a captivating gallery wall. Arrange different sized shelves at varying heights and styles. Display framed photos, artwork, and decorative items. This adds personality to your space and can be easily changed as your style evolves. Consider adding lights above or below the shelves to highlight your displays.
2. Use Floating Shelves for a Minimalist Look
Floating wooden shelves are perfect for a clean, minimalist aesthetic. They give the illusion of more space while also showcasing your favorite decor. Go for a monochromatic color scheme using neutral tones to maintain simplicity. Display small plants, books, or unique decorative pieces to add character without cluttering the visual space.
3. Incorporate Plants and Greenery
Integrating plants with your wooden shelves can bring life to your decor. Here’s how to do it:
- Use small potted plants or succulents on the shelves for an organic touch.
- Hang trailing plants from the edge of the shelf for a dramatic effect.
- Combine different types of plants for visual interest.
Plants not only beautify the space but also purify the air, making your home feel fresher.
4. Craft a Cozy Reading Nook
Transform a corner of your room into a cozy reading nook with the help of wooden shelves. Install a shelf near your seating area to hold your favorite books, reading lights, and comfy cushions. Consider adding a small throw for extra comfort. This not only gives a personal touch but also creates a dedicated space for relaxation and enjoyment.
5. Display Collections
If you have collections—be it vintage cameras, art, or other memorabilia—wooden shelves provide the perfect platform. Group similar items together on a single shelf, and ensure they’re spaced nicely to avoid clutter. This way, your favorite collectibles will become a focal point while telling a story about your interests.
6. Mix Materials for Contrast
While wooden shelves are beautiful on their own, mixing them with other materials can enhance their appeal. Try pairing wooden shelves with metal brackets or incorporating glass accents. This combination adds depth and interest to your decor.
7. Use Open Shelving in the Kitchen
Open shelving is a trend that works wonderfully in the kitchen. Install wooden shelves to display your dishes, cups, and cookbooks. This not only makes items easily accessible but also contributes to an inviting ambiance. Pair your shelves with decorative items like spices or a fruit basket for an added touch.
8. Adapt Shelving to Room Themes
Customize your wooden shelves to match the theme of your room. For a rustic look, opt for reclaimed wood. For a modern feel, sleek, polished wooden shelves may be more fitting. Match your decor elements to ensure a cohesive aesthetic throughout your home.
9. Incorporate Lighting
The right lighting can transform your wooden shelves into a stunning focal point. Here are some options:
- LED strip lights under the shelves for a soft glow.
- Small table lamps placed on the shelves for ambiance.
- Spotlights directed at the shelves to highlight decor.
These lighting options enhance visibility and create a warm atmosphere.
10. Personalize with Typography
Consider introducing personalized elements such as letters or quotes on your shelves. Using wooden letters or framed quotes can reflect your personality. This will make the space truly yours and can also serve as great conversation starters. Wooden shelves are not just for storage—they’re a canvas for creativity in your home. Explore unique combinations and ideas to elevate your living space. For more inspiration and tips on decorating with wooden shelves, visit The Spruce and House Beautiful.
Common Mistakes to Avoid When Installing Wooden Shelves
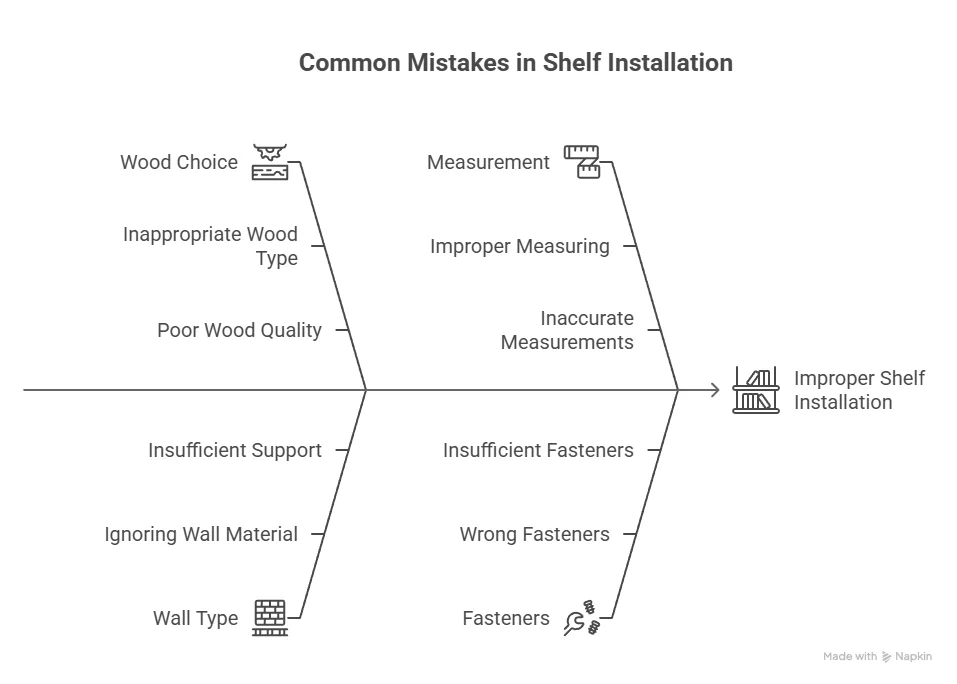
Installing wooden shelves can enhance the aesthetics and functionality of any room. However, there are common mistakes that many people make when attempting this DIY project. By avoiding these pitfalls, you can ensure a successful and secure installation. Here are key mistakes to steer clear of when installing wooden shelves.
Choosing the Wrong Type of Wood
Not all wood is created equal. Selecting the wrong type of wood can lead to structural failure or warping. Many people opt for softwoods like pine, which may not hold up under heavy loads. Instead, consider hardwoods such as oak or maple for durability. Research the different types of wood and their weight-bearing capacities whenever you plan on heavy shelving.
Ignoring the Wall Type
Your walls may be drywall, plaster, or concrete, and each material requires a different type of anchor. Using the wrong anchors can lead to shelves falling. For example:
- Drywall: Use toggle bolts or drywall anchors.
- Plaster: Expansion anchors work best.
- Concrete: Use masonry screws or expansion anchors.
Always assess the wall you’re working with before starting the installation process. The right anchors will provide the stability you need.
Improper Measuring
Accurate measurements are crucial when installing wooden shelves. Failing to measure correctly can lead to uneven shelves or incorrect spacing. Here’s how to avoid measurement mistakes:
- Use a level to mark where your shelves will go.
- Double-check your measurements before making any cuts.
- Measure twice, cut once.
Taking the time to measure accurately can save you from making costly errors later on.
Skipping Studs
One major mistake when installing shelves is bypassing wall studs. Anchoring shelves directly into drywall without securing them to studs often results in instability. To avoid this:
- Use a stud finder to locate studs.
- Mark the locations clearly.
- Ensure your brackets are screwed into these studs for maximum support.
This step is vital, especially for shelves that will hold heavy items.
Neglecting Leveling
For shelves to look and function well, they must be level. Failing to ensure your shelves are straight can lead to an unappealing appearance and uneven weight distribution. Here’s how to guarantee leveling:
- Use a carpenter’s level before securing the shelves.
- Make adjustments as necessary and re-check.
Taking these steps will help avoid future headaches and ensure your shelves serve their purpose effectively.
Using the Wrong Fasteners
The type of screws and fasteners you use can make a significant difference in the stability of your shelves. Using screws that are too short or too thin can result in weak mounts. Here’s what to consider when choosing fasteners:
- Use screws that are at least 2 inches long for heavy shelves.
- Choose screws designed for the weight capacity you anticipate.
Investing in the right fasteners will improve both safety and longevity.
Overloading Shelves
Even after proper installation, overloading your shelves can lead to disaster. Always check the weight capacity of the shelves and distribute weight evenly. Here’s how to manage weight:
- Place heavier items on lower shelves.
- Mix heavier and lighter items for balance.
Knowing the limits of your shelves will help maintain their integrity over time. By being mindful of these common mistakes, you can enjoy the beauty and utility of your wooden shelves without the stress of potential failures. For more detailed guidance on installations, you can visit Family Handyman or check out Houzz for expert tips. When embarking on a shelf installation project, taking the time to prepare and consider these points will lead to a successful outcome. Happy building!
Maintenance Tips for Long-Lasting Wooden Shelves
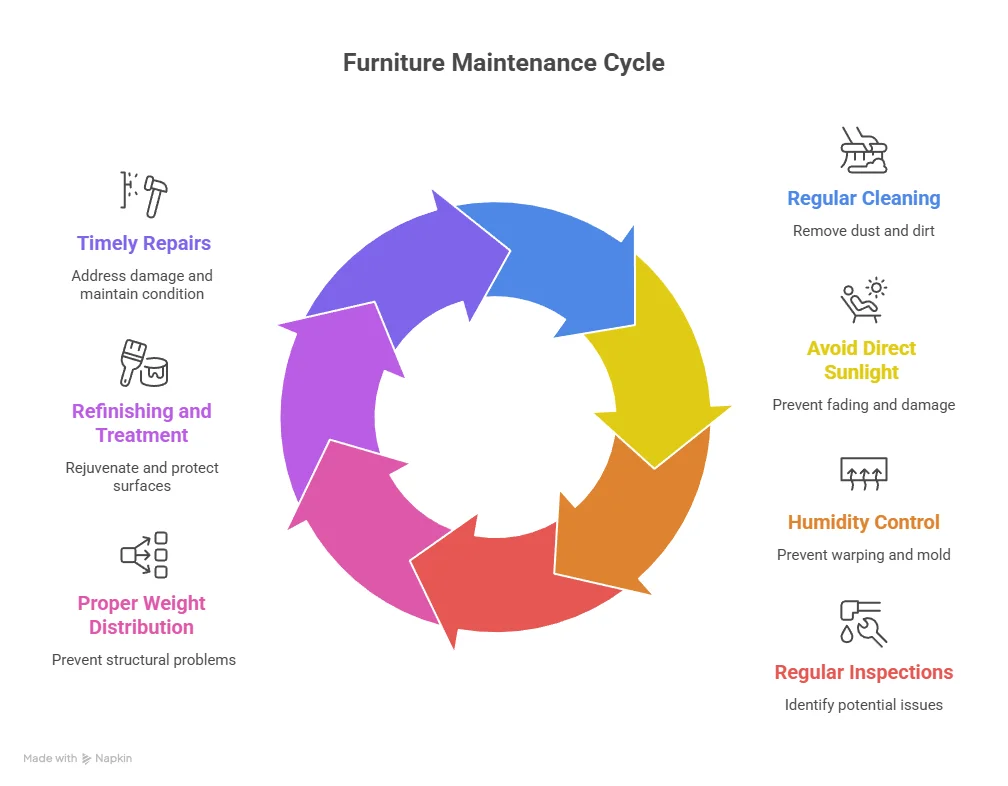
Wooden shelves can beautifully enhance any space, providing both functionality and style. However, to ensure they stand the test of time, regular maintenance is essential. Below are several practical tips that will help you keep your wooden shelves looking great and lasting longer.
Regular Cleaning
Dust is an enemy of wooden surfaces. It can scratch the finish and dull the wood over time. To keep your shelves clean:
- Use a soft, dry cloth to wipe down your shelves regularly.
- For a deeper clean, slightly dampen the cloth with water or a mixture of water and vinegar. Avoid soaking the wood.
- Always dry the shelves immediately after cleaning to prevent moisture damage.
Avoid Direct Sunlight
Direct sunlight can cause wood to fade and become discolored. To prevent this:
- Position your shelves away from direct sunlight when possible.
- If your shelves must be exposed to sunlight, consider using curtains or blinds to filter the light.
- For added protection, a UV-blocking film on windows can help maintain the wood’s natural color.
Humidity Control
Wood is porous and can absorb moisture from the air. This can lead to warping or splitting. To maintain ideal humidity levels, follow these guidelines:
- Keep indoor humidity between 30% and 50%.
- Use a dehumidifier in damp areas, especially basements, to reduce excess moisture.
- In dry seasons, a humidifier can add necessary moisture back into the air.
Regular Inspections
Regularly inspecting your shelves for signs of wear or damage can help catch issues early. Look for:
- Cracks or splits in the wood.
- Loose brackets or supports.
- Signs of insect damage or mold growth.
If you notice any problems, address them immediately to prevent further damage.
Proper Weight Distribution
Overloading your shelves with heavy items can lead to sagging or breakage. To avoid this:
- Distribute weight evenly across the shelf.
- Place heavier items on lower shelves to minimize strain.
- Consider reinforcing shelves that hold heavier items with additional supports.
Refinishing and Treatment
Over time, even the best-kept wooden shelves may need some polishing or refinishing. Here’s how to keep them looking new:
- Apply a wood polish or wax every few months to maintain shine and protection.
- If your shelves are showing significant wear, consider sanding them lightly and applying wood stain or a sealant to refresh their appearance.
Repairs
If you encounter any issues that require repairs, action should be taken as soon as possible. Common repairs include:
- Filling in cracks with wood filler.
- Repainting or restaining shelves that have noticeable scratches or stains.
- Reinforcing shelves with sturdier brackets or supports if they appear unstable.
For detailed information on the best products to use for maintenance, you can visit sites like Wood Magazine for insights on wood care. Another great resource is Houzz, which offers advice on home improvement and woodworking techniques. By following these maintenance tips, you can ensure that your wooden shelves remain an elegant and useful part of your home for years to come. Regular care and attention will keep them not only functional but also aesthetically pleasing.
Conclusion
Installing wooden shelves can not only enhance your space but also add a personal touch to your décor. By following a clear, step-by-step guide, you can efficiently install shelves that are both stylish and functional. Remember to gather the right tools and materials before starting the project; having everything at hand will streamline the process.
As you decorate with your newly installed shelves, let your creativity flow. From displaying books and plants to showcasing personal treasures, wooden shelves can serve various purposes and be a focal point in your room. However, be mindful of common mistakes, such as incorrect measurements or inadequate support. Avoiding these pitfalls will ensure your shelves are secure and visually pleasing.
Maintenance is key to ensuring your wooden shelves remain in top shape. Regularly check for signs of wear and dust them to keep them looking fresh. Following these simple tips will help your shelves endure over time.
By embracing these strategies, you not only create a beautiful and functional space but also take pride in your handiwork. So, roll up your sleeves and start your shelving project today! With the right planning, creativity, and care, you will enjoy the benefits of your wooden shelves for years to come.