
Finishing is more than a final step—it’s what brings your wooden projects to life. With the right woodworking finishing techniques, you protect your hard work, highlight the natural charm of the wood, and ensure your pieces last for years. For beginners, exploring this essential craft can feel overwhelming. With some basic knowledge and a few simple strategies, anyone can master the foundations and enjoy professional-looking results.
Preparation: The Secret to a Great Finish
Before applying any stain or topcoat, proper preparation is key. Take time to sand your wood well. Start with a coarse grit like 80 or 100, moving gradually toward finer grits, such as 180 or 220. Sand along the grain to avoid scratches. Remove dust with a tack cloth or a damp rag. Clean surfaces help stains and finishes stick better, creating a smoother appearance.
- Use a sanding block for flat surfaces to keep things even.
- Get into detailed corners with flexible sanding sponges.
- Always wipe away all dust before you finish.
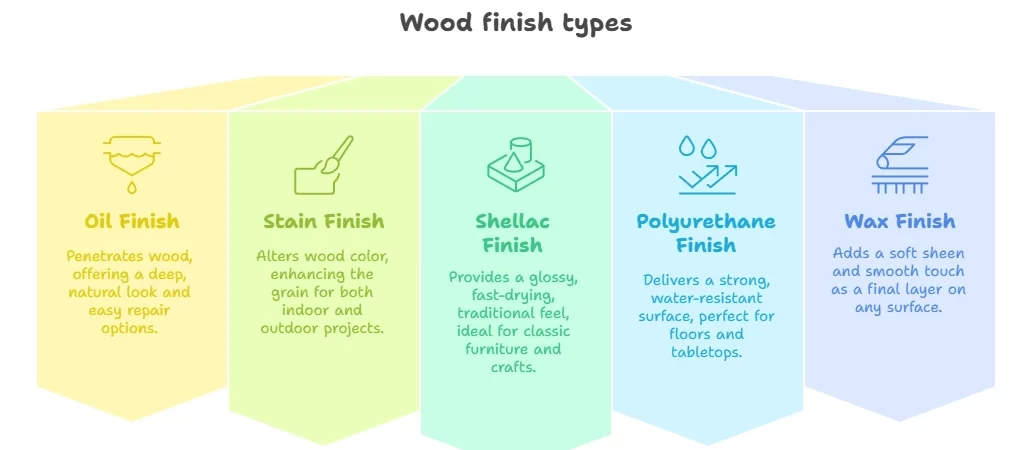
Choosing the Right Wood Finish
There are several common woodworking finishing techniques. Each has its own look, feel, and level of protection. Knowing when and how to use each can make your furniture or decor stand out.
| Type of Finish | Best For | Main Benefit |
|---|---|---|
| Oil (e.g., Danish, Linseed, Tung) | Indoor furniture, cutting boards | Deep natural look, easy repairs |
| Stain | Outdoor or indoor projects | Changes color, highlights grain |
| Shellac | Classic furniture, crafts | Glossy, fast-drying, traditional feel |
| Polyurethane | Floors, tabletops | Strong, water-resistant finish |
| Wax | Final touch on any surface | Soft sheen, smooth to the touch |
Simple Steps for Applying Finish
Using Oils
- Apply a thin coat with a clean cloth or brush.
- Let it soak in for 10–15 minutes.
- Wipe off extra oil with a dry rag.
- Let it dry overnight, and repeat for richer color.
Staining Wood
- Brush or wipe on the stain evenly.
- Let it sit for a few minutes to deepen color.
- Wipe off the extra with a clean cloth in the grain’s direction.
- Allow to dry, then seal with a clear coat.
Applying Polyurethane
- Stir the finish gently to avoid bubbles.
- Use a soft brush or foam pad for a thin layer.
- Wait for it to dry—check the label for timing.
- Lightly sand using fine grit (320 or 400) between coats.
- Apply a second or third coat for stronger protection.
Tips for Beginners to Get Great Results
- Test your finish on a scrap piece to preview the result.
- Work in a dust-free, well-ventilated area for clean, safe projects.
- Practice patience between coats—rushing can lead to streaks or smudges.
- Read product labels for drying times and safety advice.
- Wear gloves and a mask to keep yourself protected.
Blending Art and Skill
Learning woodworking finishing techniques is an art that gets better with practice. Each wood type absorbs finishes in its own way. Pine can blotch, so a pre-stain conditioner helps. Oaks and maples often shine with staining. No matter what you’re working on, take your time to explore different products and application methods. You’ll soon discover which techniques give your projects their best look and feel.
By mastering these essential skills, you’ll ensure your creations not only turn heads but also last for generations. Every stain, oil, or topcoat tells a story—one you control with every brushstroke and every careful step.
Choosing the Right Finish for Your Wood Project
Understanding Different Woodworking Finishing Techniques
Picking the correct finish for your wood project can change both its look and how well it stands up to daily use. There are a range of woodworking finishing techniques, and each one offers special features. Some finishes will make a project shine, while others focus on lasting protection. Knowing a bit about each option helps you to choose wisely and achieve the effect you want.
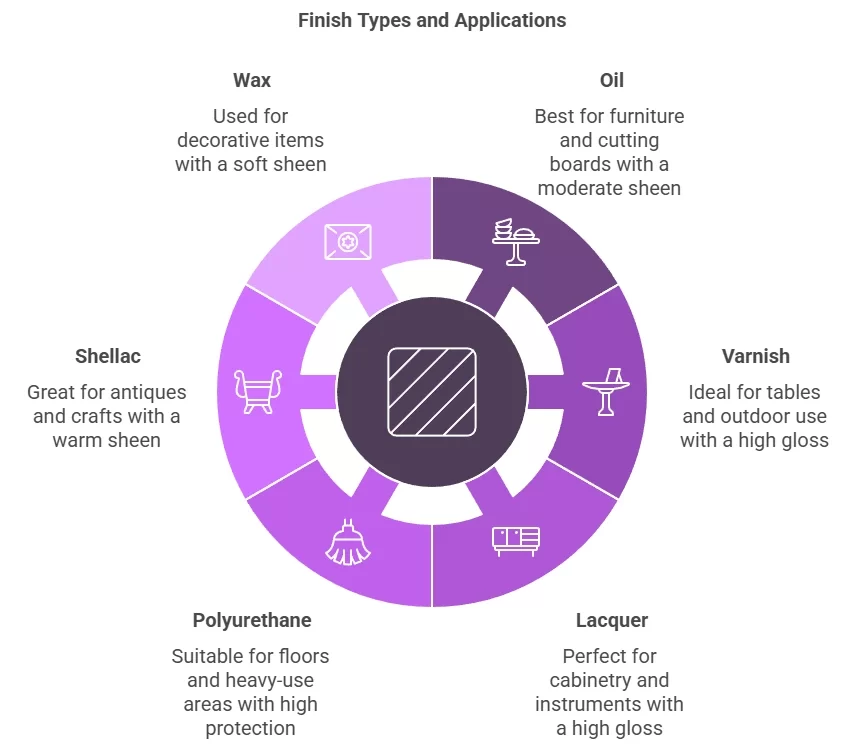
Popular Types of Wood Finishes
To make your project stand out, it pays to learn about the finishing techniques that are available. Some common finishes include:
- Oil Finishes: These soak into wood, enhancing its color and grain. Examples are linseed and tung oil. Oil finishes are easy to apply, repair, and maintain.
- Varnish: Varnish provides a hard, protective layer. It works well on surfaces you touch often, like tables and chairs. Many varnishes offer UV protection, making them great for outdoor furniture.
- Lacquer: Lacquer dries quickly and provides a glossy, smooth surface. It is often sprayed for an even coat and is popular on cabinets and musical instruments.
- Polyurethane: This finish is tough against scratches, water, and heat. It makes floors and kitchen counters last longer. Polyurethane comes in water-based and oil-based versions, so you can pick what suits your project best.
- Shellac: Shellac is a natural finish that gives wood a warm, rich tone. It works well for restoring antiques, though it is not as tough as varnish or polyurethane.
- Wax: Wax creates a soft sheen and is best for low-contact items. It works well as a last polish on top of other finishes, adding shine and a silky feel.
Factors to Consider
Before diving in, you should think about your project’s use, the type of wood, and the look you want. Here are a few things to keep in mind:
- Durability: Will your project face spills, scratches, or sunlight?
- Sheen: Do you want a high-gloss shine, a soft satin, or a matte finish?
- Application Method: Would you rather brush, wipe, or spray?
- Repair and Maintenance: Is it important for you to be able to fix scratches or touch up spots easily?
- Dry Time: How long can you wait? Some finishes dry in minutes; others take hours or days.
Comparing Common Finishes
| Type of Finish | Best For | Main Benefit |
|---|---|---|
| Oil (e.g., Danish, Linseed, Tung) | Indoor furniture, cutting boards | Deep natural look, easy repairs |
| Stain | Outdoor or indoor projects | Changes color, highlights grain |
| Shellac | Classic furniture, crafts | Glossy, fast-drying, traditional feel |
| Polyurethane | Floors, tabletops | Strong, water-resistant finish |
| Wax | Final touch on any surface | Soft sheen, smooth to the touch |
Matching Finishes to Wood Types
Some finishes enhance the beauty of certain woods. Oil finishes can make deep grains in woods like walnut or cherry stand out. Clear polyurethane lets the natural color of maple shine through, while dark stains can add warmth to light woods like oak or pine. Testing your selected finish on a scrap piece of wood gives you a preview of how your project will look.
Step-By-Step Tips for Perfect Application
- Sand the wood smooth. Fine grit sandpaper helps prevent rough spots.
- Clean off all dust before adding a finish. A tack cloth is very helpful for this.
- Apply finish in thin, even coats for the best results. Let each coat dry fully before sanding lightly and adding another layer if required.
- Work in a well-ventilated space, especially if you are using finishes with strong fumes.
- Allow plenty of time for the finish to cure before using your project.
Final Thoughts on Woodworking Finishing Techniques
The right woodworking finishing techniques can make your project durable and beautiful. Whether you want a tough coating or a natural look, you can find a finish that matches your style and protects your work. With a bit of practice and the right method, you can always get a finish that feels just right for you.
Step-by-Step Guide to Applying Stains and Sealers
Preparing Your Wood Surface
Success in woodworking finishing techniques starts with careful wood prep. Before you start, check your wood for any rough patches or uneven spots. Sanding is key. Begin with a medium-grit sandpaper, like 120 grit, to smooth the surface. Next, switch to a finer grit, such as 220, for that silky feel. Make sure you always sand with the grain to avoid scratches. After sanding, wipe the entire area with a damp cloth or tack cloth to remove dust. Clean surfaces help stains and sealers soak in consistently.
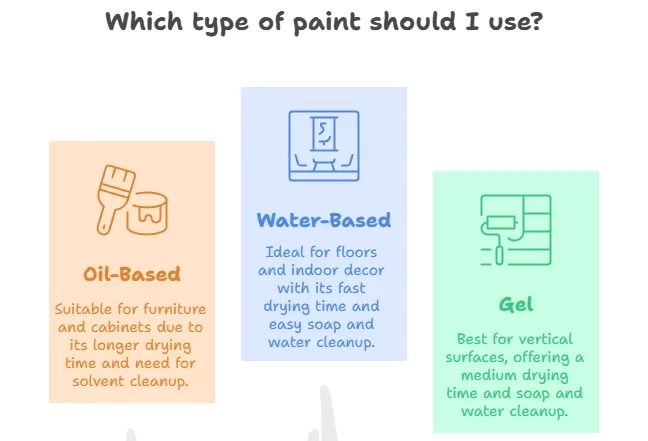
Choosing the Right Stain
Not all stains are the same. Oil-based stains tend to deepen wood color and offer more working time. Water-based stains dry faster and are great for indoor projects. Gel stains are thicker and help you control color even on tricky woods like pine. Here’s a quick guide to help you decide:
| Type | Drying Time | Best Use | Cleanup |
|---|---|---|---|
| Oil-Based | Longer | Furniture, Cabinets | Solvents (mineral spirits) |
| Water-Based | Fast | Floors, Indoor Decor | Soap and Water |
| Gel | Medium | Vertical Surfaces | Soap and Water |
Applying the Stain
- Stir Your Stain: Open your stain and stir well. Make sure the pigments are mixed evenly, as they can settle at the bottom.
- Test on Scrap: Always test your stain on a hidden or scrap piece of wood. This avoids surprises in color or appearance.
- Apply Evenly: Use a lint-free cloth, foam brush, or staining pad. Work in the direction of the wood grain. Apply a generous but even coat.
- Wait and Wipe: Let the stain soak for three to five minutes. The longer you leave it, the richer the color. Wipe off any extra with a clean cloth.
- Dry Completely: Give the stain enough time to dry. This can take from a couple of hours to overnight, depending on type and weather.
Choosing and Using a Sealer
A sealer locks in your stain and protects the wood. Your choice depends on where your project will live and how much wear it will get. Polyurethane is strong and handles spills well, making it perfect for tables and cabinetry. Lacquer dries fast and brings a glossy shine, while shellac gives a classic warm finish. For easy cleaning, water-based polyurethanes work best. Oil-based finishes last longest but need more drying time.
Steps for Applying a Sealer
- Read the Instructions: Each product may have special steps. Make sure you check the label for drying times and best practices.
- Prepare the Sealer: Stir (don’t shake) the sealer to avoid bubbles.
- Apply the First Coat: Use a high-quality brush or foam applicator. Lay down a thin, even coat with long strokes, following the wood grain.
- Let It Dry: Give your project enough time to dry. Most sealers need several hours.
- Sand Lightly: For a smooth finish, gently sand the first coat with 320-grit sandpaper once it’s dry. Wipe off dust before the next coat.
- Add Second (or Third) Coat: Build up your protection by repeating the process. Most projects benefit from two or three coats. The more coats, the more durable your finish.
Expert Tips for Beautiful Results
- Always work in a well-ventilated area. Stains and sealers release fumes.
- Don’t rush the drying time. Hurrying can lead to tacky surfaces and uneven finishes.
- Avoid staining in direct sunlight, as it can cause rapid drying and streaks.
- Wear gloves to protect your hands from chemicals and stains.
- For an ultra-smooth finish, use fine steel wool between coats of sealer.
Mastering woodworking finishing techniques helps your projects stand out and last longer. With patience and attention to detail, your wood pieces can have a professional, eye-catching finish.
Troubleshooting Common Finishing Problems
Identifying Blotchy Stains and Uneven Finishes
Are your woodworking projects showing uneven color when you apply stain? This is a frequent challenge that many woodworkers face, especially with softwoods like pine or certain hardwoods like maple. The wood absorbs stain at different rates, resulting in blotchy patches. To prevent this, always sand your wood consistently with the grain and finish with a fine grit, like 220. Applying a pre-stain wood conditioner helps seal the grain and ensures the stain is soaked up evenly. Let the conditioner dry as recommended before staining for the best results.
Addressing Dust Contamination in Clear Coats
Nothing ruins a glossy topcoat faster than dust nibs. Even a tiny speck can become an eyesore on a flawless surface. To avoid this, make sure your workspace is clean and dust-free before applying any finishing products. Use a tack cloth to wipe the surface between sanding and finishing steps. If dust settles into the finishing layer while drying, let it harden. Then, lightly sand it with 400-grit sandpaper or a fine abrasive pad. Remove all the dust before adding another coat for that smooth, glass-like finish.
Handling Finish Bubbles and Brush Marks
Bubbles and visible brush marks often form if you overwork the finish while it’s wet or use a brush that’s not designed for the specific product. Always use high-quality brushes or foam applicators that match the finish you’re using. Stir, don’t shake, liquid finishes to avoid introducing air. Apply your finish in thin, even coats. If you do spot bubbles, try lightly tipping them off with the brush tip, following the wood grain. Once the surface is dry, you can sand away rough areas and reapply another thin coat for a seamless look.
Fixing Cloudy or Milky Finishes
A cloudy or milky appearance in your finish can be frustrating. This problem often happens when there’s excess moisture or the finishing environment is too humid. It can also occur if layers of finish haven’t dried enough between coats. To resolve this, work in low-humidity conditions and allow each coat to fully cure before adding the next. If a finish has already turned milky, a gentle rub with a fine steel wool and oil might bring back clarity. Sometimes, controlled gentle heat from a hair dryer can help evaporate trapped moisture without damaging the film.
Peeling, Flaking, or Poor Adhesion Issues
If your finish peels or flakes off, it’s likely due to improper surface preparation or contamination. Always start by cleaning your wood thoroughly; remove grease, old wax, or existing finishes. Sand the surface to create a slightly rough texture so the new finish can stick well. Avoid using incompatible products—mixing oil and water-based finishes without a proper barrier coat is a common source of peeling. Below is a table showing suitable finishing sequences for common wood projects.
| Project Type | First Coat | Second Coat | Topcoat |
|---|---|---|---|
| Indoor Furniture | Wood Conditioner | Stain (Oil-based) | Polyurethane (Oil-based) |
| Outdoor Projects | Sealant | Stain (Exterior, Water-based) | Outdoor Spar Varnish |
| Cabinets | Sanding Sealer | Water-based Paint | Waterborne Polyurethane |

Managing Drips and Runs on Vertical Surfaces
Drips and runs are common when applying finishes on vertical panels or edges. The key is to use less product and spread it thinly. Work with a brush or sprayer held at the right angle, moving quickly and smoothly. If you notice a drip, level it with your brush before the finish sets. After it dries, sand the area gently, being careful not to cut into the surrounding finish. Apply another light coat for a uniform appearance.
Quick Troubleshooting Reference
- Blotching: Use wood conditioner and sand finely.
- Dust Nibs: Sand lightly between coats and always clean the surface.
- Bubbles: Use the right brush and work gently.
- Cloudiness: Avoid humid days, and let coats dry fully.
- Peeling: Clean and sand wood; don’t mix incompatible finishes.
Mastering woodworking finishing techniques is all about patience, attention to detail, and knowing how to react when things don’t go as planned. By following these troubleshooting tips, you can consistently get smooth and beautiful finishes that make every woodworking project stand out.
Eco-Friendly Options in Woodworking Finishes
Why Choose Sustainable Finishes for Your Wood Projects?
When you start a woodworking project, your choice of finish does more than just protect the wood. It impacts the environment, your health, and the character of each piece you create. Choosing eco-friendly woodworking finishing techniques means you care about a cleaner home and a healthier planet. These finishes often use natural ingredients and have fewer harsh chemicals compared to traditional finishes. You can still achieve beautiful, lasting results without harming the earth.
Natural Oils for Eco-Conscious Woodworkers
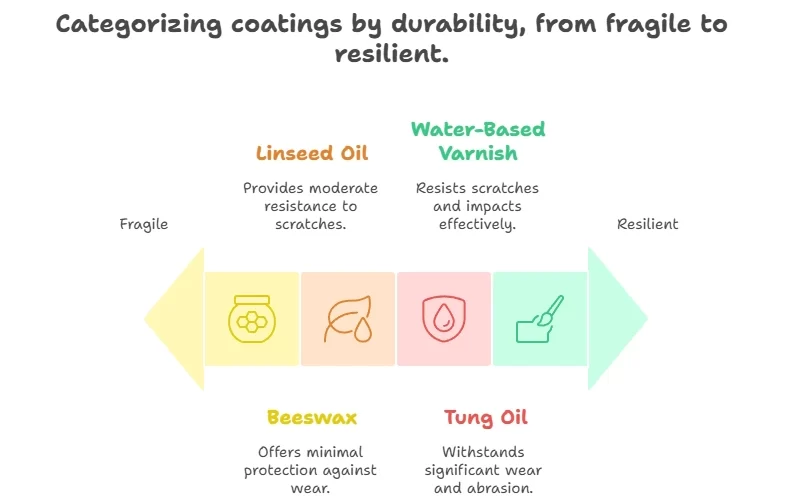
Plant-based oils are classic options in sustainable finishing. They soak into wood, bringing out natural grain and beauty, while keeping toxic emissions low. Some popular oils include:
- Linseed Oil (Flaxseed): Derived from flax plants, this oil creates a warm, rich tone and strengthens the wood fibers. Boiled versions dry faster but check labels for additives.
- Tung Oil: Extracted from the seeds of the tung tree, this finish gives a water-resistant, natural sheen. Tung oil is popular for its durability and food-safe qualities when pure.
- Walnut Oil: This is a safe choice for kitchenware and children’s toys, as it’s food-safe and non-toxic once cured. It adds mild color and rich protection.
Natural oils are easy to apply with a cloth and can be refreshed over time. They soak in without forming a heavy top layer, so your woodwork feels smooth and true to the touch.
Waxes—A Renewable and Gentle Touch
Waxes create a soft, mellow shine and help shield your projects from moisture. Eco-friendly waxes include:
- Beeswax: Sourced from beehives, beeswax is a favorite for finishing cutting boards and toys. It’s food-safe and easy to buff to a soft glow.
- Carnauba Wax: This is harvested from palm leaves. It’s a harder wax that gives extra durability and a glossy shine, often blended with beeswax.
You can use wax alone or over a natural oil for enhanced protection. These waxes are safe to touch and smell much better than chemical-based finishes. They also biodegrade naturally, returning to the earth without pollution.
Low-Impact Varnishes and Water-Based Finishes
Not every project can be handled with oils or wax alone. Sometimes, you need a tougher coat for tabletops or high-use surfaces. Water-based varnishes offer a greener solution than traditional oil-based polyurethanes. They release fewer VOCs (volatile organic compounds), reducing indoor air pollution. Modern water-based finishes dry quickly, clean up with just water, and are nearly odorless. Many brands now offer plant-based bio-polyurethanes or acrylics made with renewable resources instead of fossil fuels.
Comparing Eco-Friendly Finish Options
| Finish Type | Main Source | Application Ease | Food Safe | Durability | VOC Emission |
|---|---|---|---|---|---|
| Linseed Oil | Flax Plant | Easy | Yes | Medium | Very Low |
| Tung Oil | Tung Tree Seed | Easy | Yes | High | Very Low |
| Beeswax | Beehive | Easy | Yes | Low | None |
| Water-Based Varnish | Various | Moderate | Check Label | High | Very Low |
Key Tips for Green Finishing Success
- Read labels carefully: Pick finishes with low or no VOCs, and avoid petroleum-based solvents when possible.
- Ventilate well: Even the safest finishes need fresh air during application to protect your lungs and skin.
- Test on scrap wood: Oils and waxes may change the color of your wood, so preview your finish before starting on your final piece.
- Preserve unused product: Store natural oils and waxes in airtight jars; most last longer away from heat and sunlight.
Adding Value to Your Woodwork with Green Choices
Today, many people want handcrafted items that are both beautiful and responsible. By using eco-friendly woodworking finishing techniques, you can set your work apart. You build something special—safe for families, breathable for wood, and gentle on the environment. Whether you’re making furniture, toys, or decor, these finishes offer a way to celebrate your skills and protect what matters most.
Conclusion
Mastering woodworking finishing techniques takes patience, practice, and the right knowledge. When you start with the basics, picking the right finish for your project becomes much easier. You can achieve beautiful results by following careful steps as you apply stains and sealers. Don’t worry if you hit a few bumps along the way. Many finishing problems have clear fixes, and learning to troubleshoot will set you up for success with every new project.
Choosing eco-friendly finishes is another smart move. These options protect your health and the environment, while still giving you the results you want. As you explore different products, pay close attention to the details of each finish and how they match your project’s needs. Water-based and natural oil finishes can provide a beautiful look while reducing harmful fumes.
Every woodworking project tells a story, and the finish is what brings it to life. Thinking ahead about your finishing choices, preparing your surfaces well, and experimenting with techniques will help you create truly eye-catching pieces. Great finishing is much more than a final step—it’s what transforms raw wood into something lasting and unique. By focusing on the right techniques, choosing suitable products, and staying mindful of the environment, you can elevate your craft and take pride in every finished piece.
Keep learning, stay patient, and let your creativity shine through. Whether you’re just starting out or looking to grow your skills, smart finishing choices will make all your woodworking projects stand out for years to come.