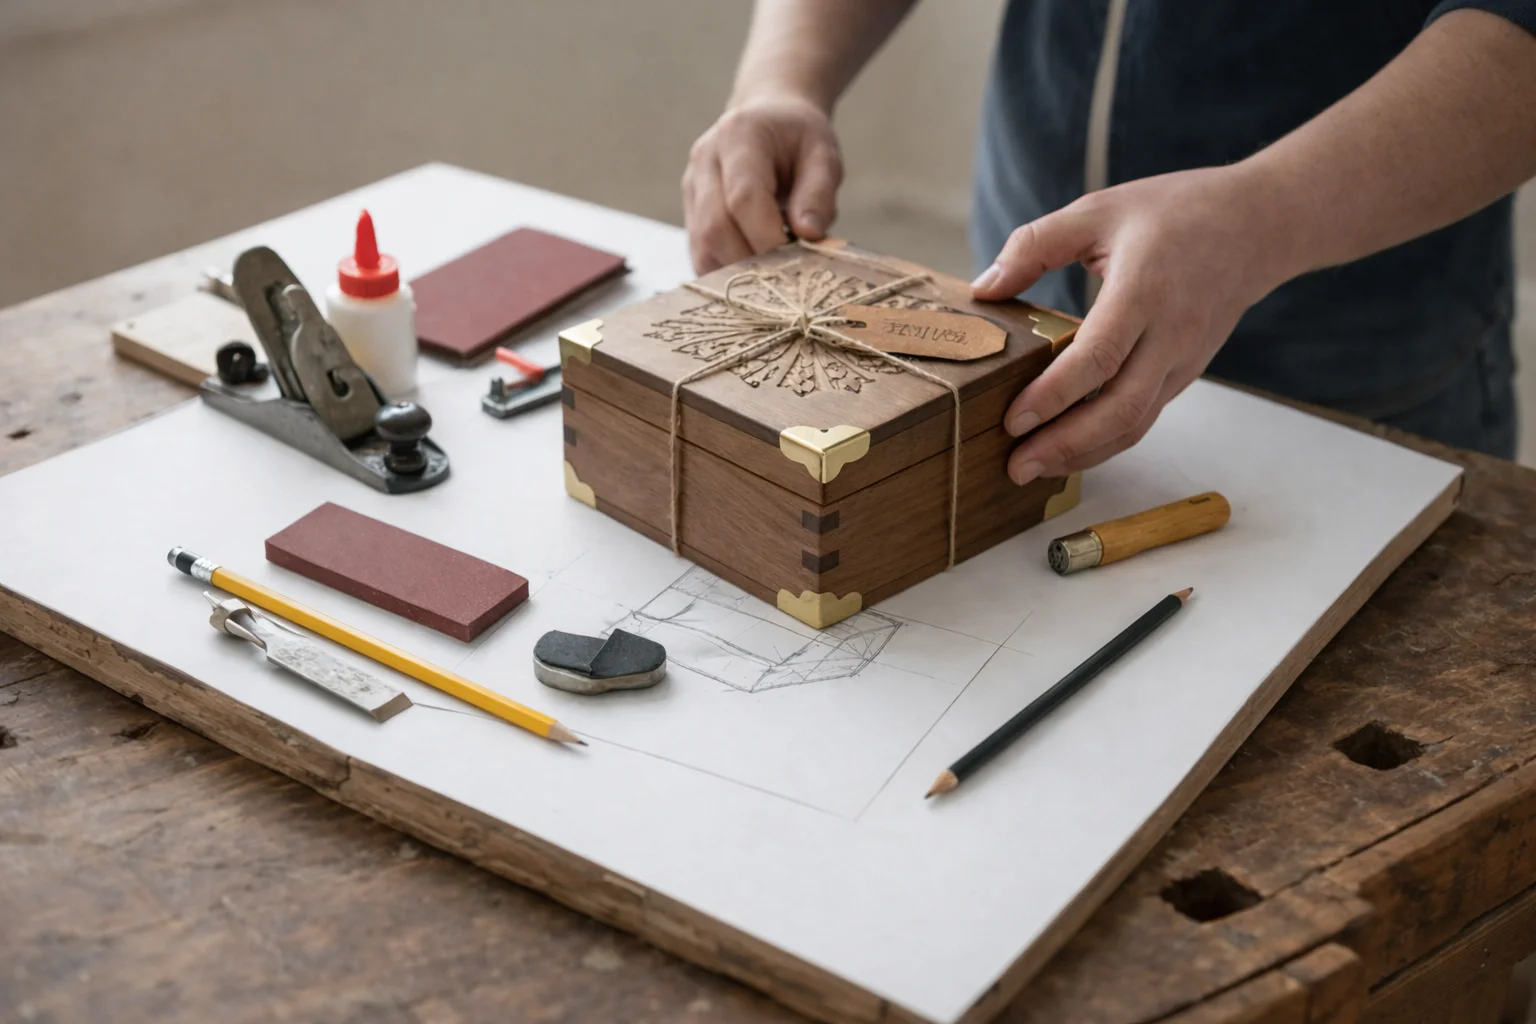
If you’ve ever wanted to create something beautiful and functional, learning How To Make Wooden Boxes is a fantastic project. Wooden boxes are not only practical, they can also serve as great home décor or gifts. With just a few tools and some basic skills, you can craft your own wooden boxes. Follow this step-by-step guide to get started.
Materials Needed
- Wood (choose between pine, oak, or birch)
- Wood glue
- Screws or nails
- Sandpaper (various grits)
- Wood finish or paint (optional)
- Tools: saw, drill, clamp, measuring tape, square
Step 1: Planning Your Box
Before you begin cutting wood, you must decide on the size and design of your box. Think about the purpose of the box: will it hold toys, tools, or something else? Draw a simple sketch of your design with measurements. A basic rectangular box is an ideal choice for beginners.
Step 2: Cutting the Wood
Based on your design, mark the dimensions on your wood pieces. You’ll need six pieces for a basic box: four sides, a top, and a bottom. Use a saw to cut the pieces accurately. Remember to wear safety goggles to protect your eyes.
Step 3: Assembling the Box
Start by attaching the sides together. Apply wood glue to the edges of the pieces you plan to join. Use clamps to hold the pieces together until the glue dries. For added strength, you can also use screws or nails at the corners.
Step 4: Adding the Bottom
Once the sides are secured, it’s time to attach the bottom piece. Apply glue along the edges of the bottom piece and fit it into the frame. Secure it with screws or nails to ensure it stays in place.
Step 5: Preparing for Finish
After assembling your box, it’s time to smooth the edges and surfaces. Use sandpaper to remove any rough spots and give your box a nice finish. Start with a coarse grit for the big areas, then use a finer grit for the finishing touches.
Step 6: Finishing Touches
Now that your box is smooth, you can paint or apply a wood finish to protect it and enhance its appearance. Choose a finish that fits your style; you might like a natural wood stain or a bold paint color, depending on your preference.
Step 7: Adding Lid and Handles (Optional)
If you want to add a lid to your box, cut an additional piece of wood to fit on top. You can hinge it to the back or just lay it on top for a removable lid. Additionally, consider adding handles to the sides for easier lifting. Simple cuts in the wood can serve as handles, or you can attach pre-made handles.
Step 8: Final Check
Before you call your project complete, check for any rough edges or misplaced screws. Fix any issues and give your box a final sanding if necessary. After this, your wooden box is ready for use!
Care Tips for Wooden Boxes
To keep your wooden box looking great, avoid exposing it to excessive moisture or sunlight. Regularly dust and clean it with a soft cloth. If necessary, reapply a protective finish occasionally to maintain its beauty. For more inspiration and ideas on wooden projects, visit Wood Magazine or Popular Woodworking. These websites provide a plethora of resources to help you enhance your woodworking skills.
Essential Tools and Materials for Crafting Wooden Boxes
Crafting wooden boxes can be an enjoyable and rewarding hobby. With the right tools and materials, you can create beautiful, functional pieces for storage, decorations, or gifts. Here’s a guide to the essential tools and materials you’ll need to get started on your wooden box project.
Basic Tools for Wooden Box Crafting
When beginning your woodworking journey, having the right tools is crucial. Here’s a list of basic tools that every DIYer should consider:
- Hand Saw: A good hand saw is essential for making clean cuts on your wood pieces.
- Power Saw: If you prefer speed and efficiency, a circular saw or miter saw can make precise cuts quickly.
- Drill: A drill is necessary for making holes and driving screws into the wood.
- Screwdriver: A set of screwdrivers helps to assemble your box securely.
- Sandpaper: To smooth the edges and surfaces of your wooden box, various grits of sandpaper are essential.
- Clamps: These hold your pieces together while the glue dries, ensuring a tight bond.
- Measuring Tools: A ruler, tape measure, and square are vital for accurate measurements and cuts.
Wood Selection
Selecting the right kind of wood is equally important. Different types of wood can affect the appearance and durability of your box. Here are some popular options:
- Pine: This softwood is affordable, lightweight, and easy to work with, making it perfect for beginners.
- Oak: A strong hardwood that offers durability and a beautiful grain, oak is a great choice for high-quality boxes.
- Birch: Known for its smooth texture, birch works well for decorative purposes and finishes nicely.
- Maple: This hardwood is elegant and sturdy, ideal for creating lasting pieces.
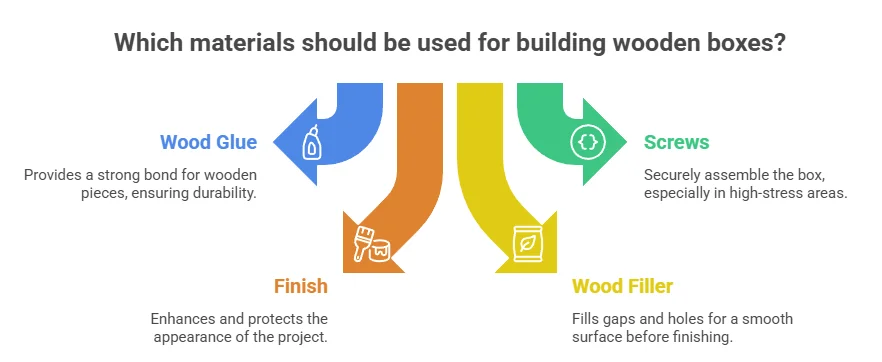
Essential Materials for Building Wooden Boxes
| Material | Description |
|---|---|
| Wood Glue | A strong adhesive designed for bonding wooden pieces together. |
| Screws | Use screws for assembling the box securely, especially in high-stress areas. |
| Finish | Choose varnish, stain, or paint to enhance and protect the appearance of your project. |
| Wood Filler | Helpful for filling gaps or holes before finishing to ensure a smooth surface. |
Optional Tools and Materials to Consider
As you expand your woodworking skills, there are additional tools and materials you might want to incorporate:
- Router: Useful for creating decorative edges and grooves on your box.
- Jigsaw: Great for cutting intricate shapes and patterns in your wood.
- Dremel Tool: Ideal for detailed work and engraving designs on the surface of your box.
Getting your hands on these tools and materials will set you up for a successful wooden box project. To find specific products, consider checking out woodworking supplies at Woodcraft or Lee Valley Tools. Remember that practicing your skills will make a world of difference in the quality of your finished product.
As you gather your tools and materials, think about what type of wooden box you’d like to create. Whether it is a simple storage box or an intricately designed keepsake box, having the right essentials on hand will help you craft your vision into reality. With these foundational tools and materials, you are well on your way to creating beautiful wooden boxes. It’s all about practice and patience, so don’t hesitate to experiment and refine your techniques as you go along!
Creative Design Ideas for Custom Wooden Boxes
Creating custom wooden boxes is a fulfilling project that offers both utility and aesthetic appeal. Whether you’re crafting a unique storage solution, making a special gift, or developing an artistic piece of decor, there are countless creative design ideas to enhance your wooden box project. One of the first considerations is the purpose of the box. Are you thinking about gifting it, or using it for organization? Identifying the box’s function will guide your design choices. Here are a few innovative concepts to spark your imagination:
- Personalized Engravings: Adding names, dates, or special messages can transform a simple box into a memorable keepsake. Consider using a wood-burning tool or laser engraving for a polished finish.
- Colorful Stains: Instead of natural wood, you can add personality with vibrant or pastel stains. Experiment with ombre effects or color-blocking for a modern twist.
- Mixed Materials: Combine wood with metal, glass, or fabric. For instance, a wooden box with metal handles or a glass lid creates a stunning contrast that captures attention.
- Inspiration from Nature: natural elements such as bark or branches can add an organic touch to your creation. These details can enhance the rustic appeal of your box.
- Functionality Features: Consider adding compartments, sliding trays, or even hidden drawers for enhanced functionality. This approach works well for jewelry boxes or storage for crafting supplies.
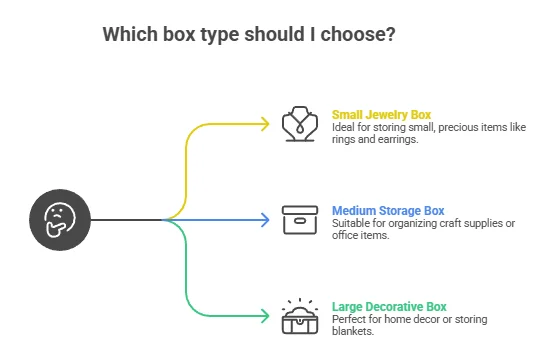
When designing your wooden box, size and shape are important factors. Here are a few ideas to help you decide:
| Box Type | Dimensions (inches) | Use Case |
|---|---|---|
| Small Jewelry Box | 6 x 4 x 3 | Storing rings, earrings, or pendants |
| Medium Storage Box | 12 x 10 x 6 | Craft supplies or office items |
| Large Decorative Box | 18 x 12 x 8 | Home decor or blanket storage |
After choosing the size and shape of your custom wooden box, think about enhancing its aesthetic appeal. You can add decorative elements such as:
- Handles and Latches: These can be functional and stylish. Opt for decorative metal handles or wooden knobs to match your design theme.
- Stenciling: Use stencils to create patterns or words on the box’s exterior. This technique can bring a personal touch to your creation.
- Feet or Bases: Adding small feet helps to elevate your box, providing a striking visual and preventing scratches on surfaces.
Additionally, don’t overlook the interior of your wooden box. Consider lining the inside with soft felt or fabric to protect delicate items. Another fun idea is to paint the interior in a contrasting color to surprise the user when the box is opened. If you’re seeking inspiration, many online resources offer tutorials and design ideas. Websites like Instructables and Pinterest showcase countless projects from fellow woodworking enthusiasts. These platforms allow you to explore different techniques and gather ideas from a diverse community.
Remember that the heart of any custom project lies in your unique creativity. No two designs should be the same, so experiment and develop a wooden box that reflects your style and purpose. With these strategies in mind, you’re well on your way to creating a one-of-a-kind wooden box that showcases your craftsmanship and adds beauty to any space.
Finishing Techniques to Enhance Your Wooden Boxes
Creating beautiful wooden boxes involves more than just crafting the right shape and size. The finishing techniques you apply can greatly enhance the final appearance and durability of your creations. Whether you’re new to woodworking or looking to refine your skills, understanding various finishing methods is essential for achieving stunning results.
Types of Finishing Techniques
There are several popular techniques you can use to finish your wooden boxes. Each technique offers unique characteristics that can suit different styles and preferences. Here are some of the most common options:
- Staining: This technique allows you to add color to the wood while still showcasing its natural grain. Stains come in a variety of shades, from dark mahogany to light pine.
- Varnish: Varnish provides a hard, protective coating that also enhances the wood’s appearance. It can be glossy, satin, or matte, allowing you to choose the finish that best fits your design.
- Lacquer: Lacquer creates a durable, high-gloss finish and dries quickly, making it a popular choice among woodworking enthusiasts. It is perfect for those who desire a smooth, glass-like surface.
- Oil Finishes: Natural oils such as linseed or tung oil penetrate the wood and enhance its natural beauty without leaving a surface film. This finish is ideal for a warm, natural look.
- Shellac: Shellac is derived from lac resin and provides a warm tone with a subtle sheen. It dries quickly, but can be susceptible to water damage.
Application Techniques
Now that you know the types of finishes available, it’s important to apply them correctly. Here are some techniques to consider:
- Brush Application: Use a high-quality brush to apply your chosen finish for even coverage. Make sure to follow the wood grain to avoid brush marks.
- Spray Application: For a smooth, even coat, consider using a spray gun. This method reduces the risk of runs or drips and is effective for intricate designs.
- Wipe-On Finishes: These are easy to apply and allow for better control. Simply apply the finish with a clean cloth, working it into the wood, and wiping away any excess.
Preparing Your Wooden Boxes for Finishing
Proper preparation is crucial for achieving the best results. Follow these steps to ensure your wooden boxes are ready for finishing:
- Sanding: Start by sanding the surface of your box. Use progressively finer grits of sandpaper (from 80 to 220 grit) to achieve a smooth finish.
- Cleaning: After sanding, clean the surface to remove dust and debris. You can use a damp cloth or a vacuum with a brush attachment.
- Conditioning: For woods prone to blotching, such as pine or cherry, consider applying a wood conditioner before staining. This will help achieve a more uniform color.
Tips for a Professional-Looking Finish
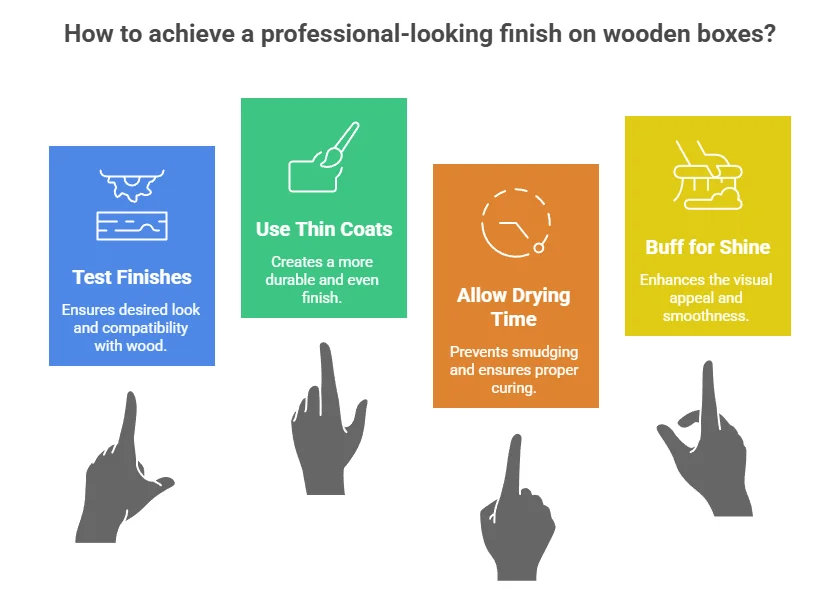
Enhancing your wooden boxes is not just about the finishing materials—it’s also about the process. Here are some tips to ensure a professional-looking result:
- Always test your finishes on scrap wood to see how they will look.
- Use multiple thin coats instead of one thick coat for a more durable finish.
- Allow adequate drying time between coats as recommended by the manufacturer.
- After the final coat, consider buffing with a soft cloth to enhance shine.
Where to Learn More
If you’re looking to dive deeper into finishing techniques, consider exploring resources from experts in woodworking, such as Wood Magazine or Woodworker’s Journal. These sites offer tutorials, tips, and inspiration tailored for both novices and seasoned artisans.
By applying these finishing techniques, you can transform ordinary wooden boxes into stunning pieces of art. With practice and patience, your skills will improve and you’ll gain confidence in crafting beautiful, functional wooden boxes that you can be proud of.
Practical Uses for Wooden Boxes in Everyday Life
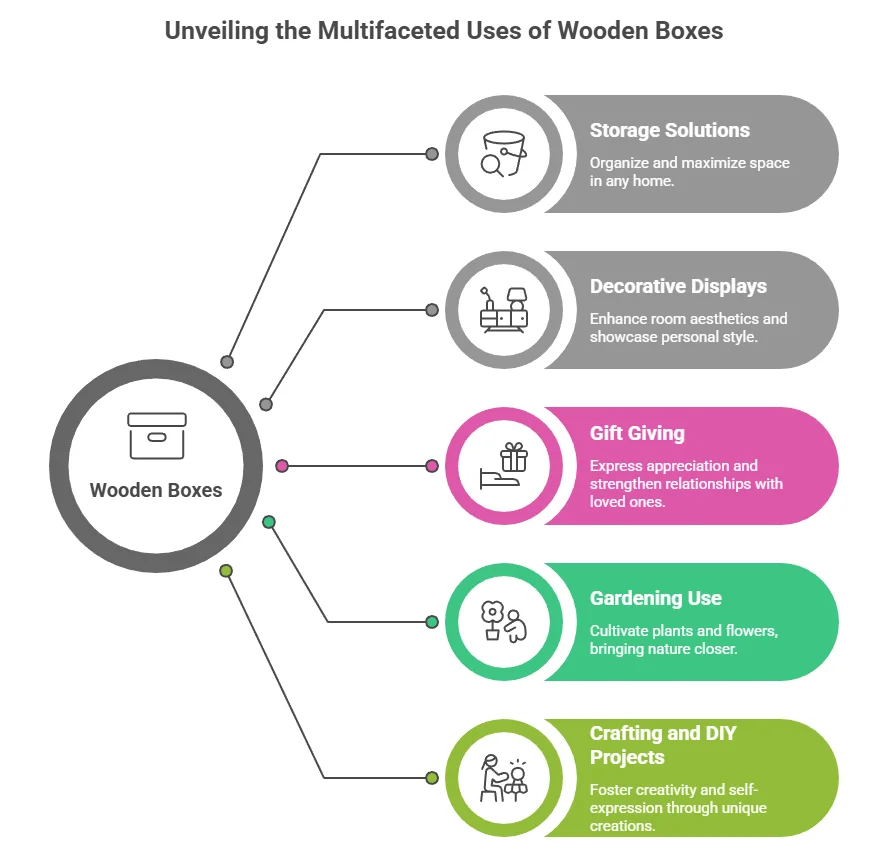
Wooden boxes have been an essential part of our daily lives for generations. Not only do they add a touch of charm and rustic beauty, but they are also incredibly versatile. Here are several practical uses for wooden boxes that you can easily integrate into your home and lifestyle.
Storage Solutions
One of the most common uses for wooden boxes is as storage solutions. Their sturdy construction makes them ideal for keeping items organized and safe. Here are a few creative ways to use wooden boxes for storage:
- Home Office: Use wooden boxes to store documents, stationery, and essential office supplies. This keeps your work area neat and enhances your productivity.
- Children’s Toy Boxes: Wooden boxes can serve as stylish toy storage. They can blend well with home decor and are strong enough to hold various toys.
- Linen Storage: Keep your linens neatly folded and stored in a decorative wooden box. This adds a touch of elegance to your bedroom while keeping things organized.
Decorative Displays
Wooden boxes can also double as decorative items in your home. Their natural beauty can enhance any room when used creatively. Here are some ideas:
- Centerpieces: Fill a wooden box with seasonal flowers, candles, or decorative stones to create a stunning centerpiece for your dining or coffee table.
- Wall-Mounted Displays: Attach wooden boxes to walls and use them to display plants, books, or other decorative items. This gives your walls an inventive touch.
- Rustic Shelves: Arrange wooden boxes on shelves for an artistic and functional storage solution that showcases your favorite items.
Gift Giving
Wooden boxes are perfect for gift-giving. Wrapping presents in beautiful wooden boxes adds an extra layer of thoughtfulness. Here’s how to use them:
- Personalized Gift Boxes: Fill a wooden box with small items that reflect the recipient’s interests or hobbies. Personalizing it can make your gift even more special.
- Party Favors: Use wooden boxes to hold party favors for events like weddings or birthday parties. Guests will appreciate the unique and practical keepsake.
Gardening Use
Gardening enthusiasts can take advantage of wooden boxes for various planting needs:
- Planter Boxes: Create raised planter boxes for your garden. They allow for better drainage and can be tailored to your garden size.
- Herb Storage: Keep your herbs fresh by placing them in a wooden box with proper drainage holes. This not only helps in gardening but adds beauty to your kitchen.
Crafting and DIY Projects
If you love to express your creativity, wooden boxes can be used in various crafting projects:
- Craft Supply Storage: Organize your crafting supplies in wooden boxes. This could include anything from paint to fabric scraps, helping you keep your space tidy.
- Customized Art: Paint or stain wooden boxes to create unique decor pieces. They can be functional while showcasing your artistic skills.
For more inspiration and project ideas, you can check out Wood Magazine or Woodworker’s Source. These resources offer in-depth tutorials and tips to help you maximize the potential of wooden boxes in your life.
Wooden boxes are immensely versatile and can be utilized for storage, decoration, gardening, gift-giving, and crafting. Their natural charm, durability, and practicality make them an excellent addition to any household. No matter how you choose to use them, wooden boxes are sure to enhance your everyday life.
Conclusion
Crafting wooden boxes can be a fulfilling and creative endeavor, perfect for beginners and seasoned woodworkers alike. By following the step-by-step guide provided, you will have the confidence to start building your own boxes with ease. Understanding the essential tools and materials helps streamline the process and ensures you have everything you need at your fingertips. Unleashing your creativity with unique design ideas opens up a world of possibilities for your wooden boxes, whether you choose a simple, rustic look or a more intricate design. The finishing techniques discussed enhance not just the appearance of your creations, but also their durability, making your wooden boxes stand out.
Beyond aesthetics, wooden boxes serve numerous practical purposes in everyday life, from storage solutions to decorative pieces in your home. By embarking on this woodworking journey, you can create functional items that are not only useful but also add a personal touch to your space. Exploring each aspect of wooden box creation, from planning and crafting to finishing and decorating, allows you to express your individuality. So gather your materials, unleash your creativity, and start making wooden boxes that reflect your style and meet your needs. Whether for personal use, gifts, or even crafts to sell, the beauty lies in the process and the satisfaction of creating something with your own hands. Embrace this rewarding hobby and enjoy the journey of woodworking!