Woodburning art is a captivating way to express creativity through heat and texture on wooden surfaces. As a beginner, mastering various Woodburning Art Techniques can allow you to create stunning pieces that showcase your unique style. Let’s delve into some fundamental woodburning methods that will help you get started on your artistic journey.
Understanding the Basics of Woodburning
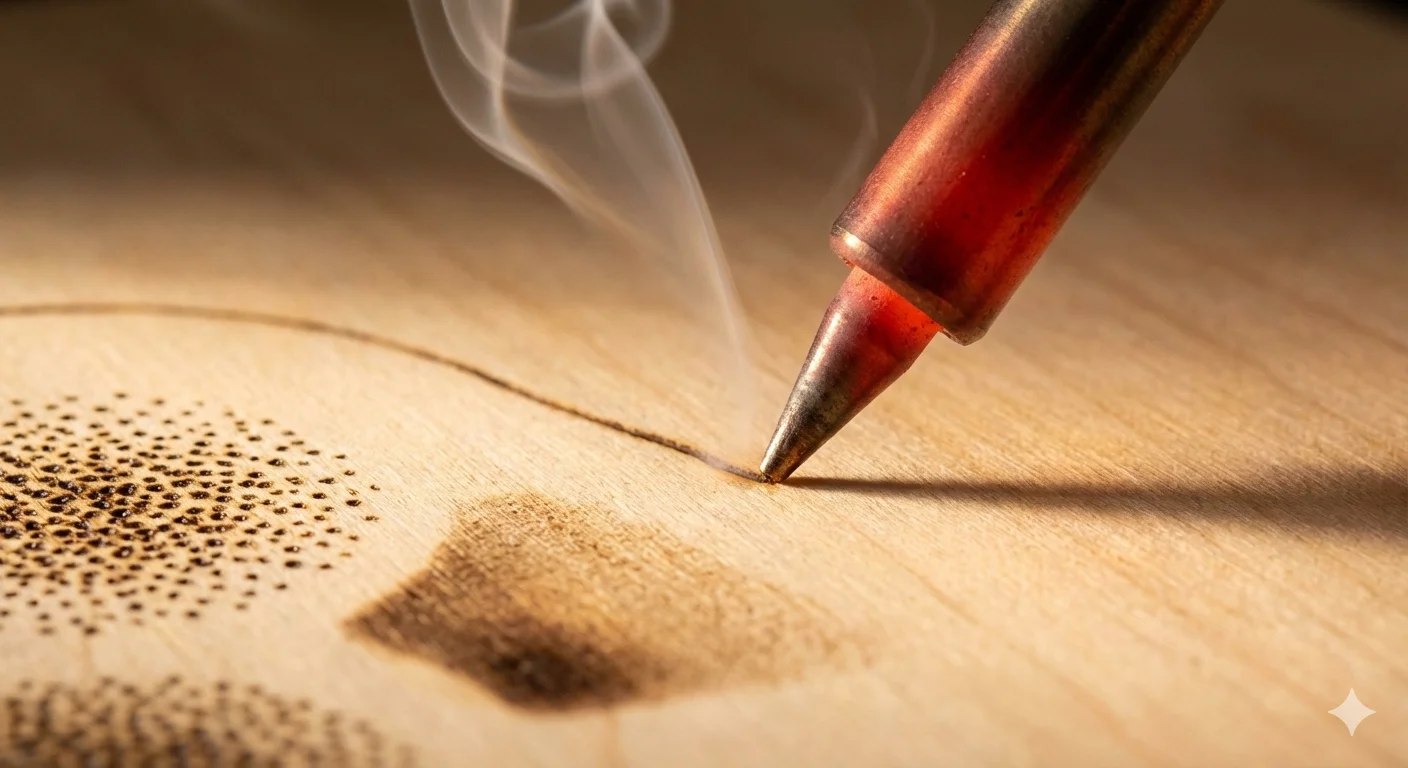
Before diving into specific techniques, it’s essential to grasp the fundamentals of woodburning. This art form uses a heated tool known as a pyrography pen, which allows you to create designs by burning the wood’s surface. The temperature of the pen can be adjusted for different effects, and the type of wood you choose can also impact your final artwork. Softwoods, like pine, are easier to burn and great for beginners, while hardwoods, like oak, provide richer details but may require more skill.
Popular Woodburning Techniques
Here are some enjoyable Woodburning Art Techniques that beginners can explore:
- Line Work: This technique involves using fine lines to create shapes and patterns. It’s perfect for adding detailed outlines to your designs and can be achieved with a fine-point pen tip.
- Shading: Shading adds depth and dimension to your artwork. You can achieve this by varying the pressure applied to the pen, using different temperatures, and employing a shading tip to blend colors smoothly.
- Texturing: Texture adds a tactile quality to your pieces. You can create various patterns—like cross-hatching or stippling—by changing the pen’s angle and pressure.
- Stencils: For those who may feel unsure about freehand drawing, using stencils can be a great way to create intricate designs. Simply place the stencil on the wood and trace over it with your pyrography pen.
- Combining Techniques: Don’t hesitate to mix and match these methods! Combining line work with shading or texture can create stunning, multi-dimensional effects.
Essential Tools and Materials for Beginners
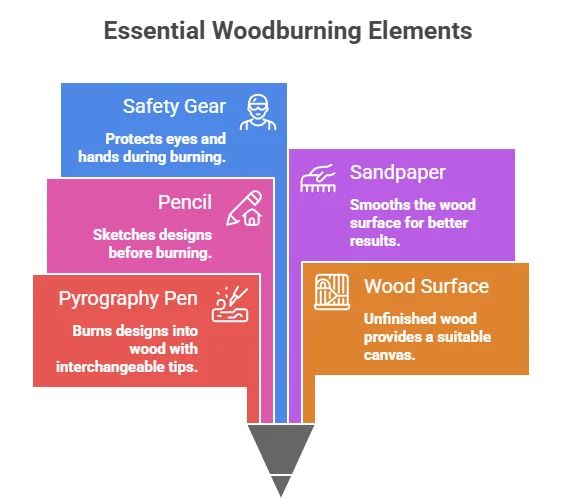
To get started with woodburning, you will need some basic tools and materials. Here’s a list:
| Item | Description | Purpose |
|---|---|---|
| Pyrography Pen | A heating tool with interchangeable tips | Used to burn designs into wood |
| Wood Surface | Use unfinished, untreated wood | Provides a suitable canvas for woodburning |
| Pencil | Regular drawing pencil | For sketching designs before burning |
| Sandpaper | Fine-grit sandpaper | To smooth the wood surface |
| Safety Gear | Safety glasses and gloves | For protection during the burning process |
You can find these tools at craft stores or online. Prominent websites like Woodcraft and Amazon offer various varieties suited for beginners.
Tips for Successful Woodburning
To improve your woodburning art skills, consider the following tips:
- Practice: Start with simple designs and gradually challenge yourself with more complex pieces as you gain confidence.
- Test Temperature: Before starting a project, do a test burn on a scrap piece of wood to understand how temperature affects the burn.
- Keep It Clean: Clean the pen tip regularly to maintain precision and avoid smudging your artwork.
- Take Your Time: Don’t rush! Enjoy the process of creating your art and take breaks if you feel fatigued.
Woodburning art can be a rewarding hobby that allows you to create lasting pieces. By exploring these techniques and tips, you’re better equipped to embark on your woodburning journey. The more you practice, the more confident you will become. So grab your tools, and let your creativity flow!
For more inspiration and techniques, visit Pyrography Online where you can connect with other artists and find helpful resources.
Tools and Materials You Need for Successful Woodburning
If you’re excited to dive into the world of woodburning art, having the right tools and materials is essential for creating beautiful pieces. Woodburning requires specific equipment that allows you to transform wood into stunning works of art. Below, we’ll explore the tools and materials you’ll need to set yourself up for success in your woodburning journey.
Essential Tools for Woodburning
To get started, consider investing in the following tools:
- Woodburning Pen: A woodburning pen is your primary tool. It heats up and allows you to burn designs into wood surfaces. Look for adjustable temperature settings, as different wood types and techniques require varying heat levels.
- Tips and Outlines: These are interchangeable a variety of tips that you can use with your pen. Common tips include fine points for detailed work, shader tips for shading, and chisel tips for broad strokes.
- Cutting Tools: A light-duty X-acto knife can come in handy for cleaning edges or making initial cuts in the wood while preparing your canvas.
- Sandpaper: Fine-grit sandpaper (around 220 grit) is important for smoothing out the wood surface before you start burning. This helps ensure a clean burn.
- Safety Equipment: Since woodburning creates smoke and heat, using a mask and goggles will protect you while working. Ensure your workspace has proper ventilation.
Choosing the Right Materials
Choosing the right wood is as crucial as having the proper tools. Here are some materials to consider:
- Wood Types: Basswood is a popular choice for beginners due to its smooth texture and light color, making it easy to burn. Other suitable woods include birch, maple, and pine, but avoid hard woods like oak at first if you’re just starting. Each type of wood reacts differently to heat.
- Wood Staining: Before starting your project, you might consider staining the wood. This can enhance the visual appeal of your final product. Make sure any stain you use is compatible with woodburning.
- Finishing Products: After completing your artwork, use polyurethane or another wood finish to protect your piece. This step preserves your design and adds a polished look.
Workspace Preparation
Your workspace is just as important as your tools and materials. Here are some tips for creating an ideal environment:
- Flat Surface: Ensure you have a stable, flat surface to work on. A large table or workbench can provide ample space for your materials.
- Lighting: Good lighting helps you see your work clearly. A bright, well-lit area will enhance your ability to make fine details.
- Organizational Tools: Keep your tools and materials organized. Use containers or caddies to store your pens, tips, and wood pieces for easy access.
Resources for Woodburning
To truly excel at Woodburning Art Techniques, consider exploring additional resources. Websites like The Wood Whisperer offer tips and tutorials that can help deepen your knowledge. You can also find community forums on Reddit’s Pyrography where experienced artists share their insights and project ideas.
Tips for Woodburning Beginners
If you’re new to woodburning, remember these tips to enhance your experience:
- Practice Makes Perfect: Start with simple designs to build your confidence before moving on to intricate patterns.
- Use Templates: Consider using printed designs or stencils initially. This can help guide your hand movements and improve your accuracy.
- Experiment with Speed: The slower you move the pen, the darker the burn. Experiment to find a comfortable speed and heat combination that works for your style.
Having the right tools and materials is key to successful woodburning. Remember to practice, be patient, and most importantly, enjoy the creative process.
Tips for Creating Stunning Designs with Pyrography
Creating stunning designs with pyrography, also known as woodburning art, involves a blend of creativity, skill, and technique. Whether you’re a beginner or an experienced artist, employing the right tips and techniques can elevate your woodburning projects to a new level.
Understanding Your Tools
The very first step in creating beautiful pyrography designs is knowing your tools. A good pyrography pen is essential. There are various types available, ranging from simple models with fixed tips to more advanced ones with adjustable temperature and a variety of interchangeable tips. Here are some types you can consider:
- Standard Pyrography Pen: Ideal for beginners and general use.
- Adjustable Temperature Pens: Great for experienced artists needing versatility.
- Specialty Tips: Include shaders, stamps, and writing tips to accomplish different styles.
Investing in quality tools can make a significant difference in your results and overall enjoyment of the craft.
Choosing the Right Wood
The choice of wood plays a critical role in the outcome of your pyrography designs. Different types of wood burn differently, affecting the texture and detail of your art. Consider the following options:
- Basswood: A favorite among pyrography artists, it has a smooth surface and burns evenly.
- Pine: Readily available and affordable, but can have knots which may affect detail.
- Birch: Offers a beautiful grain and responds well to burning.
Always choose wood that is unfinished and free from any chemicals, as these can cause unwanted effects when burned.
Planning Your Design
Before you start burning, take time to plan your design. Sketch your ideas on paper first to get a clear vision. Transfer your design to wood using carbon paper or light pencil marks. This will provide a guide that helps maintain accuracy during the burning process. Remember these tips:
- Keep your design simple for a beginner. Complexity can come later as you gain more confidence.
- Consider the type of shading and textures you want. Visualize where patterns will go.
Technique Tips
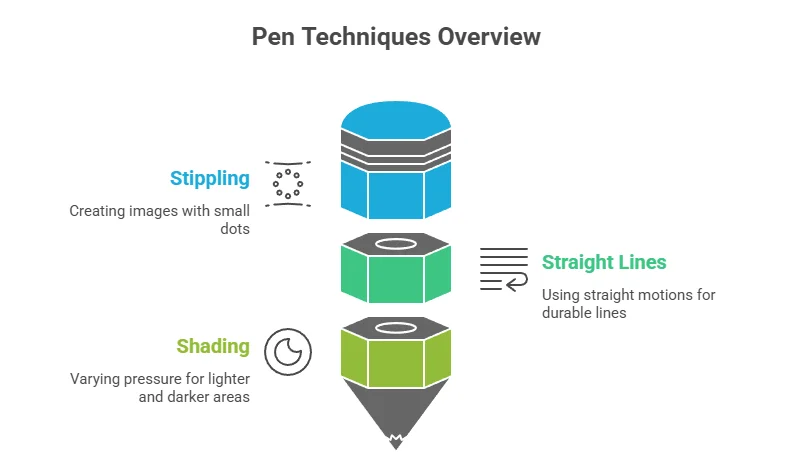
| Technique | Description |
|---|---|
| Stippling | Creating designs with small dots to form an image. |
| Straight Lines | Using the pen in a straight motion to create durable lines. |
| Shading | Applying varying pressure on the pen to create lighter and darker areas. |
Experiment with these techniques to see what suits your style best. Remember, practice is key!
Finishing Touches
The final steps in your pyrography art can enhance its appeal. Consider these finishing touches:
- Sanding: Lightly sand the surface where you’ve burned to smooth out any rough edges.
- Sealing: Use a wood finish or sealant to protect your artwork and enhance the grain.
- Framing: Present your work in a frame to preserve it and display it proudly.
By incorporating these tips into your project, you’ll not only improve your pyrography skills but also produce visually appealing designs that showcase your creativity.
For more information about pyrography techniques, you can explore resources at Pyrography.com or find detailed guides on Woodburning.com.
The History and Evolution of Woodburning Art
Woodburning art, also known as pyrography, has a rich history that stretches back thousands of years. This ancient practice involves using a heated tool to burn designs onto wood and other materials, creating stunning visual imagery. By exploring the history and evolution of woodburning art, we can better appreciate its craftsmanship and enduring appeal.
The earliest evidence of woodburning dates back to prehistoric times. Archaeologists have found artifacts in various parts of the world, indicating that early humans used fire to create decorative patterns on wood surfaces. Over millennia, the techniques evolved, with several cultures adopting and refining this artistic expression. Ancient Egyptian artifacts, for instance, showcase woodburned designs, demonstrating that this method was already appreciated for its aesthetic value.
As time progressed, different societies began to innovate woodburning techniques and tools. In Japan, around the 8th century, artisans developed intricate woodburning methods known as “shakudo.” This technique combined the practice of lacquer to enhance the visuals of the burned patterns. Meanwhile, in Europe during the Middle Ages, woodburning became an important craft for monks who created elaborate illustrations in religious texts.
By the 19th century, woodburning gained significant popularity in the United States. It became a popular pastime among hobbyists. Early woodburning tools were simple and often handmade, consisting of metal rods heated by a flame. Artists would utilize these devices to create different textures and details in their work. The introduction of a pen-like tool with interchangeable tips revolutionized pyrography, providing artists with greater precision and versatility.
The rise of the Arts and Crafts Movement in the late 19th and early 20th centuries further propelled woodburning into the mainstream. This movement emphasized handmade crafts and aesthetic appeal, attracting many artists towards woodburning. During this time, many booklets and instructional guides on woodburning techniques began to circulate, making the craft even more accessible to the general public.
Today, Woodburning Art Techniques have advanced, catering to both hobbyists and professional artists. The tools used have become more sophisticated, with electric pyrography pens allowing for better control of heat and an array of tips for various effects. Here are some popular woodburning techniques that artists use:
- Line Burning: This is the most common technique. Artists draw lines with their heated tools to outline shapes and patterns.
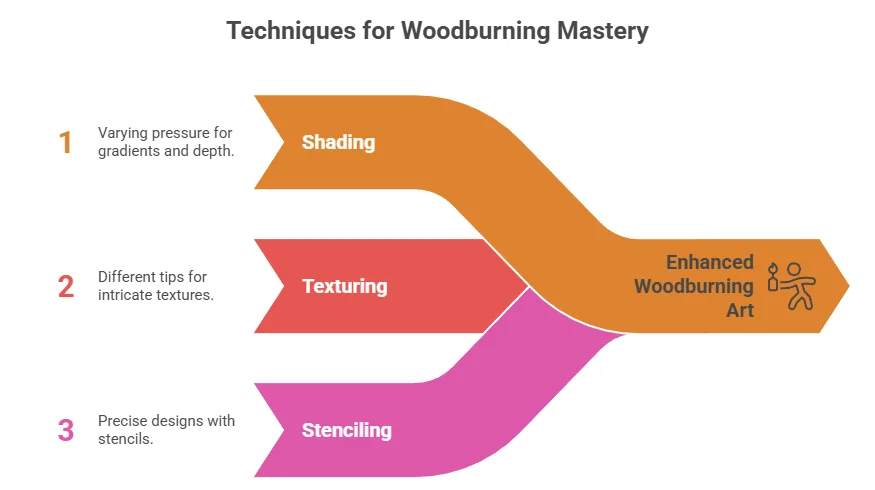
- Shading: By varying the pressure and speed of the tool, artists can create gradients and depth, enhancing the overall effect of their work.
- Texturing: Different tips can create texture, such as cross-hatching or stippling, making the art more intricate.
- Stenciling: Some artists use stencils to achieve precise designs and repeat patterns.
Many resources are available today for anyone interested in learning Woodburning Art Techniques. Websites such as Pyrography.com and Woodburning.com offer tutorials, kits, and forums to help beginners and experienced artists alike. Engaging with online communities can also inspire and motivate artists to continue honing their craft.
As you delve into woodburning art, consider the historical significance and the evolution of Woodburning Art Techniques that have shaped this unique form of artistic expression. Whether you’re a beginner or a seasoned expert, understanding the rich background can enhance your appreciation and inform your own artistic journey. Art is continuously evolving, but the allure of woodburning remains timeless, waiting for you to explore and create your masterpieces.
Embrace the joy of woodburning by experimenting with various techniques and tools. Your artistic journey could contribute to the ongoing legacy of this beautiful craft. So pick up your woodburning pen and start creating your own unique art today!
Advanced Woodburning Techniques to Enhance Your Skills
Woodburning art, also known as pyrography, is a fascinating craft that allows you to create stunning designs on wood using heat. If you’re looking to elevate your woodburning skills, exploring advanced techniques can significantly enhance your artwork. Here, you’ll discover methods that not only improve your technique but also expand your creative options.
Understanding Tools and Their Uses
The first step toward mastering advanced Woodburning Art Techniques is familiarizing yourself with the tools available. Here’s a list of essential tools:
- Woodburning Pen: This is the primary tool for pyrography. Ensure you have different tips for various effects.
- Heat Settings: A pen with adjustable heat settings gives you more control over your work.
- Wood Types: Experiment with different wood types, such as basswood, birch, and walnut, since each offers unique textures and tones.
- Stencils and Templates: These can help create intricate designs, especially for beginners.
- Sanding Blocks: Use these for prepping your wood surfaces before burning.
Shading Techniques to Add Depth

Shading is one of the most effective techniques for adding depth to your woodburning art. Here are a few methods to consider:
- Cross-Hatching: This involves making a series of parallel lines that intersect. Vary the spacing and pressure to create different effects.
- Pointillism: Use a fine tip to dot your design, creating various shades by altering the distance between dots.
- Gradient Shading: This technique requires you to use a larger tip or move the pen quickly to create a gradual shade. Practice this on scrap wood to perfect your technique.
Texture Techniques for Enhanced Detail
Texture can bring your woodburning art to life. Here are advanced texture techniques you can experiment with:
- Wood Grain Effects: Mimic the natural lines found in wood by using a series of wavy lines. This works best on lighter wood.
- Fur and Hair: Use short, flicking motions with the pen to create realistic fur or hair textures. This is ideal for designing animals or characters.
- Fabric Textures: For fabric, use wavy lines and stippling. This technique gives the appearance of folds and drapery.
Combining Techniques for Unique Pieces
Combining different techniques can yield stunning results. For example, you might start with a cross-hatch shading technique and then layer a fabric texture over it. This not only creates visual interest but also adds a unique depth to your piece. Don’t be afraid to experiment; sometimes the unexpected results can be the most striking.
Coloring Techniques to Broaden Your Palette
Although woodburning typically focuses on monochromatic designs, adding color can create new dimensions. Here are a few approaches:
- Colored Pencils: After burning, use colored pencils to add hues to specific areas. Make sure to seal the wood afterward to preserve your artwork.
- Watercolor Washes: You can apply a thin layer of watercolor over your design. However, be cautious not to soak the wood, as it can warp or damage it.
- Alcohol Inks: These can provide vibrant colors. Apply them carefully to avoid running.
Design Elements
When it comes to designing your woodburned pieces, consider adding contrasting elements or incorporating mixed media. This could mean using painted backgrounds or combining woodburning with other crafts like resin. Your imagination is the limit, so feel free to explore different combinations.
Learning Resources and Communities
- Woodburning.com – Offers tutorials, tools, and community support for woodburning enthusiasts.
- Burningart.com – A platform for sharing projects, ideas, and tips with other artists.
As you continue to practice these advanced Woodburning Art Techniques, remember that patience and persistence are key. Each new method you learn enriches your craft and broadens your artistic horizons. Embrace the journey and let your creativity shine!
Conclusion
Mastering Woodburning Art Techniques can be a rewarding journey for both beginners and experienced artists. By exploring various styles, you can discover the unique expression that suits your creativity. Armed with the right tools and materials, you’ll find that getting started is easier than you think. Quality woodburning pens, different tips, and the appropriate wood surfaces are essential for bringing your artistic vision to life.
As you become familiar with basic techniques, remember to apply the helpful tips shared in this guide. Creating stunning designs comes down to practicing your strokes, understanding shading, and layering your work. Moreover, embracing the rich history of woodburning art can inspire and deepen your connection to this craft. You’ll find that the stories of past artisans add depth to your creations.
As you progress, don’t shy away from advanced woodburning techniques. Experimenting with mixed media, incorporating colors, or playing with textures will elevate your skills and set your work apart. Each piece you create is an opportunity to learn and grow. With dedication, patience, and creativity, your woodburning art can transform into a beautifully unique form of self-expression.
Whether you’re just beginning or looking to enhance your skills, woodburning offers endless possibilities. So, grab your tools, ignite your imagination, and let the captivating world of pyrography inspire you. Dive in boldly—you never know what stunning designs you might create!