Creating strong wood joints is vital in carpentry. A strong joint holds two pieces of wood securely together, enhancing durability and stability. To How to Make Wood Joints Stronger, consider the following effective techniques:
Using Quality Wood Glue
One of the simplest ways to strengthen wood joints is by using high-quality wood glue. Here’s why it’s important:
- Enhanced Bonding: Premium wood glues penetrate the wood fibers better, creating a stronger bond.
- Heat and Moisture Resistance: Some glues offer additional resistance to heat and moisture, which is vital for long-lasting joints.
- Ease of Application: Many wood glues are easy to apply, making them suitable for both beginners and experienced carpenters.
Choosing the Right Joint Type
The type of joint you choose plays a significant role in the strength of your project. Here are some strong options:
- Mortise and Tenon: This age-old technique fits one piece of wood into a cavity in another, providing a very strong connection.
- Dovetail Joints: These joints interlock at right angles. They are particularly strong in resisting pulling apart.
- Box Joints: Similar to dovetails but simpler, box joints have a series of interlocking fingers, offering excellent surface area for glue.
Reinforcement Techniques
In addition to traditional joints, consider these reinforcement methods:
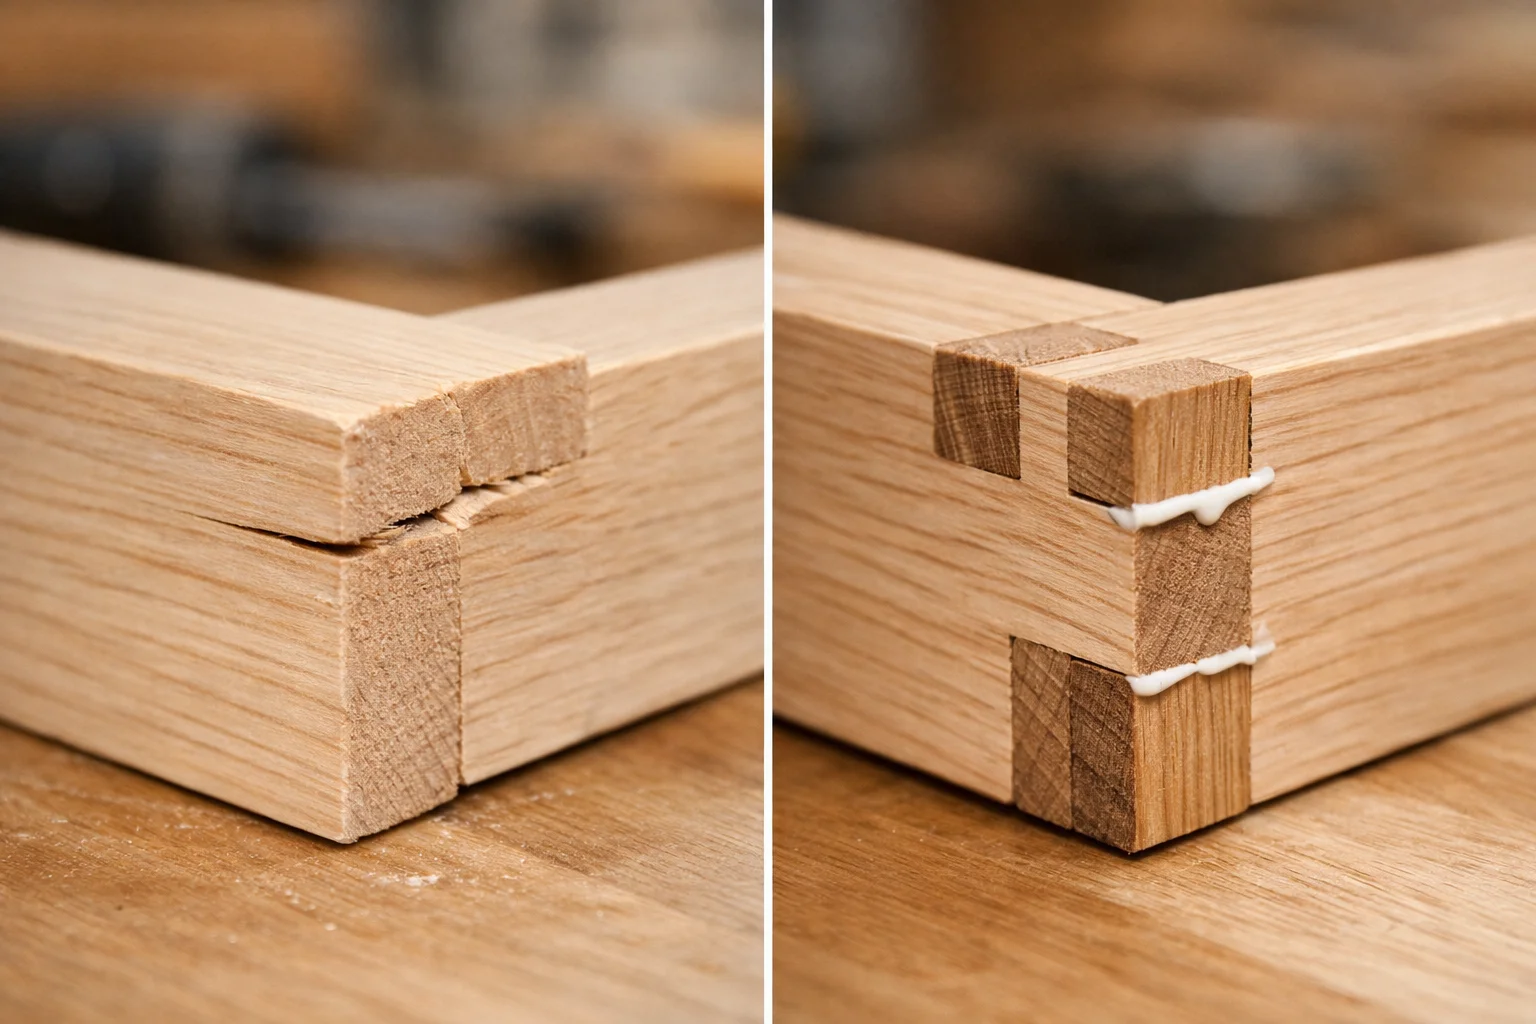
- Screws: Using screws along with glue can significantly boost joint strength. They hold pieces together under stress.
- Dowels: Dowels provide extra alignment and strength at the joint. They work great with butt joints for added stability.
- Brackets and Corner Blocks: For larger structures, using metal brackets or wooden corner blocks can provide extra support.
Proper Wood Preparation
Taking the time to prepare your wood correctly is essential for strengthening joints. Ensure the following:
- Clean Cuts: Make precise, clean cuts. Rough edges can weaken the bond.
- Dry Wood: Always use dry, well-seasoned wood. Moisture can compromise the strength of joints.
- Surface Treatment: Sanding the surfaces that will be joined together promotes better adhesion.
Utilizing Clamps Effectively
Clamping your joints properly during drying is crucial. Consider these tips:
- Pressure Distribution: Use multiple clamps to distribute pressure evenly across the joint.
- Timing: Allow enough time for glue to set before removing clamps. Rushing can weaken the joint.
- Check Alignments: Always check that your pieces are aligned correctly before clamping.
Environmental Considerations
Don’t overlook the environment where your project will be located. Changes in humidity and temperature affect wood joints. Here’s what to keep in mind:
- Indoor vs. Outdoor Use: For outdoor projects, consider using treated wood or seals that prevent moisture damage.
- Temperature Fluctuations: Choose finishes that will hold up under temperature changes, reducing the chances of warping or cracking.
Maintenance and Care
Even well-constructed joints need maintenance. Regularly check joints for signs of wear or damage. Here are some maintenance tips:
- Inspect Regularly: Check for cracks or separations in joints and address them promptly.
- Use Finishers: Applying finishes can protect joints from moisture and wear.
- Reinforce as Necessary: If you notice any weakening, don’t hesitate to reinforce the joints with additional materials.
The Importance of Joint Design in Structural Integrity
Understanding the fundamentals of joint design plays a crucial role in ensuring the longevity and durability of construction projects. It is not just a matter of connecting various materials; it involves a deep strategy of how the different elements interact under various loads and environmental conditions.
The strength of any structure can hinge on the effectiveness of its joints. Good joint design can enhance load distribution, facilitate proper alignment, and contribute to overall structural integrity. Below are some essential considerations to How to Make Wood Joints Stronger:
- Material Selection: Choose the right materials for your joints to withstand the specific stresses they will encounter. For example, hardwoods tend to be stronger and more durable than softer woods when it comes to mechanical joints.
- Joint Types: Understand various types of joints, such as mortise and tenon, dovetail, and finger joints. Each type has its own strengths and weaknesses, and selecting the right type for your project is essential.
- Moisture Control: Ensure joints are designed with moisture control in mind. Sealing joints against moisture can prevent wood warping and expand, maintaining the integrity of the structure over time.
- Mechanical Fasteners: Utilize screws, bolts, and dowels intelligently. The choice of fasteners can significantly impact joint strength. For instance, screws tend to provide stronger connections than nails because of their holding power.
- Glue and Adhesives: Use high-quality wood glue for joints where mechanical fasteners alone may not provide the necessary strength. The adhesive bonds the wood fibers together, resulting in a stronger overall joint.
When exploring How to Make Wood Joints Stronger, it becomes essential to not only focus on the connection itself but also the surrounding structure. Joint design must account for how stresses from loads will be distributed through the connected parts. This can involve the following:
- Load-Bearing Capacity: Calculate the expected loads on the joint, whether from vertical loads, lateral forces, or other stresses. Understanding the load-bearing capacity helps in selecting appropriate materials and joint types.
- Dynamic vs. Static Loads: Assess whether the joints will experience dynamic loads (which can change over time) or static loads (which remain constant). Dynamic loads may require more robust joint designs to account for movement.
- Routing and Fit: Proper routing of joints for a tight fit can drastically enhance strength. Hand-cut or machine-made joints should fit snugly to avoid gaps that can weaken the bond.
Joint design might require calculations and even computer modeling to analyze how different joint types could potentially perform. This process is often pivotal in engineering and architectural fields.
| Joint Type | Strengths | Weaknesses |
|---|---|---|
| Mortise and Tenon | Provides great support and alignment | Can be difficult to cut precisely |
| Dovetail | Excellent for tensile strength | Requires skill to execute properly |
| Butt Joint | Easy to create | Weak without added reinforcements |

More advanced techniques can also enhance joint strength. For instance, splines can be added for added support. This involves inserting a thin strip of wood to create additional surface area for adhesive. Additionally, corner blocks can reinforce corner joints effectively.
Ultimately, investing time and effort into joint design is critical for achieving the desired structural integrity. This is especially true in areas facing heavy loads or environmental challenges. Effective joint design not only promotes durability but also enhances the overall aesthetic appeal of the finished product.
For those in search of more specialized information on joint design, websites such as Fine Woodworking and Wood Magazine offer excellent insights and guidance.
By prioritizing joint design, you enable your construction projects to withstand the test of time and effectively meet the demands put forth by their intended use. This transforms not just the quality of individual projects but also contributes positively towards sustainability in the construction industry.
Choosing the Right Adhesives for Wood Joints
Choosing the right adhesive for wood joints is crucial for ensuring durability and strength in your woodworking projects. Different types of joints require different adhesives, and understanding the various options available can help you achieve the best results. In this guide, you’ll learn about the key factors to consider when selecting adhesives for wood joints.
Types of Adhesives for Wood Joints

There are several types of adhesives commonly used in woodworking. Each type has its unique properties, application methods, and ideal uses.
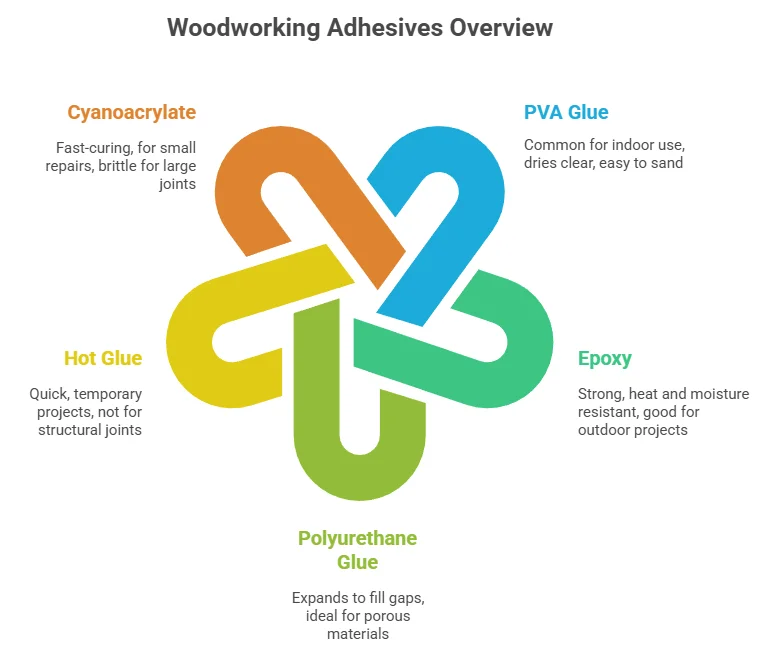
- PVA (Polyvinyl Acetate) Glue: This is the most common adhesive used in woodworking. It’s often referred to as wood glue and is ideal for most indoor applications. It dries clear and is easy to sand.
- Epoxy: This is a two-part adhesive that creates a strong bond and is resistant to heat and moisture. Epoxy is excellent for outdoor projects and repairs.
- Polyurethane Glue: Famous for its strong bonding capabilities, polyurethane glue expands as it cures, filling gaps in joints. It’s perfect for porous materials.
- Hot Glue: Hot melt adhesives are great for quick, temporary projects. However, they’re not ideal for structural joints as they may not hold up under stress.
- Cyanoacrylate (Super Glue): This fast-curing adhesive is suitable for small, quick repairs but may not be ideal for larger joints due to its brittleness.
Considerations for Choosing Wood Adhesives
When selecting the right adhesive for your wood joints, consider the following factors:
- Application Area: For indoor projects, PVA glue is usually sufficient. However, if your project will be exposed to moisture or temperature fluctuations, consider using epoxy or polyurethane glue for added durability.
- Material Compatibility: Ensure that the adhesive you choose is compatible with the type of wood you are using. Different wood species may require different adhesives for optimal bonding strength.
- Cure Time: The time it takes for the adhesive to set can significantly affect your workflow. If you need a quick bond, choose a fast-curing adhesive like cyanoacrylate or hot glue.
- Ease of Application: Some adhesives come with applicators that make them easier to use. Consider how critical ease of application is for your project.
- Strength Requirements: If you’re working on a high-stress joint, select a stronger adhesive like epoxy that can withstand heavier loads.
Working with Wood Adhesives
Properly using wood adhesives is just as important as choosing the right type. Here are some tips to ensure a strong bond:
- Surface Preparation: Make sure the surfaces to be bonded are clean and free of dust or grease. Sanding the surfaces lightly can enhance adhesion.
- Apply Evenly: Use a brush or roller to apply an even layer of adhesive. Avoid using too much adhesive, which can affect bond strength.
- Join the Pieces Immediately: After applying adhesive, join the wood pieces quickly to ensure proper bonding.
- Clamp the Joint: Use clamps to hold the joint while the adhesive cures. This helps maintain pressure and ensures a tight bond.
- Follow Instructions: Always read the manufacturer’s instructions regarding curing times and application methods.
Adhesive Tables
| Adhesive Type | Best For | Durability | Moisture Resistance |
|---|---|---|---|
| PVA Glue | Indoor Projects | Moderate | No |
| Epoxy | Outdoor Projects | High | Yes |
| Polyurethane Glue | Flexible Joints | High | Yes |
| Hot Glue | Quick Fixes | Low | No |
| Cyanoacrylate | Small Repairs | Low | No |
Common Mistakes to Avoid When Making Wood Joints
Creating strong wood joints is crucial for any woodworking project. However, there are several common mistakes that you should be aware of to ensure your joints are not only strong but also durable. Understanding these missteps can help you improve your woodworking skills and the overall quality of your projects.
1. Ignoring Wood Grain Direction
One of the most overlooked aspects of making wood joints is the direction of the wood grain. Working against the grain can weaken your joint and lead to breaks. Always try to align joints with the wood grain. This creates a stronger bond and enhances the overall integrity of the project.
2. Using the Wrong Type of Joint
Choosing the right type of joint is essential. Here are a few popular joints along with their best uses:
- Butt Joint: Simple and easy to make, ideal for framing.
- Mortise and Tenon Joint: Strong and visually appealing, excellent for furniture making.
- Dovetail Joint: Offers superior strength and is often used in drawers.
- Lap Joint: Good for joining two pieces at right angles.
Ensure you select the joint that best suits your project to avoid structural failures.
3. Not Preparing the Wood Properly
Failure to properly prepare the wood can lead to weak joints. Here are some tips to prepare your wood:
- Sand the surfaces to remove dust and debris.
- Ensure the ends are cut squarely. Use a miter saw for accuracy.
- Check for moisture content. Wood should be dried to prevent warping.
By preparing your wood correctly, you can ensure that the adhesives and other fastening methods bond effectively.
4. Over-Reliance on Glue
While glue is an essential part of many wood joints, relying solely on it can be a mistake. Glue should be used in combination with mechanical fasteners like screws or dowels for the best results. Here’s why:
- Glue can weaken over time, especially if exposed to moisture.
- Mechanical fasteners provide immediate strength while the glue cures.
- Combining methods results in a more durable joint.
5. Neglecting the Curing Time
Patience is key in woodworking. Cutting corners by not allowing glue to properly cure can compromise the strength of your joints. Always follow the manufacturer’s instructions on drying times. Typically, it’s best to let the glue sit overnight for optimal strength.
6. Skipping Clamps
Using clamps is vital when making wood joints. They ensure that the joint remains tight and in place while the glue sets. Neglecting to use clamps can lead to misalignment and weak joints. Here are some best practices for using clamps:
- Choose the right size clamps for your joint.
- Ensure even pressure across the joint to avoid gaps.
- Leave clamps on until the glue is fully cured.
7. Inadequate Test Fitting
Always test fit your joints before adding glue or fasteners. This helps you check for gaps, misalignments, or other issues that could affect the strength of your joint. If a joint does not fit perfectly, make adjustments as needed to avoid future failures.
8. Using Inconsistent Materials
Using different types of wood can lead to structural issues. Different wood species react differently to moisture and temperature changes, which can cause joints to crack or loosen over time. Stick to the same type of wood across your project for better consistency and strength.
9. Failing to Finish Joints
Not properly finishing your joints can result in exposed edges that may break down over time. Apply a protective finish like lacquer, varnish, or oil to shield your joints from moisture and wear.
By avoiding these common mistakes, you can How to Make Wood Joints Stronger significantly and ensure the longevity of your woodworking projects. For additional resources and tips, consider checking out Wood Magazine or Popular Woodworking.
Tools and Materials for Enhancing Wood Joint Durability
Enhancing the durability of wood joints is essential for creating strong and long-lasting furniture and structures. By selecting the right tools and materials, you can significantly How to Make Wood Joints Stronger. Below, you’ll find an overview of tools and materials that can make a difference.
Essential Tools for Wood Joints
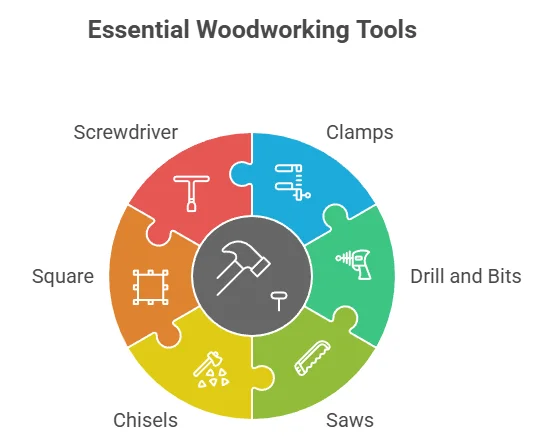
Using the correct tools is crucial for achieving effective and strong wood joints. Here are some essential tools you should consider:
- Clamps: Clamps are invaluable when it comes to holding wood pieces tightly together while adhesives cure. Look for adjustable bar clamps or F-clamps for versatile use.
- Drill and Bits: A good drill with a variety of bits will help you pre-drill holes for screws or dowels. This helps prevent wood from splitting.
- Saws: Various saws like miter saws, table saws, or hand saws are crucial for making precise cuts. Ensuring accurate cuts can improve how well joints fit together.
- Chisels: Wood chisels are essential for cleaning out joints and making precise fitting, especially for dovetail and mortise joints.
- Square: A carpenter’s square ensures that your joints are perfectly aligned, which contributes to the robustness of the finished piece.
- Screwdriver: A reliable screwdriver helps in securing screws tightly, ensuring the integrity of the joint remains intact.
Adhesives for Strengthening Wood Joints
The adhesive you choose directly affects the strength of your wood joints. Here are some popular options:
- PVA Glue: Polyvinyl acetate glue is popular among woodworkers for its ease of use and strong bond once cured.
- Epoxy: For areas requiring a more durable bond, epoxy adhesives provide excellent strength and water resistance. They are perfect for joints that will be exposed to moisture.
- Polyurethane Glue: This glue expands as it dries, filling gaps and providing a very strong bond. However, it’s messier to work with, so take precautions.
- Hide Glue: A traditional adhesive that’s easy to reverse with heat and moisture, making it valuable for antique restoration.
Additional Materials to Enhance Joint Durability
Besides tools and adhesives, certain materials can enhance the durability of your wood joints:
- Dowels: Wooden dowels can provide additional strength to joints by inserting them into pre-drilled holes, which helps align the pieces accurately.
- Screws: Proper screws provide a strong hold, especially when used alongside glue. Choose screws designed specifically for wood applications.
- Metal Fasteners: Adding metal brackets or corner braces can improve the overall strength of wood joints significantly, especially in furniture.
- Wood Filler: This is useful for reinforcing joints or filling gaps. It can strengthen joints by adding material to support loose connections.
Techniques for Stronger Joints
| Technique | Description |
|---|---|
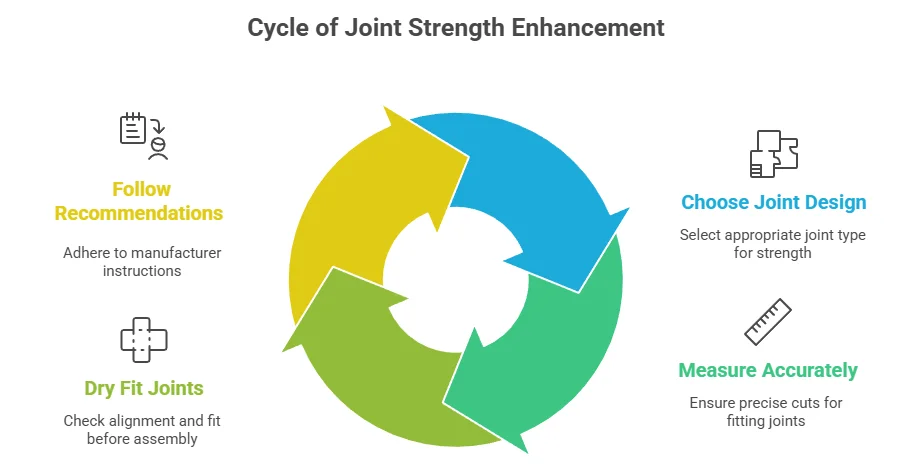
| Joint Design | Choosing the right joint design for your project can enhance strength. Mortise and tenon or dovetail joints are favorites for strength. |
| Correct Measurement | Measure twice and cut once! Accurate cuts lead to fitting joints that can withstand the test of time. |
| Dry Fit First | Always dry fit your joints before applying glue or screws. This allows you to check alignment and fit. |
| Follow Manufacturer Recommendations | Adhering to the instructions provided by tool and adhesive manufacturers helps you attain the best results. |
By investing in the right tools and materials, as well as employing effective techniques, you can significantly How to Make Wood Joints Stronger. Each choice plays a part in the longevity and strength of your projects. Remember, aiming for precision in every step of the process helps create a sturdy final product. For more information on woodworking tools and materials, visit Wood Magazine for expert tips and handcrafted techniques.
Conclusion
Strengthening wood joints is a fundamental aspect of carpentry that directly impacts the quality and longevity of your projects. Utilizing various techniques, such as reinforcing joints with dowels or biscuits, can significantly How to Make Wood Joints Stronger. Remember that the design of your joints plays a crucial role in maintaining the structural integrity of your work; thoughtful consideration of joint types and placement can prevent future issues.
Selecting the right adhesives is equally important. Make sure to choose products that are specifically designed for woodworking to ensure a durable bond that withstands time and use. Avoiding common mistakes, such as improper alignment or insufficient glue application, will help you create joints that not only look professional but also perform reliably.
Additionally, investing in the right tools and high-quality materials can make all the difference in the durability of your wood joints. Tools like clamps, saws, and jigs can enhance precision, leading to stronger connections that can better bear weight and stress over time. By following these guidelines and understanding the intricacies involved, you will take your woodworking skills to the next level, ensuring that your projects are not only beautiful but also built to last. Ultimately, mastering the art of How to Make Wood Joints Stronger will lead to successful and satisfying carpentry endeavors that you can be proud of for years to come.