
Creating wooden signs is a fun and rewarding craft that enhances your home or garden. Whether you want to create a personalized sign for your family or a welcoming piece for your business, this guide will take you step-by-step through the process. With just a few materials and tools, you can craft beautiful wooden signs that reflect your personality and style.
Gather Your Materials
To start your wooden sign project, gather the following materials:
- Wood board (choose your preferred type such as pine, cedar, or plywood)
- Sandpaper (various grits: coarse and fine)
- Paint or wood stain
- Paintbrushes and foam brushes
- Stencil or transfer paper (for designs)
- Pencil for sketching
- Sealant (optional for added protection)
- Drill (for hanging holes, if necessary)
- Ruler or measuring tape
Design Your Sign
The first step in crafting your wooden sign is to design it. Take time to think about what you want your sign to say and how you want it to look. Here’s how you can plan your design:
- Choose a catchy phrase or word that will go on your sign, like “Welcome,” “Home Sweet Home,” or your family name.
- Sketch your design on paper. Consider font styles and images that match the theme.
- Decide if you want to use stencils or freehand your design.
Prepare the Wood
Once your design is finalized, it’s time to prepare the wood. This step is crucial for a smooth and professional finish.
- Sand the wood surface using coarse sandpaper, and then smooth it out with fine sandpaper.
- Wipe down the wood with a damp cloth to remove dust and debris.
Transfer the Design
Next, transfer your design onto the wood. Here are a few options for transferring:
- If using stencils, place them on the wood and lightly trace the outline with a pencil.
- For painted designs, you can use transfer paper to trace your design directly onto the surface.
- Freehand your letters if you’re confident in your painting skills.
Paint Your Sign
Now comes the fun part! Paint your prepared wood sign according to your design. Follow these tips:
- Apply a base coat if using lighter colors over a dark wood.
- Use multiple thin coats of paint for better coverage instead of one thick coat.
- Allow adequate drying time between layers.
Add Finishing Touches
After your paint has dried, it’s time to add some finishing touches to make your sign stand out. Consider the following:
- If desired, apply a wood stain for a rustic look.
- Seal the wood with a clear coat to protect against the elements, especially if it will be outdoors.
- For added creativity, consider adding embellishments such as flowers or rustic twine.
Display Your Sign
It’s time to display your beautiful wooden sign! You can hang it on a wall, place it in your garden, or use a stake to stand it up in your yard. Make sure to drill holes if you plan to hang it, and use suitable anchors for your chosen location.
For more inspiration and techniques, check out Woodworkers Source for a wide variety of resources related to woodworking.
Crafting wooden signs is not only a creative outlet but also a great way to personalize your space. Enjoy the process and take pride in the beautiful sign you create!
Essential Tools and Materials for Making Wooden Signs
Creating wooden signs can be an enjoyable and rewarding DIY project. To get started, it is essential to have the right tools and materials. Here’s a comprehensive list that will help you on your journey to craft beautiful wooden signs.
Essential Tools
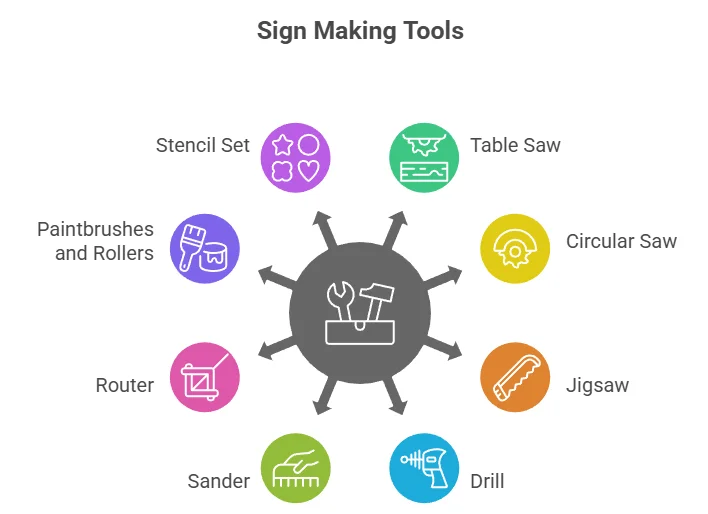
When making wooden signs, you’ll need a few basic tools to make the process smooth and efficient:
- Table Saw or Circular Saw: These saws are critical for making straight cuts in your wood. A table saw offers more precision, while a circular saw is more versatile for various projects.
- Jigsaw: This tool is perfect for cutting curved designs or intricate details in your sign.
- Drill: A power drill is necessary for adding holes for mounting your sign or creating decorative embellishments.
- Sander: A sander helps to smooth out rough edges on your wooden sign, enhancing its overall appearance. You may use a hand sander or a power sander, depending on your preference.
- Router: This tool allows you to create decorative edges and grooves on your sign, adding a professional touch.
- Paintbrushes and Rollers: For painting or applying finishes, having a variety of brushes and rollers will help you achieve different textures.
- Stencil Set: If you want to add text or designs, stencils can make the process easier and ensure uniformity.
Materials Needed
In addition to tools, here are the materials you’ll need to produce stunning wooden signs:
- Wood Boards: Choose between different types of wood like pine, cedar, or plywood. Softwoods like pine are easier to work with, while hardwoods are more durable.
- Wood Glue: This will help adhere pieces of wood together if you’re constructing a layered sign.
- Paint or Stain: Select outdoor-grade paint or wood stain to ensure durability against the elements.
- Sealer: A good wood sealer will protect your sign from moisture and UV damage, prolonging its life.
- Hanging Hardware: Consider using brackets, hooks, or chains for easy mounting of your wooden sign.
Helpful Extras
There are also some handy extras that can make your wooden sign-making experience easier:
- Protective Gear: Safety goggles and dust masks are crucial for your safety when using power tools.
- Clamps: Use clamps to hold pieces of wood in place while cutting or gluing.
- Ruler and Square: These help ensure that your cuts are straight and your designs are precise.
- Heat Gun: This can be used to create distressing effects on your wood or to remove paint if necessary.
Where to Source Your Materials
While you can find most of these tools and materials at local hardware stores, online retailers often provide better deals. Check out specialized woodworking sites like Woodcraft and Rockler for quality supplies that cater specifically to woodworking projects.
Creative Design Ideas for Personalized Wooden Signs
Creating personalized wooden signs is a fun and rewarding project that enhances your home or workspace. Whether you’re looking to add a touch of charm to your backyard or a meaningful design to your living room, these creative ideas will help inspire your wooden sign-making journey.
Choosing the Right Wood
The first step in making wooden signs is selecting the appropriate type of wood. Here are some popular choices:
- Pine: Affordable and easy to work with, making it great for beginners.
- Cedar: Naturally resistant to weather and insects, perfect for outdoor use.
- Maple: Dense and hard, offering a smooth surface for detailed designs.
- Plywood: A versatile material that can be cut into various shapes easily.
When selecting wood, ensure it is sanded well, as this will give your finished product a polished look.
Design Ideas for Your Signs
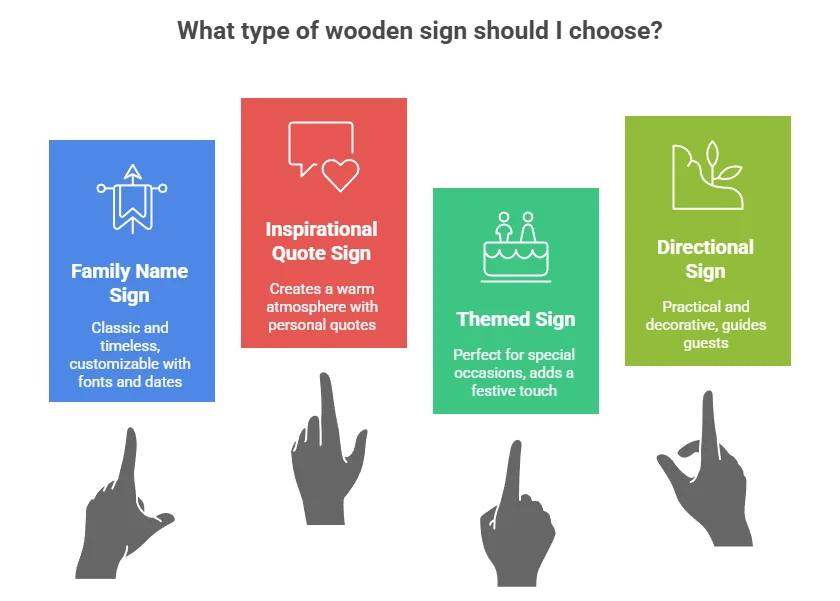
Now that you’ve chosen your wood, let’s dive into some creative design ideas that can make your wooden sign unique and personal:
- Family Name Signs: A family name sign is a classic and timeless choice. You can customize it by choosing different fonts and layouts, perhaps even including your family’s established date.
- Inspirational Quotes: Wooden signs adorned with inspirational quotes create a warm atmosphere. Select quotes that resonate with you personally.
- Themed Signs for Special Occasions: Consider themed signs for events like weddings, birthdays, or housewarming parties.
- Directional Signs: Directional signs are not only practical but can add a decorative element to your space. Use them in your garden or home’s entryway.
Techniques for Crafting Your Sign
- Hand Painting: Using acrylic or outdoor paint, hand-paint your design onto the wood. This technique allows for creativity and personal expression.
- Stenciling: Stenciling is a fantastic option for those who may not feel confident in their freehand painting skills.
- Wood Burning: Wood burning, or pyrography, gives a rustic, handcrafted feel to your signs.
Finishing Touches
- Sealing: Apply a clear coat for outdoor signs to protect against moisture and UV rays.
- Hanging Mechanism: Install hooks or wire for easy hanging.
- Lighting: Use small LED lights to highlight your sign at night.
By taking the time to plan and execute your design creatively, you’ll end up with beautiful wooden signs that add character and charm to your environment. For more design inspiration and tips, you might explore the resources available at Wood Magazine and Ana White.
Techniques for Finishing and Preserving Wooden Signs
Creating beautiful wooden signs requires not only skill in the crafting process but also knowledge of how to finish and preserve the finished product. Proper finishing and preservation enhance the wood’s natural beauty and protect it from the elements.
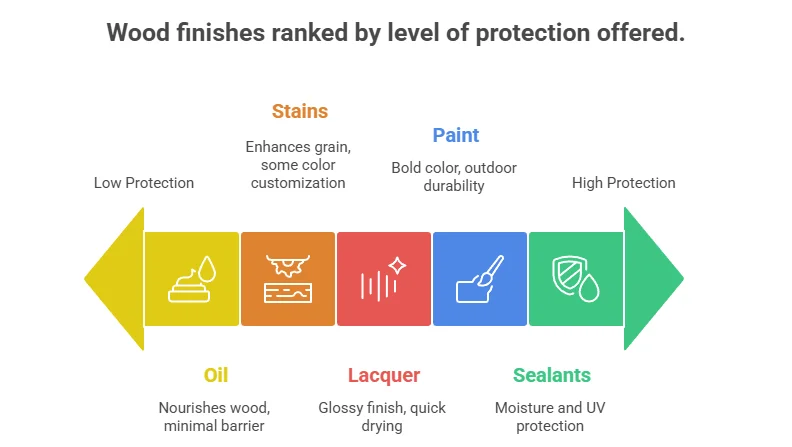
Types of Finishes for Wooden Signs
Finishes can dramatically alter the appearance and longevity of your wooden signs. Here are some popular types:
| Finish Type | Description |
|---|---|
| Stains | Enhance natural grain and add customized color. |
| Paint | Provide bold color schemes; best with outdoor-grade quality. |
| Sealants | Protect against moisture and UV damage (e.g., Polyurethane). |
| Lacquer | Provide a glossy appearance and quick drying time. |
| Oil | Penetrate and nourish wood for a warm, rich look. |
Applying Finishes Properly
- Prepare the Wood: Sand the surface with fine-grit sandpaper and wipe away dust.
- Test the Finish: Always test on a scrap piece of wood first.
- Apply Evenly: Use a clean brush or cloth to prevent drips and pooling.
- Drying Time: Allow sufficient drying time between multiple coats.
Preserving Outdoor Wooden Signs
- Choose the Right Wood: Use cedar, redwood, or treated plywood.
- Use Weather-Resistant Finishes: Select outdoor-specific products from brands like Minwax and General Finishes.
- Regular Maintenance: Inspect and reapply finishes every 1-3 years.
Additional Tips for Enhanced Longevity
- Drying Techniques: Allow signs to dry completely before exposure to humidity.
- Orientation: Position signs away from direct exposure to harsh weather if possible.
Common Mistakes to Avoid
- Skipping preparation steps.
- Using indoor products on outside signs.
- Neglecting maintenance.
Marketing Your Handmade Wooden Signs Online

Are you ready to turn your passion for making wooden signs into a thriving online business? Marketing your handmade wooden signs online can be an exciting venture, and with the right strategies, you can reach various customers eager to buy unique decor.
Build a Strong Online Presence: Start by creating a dedicated website or online store. Show high-quality images that capture the craftsmanship of your signs.
Utilize Social Media: Instagram is perfect for showing off your wooden sign creations. Use relevant hashtags like #WoodenSigns and #HandmadeDecor. Facebook and Pinterest are also vital for driving traffic.
Leverage Online Marketplaces: Consider selling on Etsy or Amazon Handmade, which cater specifically to artisans.
Content Marketing: Start a blog featuring ideas for home decor or DIY tips for maintaining wooden signs to improve your website’s SEO.
Online Advertising: Use Facebook and Instagram targeted ads to reach specific demographics interested in home decor and DIY crafts.
Collaborate with Influencers: Partner with influencers who share a passion for home decor to showcase your products to their followers.
Offer Promotions and Discounts: Run seasonal promotions or offer discounts for first-time buyers to entice customers.
Engage in Customer Service: Respond to inquiries quickly and resolve issues amicably. Positive testimonials are incredibly persuasive.
Track Your Progress: Use tools like Google Analytics to understand website traffic and conversion rates.
For more information on selling handmade products, check out Etsy and BigCommerce.
Conclusion
Creating wooden signs is not just a delightful craft; it’s also a wonderful way to express your creativity and personalize your space. With the step-by-step guide provided, you now have the knowledge to transform your ideas into beautiful, tangible pieces. Utilizing essential tools and materials will ensure that your crafting process is smooth and enjoyable, while exploring creative design ideas will allow you to make your signs truly unique.
Remember, the finishing touches are crucial for achieving that professional look. By applying various techniques for preserving your wooden signs, you can ensure they remain stunning for years to come. Whether you choose to use paint, stain, or sealant, the right finishes will enhance the natural beauty of the wood.
If you’ve created wonderful signs that you want to share with the world, marketing them online can be an exciting venture. Utilize social media and online marketplaces to reach potential buyers and showcase your creations. With eye-catching photos and engaging descriptions, your handmade wooden signs can stand out in the competitive world of crafts.
Allow your creativity to flow as you explore the exciting world of wooden sign making. Each sign you create holds a story and a touch of your personality. Dive into this rewarding hobby and watch as your skills grow, while also potentially turning your passion into a profitable side business. Embrace the journey, and most importantly, have fun crafting!