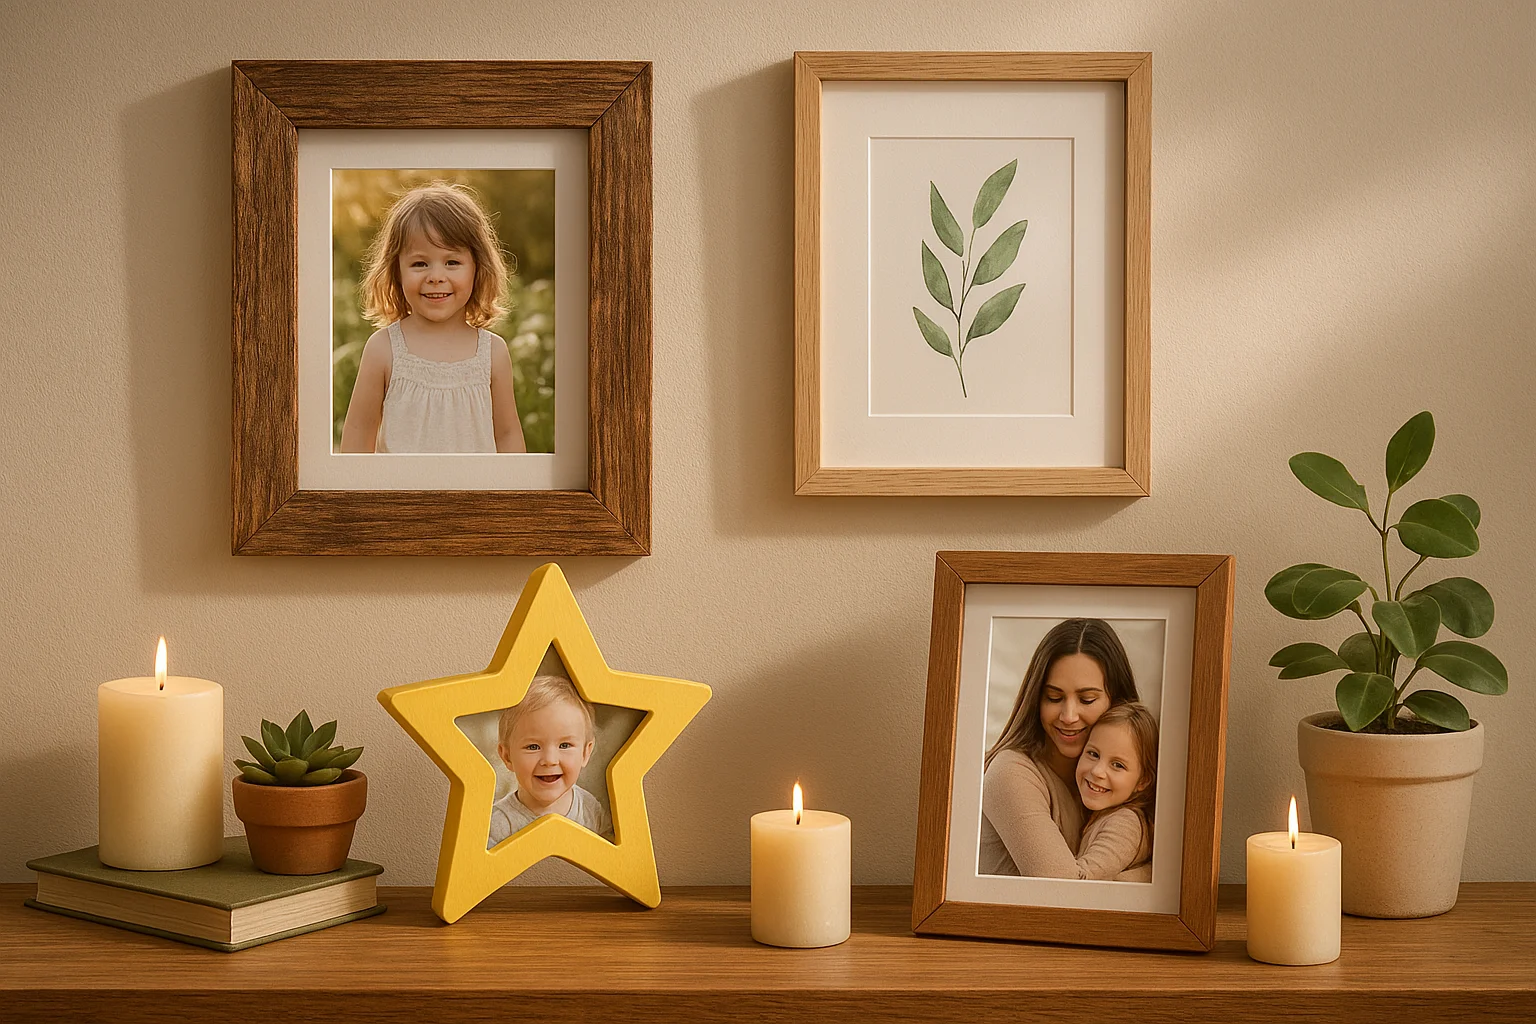
Bringing creativity into your home can be as simple as crafting your own picture frames. DIY Wooden Picture Frame Plans allow you to express your personal style while displaying your favorite photos. Whether you’re a novice or an experienced craftsperson, there are plenty of options to suit every taste. This article explores a variety of creative wooden picture frame ideas to inspire your next project.
Creative Wooden Picture Frame Ideas
Rustic Charm
If you love a country feel, try creating a rustic wooden picture frame. This style often features natural wood textures and finishes. Here’s how you can make one:
- Materials Needed: Reclaimed wood, wood glue, sandpaper, wood stains.
- Steps:
- Cut the reclaimed wood to your desired size.
- Sand the edges to avoid splinters.
- Assemble the frame using wood glue, ensuring a snug fit.
- Apply wood stain for a nice finish and let it dry
This simple yet attractive frame will add warmth and personality to your photos.
Modern Minimalist
For those who appreciate clean lines and simplicity, a modern minimalist wooden picture frame might be the ideal project. Here’s a fast way to create one:
- Materials Needed: Plywood sheets, corner brackets, wood screws.
- Steps:
- Cut two pieces of plywood for the sides and two for the top and bottom.
- Assemble the pieces using corner brackets for a sleek look.
- Sand and paint or leave the wood in its natural state.
This design seamlessly integrates with contemporary home decor, making it a perfect addition to your living space.
Whimsical Designs
If you have children or enjoy whimsical decor, try making a playful wooden picture frame. This can feature fun shapes or bright colors. Follow these steps:
- Materials Needed: Softwood, acrylic paint, craft knife.
- Steps:
- Sketch out a fun shape, such as a star or heart, on the softwood.
- Use a craft knife to carefully cut out the shape.
- Paint with bright colors and let dry.
- Add a backing for your photo and hang with twine or wire.
A whimsical frame can become a cherished piece of art in your children’s room or play area.
Multi-Photo Display
Why stop at one photo when you can showcase several? A multi-photo wooden frame can be a striking focal point. Consider following these directions:
- Materials Needed: Wooden lattice or multiple wooden panels, wood glue, hooks.
- Steps:
-
- Arrange the wooden panels horizontally or vertically.
- Glue them together and let them dry completely.
- Attach hooks to hang multiple smaller frames or photos.
This design not only displays your favorite memories but also serves as an eye-catching piece of décor.
To get started on these DIY Wooden Picture Frame Plans, look for additional resources that can guide you further. Websites like Wood Magazine and Popular Woodworking provide extensive plans and video tutorials to refine your crafting skills. Creating a wooden picture frame is not only an enjoyable craft; it also allows you to personalize your space.
Essential Tools and Materials for Building Picture Frames
Creating your own picture frames can be a rewarding and cost-effective way to showcase your cherished memories. To ensure a successful DIY project, having the right tools and materials is essential. Here’s a detailed look at what you need to begin crafting your wooden picture frames.
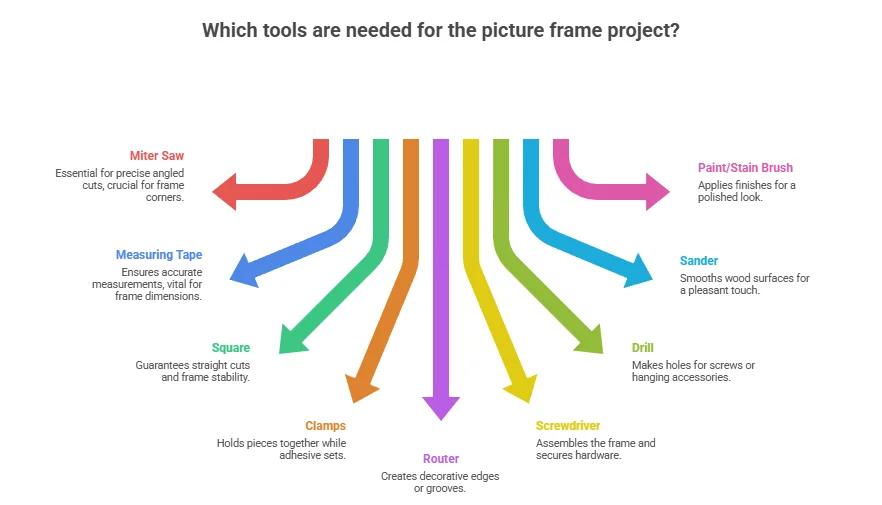
Essential Tools for Building Picture Frames
When embarking on your picture frame project, consider gathering the following tools:
- Miter Saw: A miter saw makes precise angled cuts, crucial for the corners of your frame.
- Measuring Tape: Accurate measurements are key, so always have a measuring tape on hand.
- Square: Ensures that your cuts are straight and your frame is square, providing stability.
- Clamps: These are vital to hold pieces together while the adhesive sets.
- Router: Use this tool to create decorative edges or grooves in the wood.
- Screwdriver: Essential for assembling the frame and securing hardware.
- Drill: A power drill will make it easier to create holes for screws or to attach hanging accessories.
- Sander: A sander smooths the wood surface, making it pleasant to touch and enhancing the final appearance.
- Paint or Stain Brush: If you plan on finishing the frame, having brushes handy for stain or paint application will be crucial.
Materials Needed for Picture Frames
In addition to the right tools, having good quality materials is essential. Here’s a list of materials you’ll need:
- Wood: Choose a softwood like pine, or a hardwood such as oak or maple for durability and aesthetics.
- Glass or Acrylic: Decide between glass for a classic look or acrylic for lighter frames that are less prone to breakage.
- Backing Material: Use cardboard or a lightweight wood such as masonite to hold the picture securely in place.
- Hanging Hardware: Picture hangers or D-rings are necessary for wall mounting your frame.
- Wood Glue: A strong adhesive will help bond the corners and joints together.
- Finish: Choose a color or clear finish to enhance and protect your frame.
Choosing the Right Size
Before you start cutting your wood, determine the size of the frame you want to create. Use the following guidelines:
| Photo Size | Frame Size Calculation |
|---|---|
| 4 x 6 inches | 6 x 8 inches |
| 5 x 7 inches | 7 x 9 inches |
| 8 x 10 inches | 10 x 12 inches |
| 11 x 14 inches | 14 x 17 inches |
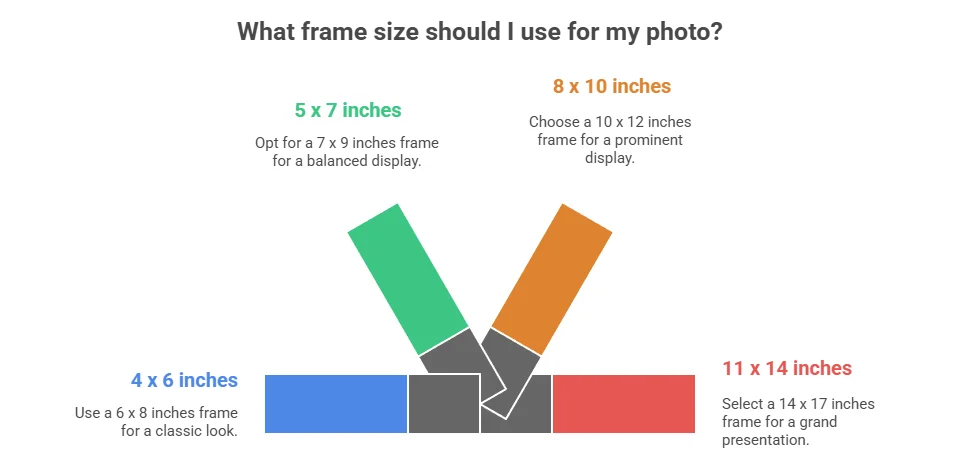
Use a simple formula: add 2 to 4 inches to each side of the photo’s dimensions to determine the desired frame size. This is the standard practice for most frame designs, allowing for an adequate border and matting.
Resources for DIY Plans
If you need some guidance in planning your wooden picture frames, many resources can help:
- Ana White offers numerous free plans and ideas for building various frames.
- Wood Magazine provides crafting tips and detailed frame construction projects.
- Woodworking for Beginners specializes in beginner tips and tricks for your first projects.
By assembling the essential tools and materials listed here, you can embark on your DIY Wooden Picture Frame Plans project equipped for success. Follow the instructions carefully, and soon you’ll have beautiful frames to proudly display your favorite images!
Step-by-Step Guide to Customizing Your Wooden Frames
Customizing wooden frames adds a personal touch to your home décor or makes a thoughtful gift. Follow this step-by-step guide to create unique wooden frames that reflect your style and creativity. Here’s how you can start.
Gather Your Materials
Before diving in, collect all the necessary materials. Here’s a list to get you started:
- Wooden boards (the size depends on frame dimensions)
- Wood screws or nails
- Wood glue
- Sandpaper (various grits)
- Paint or wood stain
- Paintbrush or roller
- Measuring tape
- Wood saw (hand saw or power saw)
- Ruler or square
- Clamps
Measure and Cut Your Wood
Start by deciding the size of your picture frame. A standard frame size is 8×10 inches, but you can customize it to your preference. Use measuring tape and a ruler to mark the wood for cutting. Follow these steps:
- Measure the dimensions of the picture you want to display.
- Add dimensions for the frame border (usually about 2 inches).
- Mark the wood boards according to your measurements.
- Carefully cut the wooden pieces using a wood saw.
Sand the Edges
After cutting, smooth out the edges and surfaces. Use sandpaper of varying grits to achieve a refined finish. Start with a coarser grit and move to a finer one:
- Coarse grit (80-120) to remove rough edges.
- Medium grit (150-180) for further smoothing.
- Fine grit (220+) for a smooth finish.
Assemble the Frame
Now it’s time to put the frame together. Lay the pieces out in a rectangle, with the corners aligned. Use wood glue for added stability:
- Apply wood glue to the ends of each frame piece.
- Join the corners together, ensuring they are square by using a ruler or square.
- Secure the frame using clamps to hold it in place while the glue dries.
- If desired, add wood screws or nails for added strength.
Apply Finishing Touches
Once the frame is assembled and dry, it’s time to add color and finish:
- Choose a wood stain or paint that matches your style.
- Using a brush or roller, apply an even coat, allowing it to dry completely.
- If you prefer a glossy finish, consider using a clear coat or varnish.
Insert Your Picture
Once everything is dry, it’s time to display your picture. Here’s how:
- Cut a piece of cardboard or wood to fit snugly behind your picture.
- Secure the picture and the cardboard together using brad nails or picture frame clips.
- Attach hanging hardware on the back if you plan to mount it on a wall.
Showcase Your Creation
Your customized wooden frame is now ready to be displayed! Place it on a shelf, hang it on a wall, or give it as a special gift. This hands-on project not only enhances your creativity but also gives you a sense of accomplishment. For more detailed DIY Wooden Picture Frame Plans and ideas, check out Wood Magazine or Popular Woodworking. These resources offer a wealth of information to inspire your next woodworking project.
Take a moment to share your completed project with friends and family, either in person or on social media. Everyone loves a personal touch, and your customized wooden picture frame will surely impress!
Tips for Choosing the Right Pictures to Display

Choosing the right pictures to display can transform your living space, creating an atmosphere that reflects your personality and style. Whether you’re curating a gallery wall or selecting images for a single frame, the choices you make can enhance the aesthetic and emotional appeal of your home. Here are some essential tips to help you pick the perfect pictures for your displays.
Consider Your Space
Start by assessing the area where you want to hang or place your pictures. Take into account:
- Size of the Space: Ensure that the images you choose fit well within the dimensions of the area. Larger photos might be overwhelming in a tiny space, while smaller images could get lost on a big wall.
- Color Scheme: Pay attention to the colors in your existing decor. Choose pictures that complement or contrast effectively with your room’s hues.
- Light and Shadow: Natural and artificial lighting affects how colors and images appear. Test your pictures under different lighting conditions to see how they pop.
Choose a Theme or Style
Using a consistent theme or style can unify your collection and create a cohesive look. Some popular themes include:
- Nature: Landscape photos or close-ups of plants can add serenity to your home.
- Family Memories: Portraits and candid shots of loved ones create emotional connections.
- Abstract Art: Modern abstract designs can lend a contemporary feel to your space.
- Travel: Pictures from your travels tell a story and add an adventurous touch.
High-Quality Images Matter
Opt for high-resolution images, as they look more professional and appealing when printed. Low-quality images can appear blurry or pixelated, which detracts from the overall aesthetic. Here are ways to ensure quality:
- Use a Good Camera: If you’re taking the photos yourself, use a camera with a high pixel count.
- Edit Before Printing: Consider using photo editing software to enhance colors and sharpness.
- Choose the Right Print Material: Depending on the look you want, you may opt for glossy, matte, or canvas prints.
Mix and Match for Interest
If you’re creating a gallery wall, don’t be afraid to blend different styles, sizes, and frames. Mixing and matching can create visual interest. Here’s how to do it:
- Varied Frame Styles: Use a combination of wood, metal, and plastic frames to add texture.
- Different Sizes: Play with large and small images to create a dynamic layout.
- Layered Layouts: Overlap images slightly for a casual, artistic feel.
Personalize Your Selection
Incorporate pictures that have personal significance. This could be photographs from special occasions, art that resonates with you, or prints from your favorite artists. Your collection should tell your story and offer a glimpse into your interests and passions.
Framework and Presentation
How you frame and present your images can significantly impact their appeal:
- Matting: Adding a mat can provide a border that enhances the photograph and gives it a polished look.
- Spacing: Leave enough space between pictures for a clean, uncluttered display.
- Hanging Height: Hang artwork at eye level for the best viewing experience.
Refresh Your Selection Regularly
Don’t hesitate to change up your display from time to time. Rotating images can keep your space feeling fresh and engaging. Whether it’s changing a seasonal theme or updating family photos, regular updates can breathe new life into your decor.
Resources for Inspiration
Looking for more ideas or specific designs? Check out the following websites for guidance on picture selection and display:
By following these tips for choosing the right pictures to display, you’ll create an inviting environment that resonates with both you and your guests. Enjoy the process of curating your collection and let your creative spirit shine!
Sustainable Practices in DIY Frame Making
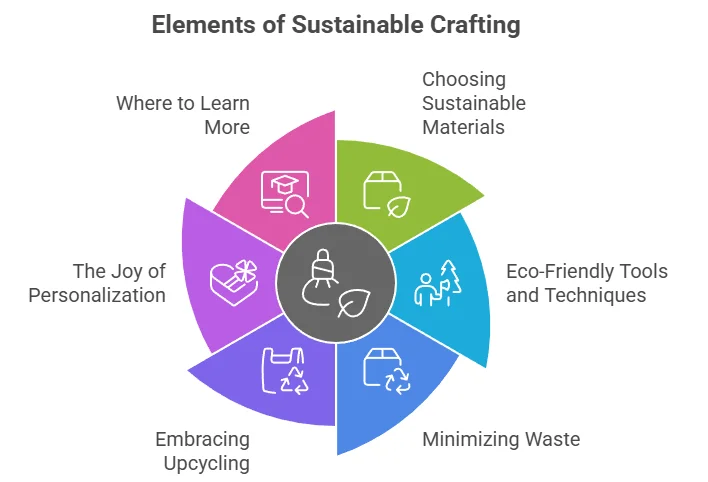
Creating your own picture frames can be a rewarding project, especially when you incorporate sustainable practices into your DIY Wooden Picture Frame Plans process. By selecting eco-friendly materials and methods, you not only enhance your creativity but also contribute to the health of our planet. This guide will explore various sustainable techniques and materials to consider when crafting your own wooden picture frames.
Choosing Sustainable Materials
When it comes to making picture frames, the materials you choose play a significant role in sustainability. Here are some options you can consider:
- Reclaimed Wood: Using reclaim wood not only helps reduce waste but gives your frames unique character. You can often find reclaimed wood at salvage yards or through local construction sites.
- Bamboo: This fast-growing grass is an excellent alternative to traditional hardwoods. It’s strong, lightweight, and requires less energy to process.
- Certified Sustainable Timber: Look for wood certified by programs such as the Forest Stewardship Council (FSC). This certification ensures that the wood comes from sustainably managed forests.
Eco-Friendly Tools and Techniques
Along with materials, consider the tools and techniques you employ. Opt for the following eco-friendly options:
- Hand Tools: Whenever possible, use hand tools instead of power tools. They consume less energy and provide greater precision.
- Non-Toxic Adhesives: Traditional glues can contain harmful chemicals. Look for natural adhesives like hide glue or PVA-based options that are less toxic.
- Low-VOC Finishes: If you plan to finish your frame, choose low-VOC (volatile organic compounds) paints or stains. These products are better for indoor air quality and the environment.
Minimizing Waste
Minimizing waste is another vital aspect of sustainable DIY practices. Here’s how you can do it:
- Plan Your Cuts: Before starting, create a detailed plan to measure and cut your wood. This helps to minimize scrap pieces.
- Keep Offcuts: Save any leftover wood for future projects. These can be used for smaller frames, decorative elements, or even other crafts.
- Donate Excess Materials: If you have wood or supplies you no longer need, consider donating them to local schools, community centers, or charities.
Embracing Upcycling
Upcycling is a fantastic way to refresh old items into beautiful frames. Here are a few ideas:
- Old Furniture: Repurpose an old table or dresser into frame materials. Sanding down the surfaces can reveal beautiful textures and patterns.
- Decorative Molding: Salvage decorative moldings from unwanted frames or furniture. These can give a vintage or antique feel to your new frame.
- Picture Frame Corners: Use corners or unique edges from mismatched frames to create a collage-style arrangement.
The Joy of Personalization
DIY frame making is a beautiful opportunity to express your personality and values. As you craft, think about:
- Unique Designs: Create a one-of-a-kind look that reflects your style. Mixing materials can add lots of charm.
- Personal Touch: Customize your frames with decorations, paint, or engraved messages that make them special for your home.
Where to Learn More
For further inspiration and guidance, consider visiting these helpful resources:
Embracing sustainable practices during your DIY Wooden Picture Frame Plans not only benefits the environment but also enriches your crafting experience. With a little creativity and resourcefulness, you can create stunning frames while respecting our planet.